Endoscopic Retrocalcaneal Decompression for Haglund Syndrome: A Masterclass
Key Takeaway
Join us for an immersive masterclass on endoscopic retrocalcaneal decompression for Haglund syndrome. We'll meticulously cover comprehensive surgical anatomy, precise patient positioning, and a granular, real-time breakdown of the intraoperative steps. Fellows will learn critical techniques for bony and soft tissue resection, managing potential pitfalls, and optimizing postoperative rehabilitation, ensuring excellent patient outcomes and a rapid return to activity.
Welcome, fellows, to the operating theater. Today, we're addressing a common yet often debilitating condition: Haglund syndrome, characterized by retrocalcaneal bursitis and frequently, insertional Achilles tendinopathy. Our approach will be endoscopic, a technique I favor for its reduced morbidity, excellent cosmetic outcome, and expedited recovery. Let's begin.
Understanding Haglund Syndrome: Anatomy and Pathology
Before we make any incisions, a thorough understanding of the underlying pathology and intricate anatomy is paramount. Patrick Haglund first described the eponymous deformity in 1928: an enlarged posterior superior border of the os calcis. This bony prominence, often referred to as a Haglund exostosis, is the primary mechanical irritant.
The critical anatomical structures involved in Haglund syndrome are:
* The Calcaneus: Specifically, its posterior superior aspect, which can develop an abnormal prominence.
* The Retrocalcaneal Bursa: This is a true synovial bursa, located between the anterior surface of the Achilles tendon and the posterior superior surface of the calcaneus. Its function is to reduce friction during ankle movement. In Haglund syndrome, this bursa becomes inflamed, hypertrophied, and painful due to repeated mechanical irritation.
* The Achilles Tendon: The largest and strongest tendon in the body, inserting onto the posterior aspect of the calcaneal tuberosity. Its anterior fibers, particularly the insertional portion, are in direct contact with the retrocalcaneal bursa and the calcaneal prominence. Chronic irritation can lead to insertional Achilles tendinopathy, characterized by degenerative changes, microtears, edema, and reactive fibrosis within the tendon substance.
The pathology arises when external shoeing (especially rigid heel counters) or activities involving repeated hyperdorsiflexion cause compressive contact between the Achilles tendon, the retrocalcaneal bursa, and the posterior proximal border of the calcaneus. This constant friction and impingement lead to inflammation, pain, and swelling.
Clinically, patients present with posterior heel pain and swelling. On examination, we'll find point tenderness along the anteromedial and anterolateral aspects of the Achilles tendon, just proximal to its insertion, and often an associated palpable prominence of the calcaneus. Pain is reliably reproduced with passive or active dorsiflexion, which exacerbates the impingement. It's crucial to differentiate between isolated retrocalcaneal bursitis and insertional Achilles tendinopathy, though they frequently coexist.
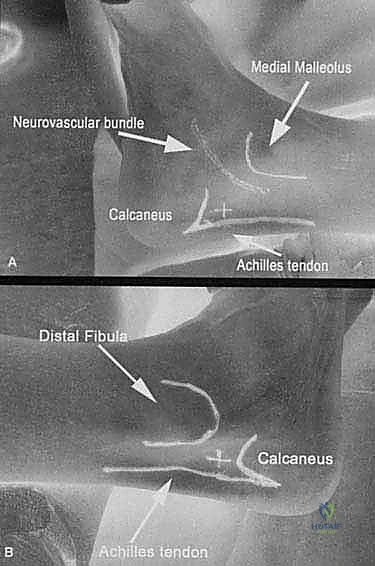
Neurovascular Considerations
As we plan our portal placement, remember the vital neurovascular structures in the vicinity:
* Sural Nerve: This nerve runs subcutaneously along the lateral aspect of the Achilles tendon. Injury to the sural nerve can result in bothersome numbness or dysesthesia along the lateral foot. Our lateral portal must be placed carefully, slightly anterior to the Achilles tendon and posterior to the sural nerve, using blunt dissection.
* Tibial Nerve and Posterior Tibial Artery/Vein: These structures are located more medially, deep to the flexor retinaculum, and are generally not at risk with our portal placement for retrocalcaneal bursoscopy.
* Lesser Saphenous Vein: Located posterolaterally, superficial to the sural nerve, it can be encountered during lateral portal creation. Careful blunt dissection helps avoid it.
Preoperative Planning and Patient Positioning
Thorough preoperative planning is the cornerstone of a successful outcome.
Imaging and Diagnostics
Our clinical evaluation, as discussed, provides the initial suspicion. However, imaging is essential to confirm the diagnosis, document the extent of the Haglund deformity, and assess for concomitant Achilles tendinopathy.
- Plain Radiographs: A lateral weight-bearing foot film is indispensable. It clearly demonstrates the calcaneal prominence, or Haglund exostosis. We'll look for the characteristic "parallel pitch lines" or evaluate the Fowler-Philip angle, though the presence of the exostosis itself is often sufficient.
FIG 1 • A. Preoperative lateral foot film showing Haglund exostosis.
* Magnetic Resonance Imaging (MRI): This is our gold standard for soft tissue evaluation. It beautifully delineates fluid within the retrocalcaneal bursa (indicating bursitis) and, critically, demonstrates the presence and extent of insertional Achilles tendinopathy. We'll assess for signal changes, thickening, or microtears within the tendon substance. This helps us decide if endoscopic debridement alone is sufficient or if an open approach with potential augmentation might be necessary, especially if more than 25% of the tendon's cross-sectional area is involved.
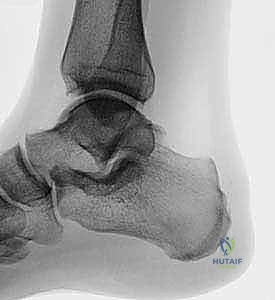
FIG 1 • B. MRI showing retrocalcaneal bursa involvement and insertional tendinopathy.
Nonoperative Management Considerations
Remember, surgery is reserved for patients who have failed a comprehensive course of nonoperative management. This typically includes:
* Nonsteroidal anti-inflammatory medications (NSAIDs).
* Shoe wear modification: avoiding rigid heel counters and backless shoes, using heel lifts to decrease Achilles tension.
* Physical therapy: icing, modalities (ultrasound, iontophoresis), stretching exercises for the gastroc-soleus complex, and hands-on friction massage.
* Pressure-release inserts.
Surgical Warning: Local injections of corticosteroids into the retrocalcaneal space, while potentially offering temporary relief, carry a significant risk of further weakening the Achilles tendon substance and predisposing it to micro- or macro-rupture. We generally avoid them in this area, especially if surgery is contemplated.
Patient Positioning and Setup
Today, we will perform this procedure with the patient in the supine position. This allows for excellent control of the foot and ankle by the surgeon.
- Anesthesia: General or regional anesthesia will be administered.
- Tourniquet: A high thigh tourniquet is applied. After limb exsanguination with an Esmarch bandage, inflate the tourniquet to 300 mmHg. This provides a bloodless field, crucial for endoscopic visualization.
- Foot Positioning: The foot is positioned at the very edge of the operating table. This allows me to place the patient's foot against my body, providing stable control and freeing both my hands for instrument manipulation.
- Leg Support: The leg rests on a firm, padded cylindrical bump, approximately 12 inches long and 4 inches in diameter. This bump elevates the ankle, providing ample room for instrument handles and allowing for controlled dorsiflexion and plantarflexion throughout the procedure.
- Fluoroscopy: We'll have a mini C-arm (like the Mini 6600 series) available and draped for occasional intraoperative fluoroscopic confirmation of bone resection.
Intraoperative Execution: The Endoscopic Decompression
Alright, fellows, let's scrub in. We've prepped and draped the limb in the usual sterile fashion. My goal here is to guide you through every micro-step, emphasizing precision and safety.
1. Portal Placement and Initial Exposure
We'll begin by establishing our portals. The key is precise localization and meticulous soft tissue dissection to protect vital structures, especially the sural nerve.
- Identify Landmarks: Palpate the Achilles tendon and the superior aspect of the calcaneus. The lateral portal will be at the level of the superior aspect of the calcaneus, slightly anterior to the Achilles tendon.
- Lateral Portal Incision: Using a #15 blade, make a small, vertical skin incision, approximately 1 cm in length. This incision should be slightly anterior to the palpable border of the Achilles tendon and, crucially, posterior to the anticipated course of the sural nerve.
- Blunt Dissection: Now, take a small curved hemostat or mosquito clamp. We will bluntly dissect through the subcutaneous tissue. Spread, don't cut. This technique minimizes the risk of injury to the sural nerve and superficial vessels. Advance the hemostat directly towards the retrocalcaneal space.
- Trocar Insertion: Once we've created a path, insert a blunt trocar into the retrocalcaneal space. This helps to gently develop the working space and separate the anterior surface of the Achilles tendon from the posterior calcaneus. You'll feel a distinct "pop" as you enter the bursa.
- Arthroscope Insertion: Remove the trocar and introduce the 4.0-mm arthroscope into the retrocalcaneal space through this lateral portal. Advance it gently until we have a clear view of the posterior calcaneus and the anterior Achilles tendon. Irrigate with normal saline to maintain a clear field.
- Medial Portal Establishment: Now, switch your focus to the medial side. Using the light of the arthroscope transilluminating from the lateral portal as a guide, identify the ideal location for the medial portal. This light helps us pinpoint the exact entry point into the retrocalcaneal space, minimizing trauma.
- Again, make a small, vertical skin incision with a #15 blade, anterior to the Achilles tendon.
- Perform blunt dissection with a hemostat, just as we did on the lateral side, carefully advancing into the retrocalcaneal space.
- Insert a blunt trocar, then remove it. This medial portal will serve as our primary working portal for instrument insertion.
Surgical Warning: Always use blunt dissection for portal creation. Never blindly stab with a sharp instrument. The sural nerve is particularly vulnerable laterally. Keep your incisions vertical and small.
2. Resection and Decompression of the Retrocalcaneal Space
With our portals established and the arthroscope providing excellent visualization, we can now proceed with decompression.
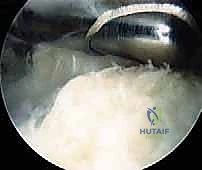
- Bursal Tissue Removal: Introduce the 3.5-mm arthroscopic shaver (or a 4.5-mm shaver for larger feet) through the medial portal. Direct the shaver towards the hypertrophied retrocalcaneal bursal tissue.
- Engage and Resect: Systematically remove all inflamed and hypertrophied bursal tissue. This immediately expands our working space and improves visualization of the underlying calcaneal prominence and the anterior surface of the Achilles tendon. Work from posteromedial to posterolateral, ensuring a panoramic view of the Achilles tuberosity attachment.
- Osseous Prominence Resection: Once the bursa is cleared, we have a clear view of the posterior superior calcaneal prominence. Depending on the quality and density of the bone, we'll use either the arthroscopic shaver or, more commonly, a 4-mm arthroscopic burr for bone resection.
- Instrument Orientation: Ensure the hooded portion of your burr or shaver is consistently oriented anteriorly, towards the bone, and away from the Achilles tendon. This protects the tendon from iatrogenic injury.
- Controlled Resection: Begin resecting the posterior superior calcaneal prominence. Work meticulously, removing bone gradually. We want to create a smooth, concave surface, eliminating any impingement on the Achilles tendon.
- Medial and Lateral Decompression: Carry out the resection both medially and laterally, extending into the sulcus of the calcaneal tendon (where the retrocalcaneal bursa once was) and distally, right up to the attachment of the Achilles tendon. The goal is to create adequate space, ensuring no areas of impingement remain.
- Fluoroscopic Guidance (as needed): In some cases, we might use the mini C-arm intermittently to confirm the extent of our osseous resection. This is particularly helpful when starting out or in complex anatomies.

TECH FIG 2 • An arthroscopic shaver is used to resect the posterior superior calcaneal prominence.
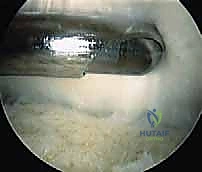
TECH FIG 2 • A 4-mm arthroscopic burr can also be used.
TECH FIG 2 • An arthroscopic shaver is used to resect the posterior superior calcaneal prominence.
Surgical Warning: Always stop the rotating or oscillating shaver or burr when it enters or exits the portal. This prevents iatrogenic injury to the skin and soft tissues around the portals. Maintain constant visualization.
3. Addressing Achilles Tendinopathy (if present)
If our preoperative MRI demonstrated insertional Achilles tendinopathy, we'll address it now.
- Tendon Evaluation: With an arthroscopic probe or nerve hook, gently palpate and identify any damaged or diseased portions of the Achilles tendon. These areas may appear discolored, thickened, or frayed.
- Limited Debridement: If there's localized myxoid degeneration or small areas of tendinopathy, we can perform a limited debridement using the arthroscopic shaver. The goal is to remove unhealthy tissue while preserving the bulk of the tendon.
- Needle Fenestration: For areas of myxoid or degenerative change, whether or not debridement was performed, we can insert an 18-gauge needle several times directly into the tendon. This "fenestration" technique promotes blood ingress and initiates a vascular response, encouraging collagen scar formation and healing within the tendon. This is a controlled injury designed to stimulate repair.
- Confirm Tendon Integrity: After any debridement or fenestration, re-insert the arthroscopic probe to confirm the continuing effective attachment and integrity of the Achilles tendon.
4. Final Assessment and Closure
Our work inside the retrocalcaneal space is nearly complete.
- Dynamic Impingement Test: Hyper-plantarflex and then hyper-dorsiflex the patient's foot against your anterior chest and abdomen. Observe the retrocalcaneal space arthroscopically. We are looking for any residual areas of Achilles tendon impingement against the resected calcaneus. If any impingement is seen, return with the burr to remove more bone until the space is clear in all ranges of motion.
- Irrigation and Suction: Thoroughly irrigate the retrocalcaneal space with saline and suction out any loose tissue, bone fragments, or debris. A clean field is essential to minimize postoperative inflammation.
- Local Anesthetic: Inject 0.25% Marcaine without epinephrine into the portal sites and surrounding soft tissues. This provides excellent postoperative pain control. We avoid epinephrine to prevent any theoretical vasoconstrictive effects on the already tenuous blood supply to the Achilles tendon.
- Portal Closure: Close the portal sites with two 4-0 nylon horizontal mattress sutures. This provides good skin apposition and minimizes tension.
- Dressing and Splint: Apply a sterile compression dressing. Then, apply a posterior splint and a sugar-tong "trilaminar splint," immobilizing the foot in slight equinus. This position reduces tension on the Achilles tendon postoperatively.
Pearls and Pitfalls
💡 Pearls
- Panoramic View: When developing the operative field, strive to achieve a panoramic view from the posteromedial to the posterolateral corner of the Achilles tuberosity attachment. This ensures no hidden areas of impingement.
- MRI is Key: Preoperative MRI is absolutely necessary to document the presence and extent of insertional tendinopathy. This guides our intraoperative decision-making.
- Experience Matters: With experience, you'll become adept at identifying and safely removing paratenon, small ruptures, or ossifications within the tendon endoscopically.
- Controlled Impingement Test: The dynamic hyper-plantarflexion and dorsiflexion test is invaluable for confirming adequate bony resection and ensuring no residual impingement.
⚠️ Pitfalls
- Sural Nerve Injury: This is the most common and bothersome complication. Always use blunt dissection for portal creation, especially laterally. Keep your lateral incision slightly anterior to the Achilles tendon.
- Inadequate Resection: Failing to remove enough bone or bursal tissue will lead to persistent symptoms and patient dissatisfaction. Confirm adequate decompression visually and with dynamic testing.
- Achilles Tendon Injury: Direct trauma from the shaver or burr can be devastating. Always keep the hooded portion of your instruments directed away from the tendon and maintain direct visualization. Avoid aggressive debridement of healthy tendon.
- Over-resection of Bone: While rare, excessive bone removal can potentially destabilize the calcaneus or weaken the Achilles insertion. Stick to removing only the prominent impingement.
- Postoperative Achilles Rupture: As seen in our patient series, an unprotected Achilles tendon, especially after debridement, is vulnerable. Strict adherence to the postoperative weight-bearing and immobilization protocol is crucial.
Postoperative Rehabilitation and Complication Management
Our responsibility extends far beyond the operating room. Meticulous postoperative care is vital for optimal recovery.
Postoperative Protocol
The general postoperative routine for endoscopic retrocalcaneal decompression is as follows:
* Weeks 0-2/3:
* Non-Weight Bearing (NWB): The patient remains strictly non-weight bearing on the operative extremity, using crutches or a knee scooter.
* Immobilization: The foot remains in the posterior and sugar-tong splint in slight equinus.
* Elevation and Ice: Emphasize strict elevation and regular icing to minimize swelling.
* DVT Prophylaxis: Standard DVT prophylaxis protocols are initiated.
* Weeks 2/3-4/6:
* Partial Weight Bearing (PWB): Transition to partial weight-bearing in a protected walker boot. Gradually increase weight-bearing as tolerated.
* Mobilization: Begin gentle range-of-motion exercises for the ankle, initially focusing on plantarflexion and dorsiflexion within pain-free limits.
* Physical Therapy: Initiate formal physical therapy, focusing on pain and edema control, gentle Achilles tendon stretching, and early strengthening of the posterior tibial and peroneal muscles.
* Weeks 4/6-8:
* Full Weight Bearing (FWB): Progress to full weight-bearing in the walker boot, then transition to supportive shoes with a heel counter.
* Strengthening: Intensify strengthening exercises, including eccentric loading of the Achilles tendon (e.g., heel drops).
* Proprioception: Begin proprioceptive training.
* Weeks 8-12+:
* Return to Activity: Patients can typically return to normal daily function in 8 weeks. Athletes typically resume sports activities at an average of 12 weeks, depending on their sport and recovery progression.
* Continued Strengthening: Maintain a consistent strengthening and flexibility program.
Surgical Warning: If significant Achilles tendon debridement or fenestration was performed, a longer period of cast immobilization (e.g., 4-6 weeks NWB) may be necessary to protect the healing tendon. Always err on the side of caution.
Complication Management
While endoscopic techniques have a low complication rate, we must be prepared to manage potential issues.
* Achilles Tendon Rupture: This is the most serious complication. As we saw in our series, one patient sustained a proximal Achilles tendon rupture 19 days post-op while ambulating without a prescribed protected walker boot. This underscores the importance of patient education and strict adherence to the NWB and protected weight-bearing protocols. Management typically involves surgical repair.
* Sural Nerve Entrapment/Neuroma: If a patient experiences persistent dysesthesia or pain along the lateral foot, it may indicate sural nerve irritation or neuroma formation. Initial management involves conservative measures (nerve blocks, gabapentin), but surgical neurolysis or neurectomy may be required in refractory cases. Our meticulous blunt dissection helps prevent this.
* Wound Dehiscence/Infection: These are rare with small portal incisions. Standard wound care and antibiotic prophylaxis are important.
* Hematoma: Careful hemostasis during surgery and a compression dressing post-op minimize this risk.
* Persistent Pain/Inadequate Decompression: This indicates residual impingement. Thorough intraoperative assessment and dynamic testing are crucial to prevent this. If symptoms persist, further imaging and potentially revision surgery may be considered.
* Stiffness: Early, controlled range-of-motion exercises are important to prevent ankle stiffness.
Outcomes
Our study of endoscopic bony and soft tissue decompression for Haglund deformity and retrocalcaneal bursitis on 32 heels in 30 consecutive patients demonstrated excellent outcomes. All patients had failed nonoperative measures. We observed no intraoperative complications, wound dehiscence, or postoperative infections. Crucially, no patients reported painful scars or neuroma-type symptoms, highlighting the cosmetic and neurological benefits of the endoscopic approach. Athletes consistently returned to their previous level of activity within an average of 12 weeks, comparable to published results by Van Dijk et al. This reinforces the efficacy and rapid recovery associated with this precise endoscopic technique.
Thank you, fellows. This procedure, when executed meticulously, offers significant relief and a swift return to function for our patients. Remember the anatomy, respect the soft tissues, and follow your post-op protocols.
Additional Intraoperative Imaging & Surgical Steps
REFERENCES
-
Angermann P. Chronic retrocalcaneal bursitis treated by resection of the calcaneus. Foot Ankle Int 1990;10:285–287.
-
Frey C, Rosenburg Z, Shereff MJ, et al. The retrocalcaneal bursa: anatomy and bursography. Foot Ankle Int 1992;13:203–207.
-
Haglund P. Beitrag zur Klinik der Achillessehne. Zeitschr Orthop Chir 1928;49:49–58.
-
Kennedy JC, Willis RB. The effects of local steroid injections on tendons: a biomechanical and microscopic correlative study. Am J Sports Med 1976;4:11–21.
-
Kitaoka HB, Alexander IJ, Adelaar RS, et al. Clinical rating systems for the ankle–hindfoot, midfoot, hallux, and lesser toes. Foot Ankle Int 1994;15:349–353.
-
Leach RE, Dilorio E, Harney RA. Pathologic hindfoot conditions in the athlete. Clin Orthop Relat Res 1983;177:116–121.
-
Leitze Z, Sella EJ, Aversa JM. Endoscopic decompression of the retrocalcaneal space. J Bone Joint Surg Am 2003;85A:1488–1496.
-
Miller AE, Vogel TA. Haglund’s deformity and the Keck and Kelly osteotomy; a retrospective analysis. J Foot Surg 1989;28:23–29.
-
Ortmann FW, McBryde AM. Endoscopic bony and soft-tissue decompression of the retrocalcaneal space for the treatment of Haglund deformity and retrocalcaneal bursitis. Foot Ankle Int 2007;28:149–153.
-
Pauker M, Katz K, Yosipovitch Z. Calcaneal ostectomy for Haglund disease. J Foot Surg 1992;31:588–589.
-
Scheider W, Niehus W, Knahr K. Haglund’s syndrome: disappointing results following surgery—a clinical and radiographic analysis. Foot Ankle Int 2000;21:26–30. 12. van Dijk CN, Scholten PE, Krips R. A 2-portal endoscopic approach for diagnosis and treatment of posterior ankle pathology. Arthroscopy 2000;16:871–876. 13. van Dijk CN, van Dyk GE, Scholten PE, et al. Endoscopic calcaneoplasty. Am J Sports Med 2001;29:185–189.
-
Indications for operative intervention included failed nonoperative measures, history and physical examinations consistent with retrocalcaneal bursitis, and Haglund deformity causing mechanical impingement or Achilles tendinopathy.
-
Patients were prospectively followed from 1997 to 2003, with a mean follow-up of 35 months (range 3 to 62 months).
-
Thirty heels completed subjective and objective measures using the American Orthopaedic Foot and Ankle Society (AOFAS) ankle–hindfoot scale. 5
-
Twenty-eight patients had an average preoperative AOFAS score of 62 points. Postoperative AOFAS scores averaged 97 points.
-
Twenty-six patients had excellent results and three had good results. There was one poor outcome and one major complication. An excellent result was defined as pain-free activity with complete return to activity, and a poor result was defined as having persistent symptoms and inability to return to activity.
-
The cohort was stratified into “daily athletic activity” and “athletic” groups and the groups were compared. No statistical differences in outcome between the two groups existed.
-
All patients reported satisfaction with the cosmetic appearance of their portal sites.
You Might Also Like