Endoscopic Plantar Fasciotomy: A Masterclass in Minimally Invasive Heel Pain Relief

Key Takeaway
Master Endoscopic Plantar Fasciotomy (EPF) for chronic heel pain. This immersive guide details patient selection, precise anatomy, advanced surgical techniques, and critical pearls for optimal outcomes. Learn step-by-step execution, from incision to fascia release, emphasizing neurovascular protection and effective post-op rehabilitation for rapid recovery and lasting relief.
Welcome, fellows, to the operating theater. Today, we're performing an Endoscopic Plantar Fasciotomy, or EPF, a minimally invasive technique that has revolutionized the treatment of recalcitrant plantar fasciitis. This procedure, while seemingly straightforward, demands meticulous attention to detail, a profound understanding of foot anatomy, and precise endoscopic skills. Our goal is to provide lasting relief for our patient, allowing them to return to their activities with minimal downtime.
Preoperative Assessment & Planning: Laying the Foundation for Success
Before we even consider making an incision, a comprehensive preoperative assessment is paramount. Plantar fasciitis, while common, is a diagnosis of exclusion.
Clinical Presentation & Diagnosis
Our patient, like many, presents with the classic symptoms:
* Localized tenderness: Directly over the plantar calcaneal tuberosity, especially on the medial aspect. We've carefully compared this to the contralateral heel to confirm the typical tenderness pattern.
* "First-step" pain: This is the hallmark symptom – severe pain in the plantar region of the foot upon initiating walking after a period of rest, such as getting out of bed in the morning or standing after prolonged sitting. The pain typically lessens with activity but may worsen again with prolonged standing or impact.
* Pain location: Primarily medial, though occasionally lateral. Rarely, we see distal plantar fasciitis, which requires careful differentiation.
* Associated findings: Often, there's a palpable soft tissue swelling of the plantar medial heel.
Remember, fellows, the underlying pathology is a degenerative tear at the fascial origin from the calcaneus, followed by a tendinopathy-type reaction. While historically termed "fasciitis," implying inflammation, specimens reveal changes more consistent with "fasciosis"—a degenerative process characterized by fibroblastic proliferation rather than acute inflammation.
Differential Diagnosis: Avoiding Missteps
A thorough differential diagnosis is crucial to ensure we're treating the correct pathology. We've meticulously ruled out:
- Plantar fascia rupture: This typically occurs acutely after vigorous activity, often with visible ecchymosis in the arch. MRI or ultrasound would confirm a complete tear.
- Tarsal tunnel syndrome: Compression of the tibial nerve can mimic heel pain, often presenting with numbness or paresthesias in the heel, sole, or toes. We'd look for a positive Tinel's sign at the tarsal tunnel and potentially nerve conduction studies (NCS) and electromyography (EMG).
- Distal tarsal tunnel syndrome (Baxter's nerve entrapment): Compression of the first branch of the lateral plantar nerve (Baxter's nerve) can closely mimic plantar fasciitis. This nerve typically courses between the abductor hallucis and quadratus plantae muscles, often compressed by the deep fascia of the abductor hallucis or by an enlarged flexor digitorum brevis. While some surgeons advocate routine Baxter's nerve decompression with plantar fascia release, we believe these are distinct entities that can be differentiated with careful examination. Our current patient exhibits no classic signs of nerve entrapment.
- Calcaneal stress fracture: Tenderness is usually diffuse across the calcaneus, not localized to the plantar medial heel. A calcaneal squeeze test would elicit pain. Plain films may show a fracture line, but MRI is definitive, clearly distinguishing it from plantar fasciitis.
- Neoplasms: Pain is typically achy, constant, nocturnal, and present even at rest or without weight-bearing. Plain films and MRI are diagnostic.
- Infection (e.g., osteomyelitis): Constant pain, swelling, redness, or fluctuance. Elevated inflammatory markers (ESR, CRP, WBC) and MRI or labeled white blood cell scans are diagnostic.
- Painful heel pad syndrome: More common in runners, thought to result from disruption of the fibrous septa within the heel pad. Tenderness is more central and directly under the bony prominence.
- Heel pad atrophy: Seen in the elderly, usually without morning pain.
- Inflammatory arthritis: Often bilateral and diffuse, associated with systemic symptoms and positive serological markers (RA factor, HLA-B27).
Imaging and Other Diagnostic Studies
Our diagnostic workup for this patient included:
* Non-weight-bearing lateral radiographs: Routinely ordered to rule out stress fractures, unicameral bone cysts, giant cell tumors, or other bony pathologies. While plantar calcaneal spurs are present in up to 50% of patients, they are generally not considered the cause of heel pain. These spurs are often associated with calcification in the origin of the flexor hallucis brevis, which is actually proximal to the plantar fascia origin.
* Ultrasound: This is our preferred initial imaging modality for its cost-effectiveness and ability to directly visualize the plantar fascia. In our patient, ultrasound documented significant thickening of the medial band of the plantar fascia, measuring over 4.5 mm (normal is up to 3 mm). This finding strongly supports the diagnosis of plantar fasciitis.
* MRI: Reserved for questionable cases or when ruling out soft tissue tumors, subtalar arthritis, or subtle stress fractures. It eloquently demonstrates plantar fascia thickening and provides excellent soft tissue contrast.
Conservative Management & Surgical Indications
Our patient underwent a rigorous 9-month course of conservative management, which is successful in 95% of cases. This included:
* Rest and activity modification
* Regular ice application
* Nonsteroidal anti-inflammatory drugs (NSAIDs)
* A dedicated plantar fascia and Achilles tendon stretching protocol
* Silicone heel pads and custom orthoses
* Night splints to maintain dorsiflexion
* Physical therapy
* Appropriate athletic footwear
* Judicious steroid injections (no more than 3, spaced appropriately)
* Extracorporeal shockwave therapy (ESWT)
Despite these efforts, the patient's pain persisted, severely impacting their quality of life. This failure to respond to 6-12 months of conservative treatment is the primary indication for surgical intervention. EPF offers several advantages over traditional open techniques: minimal soft tissue dissection, excellent visualization, precise partial transection, reduced postoperative pain, and an earlier return to weight-bearing and activities.
Surgical Anatomy: A Deep Dive
Understanding the intricate anatomy of the plantar foot is paramount for safe and effective EPF.
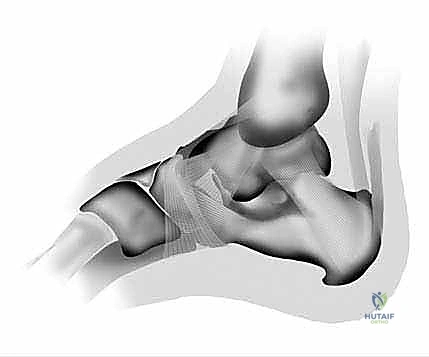
Plantar Fascia Architecture
The plantar fascia is a robust, aponeurotic ligament with longitudinal fibers originating from the medial tubercle of the calcaneus. It's organized into three distinct bands:
* Medial band: The thickest, measuring up to 3 mm normally. This is our primary target for release.
* Central band: 1 to 2 mm thick.
* Lateral band: 1 to 2 mm thick.
Distally, the fascia divides into five slips, one for each toe, contributing significantly to arch support. During gait, particularly the stance phase, the "windlass mechanism" tightens the plantar fascia as the toes extend, elevating the longitudinal arch, inverting the hindfoot, and externally rotating the leg. Our goal is to release the medial one-third to one-half of the fascia, preserving the central and lateral bands to maintain arch integrity and prevent lateral column pain.
Neurovascular Relationships: The Red Zones
This is where precision matters. We must be acutely aware of the neurovascular structures in the vicinity of our surgical field:
* Medial Plantar Nerve and Artery: These structures course just deep and slightly medial to the abductor hallucis muscle. An overly medial or deep dissection poses a significant risk.
* Lateral Plantar Nerve and Artery: These are more lateral but can be at risk with an overly aggressive lateral dissection or if the cannula is misdirected. The first branch of the lateral plantar nerve, Baxter's nerve, is particularly susceptible to entrapment and is located between the abductor hallucis and quadratus plantae muscles.
* Flexor Digitorum Brevis (FDB) Muscle: This muscle lies immediately deep to the plantar fascia. Its clear visualization after fasciotomy confirms a complete and safe release, indicating we've stayed superficial to deeper neurovascular structures.
* Abductor Hallucis Muscle: This muscle is located medially, serving as a key landmark. The plantar fascia originates just deep to its medial border.
Muscular Intervals & Osteology
- Abductor Hallucis: Forms the medial border of our endoscopic field. Our medial incision will be made just plantar to its origin.
- Flexor Digitorum Brevis: The muscle belly that becomes visible after the plantar fascia release. It's a crucial anatomical landmark confirming adequate release and safe depth.
- Calcaneal Tuberosity: The origin point of the plantar fascia, our target area for the release.
Preoperative Preparation & Operating Room Setup
Patient Positioning
"Alright team, let's get our patient positioned. We've got them supine on the operating table. Nurse, please ensure a small bump is placed under the ipsilateral hip of the affected side. This slight elevation helps to internally rotate the limb just enough to limit external rotation, providing optimal access to the medial aspect of the foot."
"Now, the operative foot needs to be elevated on a specialized foot prop. This allows us to comfortably work around the foot and maintain consistent positioning throughout the procedure. We'll apply a tourniquet at the distal calf. Ancef has already been administered."
Anesthesia & Prophylaxis
"For this outpatient procedure, we've opted for a popliteal nerve block with intravenous sedation. This provides excellent intraoperative analgesia and prolonged postoperative pain relief, which is a significant advantage for patient comfort and early mobilization. General anesthesia is also an option, but the regional block often allows for a quicker recovery from the anesthetic."
"As for prophylaxis, our patient received 1 gram of cefazolin (Ancef) perioperatively, as is our routine for reducing infection risk, which is already very low with EPF."
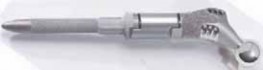
Equipment: Our Tools for Precision
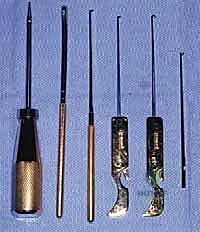
"Let's review our specialized equipment, fellows. We're using the Instratek Endotrac System."
- Cannula and Obturator: The working channel and its introducer.
- Plantar Fascia Elevator: Crucial for creating our subcutaneous working plane.
- Probe: For palpation and measurement.
- Nondisposable Knife Handles: For secure grip.
- Disposable Hook and Triangle Knives: Our cutting instruments. We'll primarily use the triangle knife today for its controlled cutting action.
- 4-mm, 30-degree Short Arthroscope: This is our eye into the foot. The 30-degree angle provides a wide field of view and allows us to look around corners.
- Cotton-tipped applicators (fluffed with Bovie scratch pad): Essential for clearing fat and debris from the cannula for optimal visualization.
- Defogging agent: To maintain a clear endoscopic view.
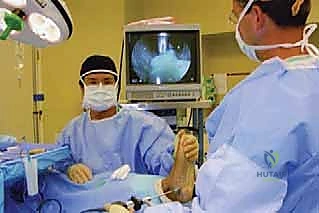
Intraoperative Masterclass: Step-by-Step Execution
"Alright, everyone, let's scrub in. We've prepped and draped the foot on the prop. The limb has been exsanguinated with an Esmarch bandage, and the tourniquet is now inflated to 250 mm Hg at the distal calf. We're ready to begin."
Establishing the Surgical Field: The Incision
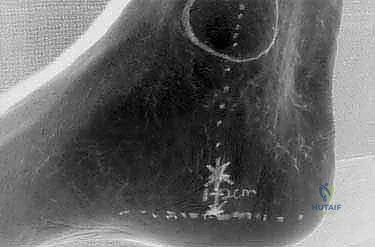
"The placement of our portals is absolutely critical for the success of this procedure. Misplaced portals can lead to inadequate release or, worse, neurovascular injury. We've already marked our incision site preoperatively, using measurements from our non-weight-bearing lateral radiographs as a guide."
"Look closely at the medial malleolus. Our incision will be an 8-mm vertical incision placed just anterior and plantar to the medial tubercle of the calcaneus. A good rule of thumb is to place it along a line that bisects the medial malleolus, or the junction of the middle and posterior thirds of the medial malleolus, approximately 1.5 to 2.0 cm superior to the junction of the keratinized and nonkeratinized skin."
Surgical Warning: Ensure your incision is not too proximal, directly off the calcaneus, as this can make fascia release difficult. Conversely, too distal, and you risk missing the fascial origin entirely.
"Scalpel, please, a #15 blade. I'll make a precise 8-mm vertical skin incision. This is just through the skin and subcutaneous tissue. Now, blunt tenotomy scissors, please. We'll carefully deepen this incision with blunt dissection, gently spreading the subcutaneous fat to expose the underlying abductor hallucis fascia. We're staying superficial here, avoiding any deeper structures."
Portal Placement: The Art of Access
"Now for the crucial step of creating our working channel. Assistant, please hand me the plantar fascia elevator. I'm going to introduce it through our medial incision. The key here is to sweep it from medial to lateral, creating a plane just plantar to the plantar fascia. You'll feel a distinct resistance as it passes beneath the fascia, and then a softer tissue plane as you clear it."
"This maneuver creates a subcutaneous tunnel, a clear pathway for our cannula. Now, with the obturator locked securely into the cannula, I'll carefully advance the assembly through this pathway. Maintain a consistent trajectory, keeping it parallel to the plantar fascia. We're aiming for a point laterally where the tip of the obturator will tent the skin."
"Once the obturator tip is clearly visible tenting the skin on the lateral side, I'll make a small, approximately 5mm, stab incision directly over its tip. Then, I'll gently advance the obturator and cannula through this lateral incision. This establishes our two-portal system, allowing for excellent visualization and instrument manipulation."
"Once the cannula is fully advanced, I'll remove the obturator. Now, look inside the cannula. You'll often see small bits of fat and soft tissue debris. Assistant, please hand me the fluffed cotton-tipped applicators, perhaps with a Bovie scratch pad. We need to meticulously clear the cannula. This is absolutely critical for achieving optimal visualization."
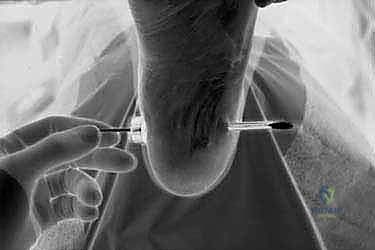
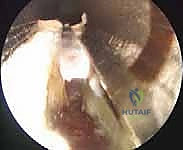
Clearing fat from cannula with fluffed cotton-tipped applicator to allow good visualization of the plantar fascia.
"A clear cannula means a clear view. Now, let's bring in our camera. Assistant, hand me the 4-mm, 30-degree short arthroscope. Gently insert it into the medial portal cannula. Connect the light source and camera. Everyone, look at the monitor."
Endoscopic Visualization: Navigating the Plantar Arch
"What do we see, fellows? Medially, we should clearly visualize the robust belly of the abductor hallucis muscle. Then, spanning across our endoscopic field, you'll see the glistening, often thickened and degenerated, plantar fascia. This is our primary target."

REFERENCES
-
The incision is only 8 mm, compared to open procedures, where the incision is at least 4 cm and, with some more extensile approaches, as much as 10 cm.
-
Barrett SL, Day SV. Endoscopic plantar fasciotomy: preliminary studies with cadaveric specimen. J Foot Surg 1991;30:170–172.
-
Barrett SL, Day SV. Endoscopic plantar fasciotomy two portal endoscopic surgical techniques: clinical results of 65 procedures. J Foot Surg 2004;32:248–256.
-
Buchbinder R. Clinical practice: plantar fasciitis. N Engl J Med 2004;350:2159–2166.
-
Hofmeister EP, Elliott MJ, Juliano PJ. Endoscopic plantar fascia release: an anatomic study. Foot Ankle Int 1995;16:719–723.
-
Hogan KA, Weber D, Shereff M. Endoscopic plantar fascia release. Foot Ankle Int 2004;25:875–881.
-
Sabir N, Debirlenk S, Yagzi B, et al. Clinical utility of sonography in diagnosing plantar fasciitis. J Ultrasound Med 2005;24: 1041–1048.
-
Saxena A. Uniportal endoscopic plantar fasciotomy: a prospective study on athletic patients. Foot Ankle Int 2004;25:882–889.
-
Surgeons with prior arthroscopic experience should find EPF to be a straightforward procedure to master. DVDs and technique guides are readily available through Instratek.
-
Training courses with cadavers are also given through the Orthopaedic Learning Center or Instratek. After 10 cases, the surgeon should feel confident with this procedure. With experience, average surgery time should be 10 to 15 minutes.
COMPLICATIONS
- Lateral column pain and arch pain have been the most common complications, reported in up to 3% to 5% of cases.
You Might Also Like