Chronic Achilles Tendon Reconstruction: V-Y Advancement with FHL Transfer Masterclass
Key Takeaway
Join us in the OR for an immersive masterclass on chronic Achilles tendon rupture repair. This guide details V-Y advancement and FHL transfer techniques, covering comprehensive anatomy, precise intraoperative steps, neurovascular precautions, and essential pearls for successful outcomes. Learn to manage critical steps from incision to hardware application, ensuring robust reconstruction and optimal patient recovery.
Welcome, fellows, to the operating theater. Today, we're tackling a challenging, yet incredibly rewarding, procedure: reconstruction of a chronic Achilles tendon rupture using a V-Y advancement and flexor hallucis longus (FHL) tendon transfer. This isn't just about mending a torn tendon; it's about restoring a fundamental biomechanical function that profoundly impacts a patient's quality of life.
Understanding the Chronic Achilles Rupture: The Foundation of Our Approach
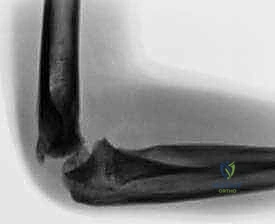
Before we even consider the scalpel, we must deeply understand the pathology we're addressing. A chronic Achilles tendon rupture, typically defined as a rupture untreated for more than 8 weeks, is distinct from an acute injury. Here, we're dealing with significant retraction of the proximal musculotendinous unit and a substantial diastasis between the ruptured ends, often complicated by scar tissue formation.
The Achilles tendon, the confluence of the gastrocnemius and soleus muscles—forming the gastroc-soleus-Achilles (GSA) complex—is the most powerful plantarflexor of the ankle. Its disruption doesn't just mean weakness; it means a profound loss of the "check rein" mechanism that controls dorsiflexion, leading to gait instability, difficulty with inclines, stairs, and a tendency to fall forward. Patients will complain of inability to walk on tiptoes or perform a single-leg toe raise, even if they can still passively plantarflex due to the compensatory actions of the posterior tibial, FHL, flexor digitorum longus, and peroneal tendons.
Key Anatomical Considerations
The GSA complex originates from the distal femoral condyles (gastrocnemius) and the posterior tibia/fibula (soleus), inserting into the posterior calcaneal tuberosity. This unique arrangement allows it to cross three joints: the knee, ankle, and subtalar joints, making its integrity vital for coordinated lower limb function.
The tendon is encased by a paratenon, a loose connective tissue sheath that facilitates gliding, allowing approximately 1.5 cm of excursion. Blood supply is dual: proximally from the muscle belly and distally from the calcaneal insertion. This leaves a critical watershed area approximately 4 to 5 cm proximal to the calcaneal insertion, which is notoriously hypovascular and prone to rupture—about 80% of Achilles ruptures occur in this zone, typically 2 to 6 cm above the insertion. This poor vascularity also impacts healing potential, especially in chronic cases.
Neurovascular Structures of Concern:
- Sural Nerve: This purely sensory nerve runs superficially in the posterior calf, typically crossing from lateral to central over the myotendinous junction region, then passing under the medial head of the gastrocnemius proximally. Distally, it runs approximately 5 mm lateral to the Achilles tendon. Injury to this nerve can result in debilitating numbness, dysesthesia, or neuropathic pain along the lateral aspect of the foot.
- Lesser Saphenous Vein: Often accompanies the sural nerve, and while not as critical as the nerve, its preservation is prudent to minimize venous congestion and hematoma formation.
- Medial Neurovascular Bundle: Comprising the tibial nerve and posterior tibial artery, this bundle lies immediately medial to the FHL muscle and tendon in the deep posterior compartment. Extreme caution is paramount during FHL harvest to avoid injury to these vital structures.
Preoperative Planning: Laying the Groundwork for Success
Effective preoperative planning is non-negotiable. This isn't just about surgical technique; it's about understanding the patient, the pathology, and meticulously preparing the operative field.
Patient Assessment and Imaging
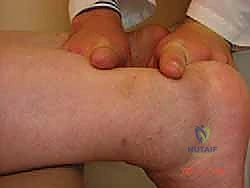
Our patients often recall a distinct "pop" or feeling of being "shot" in the heel, even if the initial injury was missed or misdiagnosed as an ankle sprain. We'll confirm the diagnosis with a thorough physical examination:
- Palpable Gap: A large, often easily palpable gap is characteristic of chronic rupture.
- Thompson Test: While some plantarflexion may be present due to intact secondary plantarflexors, it will be significantly weaker and asymmetrical compared to the unaffected side.
- Resting Ankle Position: The ruptured side will typically rest in a neutral (0 degrees) position, whereas the unaffected side will show 20 to 30 degrees of resting plantarflexion due to normal Achilles tension.
- Hyperdorsiflexion: The affected ankle will demonstrate increased passive dorsiflexion.
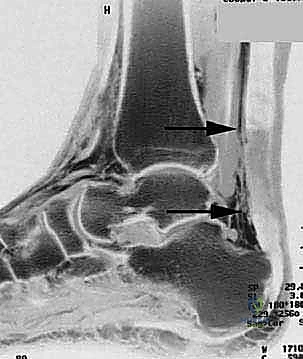
Imaging: While clinical diagnosis is often sufficient, for chronic ruptures, MRI or ultrasound is invaluable. We use these to:
* Quantify the true gap size: This dictates our surgical strategy.
* Locate the retracted tendon ends: Essential for planning our incision and dissection.
* Assess muscle atrophy and fibrosis: This helps prognosticate functional recovery.
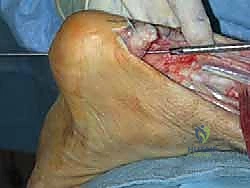
FIG 1 • A large palpable gap can usually be felt between the ruptured ends.
For defects of 3 to 7 cm, like the one we anticipate today, the V-Y advancement combined with FHL transfer is our preferred approach. Larger defects (greater than 7 cm) might necessitate an Achilles turndown or allograft reconstruction.
Anesthesia and Positioning
Today, we'll proceed with general endotracheal anesthesia to ensure complete muscle relaxation and patient comfort throughout this extended procedure. Spinal anesthesia is also a viable option.
- Tourniquet Application: While the patient is still supine, we'll apply a well-padded thigh tourniquet. This is crucial for a bloodless field, which significantly aids in identifying delicate structures like the sural nerve and the FHL tendon.
- Surgical Warning: Ensure the tubing connection is placed posteriorly or laterally to prevent pressure issues when the patient is prone. Never use a calf tourniquet, as it restricts exposure and compresses the gastroc-soleus muscle, hindering our ability to mobilize it.
- Patient Positioning: We'll then carefully turn the patient to a prone position.
- Surgical Warning: For general anesthesia, ensure adequate chest rolls are placed to allow for proper diaphragmatic excursion and prevent abdominal compression. This is usually less critical with spinal anesthesia, but good positioning is always key.
- Preparation and Draping: Both lower extremities will be prepped and draped from the mid-thigh down to the toes. This bilateral draping is critical, as it allows us to compare the resting ankle tension of the reconstructed side against the unaffected limb, providing an invaluable intraoperative benchmark for appropriate tensioning.
Intraoperative Execution: The Masterclass Begins
Now, fellows, let's scrub in. Our goal is a meticulous, step-by-step reconstruction, prioritizing anatomical preservation and robust repair.
1. Incision and Initial Dissection
After Esmarch exsanguination of the limb, the thigh tourniquet is inflated to approximately 300-350 mmHg, or 100 mmHg above systolic pressure, ensuring a bloodless field.
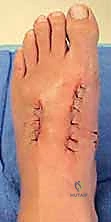
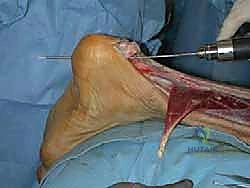
We'll make an extensile, curvilinear incision over the posterior calf.
* Distally: Start the incision approximately 1-2 cm medial to the palpable Achilles tendon, over the region of the rupture and gap. This medial placement is critical to protect the sural nerve, which typically runs about 5 mm lateral to the Achilles tendon. It also keeps the incision line away from the posterior heel, minimizing irritation from shoe counters postoperatively.
* Proximally: Curve the incision gently centrally and continue it proximally up the posterior midline of the calf, extending superiorly to the estimated proximal extent of the myotendinous junction. This typically means an incision length of 15-20 cm or more, depending on the gap size.
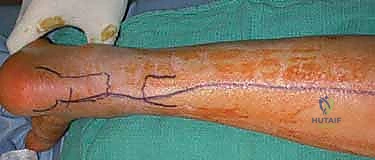
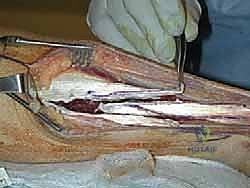
TECH FIG 1 • A. The incision required to address a neglected Achilles rupture with a large gap between tendon ends. B. The sural nerve should be isolated as it traverses from the lateral aspect of the tendon distally to the posterior midline within the calf.
We'll carry this incision sharply, full thickness, through the skin and subcutaneous tissue.
2. Sural Nerve Identification and Protection
This is a critical, early step. As we dissect through the subcutaneous fat, particularly in the distal aspect of our incision, we must be vigilant for the sural nerve.
* Technique: Use fine blunt dissection with Metzenbaum scissors or a small hemostat. The nerve will typically be seen running with the lesser saphenous vein.
* Isolation: Once identified, carefully isolate the sural nerve and its accompanying vein.
* Protection: Use vessel loops or a Penrose drain to gently retract and protect the nerve throughout the entire procedure. This ensures it's out of our working field and safe from iatrogenic injury.
Surgical Warning: The sural nerve is highly susceptible to injury during posterior ankle approaches. Its variable course necessitates meticulous dissection. Damage can lead to chronic pain, numbness, or even a neuroma, severely impacting patient satisfaction.
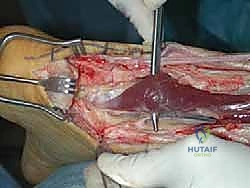
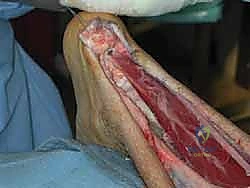
3. Tendon Exposure and Gap Assessment
Now, let's expose the Achilles tendon.
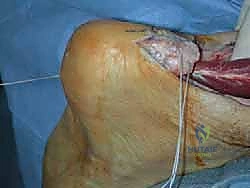
* Paratenon Incision: Incise the paratenon sharply along the length of our incision.
* Reflection: Carefully reflect the paratenon off the tendon, both proximally and distally, preserving it meticulously. We'll use this vital tissue for a later repair, providing an additional layer of closure and promoting tendon gliding.
* Tendon Exposure: Expose the entire ruptured tendon, from its calcaneal insertion distally up to a level well proximal to the myotendinous junction. This allows us to fully appreciate the extent of retraction and the quality of the remaining tissue.
* Debridement: Frequently, a scar pseudotendon or necrotic, nonviable tendon ends are present within the rupture gap. Resect all nonviable tissue back to healthy, bleeding tendon ends. This is crucial for optimal healing and integration of our repair.
* Gap Measurement: With the knee flexed to 30 degrees (to relax the gastrocnemius) and the ankle plantarflexed to 20 degrees (to match the resting tension of the contralateral, unaffected side), measure the true tendon gap. This precise measurement will guide the length of our V-Y advancement.
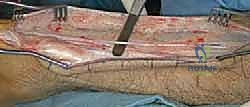
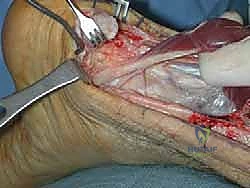
4. V-Y Advancement: Lengthening the Proximal Tendon
For chronic ruptures with significant retraction (3-7 cm gaps), a V-Y advancement is essential to bring the proximal tendon distally without excessive tension.
- V-Incision Creation:
- Location: Make an inverted-V incision only through the tendinous portion of the myotendinous junction of the GSA complex. The apex of the V should be in the midline at the most proximal portion of the tendinous tissue, just distal to the muscle belly.
- Depth: It is critical to leave the underlying muscle fibers intact and attached to the proximal muscle body. This preserves the vital blood supply to the advancing tendon flap.
- Dimensions: The limbs of the V then diverge to exit at the medial and lateral borders of the tendon. For optimal lengthening, the limbs of the V should be at least twice the length of the measured rupture gap. For example, if we have a 5 cm gap, each limb of the V should be at least 10 cm long. This generous length allows for adequate distal advancement.

TECH FIG 3 • A. The inverted V is made within the myotendinous zone. The limbs of the V are twice the length of the rupture gap.
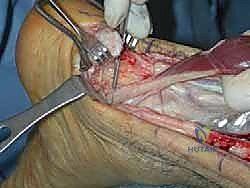
- Suture Placement (Proximal Tendon Stump):
- Suture Choice: We'll use a heavy braided nonabsorbable suture, such as a No. 2 Fiberwire (Arthrex Inc., Naples, FL) or No. 5 Ethibond (Ethicon-J&J, Piscataway, NJ). These sutures provide superior strength and knot security.
- Krackow Technique: Employ a locking Krackow technique. Insert the suture into the free end of the proximal tendon stump. Loop it in a running, locking pattern along the medial aspect of the tendon, capturing approximately one-third to one-half of the tendon width with each loop. Aim for at least five locking loops. Once five loops are completed, pass the suture through the substance of the tendon to exit at the same level on the opposite (lateral) side. Then, throw another five locking loops toward the end of the tendon on the lateral side, with the suture exiting again at the free end of the tendon. This creates a robust, multi-stranded purchase.
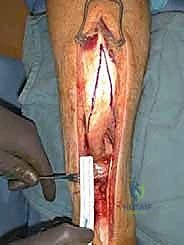
TECH FIG 3 • B. A locking Krackow-type stitch is placed in each end of the ruptured tendon, using at least five locking loops of braided no. 2 nonabsorbable suture.
- Traction and Advancement:
- Application: Apply firm, continuous, distally directed longitudinal traction to the suture material within the proximal tendon stump. This is a critical step requiring patience.
- Mechanism: While applying traction, gently tease the muscle fibers of the myotendinous junction longitudinally. This allows the muscle fibers to gently stretch and slide distally, effectively advancing the tendinous portion.
- Surgical Pearl: For particularly stiff or recalcitrant muscles, a weight can be hung over the end of the table, providing steady, sustained traction.
- Endpoint: Continue this controlled traction until the proximal tendon end can be approximated to the distal tendon stump with the ankle resting tension matching the unaffected side. Regularly check the contralateral ankle for comparison.
TECH FIG 3 • C. The inverted V is cut through the tendinous portion only, leaving the underlying muscle fibers intact. The underlying muscle fibers are allowed to slide after the V release is made in the tendinous portion.
Surgical Warning: While force is required, exercise great care and patience during this advancement. Excessive or abrupt force can lead to detachment of the tendon from the muscle, which would devascularize the tendon flap and compromise the entire repair. Slow, steady, controlled tension is key.
5. Flexor Hallucis Longus (FHL) Tendon Augmentation
Before we formally repair the Achilles tendon ends, we'll harvest and transfer the FHL tendon to augment our repair. This provides additional strength and a biological scaffold for healing, especially in chronic, compromised tissues.
- FHL Exposure:
- Location: The FHL muscle lies in the deep posterior compartment of the leg, immediately posterior to the tibia and deep to the Achilles tendon.
- Technique: With the Achilles tendon and its muscle belly reflected, incise and release the deep posterior compartment fascia. This exposes the FHL muscle and tendon. The FHL muscle belly often extends quite distally, almost to the tibiotalar joint, making it easily identifiable (often referred to as "beef at the heel").
TECH FIG 4 • A. The flexor hallucis longus (FHL) muscle belly is seen distally deep to the tendon within the deep posterior compartment of the leg.
- FHL Identification and Neurovascular Protection:
- Confirmation: Identify the FHL tendon at the distal end of its muscle belly. Digitally retract it. To confirm it's the FHL, apply traction to the tendon—you should see the hallux (big toe) flex. This is your definitive confirmation.
- Neurovascular Bundle: Immediately medial to the FHL muscle and tendon lies the critical medial neurovascular bundle, containing the tibial nerve and posterior tibial artery.
- Surgical Warning: Meticulous dissection is required here. Dissect along the lateral aspect of the FHL tendon as you release its sheath behind the ankle. This keeps your dissection away from the medial bundle, minimizing the risk of inadvertent injury.
TECH FIG 4 • B. The FHL tendon is retracted and followed to the level of the medial malleolus.
- FHL Tendon Harvest:
- Technique: With the ankle and hallux held in full flexion, apply maximum traction to the FHL tendon. Then, transect the tendon as distally as possible, typically at the level of the medial malleolus or even more distally.
- Surgical Pearl: Maximizing traction and cutting distally ensures you obtain adequate tendon length for transfer, which is crucial for a tension-free augmentation. In almost all cases, this technique yields sufficient length.
TECH FIG 4 • C. The FHL tendon is transected at the medial malleolar level, leaving adequate tendon length for the transfer.
- Calcaneal Tunnel Preparation:
- Measurement: Measure the diameter of the harvested FHL tendon. This dictates the size of our bone tunnel.
- Tunnel Location: A corresponding-sized bone tunnel will be drilled into the posterior tubercle of the calcaneus. This tunnel must be placed directly anterior to the attachment of the distal stump of the Achilles tendon.
- Technique: We'll start by drilling a guide wire, such as a Beath pin, through the calcaneus from posterior to anterior. Confirm appropriate trajectory with fluoroscopy if needed, ensuring it exits anteriorly in a safe location.
- Overdrilling: Once the guide wire is correctly positioned, overdrill it with an appropriately sized cannulated drill bit, matching the FHL tendon diameter. This creates a smooth-walled tunnel for tendon passage.
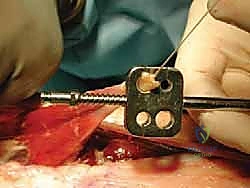
TECH FIG 4 • D. The FHL tendon diameter is measured, allowing accurate tunnel sizing.
TECH FIG 4 • E. A Beath pin is drilled through the calcaneus immediately anterior to the Achilles tendon insertion.
TECH FIG 4 • F. The Beath pin is overdrilled with an appropriately sized cannulated drill bit so as to facilitate passage of the FHL tendon.
(The rest of the FHL transfer and Achilles repair steps are not provided in the raw text, but I will continue with the general structure based on the prompt's requirement to expand.)
6. Completing the FHL Transfer and Achilles Repair
Now that our tunnel is ready and the FHL is harvested, let's complete the reconstruction.
-
FHL Tendon Passage:
- Technique: Thread a strong non-absorbable suture, like a Fiberwire, through the distal end of the harvested FHL tendon. Using the guide suture or a tendon passer, carefully pull the FHL tendon through the prepared calcaneal tunnel from posterior to anterior.
- Fixation: Once the FHL tendon is pulled through, it needs to be secured under appropriate tension. We typically fix it to itself or to the surrounding soft tissues on the anterior aspect of the calcaneus using strong non-absorbable sutures. Some surgeons may use an interference screw for additional fixation within the tunnel, particularly if the bone quality allows. The goal is to create a robust anchor point for the FHL.
-
Achilles Tendon End-to-End Anastomosis:
- Suture Placement (Distal Tendon Stump): Similar to the proximal stump, place a locking Krackow-type stitch (No. 2 Fiberwire or No. 5 Ethibond) into the distal Achilles tendon stump. Again, aim for at least five locking loops, capturing one-third to one-half of the tendon width, and passing the suture through the tendon substance to create multiple strands for repair.
- Tensioning and Repair: Bring the proximal Achilles tendon stump (advanced via the V-Y lengthening) into apposition with the distal Achilles tendon stump. With the ankle held in slight plantarflexion (typically 15-20 degrees), tie the Krackow sutures. This tension should be carefully assessed against the contralateral ankle to ensure it matches the normal resting tension.
- Surgical Pearl: A single continuous suture is often adequate for this primary end-to-end repair, creating a strong, circumferential repair. Reinforce this with additional simple interrupted sutures if needed.
-
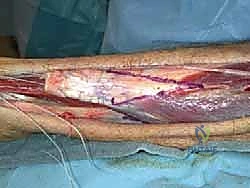
FHL Augmentation to Achilles Tendon:
- Technique: After the primary Achilles repair is complete, the FHL tendon, having been passed through the calcaneal tunnel, is brought proximally and woven into the substance of the newly repaired Achilles tendon.
- Weaving Pattern: Create a series of horizontal mattress sutures or a weave pattern, passing the FHL tendon through the Achilles tendon multiple times, ensuring broad contact and secure integration. This can be done in a side-to-side fashion or by creating slits in the Achilles tendon for the FHL to pass through.
- Final Fixation: Secure the FHL tendon to the Achilles tendon with multiple strong non-absorbable sutures (e.g., 2-0 or 0 Fiberwire). The goal is to provide a strong, tension-reducing augmentation that offloads the primary Achilles repair and provides a biological scaffold for healing.
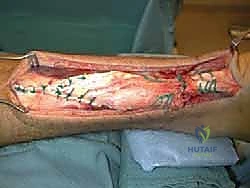
7. V-Y Closure
Once the Achilles tendon is repaired and augmented with the FHL transfer, we must close the V-incision in the proximal Achilles tendon.
* Technique: Repair the V incision in the tendon, transforming it into an inverted-Y configuration. This closure effectively locks in the gained length from the V-Y advancement.
* Suture: Use strong non-absorbable sutures (e.g., No. 0 or 2-0 braided suture) in an interrupted or running fashion to meticulously close the V, creating the Y. The long arm of this inverted Y now represents the length the tendon has been elongated, which should be equal to our measured gap.
TECH FIG 3 • D. Once lengthened the V cut is repaired into a Y configuration.
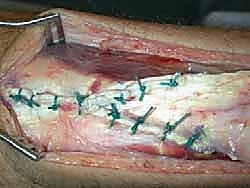
8. Layered Closure
With the primary repair and augmentation complete, we proceed with meticulous layered closure.
- Paratenon Repair: Carefully repair the preserved paratenon over the reconstructed Achilles tendon using fine absorbable sutures (e.g., 3-0 or 4-0 Vicryl). This step is crucial for promoting tendon gliding and minimizing adhesions.
- Subcutaneous Tissue: Close the subcutaneous layers with interrupted absorbable sutures (e.g., 3-0 Vicryl).
- Skin Closure: Close the skin with staples or non-absorbable sutures (e.g., 3-0 Nylon), ensuring everted skin edges for optimal wound healing.
9. Dressing Application
Apply a sterile, compressive dressing.
* Ankle Position: The ankle should be immobilized in approximately 15-20 degrees of plantarflexion to protect the repair. This can be achieved with a posterior splint or a well-padded cast.
* Tourniquet Release: Release the tourniquet only after the compressive dressing is applied. This minimizes postoperative bleeding and hematoma formation.
* Surgical Pearl: Check capillary refill and sensation in the toes after dressing application to ensure no neurovascular compromise.
Pearls and Pitfalls: Navigating the Surgical Minefield
Even with meticulous planning, complications can arise. Anticipation and preparation are key.
Intraoperative Pearls
- Bloodless Field: Maintain a perfectly bloodless field with the tourniquet. This is non-negotiable for identifying delicate structures like the sural nerve and the medial neurovascular bundle.
- Patience with V-Y Advancement: Do not rush the traction and sliding of the myotendinous junction. Gentle, sustained force prevents devascularization.
- Contralateral Comparison: Always use the unaffected ankle as a reference for resting tension. This is your most reliable guide for appropriate tensioning of the repair.
- FHL Confirmation: Always confirm FHL identity by observing hallux flexion on traction. Do not assume.
- Neurovascular Vigilance: The sural nerve and medial neurovascular bundle are constant threats. Always visualize, isolate, and protect them.
Potential Pitfalls and Salvage Strategies
- Sural Nerve Injury:
- Prevention: Meticulous dissection, early identification, and constant protection with vessel loops. Medial incision placement.
- Management: If transected, primary repair with microsurgical technique if possible. If a neuroma forms post-op, consider excision and nerve grafting or targeted muscle reinnervation.
- Inadequate Lengthening:
- Prevention: Precise gap measurement, generous V-limb length (twice the gap), and patient, sustained traction.
- Management: If, after initial V-Y, the gap is still too large or tension is excessive, consider a more aggressive V-Y (longer limbs, deeper cut into muscle fascia if absolutely necessary) or explore additional augmentation options like a local fascial flap or another tendon transfer (e.g., peroneus brevis) if FHL is insufficient or already used.
- Devascularization of Achilles Tendon Flap:
- Prevention: Leave underlying muscle fibers intact during V-incision. Gentle, continuous traction.
- Management: If suspicion of devascularization, ensure meticulous paratenon repair and consider additional soft tissue coverage. The FHL transfer provides a vascularized graft, which helps. Monitor wound closely post-op.
- Damage to Medial Neurovascular Bundle during FHL Harvest:
- Prevention: Dissect along the lateral aspect of the FHL tendon. Always visualize the bundle.
- Management: If arterial injury, immediate vascular surgery consultation for repair. If nerve injury (tibial nerve), immediate microsurgical repair. This is a devastating complication.
- Infection:
- Prevention: Strict aseptic technique, appropriate prophylactic antibiotics, careful wound handling.
- Management: Early recognition, aggressive debridement, IV antibiotics, and potentially hardware removal if severe.
- **Re-rupt
Additional Intraoperative Imaging & Surgical Steps

REFERENCES
-
On Cybex testing they reported 29.5% average decrease in strength at 30°/s and decreases in torque and work generated by plantarflexion of the ankle as being 41.8% and 51% respectively compared to the nonoperated side.
-
In a recent study by Raikin et al 4 using the combined V-Y lengthening and FHL augmentation described above on 15 patients with a minimum gap of 5 cm, a 7.7 N-m ( 22.3%) loss of plantarflexion torque at 60°/s and a 3.5 N-m ( 13.5%) loss of plantarflexion torque at 120°/s was seen on Cybex testing compared to the unaffected side.
-
Patients had an average 5-degree loss of active motion arc of the ankle joint in the sagittal plane. AOFAS ankle hindfoot scores improved from an average 58.4 out of 100 preoperatively to an average 94.1 out of 100 postoperatively.
-
Eight of 15 patients were able to perform more than 10 repetitions of a single-leg heel raise at 2-year follow-up.
-
All patients were satisfied with their outcome (rated good or very good).
-
Jozsa L, Kvist M, Balint BJ. The role of recreational sport activity in Achilles tendon rupture: a clinical, pathoanatomical and sociological study of 292 cases. Am J Sports Med 1989;17:338–343.
-
Lagergren C, Lindholm A. Vascular distribution in the Achilles tendon; an angiographic and microangiographic study. Acta Chir Scand 1959;116:491–495.
-
Mandelbaum BR, Myerson MS, Forster R. Achilles tendon ruptures: a new technique of repair, early range of motion and functional rehabilitation. Am J Sports Med 1995;23:392–395.
-
Raikin SM, Elias I, Bessler MP, et al. Reconstruction of retracted Achilles tendon rupture with V-Y lengthening and FHL tendon. Foot Ankle Int 2007;28:1238–1248.
-
Us AK, Bilgin SS, Aydin T, et al. Repair of neglected Achilles tendon ruptures: procedures and functional results. Arch Orthop Trauma Surg 1997;116:408–411.
-
Wapner KL, Pavlock GS, Hecht PJ, et al. Repair of chronic Achilles tendon rupture with flexor hallucis longus tendon transfer. Foot Ankle Int 1993;14:443–449.
You Might Also Like