Limited Open Achilles Tendon Repair: An Intraoperative Masterclass with the Achillon Instrument
Key Takeaway
This masterclass guides fellows through a limited open Achilles tendon repair using the Achillon instrument. We cover meticulous preoperative planning, precise patient positioning, and detailed intraoperative execution from incision to closure. Emphasis is placed on comprehensive anatomy, neurovascular considerations, and the exact application of the Achillon device for robust tendon approximation, ensuring excellent functional outcomes and minimizing complications.
Introduction to Acute Achilles Tendon Rupture Repair
Welcome, fellows, to the operating theater. Today, we're addressing a common yet critical injury: an acute rupture of the Achilles tendon. This procedure, a limited open repair utilizing the specialized Achillon instrument, represents a refined approach that marries the benefits of direct visualization with minimized soft tissue disruption. This technique is particularly indicated for acute ruptures, typically within three weeks of injury, occurring between 2.0 and 7.0 cm proximal to the calcaneal tuberosity. This zone accounts for over 90% of all Achilles ruptures. For ruptures higher than 8 cm (muscular involvement), we often consider nonoperative management, while those less than 2 cm from the insertion necessitate direct bony fixation.
Understanding the Injury
Achilles tendon ruptures are frequently seen in high-level athletes, recreational enthusiasts, and even sedentary individuals, often presenting with a sudden "pop" or "snap" during forceful ankle dorsiflexion. While most are complete, partial injuries do occur. On physical examination, expect to find moderate swelling posteriorly, a palpable tender defect or "soft spot" typically 2.5 to 5 cm proximal to the calcaneal insertion, and a positive Thompson squeeze test. Patients usually report difficulty walking on their toes or rising on their heels, and you'll observe spontaneous excess dorsiflexion of the affected ankle when the patient is prone.
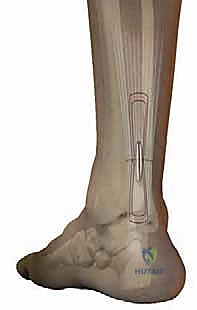
Surgical Anatomy: A Critical Review
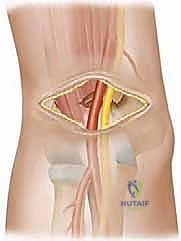
Let's quickly review the essential anatomy before we begin. The Achilles tendon, a robust structure approximately 9 cm long and 0.9 cm in diameter, is the confluence of the gastrocnemius and soleus tendons proximally. Distally, it inserts onto the posterior aspect of the calcaneal tuberosity. Crucially, it's enveloped by the paratenon, a delicate sheath vital for tendon vascularization. A significant clinical pearl here is the area of poor vascularity, located approximately 2.5 to 5 cm above the calcaneal tuberosity. This hypovascular zone is precisely where most ruptures occur, contributing to the challenges of healing and the rationale behind meticulous repair techniques.
Neurovascular Considerations:
The sural nerve runs superficially along the lateral aspect of the Achilles tendon. It's imperative to identify and protect this structure throughout our approach. Injury to the sural nerve can lead to distressing sensory disturbances along the lateral foot and ankle, which we absolutely want to avoid. Our medial paratendinous incision helps minimize this risk, but constant vigilance is paramount.
Relevant Osteology:
The calcaneal tuberosity is our key bony landmark distally. While this technique addresses mid-substance ruptures, always remember to rule out calcaneal avulsion fractures preoperatively, as these require a different fixation strategy.
Differential Diagnosis
While history and physical examination are usually sufficient for diagnosis, always keep these in mind:
* Ankle sprain
* Ankle fracture (especially medial malleolus, or calcaneal avulsion)
* Tennis leg (gastrocnemius tear)
* Plantaris tendon rupture
* Acute paratenonitis
Plain radiographs are always advised in a traumatic setting to rule out associated fractures or avulsions. Ultrasound and MRI are typically not required but can be valuable if the diagnosis is equivocal.
Indications and Contraindications
Indications for this Limited Open Technique:
* Acute Achilles tendon rupture (less than 3 weeks duration).
* Rupture occurring between 2.0 and 7.0 cm above the calcaneal tuberosity.
Contraindications:
* Chronic rupture (greater than 3 weeks duration).
* Previous local surgery in the Achilles region.
* Systemic steroid use (increases risk of wound complications and poor healing).
* Open ruptures or lacerations presenting greater than 6 hours post-injury.
* Complex open ruptures with significant soft tissue defects.
* Ruptures outside the 2-8 cm zone from the calcaneal tuberosity (requiring different approaches).
* Elderly patients with limited functional expectations, significant tobacco/alcohol addictions, vascular disease, or severe comorbidities (renal failure). These patients may be better candidates for nonoperative management, given the increased surgical risks.
Preoperative Planning: Setting the Stage for Success
Before we even bring the patient into the room, meticulous planning is paramount.
Imaging Review
- Plain Films: We've already reviewed the plain radiographs. Confirm no associated ankle fractures, calcaneal avulsion, or calcific tendinopathy that might complicate our repair or alter our approach.
- Other Imaging: If an ultrasound or MRI was performed for diagnostic clarity, we'll review those images again, paying close attention to the exact nature of the rupture (complete vs. partial), the gap size, and the quality of the tendon ends.
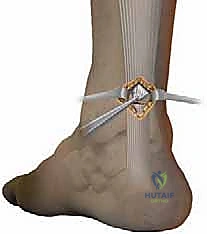
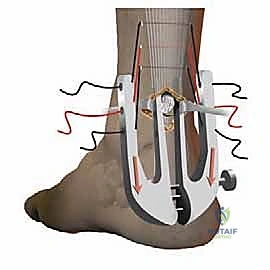
Instrumentation: The Achillon System
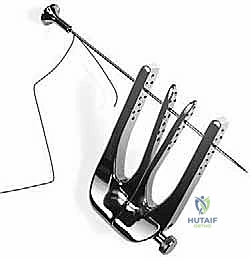
Our cornerstone instrument today is the Achillon (Newdeal, Integra Life Science), designed specifically for this mini-invasive repair.
* It's available in either a rigid polymer or stainless steel.
* Its primary function is to guide the precise passage of sutures through the tendon stumps.
* It comprises a pair of internal branches connected to external branches, each with a line of apertures at the same level. This design ensures accurate, reproducible suture placement.
* The two internal branches are angled at 8 degrees to each other, mirroring the natural V-shape of the Achilles tendon.
* A micrometric screw allows us to adjust the opening of the branches to accommodate varying tendon morphologies.
* We'll also use a specialized straight needle with its attached suture, along with a needle driver designed to provide a larger support surface for pushing the needle and, critically, to protect our gloves from accidental perforation.
Patient Positioning and Preparation
"Alright team, let's get our patient positioned. We want optimal access and visibility."
- Anesthesia: The patient will be under general anesthesia. Before positioning, I'll perform a final examination under anesthesia to reconfirm the side of injury and the palpable tendon defect. This crucial step prevents later confusion.
- Prone Positioning: We'll carefully place the patient prone on the operating table. Ensure adequate padding at all pressure points – the chest, iliac crests, and shins – to prevent nerve palsies or skin breakdown.
- Tourniquet Application: A pneumatic tourniquet is applied around the upper thigh of the operative leg. We'll inflate this once we're ready for the incision to ensure a bloodless field, which is critical for identifying delicate structures like the paratenon and tendon ends.
- Preparation and Draping: Both legs are included in our sterile preparation and draping. This is not just for symmetry; it allows us to compare Achilles tendon tension and spontaneous plantarflexion intraoperatively with the contralateral, uninjured limb. This comparison is invaluable for assessing appropriate tendon length and tension during the repair.
- Antibiotic Prophylaxis: The patient has already received appropriate antibiotic prophylaxis as per our institutional protocol, typically within 60 minutes of incision.
- No Plastic Draping: Note that we do not use plastic draping directly over the surgical site, as this technique involves percutaneous steps where sutures will exit the skin.
Intraoperative Execution: The Masterclass Begins
"Alright, fellows, we're scrubbed in, gowned, and gloved. Tourniquet is up. Let's begin. The field is prepped and draped. Our goal is a strong, anatomically reduced repair with minimal soft tissue disruption."
Step 1: Locating the Rupture and Incision Planning
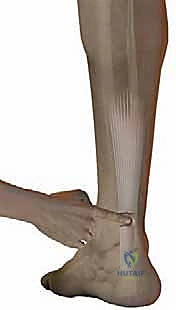
"First, let's palpate the site of injury. You can feel that distinct gap, the 'soft spot,' right here."
* Palpate the site of injury, confirming the gap or "soft spot." This is our primary landmark.
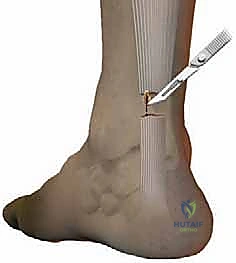
* Plan the Incision: Our incision will be paratendinous and medial, originating directly at the soft spot and extending approximately 2.0 cm proximally. This limited incision minimizes soft tissue trauma and helps protect the sural nerve, which typically runs laterally.
Step 2: Initial Dissection and Paratenon Management
"Scalpel, please. We're making our paratendinous incision now, just medial to the midline of the Achilles."
* Make the medial paratendinous incision.
* Skin and Subcutaneous Retraction: Gently retract the skin and subcutaneous tissue with small, sharp hooks. We need to meticulously identify the paratenon. This delicate envelope is crucial.
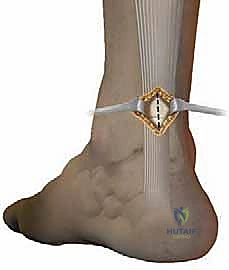
* Open and Tag the Paratenon: "Now, carefully, with small scissors or a scalpel, we're going to open the paratenon sheath longitudinally. Take your time here; we want to preserve its integrity as much as possible."
* Carefully open the paratenon sheath.
* Tag each edge with a stay suture. This is a critical step. These sutures will allow us to retract the paratenon gently, protect it during the repair, and facilitate its meticulous closure at the end, which is essential for preserving tendon vascularity and promoting healing.
Step 3: Identifying Tendon Stumps and Proximal Suture Placement
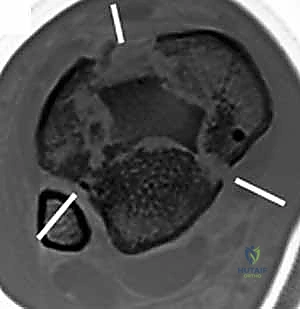
"Now that the paratenon is open, we can clearly see the ruptured tendon ends. Identify both the proximal and distal stumps. Note the exact site and morphology of the rupture. We'll start with the proximal stump."
* Identify both stumps of the ruptured tendon.
* Carefully note the exact site of rupture. This direct visualization is one of the key advantages of this limited open technique over purely percutaneous methods.
"Let's prepare the Achillon instrument for the proximal stump."
* Introduce the Achillon Instrument (Proximal): With the Achillon instrument in its closed position, introduce it gently under the paratenon in a proximal direction.
* Grasp the Proximal Stump: Simultaneously, use a small clamp, like an Allis clamp or a Babcock, to firmly hold the proximal tendon stump under the instrument. This ensures the tendon is properly centered within the instrument's internal branches.
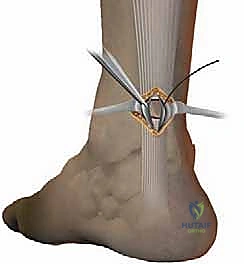
* Widen the Instrument: As you advance the instrument proximally, progressively widen its branches using the micrometric screw. Ensure the tendon stump is securely positioned between the two internal branches. You should be able to confirm the position of the guide by external palpation – feeling the tendon between the central (internal) branches.
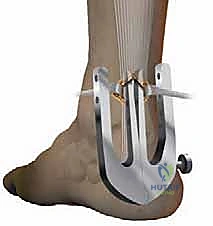
"Now for the sutures. We'll use three sutures here for a robust repair."
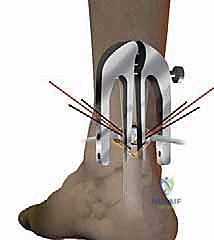
* Pass Sutures (Proximal): Using the straight needle and needle driver, pass three sutures from lateral to medial through the tendon, typically starting with the most proximal hole of the instrument. Each suture will pass through the lateral external branch, then the internal lateral branch, through the tendon, out the internal medial branch, and finally through the medial external branch.
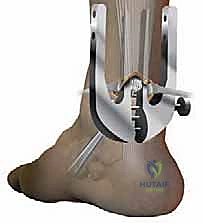
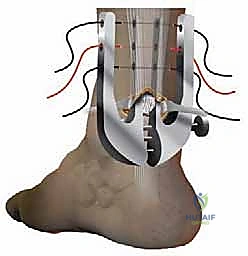
* Secure Suture Ends: As each suture is passed, hold the end of each suture with a small clamp to keep them separate and prevent tangling.
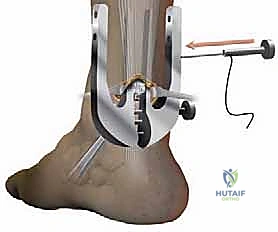
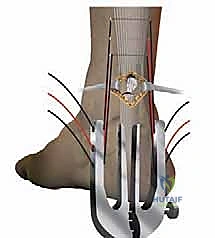
* Withdraw the Instrument (Proximal): "Now, pay close attention to this maneuver. We're going to slowly withdraw the Achillon instrument while progressively closing its branches."
* Slowly withdraw the instrument while progressively closing the branches. This critical maneuver causes the sutures to slide from their initial extracutaneous position to a peritendinous position. The result is that only the tendon itself is held by the sutures, maximizing purchase and minimizing skin tethering.

* Confirm Suture Anchorage: Apply gentle traction to each of the three suture pairs to ensure they are firmly anchored within the proximal tendon stump. Individually clamp each suture pair to prevent any confusion during the tying phase.
Step 4: Distal Suture Placement
"Now, we'll perform the exact same sequence on the distal tendon stump."
* Introduce the Achillon Instrument (Distal): Introduce the Achillon instrument, again in a closed position, under the tendon sheath and push it distally until it gently touches the calcaneus. This ensures we capture sufficient distal tendon for a strong repair.
* Pass Sutures (Distal): Repeat the process of passing three sutures from lateral to medial through the distal tendon stump, securing each pair with clamps.
* Withdraw the Instrument (Distal): Slowly withdraw the instrument, progressively closing its branches, to bring the sutures into their peritendinous position.
* Confirm Suture Anchorage: Apply gentle traction to confirm secure anchorage and individually clamp each distal suture pair.
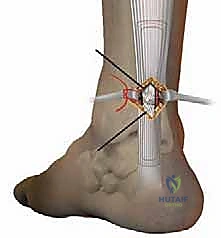
Step 5: Tendon Reduction and Knot Tying
"We now have our six suture ends – three from the proximal stump and three from the distal. Let's organize them for tightening."
* Organize Sutures: All the sutures are now organized for tightening. We will tie corresponding proximal and distal pairs.
* Ankle Positioning: Assistant, please place the ankle in approximately 30 degrees of plantarflexion (equinus). This position reduces tension on the repair and facilitates approximation of the tendon ends.
* Tendon Reduction Under Direct Vision: "Now, as we tie these sutures, I want you to observe the tendon ends. The tendon reduction must be carefully controlled under direct visual control through our limited incision."
* Begin tying the corresponding suture pairs. As you tie, gently approximate the tendon ends. Ensure a neat, anatomical reduction with good apposition of the tendon ends.
* Assessing Tendon Length: If the tendon ends are very frayed, making it difficult to ascertain the precise tendon length and reduction, compare the tension and resting position of the repaired tendon to the opposite, uninjured leg. This provides an excellent intraoperative reference for achieving appropriate tension.
* Secure Knots: Tie secure, non-slipping knots for each suture pair. We typically use a modified Krackow or similar locking stitch pattern within the tendon to maximize pull-out strength.
Step 6: Closure
"Excellent, the repair looks strong and anatomically reduced. Now for closure."
* Paratenon Closure: "First, we'll meticulously close the paratenon sheath using fine, absorbable sutures. This is critical for promoting healing and maintaining the vascular environment around the tendon."
* Skin Closure: After paratenon closure, we will close the skin with intradermal sutures. This provides a cosmetically appealing result and minimizes skin tension.
* No Drain: We typically do not use a drain for this procedure, given its limited open nature and minimal dead space.
* Tourniquet Release: Release the tourniquet and ensure hemostasis.
Step 7: Postoperative Immobilization
"Before the patient is moved or wakes up, we must apply the splint."
* Apply Splint: Apply a splint holding the ankle in approximately 30 degrees of plantarflexion. This position protects the repair from premature stretching and excessive tension. This is a crucial step to prevent early rerupture due to inadvertent dorsiflexion during patient transfer or awakening.
💡 Pearls and Pitfalls
"Fellows, throughout this procedure, certain steps are absolutely critical for success. Let's review them."
Pearls for Optimal Outcome:
- Meticulous Paratenon Management: Carefully open the paratenon and tag its edges with stay sutures. This protects it and facilitates precise closure, essential for tendon vascularity and healing.
- Accurate Rupture Localization: Prior to making the incision, accurately locate and palpate the exact site of rupture. This guides your incision and ensures you're directly addressing the pathology.
- Secure Tendon Stump Grasp: Always hold the tendon stump firmly with a small clamp while introducing the Achillon instrument under the paratenon. This ensures the tendon is properly centered within the instrument.
- Controlled Instrument Widening: Progressively open the Achillon instrument as it is introduced. This allows for optimal purchase on the tendon without causing undue trauma.
- Careful Instrument Withdrawal: After suture insertion, carefully withdraw the instrument while its branches are progressively closed. This ensures the sutures transition from an extracutaneous to a peritendinous position, maximizing tendon purchase.
- Organized Suture Management: Carefully organize all sutures for tying with the ankle placed in equinus. Keep each of the three sutures separate from each other to avoid tangling and confusion.
- Direct Visual Control of Reduction: Tendon reduction must be carefully controlled under direct vision. Ensure precise apposition of the tendon ends to promote optimal healing and minimize gapping.
- Pre-Movement Orthosis Application: The orthosis (splint) is applied prior to moving or waking the patient. This prevents any uncontrolled ankle dorsiflexion that could stress or disrupt the fresh repair.
- Contralateral Limb Comparison: Utilize the uninjured leg for comparison of tendon tension and length, especially when dealing with frayed ends where direct visual assessment of length is challenging.
Pitfalls to Avoid (and How to Salvage):
- Failure to Accurately Locate the Exact Site of Rupture Prior to Incision: This can lead to an incision that is too far proximal or distal, requiring extension and increasing soft tissue dissection, which defeats the purpose of a limited open approach. Salvage: Extend the incision as necessary, but always re-palpate and re-identify landmarks carefully.
- Failure to Tag the Paratenon with Stay Sutures: Without stay sutures, the delicate paratenon can retract and be difficult to identify for meticulous closure, potentially compromising tendon vascularity. Salvage: Carefully dissect to identify the paratenon edges and apply stay sutures, even if it requires slightly more dissection.
- Failure to Hold Tendon Stump with Clamp While Introducing Achillon Instrument: The tendon stump may slip out of the instrument's grasp, leading to inaccurate suture placement or damage to the tendon end. Salvage: Re-grasp the tendon stump firmly and re-introduce the instrument.
- Failure to Progressively Open the Achillon Instrument as It Is Being Inserted: This can lead to insufficient tendon capture or damage to the tendon if forced. Salvage: Withdraw the instrument slightly, re-evaluate tendon position, and progressively widen the branches as you advance.
- Failure to Keep Each of the Three Sutures Separate from Each Other: Tangled sutures can lead to incorrect tying, uneven tension, or prolonged operative time. Salvage: Carefully untangle and organize all sutures before tying, ensuring each pair is correctly identified.
- Failure to Apply Traction to the Three Suture Pairs to Ensure That They Are Firmly Anchored in the Tendon: If sutures are not firmly anchored, they may pull through the tendon during tying, leading to a failed repair. Salvage: If a suture pulls out, re-pass it through a fresh, healthy portion of the tendon, potentially at a different aperture level if available, or consider an additional suture.
- Failure to Individually Clamp Each of the Three Suture Pairs to Avoid Confusion: Similar to tangling, confusion between suture pairs can lead to incorrect tensioning or tying. Salvage: Re-identify each suture pair by tracing it back to its entry/exit points and re-clamp them systematically.
- Failure to Control Tendon Reduction Under Direct Visual Control: Blind reduction can result in gapping, malrotation, or an elongated repair, all of which compromise healing and functional outcome. Salvage: Untie sutures, re-reduce the tendon under direct vision, and re-tie. If significant fraying, rely heavily on contralateral limb comparison for length.
- Failure to Apply Orthosis Prior to Moving or Waking the Patient: This is a major pitfall that can lead to immediate rerupture due to uncontrolled ankle dorsiflexion. Salvage: Immediately re-apply the splint in the correct position. If rerupture is suspected, consider re-exploration, but prevention is key.
- Sural Nerve Injury: Although our medial incision minimizes risk, the sural nerve can be inadvertently stretched or injured, leading to sensory deficits. Prevention: Meticulous dissection, careful retraction, and staying medial to the tendon. Salvage: If identified intraoperatively, direct repair of the nerve may be indicated. Postoperatively, manage symptomatically and refer to neurology if persistent.
- Wound Complications: While this limited open technique aims to reduce wound complications, they can still occur. Prevention: Aseptic technique, gentle tissue handling, meticulous closure. Salvage: Local wound care, debridement, and in severe cases, plastic surgery consultation for flap coverage.
Postoperative Care and Rehabilitation: The Road to Recovery
"Our work in the OR is done, but the journey to full recovery has just begun. Postoperative care and rehabilitation are as critical as the surgery itself."
Initial Immobilization and DVT Prophylaxis
- Splint: The patient will remain in the splint, holding the ankle in 30 degrees of plantarflexion, full time for the first 2 weeks.
- Weight Bearing: During these first 2 weeks, patients are allowed partial weight bearing (30 to 45 pounds), typically with crutches or a walker.
- DVT Prophylaxis: Low-molecular-weight heparin (subcutaneous administration) is used to prevent deep vein thrombosis for 3 weeks postoperatively. This is a standard protocol to mitigate the risk associated with immobilization.
Early Functional Rehabilitation (Stages)
Our early functional rehabilitation program is carefully supervised by a physical therapist and is divided into four stages:
Stage 1: Weeks 0-2 (Protection and Limited Motion)
* Ankle Position: Splint in 30 degrees plantarflexion.
* Weight Bearing: Partial weight bearing (30-45 lbs).
* Exercises: Gentle isometric exercises for thigh muscles (quadriceps sets, gluteal sets). Focus on maintaining strength without stressing the ankle.
Stage 2: Weeks 2-3 (Initiation of Gentle Motion)
* Splint: Continue full-time splint use.
* Weight Bearing: Full weight bearing is allowed after 3 weeks.
* Exercises: Gentle ankle range of motion (flexion and extension) is begun, carefully controlled to avoid excessive dorsiflexion. Continue thigh muscle exercises. Introduction of a stationary bicycle with minimal resistance, focusing on gentle, controlled pedal strokes.
* Goal: The primary goal by the end of the third week is to reach a neutral ankle position.
Stage 3: Weeks 3-8 (Progressive Loading and Strengthening)
* Splint: Continuous use of the protective splint.
* Weight Bearing: Full weight bearing allowed.
* Exercises: Progressive increase in ankle ROM, stretching, and isometric exercises. Introduction of proprioceptive exercises (e.g., balance board) to regain neuromuscular control. Light resistance exercises for calf muscles.
Stage 4: Weeks 8+ (Advanced Strengthening and Return to Activity)
* Splint Discontinuation: At the end of 8 weeks, the splint is discontinued, and weight bearing is allowed without any external support.
* Intensive Program: A more intensive program of ankle range of motion, stretching, and isometric and proprioceptive exercises is instituted. This includes eccentric calf strengthening.
* Return to Activity:
* Jogging is allowed at 3 months.
* More demanding sports activities are allowed at 5 months, provided the patient has achieved adequate strength, flexibility, and functional capacity.
Outcomes and Complication Management
This limited open procedure with the Achillon instrument offers the advantage of a direct, robust repair while significantly reducing the soft tissue complications commonly associated with traditional open repairs. Our own prospective multicenter study involving 82 patients demonstrated excellent results:
* No wound healing problems or infections.
* No sensory disturbance in the sural nerve distribution.
* All patients returned to their previous professional or sporting activities.
* The mean AOFAS score was 96 points (range 85 to 100 points), indicating excellent functional outcomes.
Potential Complications and Management:
* Rerupture: While the rerupture rate is significantly lower with operative repair compared to nonoperative treatment, it can still occur, especially with noncompliance to rehabilitation protocols. Management: Re-evaluation, often requiring revision surgery.
* Wound Dehiscence/Infection: Though rare with this technique, any signs of infection or wound breakdown require prompt attention, including antibiotics, wound care, and potentially debridement.
* Sural Nerve Injury: As discussed, this is a risk. Management: Symptomatic treatment, nerve blocks, and referral to a neurologist or pain specialist if persistent.
* Hardware Failure: While not strictly "hardware" in the traditional sense, suture pull-out or breakage is possible, leading to rerupture. Management: Revision surgery.
* Noncompliance: As noted in our study, noncompliance (e.g., early removal of orthosis) can lead to complications. Management: Patient education, close follow-up, and reinforcement of rehabilitation protocols are crucial.
"Fellows, this technique, when executed meticulously with a thorough understanding of the anatomy and a commitment to structured rehabilitation, offers our patients an excellent chance at full recovery and return to their desired activity levels. Thank you."
REFERENCES
Concentric Peak Torque Table 1 Measured with Isokinetic Dynamometry in Fifty Patients
-
Cetti R, Christensen SE, Ejsted R, et al. Operative versus nonoperative treatment of Achilles tendon rupture. A prospective randomized study and review of the literature. Am J Sports Med 1993;21: 791–799.
-
Leppilahti J, Orava S. Total Achilles tendon rupture. A review. Sports Med 1998;25:79–100.
-
Maffulli N. Rupture of the Achilles tendon. J Bone Joint Surg Am 1999;81:1019–1036.
-
Soldatis JJ, Goodfellow DB, Wilber JH. End-to-end operative repair of Achilles tendon rupture. Am J Sports Med 1997;25:90–95.
-
Bradley JP, Tibone JE. Percutaneous and open surgical repairs of Achilles tendon ruptures. A comparative study. Am J Sports Med 1990;18:188–195.
-
Mandelbaum BR, Myerson MS, Forster R. Achilles tendon ruptures. A new method of repair, early range of motion, and functional rehabilitation. Am J Sports Med 1995;23:392–395.
-
Haji A, Sahai A, Symes A, et al. Percutaneous versus open tendo Achillis repair. Foot Ankle Int 2004;25:215–218.
-
Cretnik A, Kosanovic M, Smrkolj V. Percutaneous versus open repair of the ruptured Achilles tendon: a comparative study. Am J Sports Med 2005;33:1369–1379.
-
Calder JD, Saxby TS. Independent evaluation of a recently described Achilles tendon repair technique. Foot Ankle Int 2006;27:93–96.
-
Ma GW, Griffith TG. Percutaneous repair of acute closed ruptured Achilles tendon: a new technique. Clin Orthop 1977;(128):247–255.
-
Kakiuchi M. A combined open and percutaneous technique for repair of tendo Achillis. Comparison with open repair. J Bone Joint Surg Br 1995;77:60–63.
-
Assal M, Jung M, Stern R, et al. Limited open repair of Achilles tendon ruptures: a technique with a new instrument and findings of a prospective multicenter study. J Bone Joint Surg Am 2002;84-A: 161–170.
-
Rippstein P, Easley M. “Mini-open” repair for acute Achilles tendon ruptures. Tech Foot Ankle Surg 2006;5:3–8.
-
Assal M, Stern R, Peter R. Fracture of the ankle associated with rupture of the Achilles tendon. Case report and review of the literature. J Ortho Trauma 2002;16:358–61.
-
DiStefano VJ, Nixon JE. Achilles tendon rupture: pathogenesis, diagnosis, and treatment by a modified pullout wire technique. J Trauma 1972;12:671–677.
Angular Mean Torque (and Velocity Standard Deviation) ( Nm ) (deg/sec) Injured Side Unaffected Side 30 111.4 19 118.9 30 60 95.4 19 101.3 25 3 weeks postoperatively, thus disrupting the repair by a new injury. One patient fell 12 weeks after the surgery and sustained a rerupture. All three new injuries were repaired with an open surgical procedure.
-
Isokinetic results: The concentric peak torque was performed with the ankle in plantarflexion at 30°/s and 60°/s of angular velocity, after correction for dominance. There was no significant difference between the injured and uninvolved sides (Table 1). Endurance testing at 120°/s also revealed no difference between sides.
-
Three recent reports describe similar excellent results using the exact surgical technique and Achillon instrument, thus providing further confirmation of its important role in the repair of acute Achilles tendon ruptures.
COMPLICATIONS
- Disruption of the repair related to the patient’s noncompliance with the rehabilitation protocol (before the third month postoperatively)
-
Rerupture of the healed Achilles tendon (after the third month postoperatively)
-
Sural nerve injury
-
Infection
-
Deep venous thrombosis
You Might Also Like