Supramalleolar Osteotomy: An Intraoperative Masterclass for Ankle Deformity Correction
Key Takeaway
This masterclass provides an immersive, step-by-step guide to supramalleolar osteotomy. We cover preoperative planning, patient positioning, comprehensive surgical anatomy, and meticulous intraoperative execution, including fibular and tibial osteotomies. Learn critical pearls, potential pitfalls, and strategies for optimal fixation and postoperative rehabilitation to correct ankle malalignment and restore joint congruity.
Alright, fellows, gather around. Welcome to the operating theater. Today, we're tackling a supramalleolar osteotomy – a precise, technically demanding procedure designed to normalize altered load distribution across the ankle joint. This isn't just about cutting bone; it's about restoring biomechanical harmony, preventing further cartilage degeneration, and alleviating pain for our patients.
Understanding the Indication: Why We're Here
A supramalleolar osteotomy is, by definition, an osteotomy performed at the level of the distal tibia, often accompanied by a fibular osteotomy, to correct angular deformities just above the ankle joint. Our primary goal is to re-establish a neutral mechanical axis and optimize joint congruity. This procedure is indicated in cases of asymmetric osteoarthritis, malunited fractures of the distal tibia that have led to angular deformity, and sometimes in conjunction with osteochondral lesion management.
We frequently see patients with chronic ankle pain and progressive arthritis due to long-standing varus or valgus malalignment. This altered alignment creates abnormal stress concentrations on specific areas of the tibiotalar joint, leading to accelerated cartilage wear. Think of it like uneven tire wear on a car; eventually, the entire system breaks down.
Preoperative Planning: The Blueprint for Success
Before we even consider making an incision, meticulous preoperative planning is paramount. This is where we define the problem, quantify the deformity, and design our solution.
Patient Assessment and Diagnostic Studies
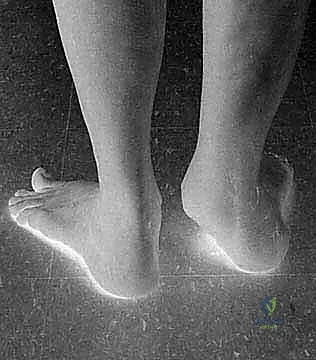
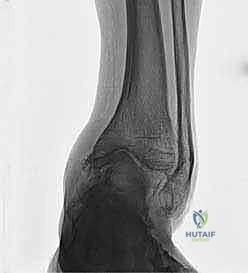
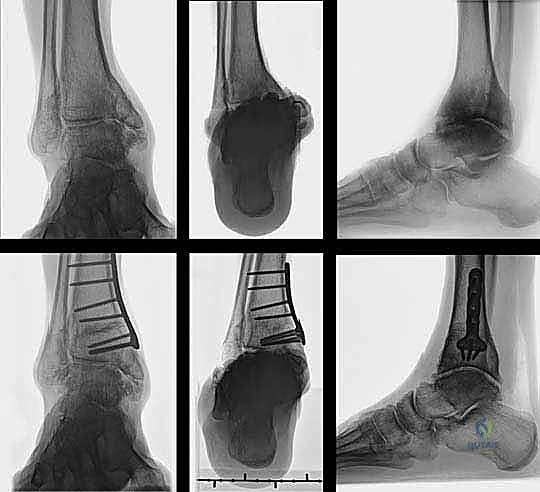
Our patient today presents with a post-traumatic varus deformity of the ankle, a result of a distal tibia and fibula fracture 26 years ago. This has led to significant asymmetric osteoarthrosis of the tibiotalar joint, as you can see on his weight-bearing radiographs.
FIG 1 • Weight-bearing radiograph of a 65-year-old man with a posttraumatic varus deformity after a fracture of the distal tibia and fibula 26 years ago. The anteroposterior view shows the asymmetric osteoarthrosis of his tibiotalar joint due to the altered load distribution.
Clinical Examination:
* Alignment Assessment: We carefully assess the overall limb alignment, looking for any knee or hip deformities that might influence the ankle.
* Ligamentous Stability: Drawer and talar tilt tests are crucial to assess ankle joint stability. Instability can contribute to or worsen malalignment.
* Muscular Balance: We evaluate inversion and eversion strength to rule out peroneal tendon insufficiency, which can exacerbate valgus deformities.
* Subtalar Range of Motion: This helps differentiate between ankle and subtalar pathology.
* Coleman Block Test: This simple test helps us determine if a forefoot-driven hindfoot varus is contributing to the overall deformity. If the hindfoot corrects with the lateral border of the foot elevated on a block, the primary issue might be forefoot driven, requiring a different surgical approach.
Imaging:
* Weight-bearing Radiographs: These are our workhorse. We need full-length radiographs of the entire foot, ankle, and tibial shaft, along with a Saltzman hindfoot view. These images allow us to assess the nature and location of the deformity under physiological loading conditions. If there's any clinical suspicion of knee or femoral deformity, whole lower-limb radiographs are essential to capture the entire mechanical axis.
* Advanced Imaging (Selective): While not routinely required, CT and MRI can be invaluable for evaluating osteochondral lesions, assessing peroneal tendon disorders, or detailing ligamentous insufficiency. SPECT-CT can also be a useful tool for assessing and staging osteoarthritis in complex cases.
Differential Diagnosis and Nonoperative Management
It's critical to rule out conditions that mimic or contraindicate osteotomy. Symmetric or end-stage osteoarthritis is generally better treated with arthrodesis or arthroplasty. Systemic diseases like diabetes mellitus (Charcot arthropathy), rheumatoid arthritis, or severe neurovascular disorders significantly impact bone healing and may contraindicate this procedure. Muscular imbalance, especially in neurologic disease, and forefoot-driven hindfoot deformities also need careful consideration, as they may require adjunct or alternative surgical interventions.
Nonoperative management, including physiotherapy and shoe modifications, is appropriate for asymptomatic or mild-to-moderate malalignment. However, for severe, symptomatic malalignment, especially when progressive cartilage wear is evident, surgery should be strongly considered.
Surgical Contraindications:
* Tobacco Use: A strong relative contraindication due to its detrimental effects on bone healing.
* Compromised Bone Quality: Disorders altering bone quality or healing capacity (e.g., severe osteoporosis, certain medications, advanced age) must be carefully assessed.
Defining the Deformity and Planning the Correction
The most critical aspect of planning is accurately identifying the origin and nature of the deformity. We must distinguish isolated frontal plane deformities from complex multiplanar deformities that might involve rotational or translational components, or be influenced by muscular dysfunction or ligamentous imbalance.
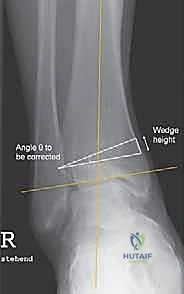
Measuring the Tibiotalar Angle:
On a standard anteroposterior ankle radiograph, we measure the tibiotalar angle – the angle between the mechanical axis of the tibia and the tibial joint surface. This angle helps us quantify the degree of varus or valgus.
Calculating the Wedge:
To determine the precise size of the wedge to be added (opening wedge) or removed (closing wedge), we can use a simple mathematical formula:
$$ \tan(\theta) = H/W $$
Where:
* $\theta$ is the angle to be corrected (in degrees).
* H is the wedge height in millimeters.
* W is the width of the tibia at the level of the osteotomy.
This allows us to precisely calculate the height of the wedge needed. For asymmetric osteoarthritis, an overcorrection of 3 to 5 degrees is generally recommended to shift the load away from the damaged cartilage. We must also account for any additional rotational or translational deformities during our planning.
Patient Positioning and Surgical Approach Selection
Our patient positioning is dictated by the chosen surgical approach, which in turn depends on the nature of the deformity and local soft tissue conditions.
- Valgus Deformities: Typically addressed with a medial closing wedge osteotomy or a lateral opening wedge osteotomy.
- Varus Malalignment: Corrected with a medial opening wedge osteotomy (as we will perform today) or a lateral closing wedge osteotomy.
The decision between a closing wedge laterally and an opening wedge medially often hinges on the amount of correction required. For deformities exceeding 10 degrees, a lateral closing wedge osteotomy is often preferred, as the fibula can restrict the amount of correction achievable with an extensive medial opening wedge.
Lateral Closing Wedge Osteotomy (for Valgus Deformity)
If we were correcting a valgus deformity with a lateral closing wedge, the patient would be positioned in either the lateral decubitus position or supine with a sandbag under the buttock of the affected limb. This provides optimal access to the lateral aspect of the distal tibia and fibula.
Medial Opening Wedge Osteotomy (for Varus Deformity – Our Case Today)
For our patient's varus deformity, we will perform a medial opening wedge osteotomy. The patient is positioned supine on the operating table. I recommend placing a small bump or sandbag under the ipsilateral calf to slightly flex the knee and internally rotate the limb, which helps present the medial aspect of the tibia for easier access. A small bump under the contralateral hip can also help prevent external rotation of the affected limb.
Intraoperative Masterclass: Step-by-Step Execution
Now, let's get scrubbed in and begin.
I. Lateral Closing Wedge Osteotomy to Correct Valgus (Hypothetical Walkthrough)
Let's first briefly review the steps for a lateral closing wedge osteotomy, as it provides a valuable contrast to our planned medial opening wedge.
1. Preparation and Tourniquet Application:
We would exsanguinate the limb using an Esmarch bandage, then inflate a pneumatic tourniquet on the proximal thigh to approximately 250-300 mmHg, ensuring a bloodless field.
2. Surgical Approach and Initial Dissection:
* Incision: A 10-cm longitudinal, slightly curved incision would be made along the anterior margin of the distal fibula. If we needed to extend distally, we'd curve it ventrally, ending just distal to and anterior of the lateral malleolus. This curved extension helps protect the neurovascular structures and accommodates the contour of the ankle.
* Anatomical Considerations:
* Superficial Peroneal Nerve: Branches of the superficial peroneal nerve cross the distal anterolateral aspect of the leg. Extended proximal dissection would necessitate careful identification, exposure, and protection of these branches.
* Sural Nerve and Short Saphenous Vein: These typically run dorsal to our incision line and are usually not encountered.
* Peroneal Artery Branches: Small branches of the peroneal artery, lying deep to the medial surface of the distal fibula, may need careful cauterization to maintain hemostasis.
* Exposure: We would carefully deepen the incision through the subcutaneous tissues. We'd then identify the interval between the peroneus brevis and tertius tendons, and meticulously dissect down to expose the lateral surfaces of the fibula and tibia.
* Periosteum: To preserve bone vascularity, we avoid extensive periosteal stripping. We would only incise the periosteum directly at the planned osteotomy sites.
* Anterior Syndesmosis: The anterior syndesmosis would be carefully exposed at the distal end of our incision.
3. Fibular Osteotomy (for Valgus Correction):
In most cases of varus deformity addressed with a lateral closing wedge osteotomy, the fibula needs to be shortened to maintain ankle joint congruity. I prefer a Z-shaped osteotomy for the fibula, as it offers superior control over rotation and primary stability compared to a simple block resection.
- Planning the Z-Osteotomy: The length of the Z-shaped osteotomy is typically 2 to 3 cm, starting distally at the level of the anterior syndesmosis.
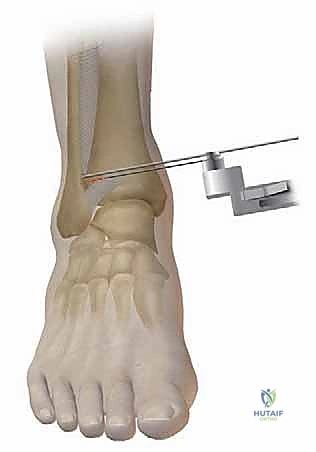
- K-wire Placement: We'd place Kirschner wires as references at the level of the planned transverse cuts to confirm their location fluoroscopically.
- Osteotomy Execution: Using an oscillating saw, we carefully perform the Z-shaped cuts. To avoid interference from the dense syndesmotic ligaments, I routinely direct the proximal transverse cut anteriorly and the distal cut posteriorly, especially as it typically sits at the syndesmosis.
TECH FIG 2 • Drawing illustrating the Z-shaped osteotomy for shortening of the fibula.
* Bone Block Resection: After mobilizing the fibula, we resect precisely measured bone blocks from both ends of the Z, based on our planned shortening amount.
4. Lateral Closing Wedge Tibial Osteotomy:
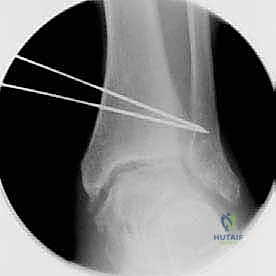
* K-wire Placement: This is critical for accurate wedge creation. We'd drill two Kirschner wires through the tibia. These wires define the planes of our osteotomy. The tips of the wires should converge at the medial cortex, which will serve as our hinge. The angle between these K-wires must precisely correspond to our preoperative planning.
* Placement Guidance: Unless the deformity is located proximal to the supramalleolar area, the wires are directed from proximal to the anterior syndesmosis to the medial physeal scar, or the apex of the deformity.
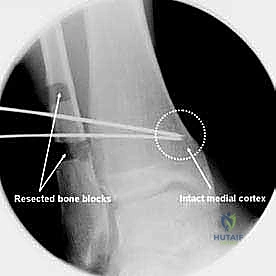
TECH FIG 3 • (continued) B . Intraoperative radiograph showing the guide-wires for the tibial osteotomy after the Z-shaped fibula osteotomy. Distal tibia/fibula before ( C ) and after ( D ) closure of the osteotomy. Note the shortening of the fibula.
* Periosteal Incision: The periosteum is incised only at the level of the planned osteotomy and carefully mobilized with a scalpel or periosteal elevator. Remember, minimal stripping!
* Osteotomy: Using an oscillating saw, cooled with constant saline or water irrigation to prevent thermal necrosis, we perform the osteotomy along the K-wires. The goal is to cut precisely to the medial cortex, leaving it intact as a hinge.
* Correction Principle: The correction must be performed at the center of rotation and angulation (CORA) of the deformity to prevent unwanted translational malpositioning of the distal (ankle) and proximal (tibial shaft) fragments.
* Wedge Closure: Once the wedge of bone is removed, we carefully close the osteotomy gap by applying controlled force, ensuring the medial hinge remains intact.
5. Optimizing Joint Congruity and Securing the Fibula:
* Fluoroscopic Verification: Under fluoroscopic guidance, we meticulously assess tibiotalar joint congruity and ensure optimal reduction of the fibular osteotomy. This is our moment of truth – confirm the correction is adequate and the joint is well-aligned.
* Fibular Fixation: Once optimal joint congruity is achieved, the fibula is secured. I typically use small screws placed in the longitudinal limb of the Z-osteotomy. Alternatively, a one-third tubular plate can be used for added stability.
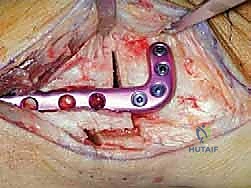
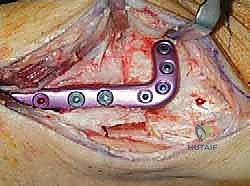
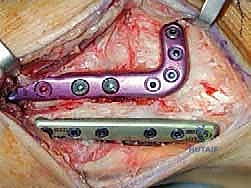
TECH FIG 4 • Fixation of the fibula with a plate.
* Tibial Fixation: The tibial osteotomy is then secured with a plate. I prefer modern locking plates for optimal primary stability. It is absolutely imperative that the osteotomy is completely closed when using locking plate technology, as these plates do not inherently provide compression.
* Compression Technique: Prior to locking the plate, I use a tensioning device to achieve optimal compression across the osteotomy site. This promotes healing and enhances stability.
6. Wound Closure:
I routinely close the periosteum over the osteotomy with 2-0 absorbable sutures to help contain the hematoma and promote healing. Subcutaneous tissues are closed with interrupted absorbable sutures, followed by skin closure with interrupted non-absorbable sutures or staples.
II. Medial Opening Wedge Osteotomy for Correction of Varus Deformity (Our Current Case)
Now, let's focus on our patient. We're correcting a varus deformity with a medial opening wedge osteotomy.
1. Patient Positioning and Preparation:
Our patient is supine. We've placed a small bump under the ipsilateral calf to slightly flex the knee and internally rotate the limb. The limb has been exsanguinated with an Esmarch bandage, and the thigh tourniquet is inflated to 250-300 mmHg.
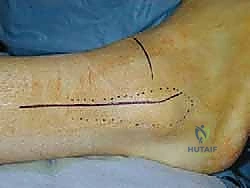
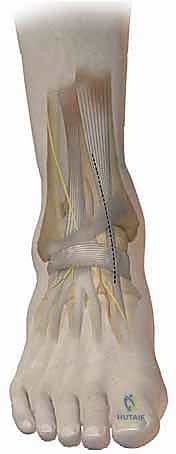
2. Surgical Approach: Medial Approach
- Incision: We'll make a 10-cm longitudinal incision, beginning approximately over the medial malleolus and extending proximally along the distal tibia. This allows for adequate exposure while minimizing soft tissue disruption.
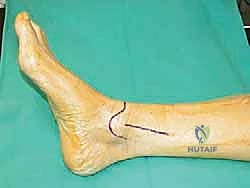
TECH FIG 6 • A, B. Medial approach to the distal tibia.
* Anatomical Considerations:
* Great Saphenous Vein and Saphenous Nerve: These structures typically lie anterior to our incision. We'll carefully identify and retract them anteriorly to protect them. The saphenous nerve provides sensation to the medial aspect of the leg and foot, and injury can lead to bothersome dysesthesia.
* Posterior Tibial Tendon: This vital tendon lies immediately on the posterior aspect of the medial malleolus. We must identify it, carefully incise its sheath, and retract it posteriorly to visualize the dorsal surface of the distal tibia.
> SURGICAL WARNING: Be extremely gentle with the posterior tibial tendon and its sheath. Overtightening the sheath closure can lead to stenosing flexor tenosynovitis, a painful post-operative complication.
* Posterior Tibial Neurovascular Bundle: Deep to the posterior tibial tendon and flexor digitorum longus, we have the posterior tibial artery, tibial nerve, and posterior tibial veins. While not directly in our field, awareness of their proximity is crucial for deep retraction.
* Dissection: We carefully deepen our incision through the subcutaneous tissues. The skin flaps are mobilized minimally, taking care not to damage the neurovascular bundle that runs along the anterior border of the medial malleolus. We then identify the posterior tibial tendon, incise its sheath longitudinally, and retract it posteriorly with a blunt Hohmann retractor. This exposes the medial surface of the distal tibia.
3. Tibial Osteotomy:
- Minimal Periosteal Stripping: The tibia is exposed with minimal periosteal stripping. Remember, we want to preserve the blood supply to the bone to promote healing. We will only incise the periosteum directly at the planned osteotomy site.
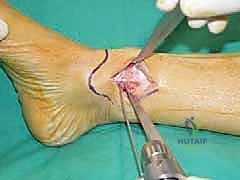
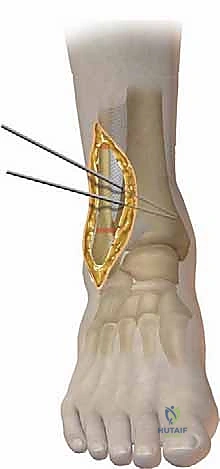
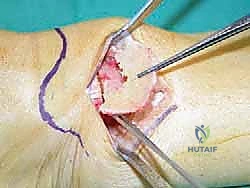
TECH FIG 7 • A. Intraoperative picture of the K-wire placement.
* K-wire Placement: This is the most critical step for achieving accurate correction. Under image intensification (fluoroscopy), we determine the precise plane of our osteotomy. We then place a K-wire from the medial cortex, directing it towards the lateral cortex. The tip of this K-wire should be positioned at the planned hinge point, which is typically the medial physeal scar or, in the case of a malunion, at the apex of the deformity. This K-wire defines the proximal cut of our opening wedge. A second K-wire is then placed distally, parallel to the first, or at a predetermined angle to create the desired wedge.

TECH FIG 7 • (continued) B. Incision and careful stripping of the periosteum.
> SURGICAL WARNING: Inaccurate K-wire placement can lead to relative translation of the distal and proximal fragments, resulting in malalignment of the ankle joint under the tibial shaft axis. Double-check your angles and ensure your hinge is precise.
* Periosteal Incision and Elevation: Once the K-wires are confirmed fluoroscopically, we incise the periosteum at the exact level of the planned osteotomy. Using a scalpel or a sharp periosteal elevator, we carefully elevate the periosteum only enough to allow saw blade passage, limiting our stripping to the osteotomy site.
* Osteotomy Execution: We use a wide oscillating saw blade to create a clean, congruent osteotomy. Constant irrigation with saline is crucial to prevent thermal injury and subsequent bone necrosis. We cut along the planes defined by our K-wires, ensuring we approach the lateral cortex but do not violate it. The lateral cortex will serve as our hinge.
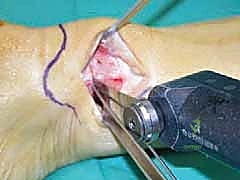
TECH FIG 7 • (continued) C. Osteotomy of the tibia with an oscillating saw.
TECH FIG 7 • (continued) D. Drawing of the saw cut for a medial opening wedge osteotomy.
* Alternative: In some cases, a chisel or osteotome may be used instead of the oscillating saw, particularly to preserve the lateral hinge and minimize thermal injury. However, this requires significant experience to ensure a controlled and precise cut.
* Opening the Wedge: Once the osteotomy is complete, we gently open the wedge using specialized osteotomy spreaders or lamina spreaders. This must be done slowly and carefully to avoid fracturing the lateral cortical hinge. We meticulously monitor the opening under fluoroscopy to achieve the precise angle of correction determined during preoperative planning.
4. Grafting the Gap:
The gap created by the opening wedge must be filled to provide structural support and promote bone healing.
* Graft Options: I typically use allograft (e.g., Tutoplast Spongiosa) or autograft from the iliac crest. Autograft offers superior osteoinductive and osteoconductive properties, but harvesting involves an additional incision and potential donor site morbidity. Allograft provides an excellent structural scaffold.
* Graft Placement: The chosen graft material is carefully packed into the osteotomy gap, ensuring it fills the space completely and provides stable support for the correction.

TECH FIG 7 • (continued) E. Fill the gap.
5. Fixation of the Osteotomy:
* Plate Selection: We secure the osteotomy with a medial locking plate. These plates provide excellent primary stability, which is crucial for early mobilization. Alternatively, plates with an integrated spacer, like a Puddu plate, can be used, which inherently maintain the desired gap.
* Plate Application: The plate is contoured to the medial aspect of the tibia, spanning the osteotomy site. We ensure it sits flush against the bone.
* Screw Placement:
* First, we place non-locking cortical screws in the neutral position to compress the plate to the bone, or in an eccentric position if additional compression across the osteotomy is desired (though less common with opening wedges).
* Then, we place locking screws proximally and distally to the osteotomy. These screws create an angularly stable construct, providing robust fixation regardless of bone quality.
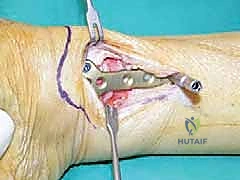
TECH FIG 7 • (continued) F. Plate fixation of the osteotomy.
> SURGICAL WARNING: Ensure all screws are of appropriate length and do not penetrate the far cortex excessively, potentially irritating soft tissues or neurovascular structures. Always confirm screw placement with fluoroscopy.
6. Wound Closure:
* Periosteum: I close the periosteum over the osteotomy site with fine absorbable sutures (e.g., 2-0 Vicryl). This helps promote healing and provides a barrier for the graft.
* Posterior Tibial Tendon Sheath: Carefully close the incised sheath of the posterior tibial tendon with fine absorbable sutures (e.g., 3-0 Vicryl), ensuring it is not overtightened.
* Subcutaneous Tissues: The subcutaneous tissues are closed with interrupted absorbable sutures (e.g., 3-0 Vicryl).
* Skin: The skin is closed with interrupted non-absorbable sutures (e.g., 3-0 nylon) or surgical staples. A sterile dressing is applied.
III. Anterior Approach (for Medial Opening Wedge, Alternative)
While we used the medial approach today, an anterior approach is also an option for a medial opening wedge osteotomy. Let's quickly review its specifics.
1. Preparation:
Similar to other approaches, the limb is exsanguinated, and the thigh tourniquet is inflated.
2. Incision and Dissection:
* Incision: An anterior incision is made over the distal tibia and ankle, immediately lateral to the tibial crest. This incision is typically longitudinal.
TECH FIG 5 • Anterior approach to the distal tibia with the interval between the extensor hallucis longus and the anterior tibial tendon and the neurovascular bundle lying lateral to it.
* Anatomical Considerations:
* Superficial Peroneal Nerve: This nerve will cross the distal aspect of the incision and must be identified and protected.
* Deep Neurovascular Bundle: The anterior tibial artery and deep peroneal nerve are located in the lateral aspect of this approach. These structures must be identified, protected, and retracted laterally.
* Extensor Retinaculum: The extensor retinaculum is divided longitudinally.
* Interval: The approach utilizes the interval between the tibialis anterior tendon (retracted medially) and the extensor hallucis longus tendon (retracted laterally).
* Fat Pad: The ankle joint is covered by an extensive fat pad containing a venous plexus, which often requires partial cauterization for adequate visualization.
* Joint Exposure (Optional): If tibiotalar joint debridement or exostectomy is required, an anterior capsulotomy can be performed at this stage. However, if only a supramalleolar osteotomy is planned, there is no need to expose the joint itself.
* Tibial Exposure: With all soft tissues and neurovascular structures meticulously protected, the anterior surface of the tibia can then be exposed. The osteotomy would then be carried out as described previously, ensuring minimal periosteal stripping.
Pearls and Pitfalls: Navigating Challenges
- Inadequate Preoperative Planning: This is the most common pitfall. Without precise measurements and a clear surgical plan, you risk under- or over-correction, or creating translational deformities. Always double-check your calculations and templating.
- Nerve Injury: The superficial peroneal nerve (lateral approach), saphenous nerve (medial approach), and deep peroneal nerve (anterior approach) are all vulnerable. Meticulous dissection, careful retraction, and clear identification are key.
> SURGICAL WARNING: If you encounter a nerve, gently dissect it free and protect it with a vessel loop or rubber band. Avoid direct pressure from retractors. - Thermal Necrosis: Using an oscillating saw without constant, copious irrigation can lead to heat generation and localized bone necrosis, increasing the risk of nonunion. Always ensure your assistant is irrigating generously.
- Incomplete Osteotomy or Hinge Fracture: Failing to cut completely through the desired cortices (except the hinge) or fracturing the intended hinge can compromise stability and accurate correction. Use sharp saws and controlled movements.
- Nonunion/Delayed Union: Factors like smoking, poor bone quality, infection, or inadequate fixation can lead to healing complications. Optimize patient health preoperatively, ensure rigid fixation, and consider bone graft extenders if needed.
- Hardware Prominence/Irritation: Plates and screws can be prominent, especially in thin patients, leading to soft tissue irritation. Choose low-profile hardware and ensure optimal placement.
- Infection: Standard surgical precautions, strict sterile technique, and appropriate antibiotic prophylaxis are essential. If infection occurs, aggressive de
Additional Intraoperative Imaging & Surgical Steps

REFERENCES
-
Cheng Y-M, Huang P-J, Hong S-H, et al. Low tibial osteotomy for moderate ankle arthritis. Arch Orthop Trauma Surg 2001;121: 355–358.
-
Hintermann B, Knupp M, Barg A. Osteotomies of the distal tibia and hindfoot for ankle realignment. Orthopade 2008;37:212–223.
-
Knupp M, Pagenstert GI, Barg A, et al. SPECT-CT compared with conventional imaging modalities for the assessment of the varus and valgus malaligned hindfoot. J Orthop Res 2009;27:1461–1466.
-
Knupp M, Pagenstert G, Valderrabano V, Hintermann B. Osteotomies in varus malalignment of the ankle. Oper Orthop Traumatol 2008;20:262–273.
-
Knupp M, Sufkens SAS, Pagenstert GI, et al. Supramalleolar osteotomy for tibiotalar varus malalignment. Tech Foot Ankle Surg 2009;8:17–23.
-
Pagenstert GI, Hintermann B, Barg A, et al. Realignment surgery as alternative treatment of varus and valgus ankle osteoarthritis. Clin Orthop Rel Res 2007;462:156–168.
-
Pagenstert GI, Knupp M, Valderrabano V, Hintermann B. Realignment surgery for valgus ankle osteoarthritis. Oper Orthop Traumatol 2009;21:77–87.
-
Stamatis ED, Cooper PS, Myerson MS. Supramalleolar osteotomy for the treatment of distal tibial angular deformities and arthritis of the ankle joint. Foot Ankle Int 2003;24:754–764.
-
Takakura Y, Takaoka T, Tanaka Y, et al. Results of opening-wedge osteotomy for the treatment of a post-traumatic varus deformity of the ankle. J Bone Joint Surg Am 1998;80A:213–218.
You Might Also Like