Supramalleolar Osteotomy with External Fixation: A Masterclass in Distal Tibial Deformity Correction
Key Takeaway
Join us in the OR for a masterclass on supramalleolar osteotomy (SMO) with external fixation. This immersive guide covers meticulous preoperative planning, critical surgical anatomy, and a granular, real-time breakdown of percutaneous osteotomy and circular fixator application for complex distal tibial deformities. We emphasize neurovascular protection, precise technique, and managing potential pitfalls for optimal patient outcomes.
Alright, fellows, gather around. Today, we're tackling a challenging but incredibly rewarding procedure: a Supramalleolar Osteotomy (SMO) with External Fixation for distal tibial malalignment. This isn't just about cutting bone; it's about restoring anatomical alignment, preserving joint health, and significantly improving our patient's quality of life. Our preferred approach utilizes a minimally invasive percutaneous osteotomy combined with a circular external fixator, allowing for gradual correction – a technique that has consistently yielded excellent, reproducible results with minimal complications, especially critical in patients with compromised soft tissues.
The Philosophy of Supramalleolar Osteotomy
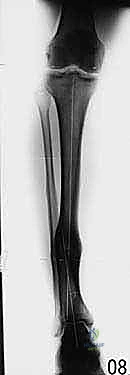
Let's start with the fundamentals. A supramalleolar osteotomy, by definition, involves an osteotomy of both the distal tibia and fibula. We typically perform this at the metaphyseal-diaphyseal junction, approximately 5 cm proximal to the ankle joint. This location is often chosen strategically, even if it's not the exact apex of deformity (the CORA, or Center of Rotation and Angulation). Why? Because the bone at the true CORA can frequently be highly sclerotic, a consequence of chronic stress and microtrauma, which compromises its healing potential. By moving our osteotomy slightly distal or proximal into less sclerotic, more vascularized bone, we significantly enhance the predictability and robustness of bone formation, leading to faster consolidation.
The most common indication for SMO is malalignment of the distal tibia. This is a prevalent issue, yet historically, it's often been undertreated due to a perceived lack of safe and reliable correction methods. With our current techniques, we can confidently address these deformities. Remember, patients rarely present with a single plane deformity; often, they exhibit a combination of varus, valgus, apex anterior (procurvatum), apex posterior (recurvatum), malrotation, and shortening.
Comprehensive Surgical Anatomy: Navigating the Distal Tibia
Before we make any incision, a thorough understanding of the distal tibial anatomy is paramount. This region is a complex interplay of bone, muscle, tendons, and critical neurovascular structures.
1. Osteology and Deformity:
* The distal tibia and fibula form the ankle mortise. Our osteotomy will be positioned about 5 cm proximal to this joint line.
* Common deformities include:
* Varus/Valgus: Coronal plane malalignment.
* Apex Anterior (Procurvatum)/Apex Posterior (Recurvatum): Sagittal plane malalignment. A recurvatum deformity of the distal tibia, combined with an equinus contracture, can lead to a forward-translated foot position and an extension moment at the knee.
* Malrotation: Best assessed clinically with the patient prone, using the thigh-foot axis.
* Shortening: Often accompanies angular deformities.
2. Muscular Intervals and Tendons:
* Our approach for the percutaneous osteotomy will be medial to the tibialis anterior tendon. This is a crucial landmark. The tibialis anterior lies in the anterior compartment, and by staying medial to it, we avoid direct injury to the muscle belly and its neurovascular supply.
* The posteromedial aspect of the tibia is where we need to exercise extreme caution.
3. Neurovascular Risks:
* Tibial Nerve: This is our primary concern, especially with longstanding varus or flexion (procurvatum) deformities. These deformities can cause relative shortening of the tibial nerve. An existing equinus contracture of the ankle will exacerbate this situation.
* Pearls for Nerve Protection:
* Gradual Correction: This is our preferred method for significant deformities, as it allows the nerve to stretch slowly over time, minimizing the risk of neuropraxia. If symptoms arise, we can slow or pause the correction.
* Tarsal Tunnel Release: In cases of severe, fixed nerve shortening, or if acute correction is deemed necessary for other reasons, a prophylactic tarsal tunnel release may be considered.
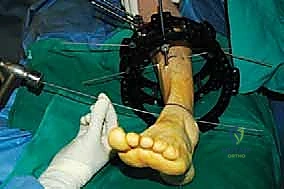
* Foot Internal Rotation: During the osteotomy, we recommend internally rotating the foot. This maneuver helps to ensure the osteotomy is complete and can help mitigate stretching of the tibial nerve, particularly when the osteotome passes posteromedially.
* Posterior Tibial Artery and Veins: These structures run closely with the tibial nerve in the tarsal tunnel. Meticulous technique and fluoroscopic guidance are essential to avoid injury, especially during posteromedial osteotomy completion.
* Superficial Peroneal Nerve: While less directly at risk from the osteotomy itself, pin placement for the external fixator requires careful attention to avoid this nerve, which runs superficially in the anterolateral leg.
4. Soft Tissue Envelope:
* Many patients, especially those with post-traumatic deformities, present with compromised skin: matted down, adherent to bone, or with previous skin grafts/free flaps. This significantly influences our choice of technique.
* Poor skin often tolerates large incisions poorly, increasing risks of wound dehiscence and infection. This is a primary reason we favor a minimally invasive, percutaneous osteotomy with external fixation over open approaches with internal fixation.
Preoperative Planning: The Blueprint for Success
Effective preoperative planning is the cornerstone of a successful deformity correction. This is where we translate our clinical findings and imaging into a precise surgical strategy.
1. Patient History and Physical Examination:
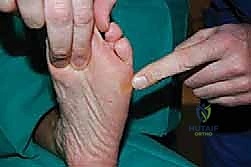
* History: Elicit details about the original injury (high-energy, open fracture – higher infection risk), previous surgeries, history of infection (antibiotic use, duration), and current symptoms (pain, LLD, back/hip pain, use of shoe lifts, perceived pressure points on the foot).
* Physical Exam:
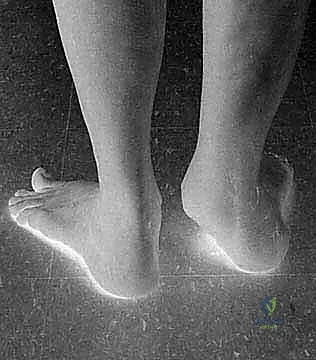
* Standing & Gait Analysis: Observe for gross deformity, LLD, and compensatory mechanisms (e.g., subtalar valgus for tibial varus).
* LLD Assessment: Use blocks under the short leg to level the pelvis, noting the block height.
* Range of Motion (ROM): Assess ankle, subtalar, forefoot, and toe ROM. Identify any fixed joint contractures (e.g., equinus contracture with recurvatum).
* Neurovascular Status: Palpate posterior tibial and dorsalis pedis pulses. Assess foot sensation (light touch, two-point discrimination) and motor function (dorsiflexion, plantarflexion, toe movements). Document any pre-existing deficits.
* Rotational Profile: Assess thigh-foot axis and tibiofemoral angle with the patient prone.
* Soft Tissue Envelope: Meticulously document skin condition, previous scars, and flaps.
2. Imaging and Diagnostic Studies:
* Standard Radiographs:
* AP, Lateral, Mortise views of the Ankle: Essential for local assessment.
* Saltzman View of both feet: Critical for assessing hindfoot alignment and subtalar compensation.
* 51-inch Bipedal Erect Leg Radiograph (Hips to Ankles): This is non-negotiable for comprehensive limb alignment and LLD assessment. Ensure blocks are used under the short leg to level the pelvis.
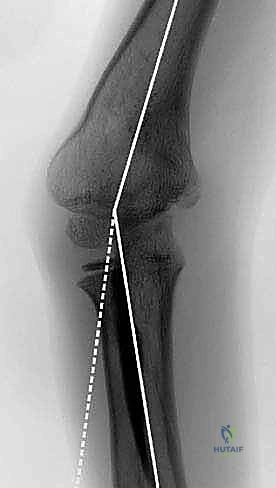
* On the AP view: We define the proximal tibial axis with a middiaphyseal tibial line. The distal tibial axis is a line perpendicular to the ankle joint drawn retrograde. The intersection of these lines defines the apex of deformity (CORA).
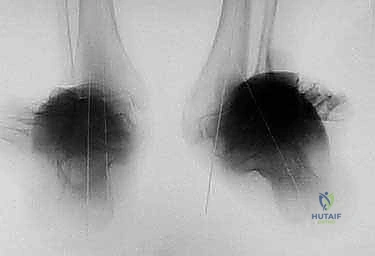
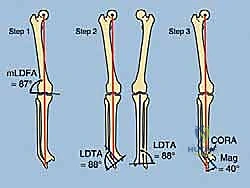
FIG 2 • A. Lateral distal tibial angle measurement and variations. B. How to find the center of rotation and angulation (CORA) of a distal tibial deformity, which will in turn help calculate the correct amount of translation needed at the osteotomy site. C. Normal anterior distal tibial angle. (continued)
* On the Lateral view: The distal tibial axis is drawn 80 degrees to the lateral joint line (normal anterior distal tibial angle is 80 degrees). Again, the intersection points to the CORA.
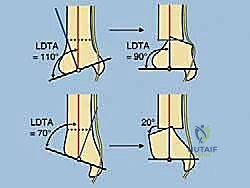
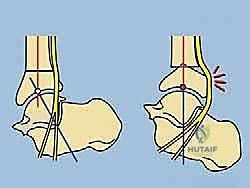
FIG 2 • (continued) D. Upper diagram demonstrates stretching of the tibial nerve with varus corrections. Valgus correction through the distal tibia does not stretch the same nerve ( lower diagram ). Both diagrams highlight proper translation needed to align the ankle under the tibia. This procurvatum deformity ( E ) results in symptomatic impingement of the talus on the anterior tibia with the ankle in the neutral position. Correction of this very distal procurvatum deformity with proper translation will stretch the tibial nerve significantly. One should consider gradual correction or tarsal tunnel release with an acute correction. (Reprinted with permission from Dror Paley. Principles of Deformity Correction. Springer-Verlag, 2003.)
* Scanogram (Supine): Useful for LLD measurement but less so for alignment analysis.
* Advanced Imaging (as needed):
* CT Scan: Provides detailed bony information, especially useful for complex rotational deformities (cuts at proximal/distal femur/tibia), nonunion assessment, and identifying sclerotic bone.
* MRI: Evaluates cartilage condition in the ankle/subtalar joints, soft tissue integrity, and helps diagnose infection.
* Laboratory Studies: WBC count, ESR, CRP to screen for infection, especially with nonunions. If infection is suspected, antibiotics should ideally be discontinued for 6 weeks pre-op for reliable culture results, with careful patient monitoring.
3. Deformity Analysis and Correction Planning:
* CORA Identification: Precisely locate the CORA in both coronal and sagittal planes.
* Osteotomy Level Decision: Determine if the osteotomy will be at the CORA or an adjacent site for better bone healing. If not at the CORA, calculate the necessary translation at the osteotomy site to achieve full correction.
* Acute vs. Gradual Correction:
* Acute Correction: Best for modest deformities, mobile atrophic nonunions (often requiring open grafting), and small bone defects. Simpler fixation, earlier bone contact. However, higher risk of neurovascular insult, especially in the tibia/ankle. Requires plates, IM nails, or external fixation.
* Gradual Correction (Ilizarov Method): Our preferred method for large deformities, poor skin, associated limb lengthening, bone transport for segmental defects, and stiff hypertrophic nonunions. It employs distraction osteogenesis, allowing slow stretching of soft tissues and nerves (e.g., tibial nerve in equinovarus). If nerve symptoms occur, correction can be slowed or stopped.
* Single vs. Double-Level Osteotomy: If LLD is present, decide whether to perform lengthening and deformity correction at one level (if regenerate potential is good) or a double-level osteotomy (one at CORA for deformity, one in proximal tibia for lengthening).
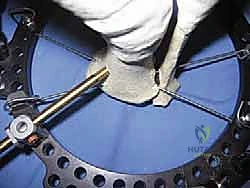

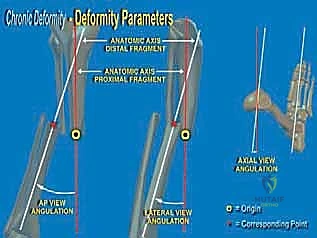
FIG 3 • A large distal varus deformity seen radiographically ( A ). With a 2-cm limb-length discrepancy, the deformity can be corrected and lengthened at one level ( B ). Alternatively, for larger deformities, a double-level osteotomy can be performed ( C ). (Reprinted with permission from Dror Paley. Principles of Deformity Correction. Springer-Verlag, 2003.)
* Addressing Joint Contractures: Identify and plan for simultaneous correction of any coexisting joint contractures (e.g., equinus contracture). If subtalar valgus/varus is a fixed contracture, additional surgery may be needed.
Patient Positioning and Anesthesia
1. Anesthesia: The patient will receive spinal-epidural anesthesia with intravenous sedation. This provides excellent pain control and muscle relaxation, which is crucial for precise surgical maneuvers and allows for intraoperative assessment of nerve function if needed.
2. Positioning:
* The patient is positioned supine on the operating table.
* The affected leg is prepped and draped in a sterile fashion, allowing full access from the knee to the foot.
* Ensure the foot can be freely manipulated and internally rotated during the osteotomy.
* A bump under the ipsilateral hip can help prevent external rotation of the limb, facilitating C-arm access and maintaining proper alignment during pin placement.
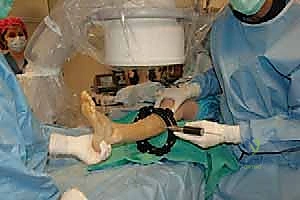
* The C-arm fluoroscopy unit is positioned to allow both AP and lateral views of the distal tibia and ankle without repositioning the patient. We'll typically have it draped and ready on the contralateral side, swinging it over as needed.
Step-by-Step Intraoperative Execution: The Masterclass Unfolds
Alright, fellows, let's get scrubbed in. We have our preoperative plan, the patient is positioned, and the C-arm is ready.
1. Initial Incision and Osteotomy Site Marking:
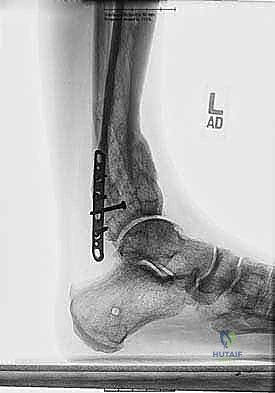
* Identify the Osteotomy Level: Based on our templating, we'll confirm the planned osteotomy level, approximately 5 cm proximal to the ankle joint, at the metaphyseal-diaphyseal junction.
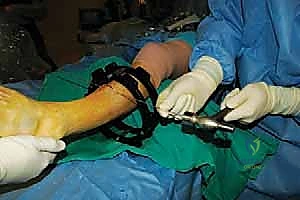
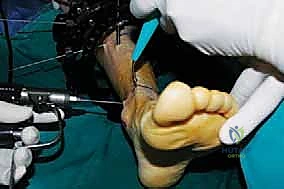
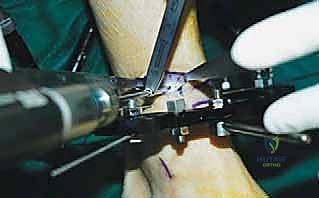
* Skin Incision: We'll make a small, approximately 1-2 cm longitudinal incision, medial to the tibialis anterior tendon. This is a key pearl. Staying medial avoids the tendon itself and the neurovascular structures of the anterior compartment.
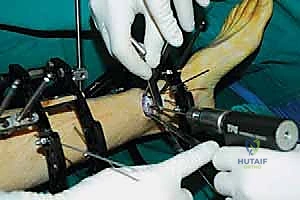
* Fluoroscopic Guidance: Before incision, confirm the exact location with a small marking wire or needle under C-arm guidance (AP and lateral views). Mark the entry point on the skin.
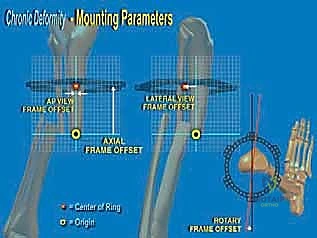
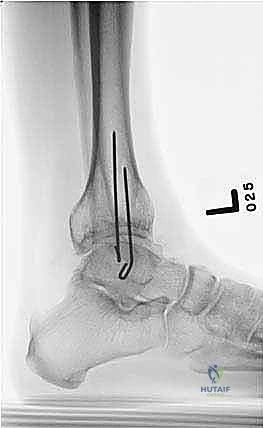
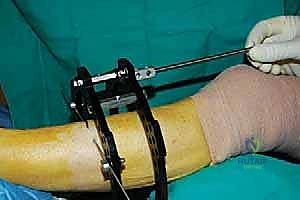
FIG 4 • A. A small incision is made medial to the tibialis anterior tendon. B. The osteotome is inserted through the incision and advanced toward the tibia. C. The osteotome is advanced under fluoroscopic guidance to ensure that it does not pass beyond the far cortex. D. The osteotomy is completed by rotating the foot internally. E. The osteotomy is complete. (Reprinted with permission from Dror Paley. Principles of Deformity Correction. Springer-Verlag, 2003.)
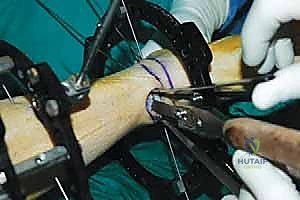
2. Percutaneous Osteotomy Technique:
* Deep Dissection: Using a mosquito clamp or small hemostat, we'll carefully spread down through the subcutaneous tissue to the periosteum.
* Periosteal Incision: Incise the periosteum longitudinally at the planned osteotomy site.
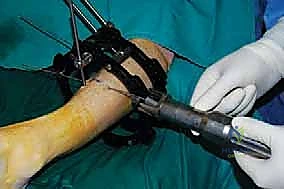
* Osteotome Insertion: Now, take a sharp, thin osteotome. Insert it through the incision and advance it toward the tibia. Feel for the bone.
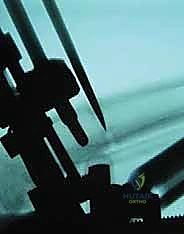
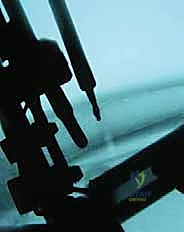
* Fluoroscopic Guidance for Osteotome Advancement: This is critical. Advance the osteotome under constant C-arm guidance, checking both AP and lateral views.
* Medial Cortex: Engage the medial cortex first.
* Anterior and Posterior Cortices: Direct the osteotome to cut the anterior and posterior cortices from the medial side.
* Lateral Cortex: Advance the osteotome carefully towards the lateral cortex.
* CRITICAL WARNING:
> SURGICAL WARNING: Judicious use of the C-arm is absolutely essential. NEVER allow the osteotome to pass beyond the far cortex and into the soft tissues on the lateral side without direct visualization. This risks injury to the deep peroneal nerve, anterior tibial artery, and lateral compartment muscles. We are aiming for a controlled, incomplete osteotomy at this stage, leaving a small bridge of the lateral cortex intact.
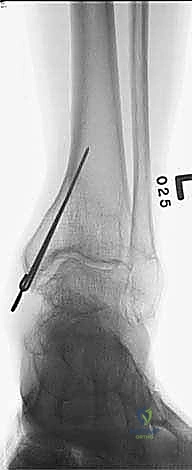
* Completing the Osteotomy: Once the medial, anterior, and posterior cortices are cut, and the lateral cortex is scored, we'll complete the osteotomy by gently rotating the foot internally. This maneuver creates a controlled fracture through the remaining lateral cortex and helps avoid stretching the tibial nerve posteromedially. You'll often feel a distinct "give" or subtle crack as the osteotomy is completed. Confirm completion with fluoroscopy.
* With experience, this osteotomy can be done mostly by "feel," but always confirm with fluoroscopy, especially early in your career.
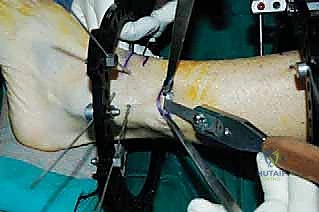
3. Fibular Osteotomy:
* The fibula must also be osteotomized to allow for adequate correction of the tibia.
* We'll make a separate small incision over the fibula, approximately 1-2 cm proximal to the planned tibial osteotomy, to create a slight offset. This helps prevent synostosis.
* Carefully dissect down to the fibula, avoiding the superficial peroneal nerve.
* Use a small osteotome or a drill to create multiple small holes (drill-osteoclasis) through the fibula. Then, gently complete the osteotomy with a small osteotome or by applying controlled bending force. Confirm with fluoroscopy.
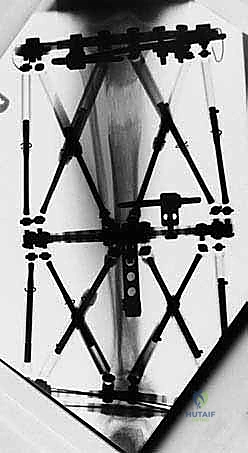
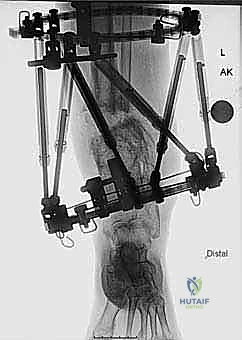
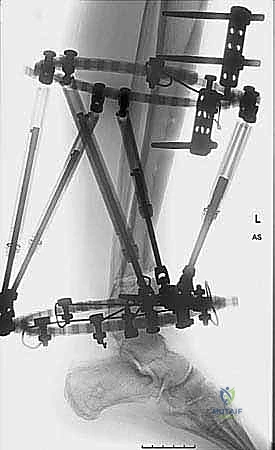
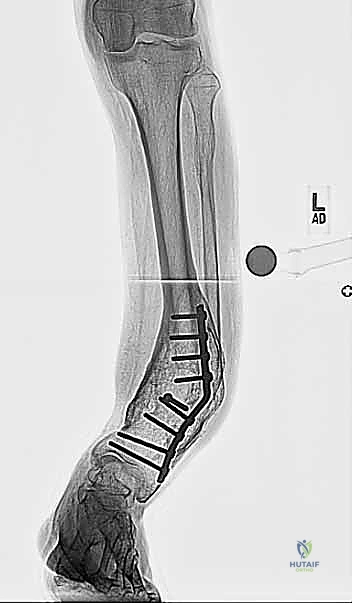
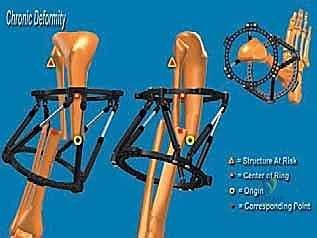
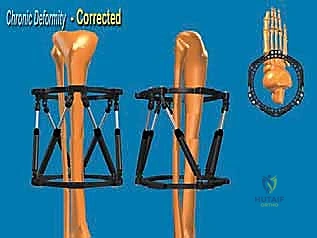
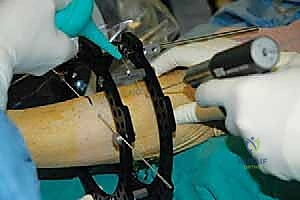
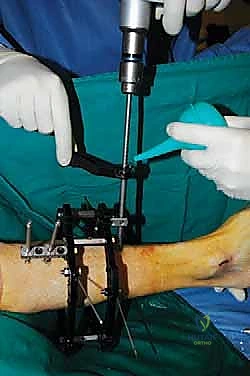
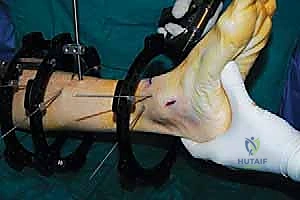
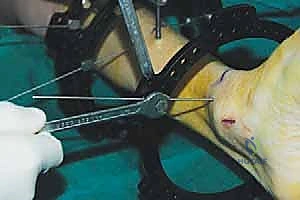
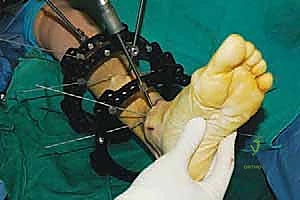
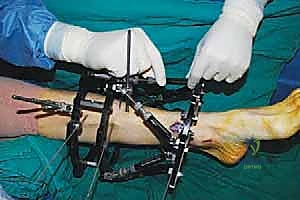
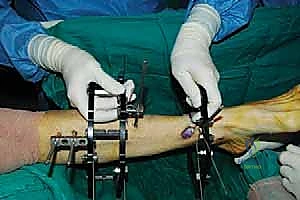
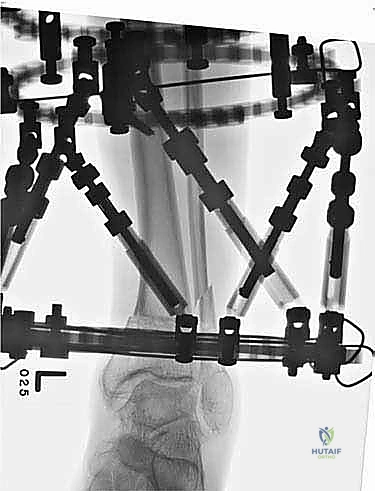
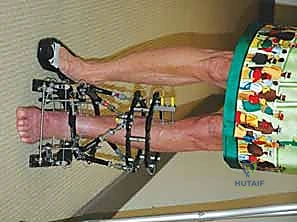
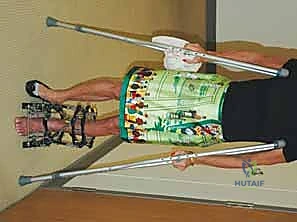
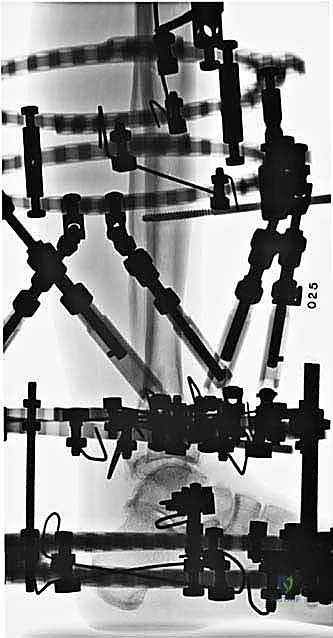
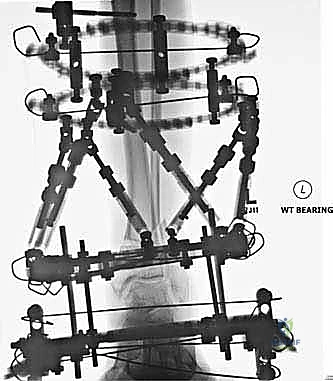
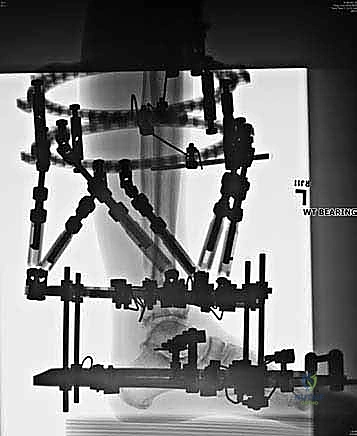
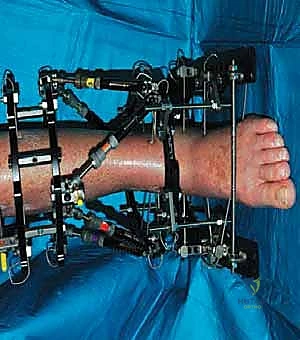
4. External Fixator Application (Circular Frame):
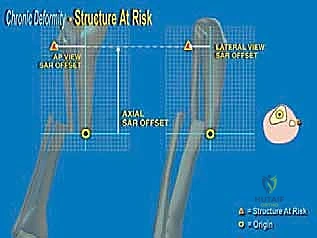
* Now that our osteotomies are complete, we move to the external fixator application. We're using a circular frame, which allows for precise, multiplanar correction.
* Proximal Ring Placement:
* Place a proximal ring around the calf, typically in the proximal or mid-tibia. Ensure it's concentric and perpendicular to the mechanical axis of the tibia.
* Insert two to three transosseous wires or half-pins into the proximal tibial segment, ensuring they are well-tensioned and secure. Pay attention to avoiding neurovascular structures, especially the anterior tibial artery and deep peroneal nerve anteriorly, and the posterior tibial artery and nerve posteriorly.
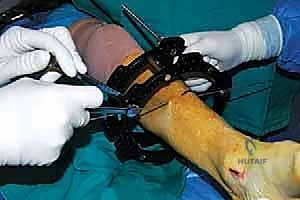
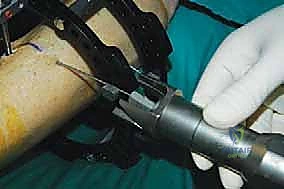
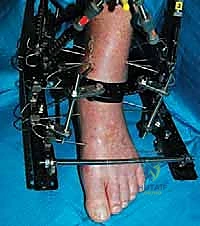
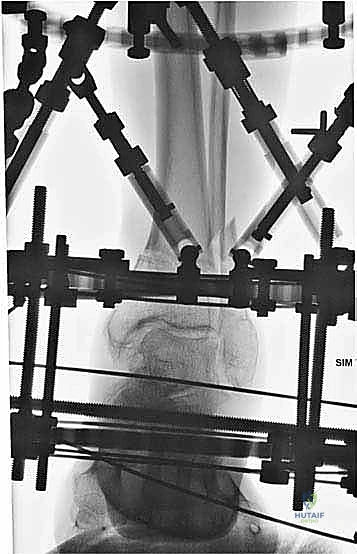
* Distal Ring Placement:
* Place a distal ring (or foot ring) around the ankle/foot. This ring will anchor the distal segment.
* Insert wires or half-pins into the distal tibial segment and calcaneus. For the distal tibia, ensure pins are placed well away from the osteotomy site. For calcaneal wires, confirm placement under fluoroscopy to avoid the subtalar joint and neurovascular bundles.
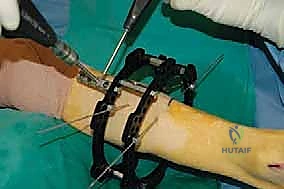
* Connecting Rods and Hinges:
* Connect the proximal and distal rings with threaded rods.
* Place hinges at the planned CORA or the osteotomy site, allowing for controlled angular correction. The precise placement and orientation of these hinges are critical for achieving the desired correction.
* Final Frame Assembly Check:
* Ensure all nuts are tightened, and the frame is stable.
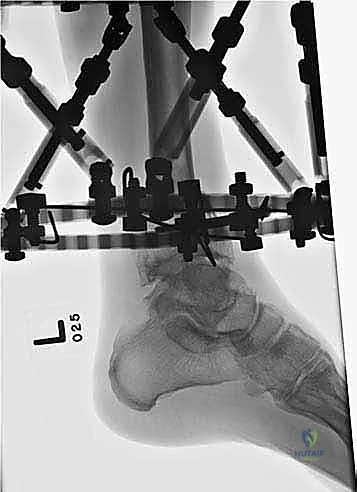
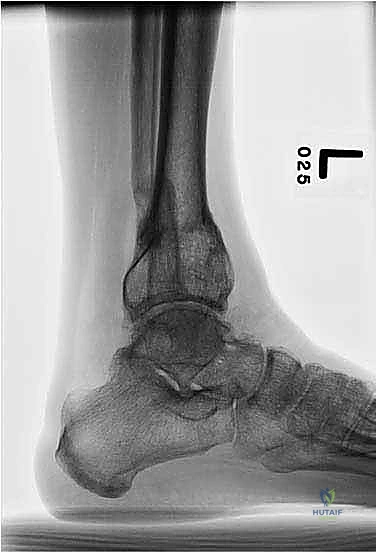
* Take final AP and lateral fluoroscopic images to confirm osteotomy completion, pin placement, and initial frame construct.
5. Wound Closure:
* Close the small skin incisions with a few simple interrupted sutures or skin staples.
* Apply sterile dressings around all pin sites.
Pearls and Pitfalls: Navigating the Challenges
- Sclerotic Bone: If you encounter extremely sclerotic bone at the planned osteotomy site, consider moving the osteotomy to an adjacent, less sclerotic area. This improves healing. If you must go through sclerotic bone, use a sharp, narrow osteotome and consider pre-drilling a few small holes along the osteotomy line to facilitate the cut.
- Tibial Nerve Injury: The most feared complication.
- Prevention: Gradual correction is key. Internally rotate the foot during the posteromedial osteotomy.
- Salvage: If nerve symptoms (pain, paresthesia, motor weakness) develop during gradual correction, immediately stop or reverse the distraction. Monitor closely. If symptoms persist or worsen, consider neurolysis or tarsal tunnel release.
- Incomplete Osteotomy: This can lead to uncontrolled fracture patterns or inability to correct the deformity. Always confirm complete osteotomy of both tibia and fibula with fluoroscopy. If still incomplete, use a small osteotome to gently complete the cut.
- Pin Tract Infection: A common complication with external fixation. Meticulous pin care post-op is crucial. If superficial infection occurs, treat with oral antibiotics and local wound care. Deep infections may require pin removal and replacement, or even frame removal.
- Nonunion/Delayed Union: Can occur, especially with poor bone quality or inadequate distraction osteogenesis. Nutritional optimization, smoking cessation, and sometimes bone graft supplementation are important.
- Hardware Failure: Breakage of wires, pins, or frame components can occur, especially with prolonged fixation. Regular follow-up and frame maintenance are essential.
- Fixed Subtalar Deformity: If a longstanding varus deformity of the distal tibia has led to a fixed hindfoot valgus (or vice versa), simply correcting the tibia will not fully resolve the patient's symptoms. This fixed subtalar deformity must be addressed, potentially with a subtalar fusion or osteotomy, either simultaneously or as a staged procedure.
- Poor Skin/Wound Complications: Minimally invasive approach helps. Aggressive wound care, debridement, and plastic surgery consultation may be needed for dehiscence or necrosis.
Postoperative Rehabilitation and Complication Management
Our work doesn't end when the
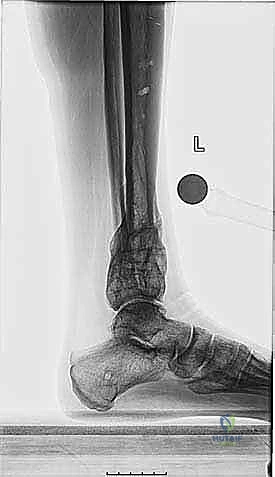
Additional Intraoperative Imaging & Surgical Steps
REFERENCES
-
Abraham E, Lubicky JP, Songer MN, et al. Supramalleolar osteotomy for ankle valgus in myelomeningocele. J Pediatr Orthop 1996;16: 774–781.
-
Benthien RA, Myerson MS. Supramalleolar osteotomy for ankle deformity and arthritis. Foot Ankle Clin 2004;9:475–487.
-
Best A, Daniels TR. Supramalleolar tibial osteotomy secured with the Puddu plate. Orthopedics 2006;29:537–540.
-
Feldman DS, Shin SS, Madan S, et al. Correction of tibial malunion and nonunion with six-axis analysis deformity correction using the Taylor Spatial Frame. J Orthop Trauma 2003;17:549–554.
-
Fragomen A, Ilizarov S, Blyakher A, et al. Proximal tibial osteotomy for medial compartment osteoarthritis of the knee using the Taylor Spatial Frame. Techniques in Knee Surgery 2005;4:175–183.
-
Fraser RK, Menelaus MB. The management of tibial torsion in patients with spina bifida. J Bone Joint Surg Br 1993;75B:495–497.
-
Gessmann J, Seybold D, Baecker H, et al. Correction of supramalleolar deformities with the Taylor spatial frame. Z Orthop Unfall 2009;147:314–320.
-
Graehl PM, Hersh MR, Heckman JD. Supramalleolar osteotomy for the treatment of symptomatic tibial malunion. J Orthop Trauma 1987;1:281–292.
-
Ilizarov GA. Clinical application of the tension-stress effect for limb lengthening. Clin Orthop Relat Res 1990;250:8–26.
-
Inan M, Ferri-de Baros F, Chan G, et al. Correction of rotational deformity of the tibia in cerebral palsy by percutaneous supramalleolar osteotomy. J Bone Joint Surg Br 2005;87B:1411–1415.
-
Inda JI, Blyakher A, O’Malley MJ, et al. Distraction arthroplasty for the ankle using the Ilizarov frame. Tech Foot Ankle Surg 2003;2: 249–253.
-
Katsenis D, Bhave A, Paley D, et al. Treatment of malunion and nonunion at the site of an ankle fusion with the Ilizarov apparatus. J Bone Joint Surg Am 2005;87A:302.
You Might Also Like