RASL Procedure: Mastering Scapholunate Instability Correction
Key Takeaway
Welcome to the OR, fellows. Today, we're tackling scapholunate instability with the Reduction and Association of the Scaphoid and Lunate (RASL) procedure. This masterclass covers comprehensive anatomy, meticulous preoperative planning, and a granular, real-time walkthrough of every surgical step. We'll emphasize precise instrument use, critical decision-making, and essential pearls to achieve optimal wrist stability and function.
Alright, fellows, gather around. Welcome to the operating theater. Today, we're addressing a common yet complex wrist pathology: scapholunate instability. We'll be performing the Reduction and Association of the Scaphoid and Lunate, or RASL procedure. This is a crucial technique for restoring carpal kinematics and preventing the dreaded progression to scapholunate advanced collapse (SLAC) arthritis. Pay close attention; every detail matters in wrist surgery.
Understanding Scapholunate Instability: Anatomy and Pathogenesis
Before we make any incisions, let's review the fundamental anatomy and biomechanics. The normal relationship between the scaphoid and the lunate is paramount for synchronized wrist motion. In a neutral wrist, the scapholunate angle typically measures 46 degrees. This precise alignment is maintained by the scapholunate interosseous ligament (SLIL), which is the primary stabilizer between these two crucial carpal bones.
Comprehensive Surgical Anatomy
The SLIL is not a monolithic structure; it has three distinct components:
* Dorsal Component: This is the thickest and biomechanically most significant part of the ligament. Its integrity is critical for preventing scaphoid flexion and lunate extension.
* Palmar Component: Thinner than the dorsal, it provides secondary stability.
* Proximal Component: This is the membranous portion, less structurally important than the dorsal and palmar bands.
Normally, the interval between the scaphoid and lunate is less than 3 mm. We always compare this to the contralateral wrist, as some individuals exhibit constitutional ligamentous laxity.
Neurovascular Considerations:
The dorsal wrist is home to several critical structures we must respect.
* Superficial Radial Nerve (SRN): This nerve and its branches course dorsally and radially. Our dorsal incision and subsequent radial incision demand meticulous identification and protection to prevent painful neuromas or dysesthesias.
* Dorsal Veins: These are often prominent and should be preserved whenever possible to minimize postoperative swelling and improve wound healing.
* Radial Artery: While deeper, branches of the radial artery can be encountered, especially during the radial styloidectomy. Careful dissection is key.
Osteology and Kinematics:
The scaphoid and lunate are intimately linked. With wrist flexion and radial deviation, both bones normally flex. With extension and ulnar deviation, they extend. This synchronous 25 degrees of rotation and 10 degrees of deviation motion is lost after SLIL injury.
* Scaphoid Flexion: Post-injury, the scaphoid tends to flex excessively.
* Lunate Extension: Concurrently, the lunate extends, leading to a Dorsal Intercalated Segment Instability (DISI) pattern.
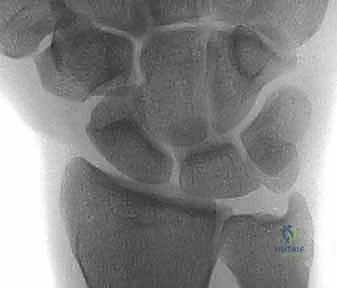
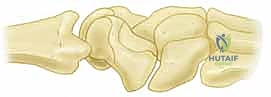
FIG 2 • Dorsal intercalated segment instability (DISI) occurs as a result of lunate extension. Consequently, the capitate and distal carpal row migrate proximally and translate dorsally.
This DISI deformity, characterized by unlinked lunate extension, creates a widened scapholunate diastasis and alters carpal kinematics. The capitate and distal carpal row migrate proximally and translate dorsally, leading to point stress at the radiostylo-scaphoid juncture. This is the initial stage of SLAC arthritis, progressing from the radioscaphoid joint to the proximal scaphoid fossa, then the midcarpal joint (capitolunate), and eventually pancarpal arthritis.
Pathogenesis and Clinical Presentation
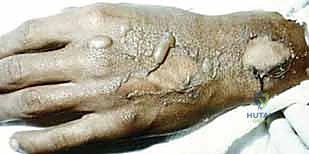
SLIL injury typically results from a fall onto an extended wrist, combining axial load, wrist extension, intercarpal supination, and ulnar deviation. These supraphysiologic loads overwhelm the ligament's capacity.
Patients present with a history of wrist trauma, often chronic. We categorize instability:
* Predynamic: No radiographic changes, but history and physical exam suggest SLIL injury.
* Dynamic: Abnormal alignment only on stress radiographs.
* Static: Abnormal alignment evident on routine radiographs (widened scapholunate interval >3mm, scaphoid cortical ring sign, scapholunate angle >60 degrees).
Physical Examination:
* Direct Palpation: Tenderness over the scapholunate interval, often with dorsal capsule synovitis.
* Range of Motion: Pain with active and passive motion.
* Watson Scaphoid Shift Test: A classic provocative maneuver. With the wrist radially deviated, apply volar pressure to the scaphoid tubercle. Ulnar deviate the wrist while maintaining pressure. A painful "clunk" as the scaphoid subluxes dorsally indicates SLIL injury. Compare to the contralateral wrist for hyperlaxity.
Imaging and Diagnostic Studies
Plain radiographs are our first line of defense. We need:
* Neutral PA, lateral, and oblique views.
* PA views in ulnar and radial deviation.
* Clenched-fist PA view in pronation (to accentuate diastasis).
* Crucially, contralateral wrist films for comparison.
Radiographic signs of SLIL injury:
* Scapholunate Diastasis: Greater than 3 mm.
* Scaphoid Cortical Ring Sign: Occurs when the scaphoid is excessively flexed, bringing its distal tubercle into alignment with the proximal scaphoid on a PA view.
* Scapholunate Angle: Greater than 60 degrees on a lateral view.
* DISI Deformity: With capitate dorsal translation and decreased carpal height.
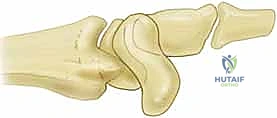
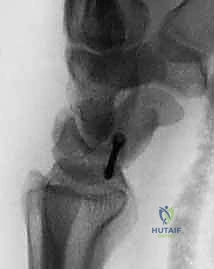
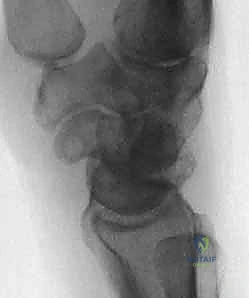
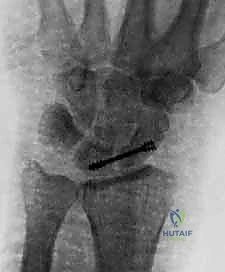
FIG 3 • A. A widened scapholunate interval ( 3 mm) and a scaphoid cortical ring sign are seen on an AP view of the wrist. B. An obtuse scapholunate angle ( 60 degrees) is appreciated on a lateral view of the wrist.
MRI can be helpful, though its accuracy varies. Arthroscopy is often the gold standard for evaluating SLIL quality, especially in chronic cases. If the ligament is repairable, primary repair is preferred. If not, the RASL procedure offers a robust solution by fusing the scaphoid and lunate.
Contraindications to RASL
We must rule out significant arthritis beyond the radioscaphoid joint.
* Significant capitolunate or pancarpal arthritis.
* If extensive arthritis is present, a salvage procedure like a proximal row carpectomy or a limited wrist fusion (e.g., four-corner fusion) might be more appropriate.
* However, focal arthritis between the scaphoid and radial styloid is not a contraindication, as a radial styloidectomy is a routine part of this procedure.
Preoperative Planning and Patient Positioning
Preoperative templating is essential. We'll assess the size of the scaphoid and lunate from radiographs to estimate potential Herbert screw length. The fluoroscopy unit will be prepared and draped, ensuring it can be rotated 90 degrees easily for both AP and lateral views without breaking sterility.
Patient Positioning:
The patient is supine on the operating table. The affected arm is placed on a standard hand table. We'll use a tourniquet on the upper arm to ensure a bloodless field, typically inflated to 250-300 mmHg.
* Arm Position: The arm is adducted, elbow flexed, and the hand positioned for easy access to the dorsal aspect.
* Fluoroscopy Setup: The C-arm is positioned to allow for both true AP and lateral views of the wrist without repositioning the arm. The table will be rotated 90 degrees to facilitate this, allowing the C-arm to swing in from the side.
* Sterile Prep and Drape: Standard sterile prep from the hand to above the elbow. A sterile stockinette covers the forearm, and the hand is draped free.
Intraoperative Execution: The RASL Masterclass
Alright, let's get scrubbed in. Tourniquet up.
Step 1: Dorsal Ligament-Sparing Capsulotomy
"Scalpel, please. We're going to make our primary dorsal incision first."
- Dorsal Skin Incision: We'll make a longitudinal incision on the dorsal wrist, approximately 4-5 cm in length. This incision will be just ulnar to the tubercle of Lister. This position helps us avoid the main branches of the superficial radial nerve and aligns with the interval between the third and fourth extensor compartments.

TECH FIG 1 • A. A dorsal midline incision is made just ulnar to the tubercle of Lister.
-
Subcutaneous Dissection: Using a combination of sharp and blunt dissection with Metzenbaum scissors, carefully dissect through the subcutaneous tissue. Identify and gently retract any dorsal veins.
> Surgical Warning: Always be mindful of the superficial radial nerve branches. While our incision is designed to minimize risk, anatomical variations exist. Use loupe magnification if available. -
Extensor Retinaculum Incision: Now, identify the extensor retinaculum. We'll make an oblique incision through the retinaculum, parallel to the course of the Extensor Pollicis Longus (EPL) tendon. This opens the third and fourth extensor compartments.
TECH FIG 1 • B. An oblique incision is made through the extensor retinaculum parallel to the extensor pollicis longus (EPL) tendon. The EPL is retracted radially and the fourth compartment tendons are retracted ulnarly.
"Fellows, notice how we're carefully retracting the EPL radially and the tendons of the fourth compartment (extensor digitorum communis, extensor indicis proprius) ulnarly. This exposes the dorsal wrist capsule."
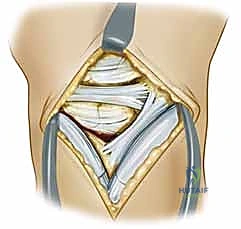
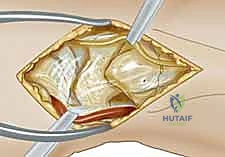
- Dorsal Wrist Capsulotomy: The goal here is a ligament-sparing approach. Identify the dorsal intercarpal ligament (DIC) and the dorsal radiocarpal ligament (DRC). We want to preserve these critical stabilizers. We'll make an oblique incision through the dorsal wrist capsule, parallel and proximal to the DIC. This provides excellent exposure of the scapholunate interval, radiocarpal, and intercarpal joints.
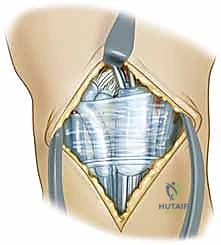
TECH FIG 1 • C. An oblique incision is made through the dorsal wrist capsule parallel and proximal to the dorsal intercarpal ligament. The dorsal radiocarpal ligament should also be identified and preserved.
"Look inside, fellows. With the capsule open, we can now directly visualize the scapholunate interval. We're assessing the quality of the SLIL remnants and the articular cartilage of the scaphoid and lunate. If we see significant arthrosis beyond the radioscaphoid joint, we'd reconsider our plan for a salvage procedure."
Step 2: Radial Styloidectomy
"Now, let's address the radial styloid. This is a crucial step to prevent impingement and facilitate better carpal motion post-fusion."
- Second Incision (Radial): We'll make a second, smaller longitudinal incision in the midaxial line, directly over the first dorsal compartment, distal to the radial styloid.
TECH FIG 2 • A. A longitudinal incision is made over the first dorsal extensor compartment.
-
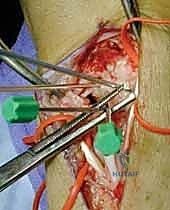
Neurovascular Dissection: Carefully dissect down to the first dorsal compartment. Identify the major branch of the superficial radial nerve and isolate it with vessel loops. The radial artery will be deeper, but be aware of its branches.
"This nerve is extremely sensitive, fellows. Take your time here. A clean dissection and protection are paramount." -
First Compartment Release: Release the retinaculum of the first dorsal compartment (housing the abductor pollicis longus and extensor pollicis brevis tendons). Retract these tendons dorsally.
-
Capsular Incision and Periosteal Elevation: Incise the capsule longitudinally to expose the radial styloid. Elevate the periosteum overlying the radial styloid using a small periosteal elevator.

TECH FIG 2 • B. The first compartment is released and a longitudinal incision is made down to the radial styloid.
- Styloidectomy: Using a small osteotome or an oscillating saw, perform the radial styloidectomy. The goal is to remove just enough of the radial styloid to prevent impingement of the scaphoid against the radius during radial deviation.
> Surgical Warning: Do not be overly aggressive. Excessive removal can compromise the critical volar radioscaphocapitate and long radiolunate ligaments, which originate from the base of the radial styloid, potentially destabilizing the wrist. We're aiming for relief of impingement, not wholesale resection.
Step 3: Preparation and Reduction of the Scapholunate Joint
"Now for the heart of the procedure: preparing the joint surfaces and achieving a stable reduction."
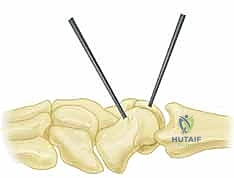
- K-wire Joystick Placement: We'll use two 0.062-inch Kirschner wires as joysticks.
- Lunate: Place a K-wire in the most proximal portion of the exposed dorsal surface of the lunate, angled from proximal to distal. This will allow us to flex the lunate out of its extended DISI posture.
- Scaphoid: Place a K-wire in the most distal portion of the exposed dorsal surface of the scaphoid, angled from distal to proximal. This will allow us to extend the scaphoid out of its flexed posture.
Surgical Warning: Crucially, plan the K-wire placement to avoid the eventual path of our Herbert screw. The screw will typically traverse the center of rotation of both bones.
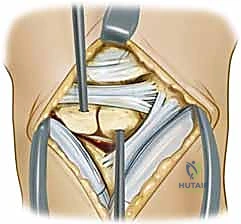
TECH FIG 3 • A. 0.062-inch Kirschner wires are placed in the lunate and scaphoid to serve as joysticks.
"These wires give us precise control over each carpal bone, allowing us to manipulate them independently."
- Cartilage Removal: Using a side-cutting burr, meticulously remove the articular cartilage from the scapholunate joint surfaces. The joysticks can be used to gently distract the bones, improving visualization. Continue burring until you visualize punctate bleeding from healthy cancellous bone.
> Surgical Warning: Remove only the cartilage and dense subchondral bone. Avoid removing excessive cancellous bone, as this will decrease the surface area for fusion and the amount of bony contact after reduction, potentially compromising fusion rates.
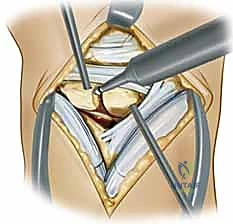
TECH FIG 3 • B. A side-cutting burr is used to remove the cartilage within the scapholunate joint.
"We need a good, raw bony surface for a solid fusion, fellows. Think of it like preparing a graft site."
- Scapholunate Reduction: Now, using our K-wire joysticks, we'll reduce the scaphoid and lunate.
- Flex the lunate: Manipulate the lunate K-wire to bring the lunate out of extension.
- Extend the scaphoid: Manipulate the scaphoid K-wire to bring the scaphoid out of excessive flexion.
"Observe how the scaphoid and lunate now align. We're aiming for a normal scapholunate interval and angle, correcting the DISI deformity."
TECH FIG 3 • C. The joysticks are used to extend the scaphoid and to flex the lunate.
- Hold Reduction with Köcher Clamp: Once the reduction is achieved, apply a Köcher clamp to hold the scaphoid and lunate firmly in their corrected position. Ensure the clamp jaws are placed on bone and not impinging on soft tissues or cartilage.
TECH FIG 3 • D. A Köcher clamp is used to hold the reduction.
- Fluoroscopic Verification: "Let's get some images, C-arm in." We'll take AP and lateral fluoroscopic views to confirm the reduction. We're looking for:
- Scapholunate interval <3mm (or comparable to contralateral side).
- Scapholunate angle ~46 degrees (definitely <60 degrees).
- Correction of the DISI deformity on the lateral view.
"Excellent. The alignment looks good. We have a stable reduction."
Step 4: Herbert Screw Placement
"Now for the definitive fixation with the Herbert screw. This is a headless, cannulated compression screw designed for scaphoid fixation, and it works beautifully for scapholunate fusion."
-
Jig Introduction: Introduce the Herbert jig. The insertion point of the jig should be placed on the scaphoid waist through our radial incision. The end of the jig is then rested on the proximal ulnar corner of the lunate through the dorsal incision.
> Surgical Warning: The path of the Herbert screw must traverse the center of rotation of both the scaphoid and the lunate to provide optimal compression and stability. Avoid violating the lunotriquetral interosseous ligament.
"Confirm the jig position visually and with fluoroscopy. It should be perfectly aligned to give us the ideal screw trajectory." -
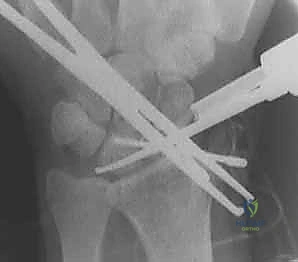
Insertion Angle: The insertion angle of the screw should be roughly parallel to the radial inclination of the distal radius, which is approximately 20 degrees. This ensures proper engagement and avoids eccentric placement.
TECH FIG 4 • A. The insertion angle of the Herbert screw should be roughly parallel to the radial inclination of 20 degrees.
-
Drilling, Measuring, Tapping: Follow the specific Herbert screw system protocol. This typically involves:
- Drilling: Using the cannulated drill bit through the jig, drill the pilot hole. Maintain constant fluoroscopic guidance to ensure the drill bit stays within the bone and does not perforate the far cortex or enter the joint space.
- Measuring: Use the depth gauge to accurately determine the required screw length.
- Tapping: Tap the bone if required by the screw system, particularly in dense cortical bone, to facilitate smooth screw insertion.
-
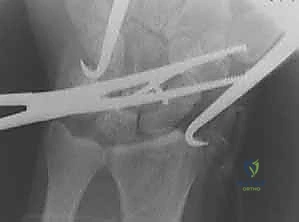
Screw Insertion: Insert the Herbert screw. Advance it slowly under fluoroscopic guidance. The screw should be countersunk into the scaphoid, meaning its head should be below the bone surface and not palpable. This prevents soft tissue irritation.
-
Final Fluoroscopic Confirmation: Obtain final AP and lateral fluoroscopic views to confirm correct screw placement and length.
TECH FIG 4 • B,C. The position of the screw is verified with an image intensifier.
- Assess Reduction and ROM: Remove the Köcher clamp and the K-wire joysticks. Gently take the wrist through a full range of motion (flexion, extension, radial and ulnar deviation). Assess for any restrictions in motion and, critically, confirm that the scaphoid and lunate remain reduced and stable. This dynamic assessment is vital.
Step 5: Wound Closure
"Tourniquet down. Let's achieve meticulous hemostasis before closing."
-
Hemostasis: Release the tourniquet. Use Bovie or bipolar electrocautery to achieve complete hemostasis. Ensure all bleeding points are controlled.
-
Capsular and Retinacular Closure:
- First, close the dorsal and radial capsular incisions using 3-0 absorbable monofilament suture (e.g., Vicryl or PDS).
- Then, repair the extensor retinaculum. Ensure the EPL and fourth compartment tendons are carefully placed back into their respective compartments before closing the retinaculum over them. This prevents bowstringing and tendon irritation.
-
Subcutaneous Closure: Close the subcutaneous layers with interrupted 4-0 absorbable sutures to obliterate dead space.
-
Skin Closure: Close the skin using 5-0 nylon suture in a running or interrupted fashion.
-
Dressing and Splint: Apply a sterile, bulky dressing. Finally, apply a volar thumb spica splint. This will immobilize the wrist and thumb, protecting our fusion site.
💡 Pearls and Pitfalls
-
Neurovascular Protection:
> Identify and protect all neurovascular structures, especially superficial radial sensory nerve branches during both dorsal and radial approaches.
> Identify the dorsal radial artery just distal to the screw insertion site before screw placement to avoid injury. -
Radial Styloidectomy:
> Avoid removing too much of the radial styloid. Excessive resection may destabilize the critical volar radioscaphocapitate and long radiolunate ligaments, leading to secondary instability.
> Remove just enough bone to prevent radioscaphoid impingement during radial deviation. Use fluoroscopy to confirm adequate clearance. -
Kirschner Wire Joystick Placement:
> Do not place the K-wires in the exact centers of the scaphoid and lunate. This will interfere with the planned Herbert screw trajectory.
> Aim for the proximal ulnar corner of the lunate and the distal radial corner of the scaphoid to avoid the central axis where the screw will pass. This provides optimal leverage for reduction. -
Bone Preparation (Chondral Surfaces):
> When burring down the chondral surfaces, ensure only cartilage and dense subchondral bone are removed.
> Removing too much cancellous bone will decrease the amount of bony contact between the scaphoid and lunate after reduction, potentially leading to nonunion. Aim for healthy, bleeding cancellous bone. -
Screw Placement:
> After placing the Herbert jig, always inspect its position both visually and by fluoroscopy (AP and lateral views) to confirm optimal trajectory.
> The axis of the jig (and thus the screw) should cross the central portions of both the scaphoid and lunate for best compression.
> The screw should be directed toward the proximal ulnar corner of the lunate, ensuring it traverses both bones effectively and avoids the lunotriquetral interval.
> Salvage for misplaced K-wires/Jig: If K-wires are in the way, remove and reinsert them slightly off-axis. If the jig is misaligned, reposition it. Never force drilling or screw insertion if the trajectory is suboptimal.
> Salvage for lost reduction: If reduction is lost during drilling or screw insertion, remove the hardware/jig, re-reduce using joysticks and Köcher clamp, and re-verify with fluoroscopy before proceeding.
Postoperative Care and Rehabilitation
Our job isn't done until the patient has achieved the best possible outcome. Postoperative care is critical for successful fusion and functional recovery.
Immediate Postoperative Period (0-6 Weeks)
- Immobilization: The patient will be kept in the volar thumb spica splint for 2-3 weeks, followed by a short arm thumb spica cast for another 3-4 weeks. This provides rigid immobilization essential for bone fusion.
- Elevation: Strict hand elevation above the heart to minimize swelling.
- Pain Management: Prescribe appropriate analgesics.
- Neurovascular Checks: Regular checks of capillary refill, sensation, and motor function in the fingers.
- Wound Care: Keep the dressing clean and dry. Instruct the patient on signs of infection (redness, increased pain, pus, fever).
- DVT Prophylaxis: Depending on patient risk factors and surgeon preference, DVT prophylaxis (e.g., aspirin, LMWH) may be considered, especially for prolonged immobilization.
Early Rehabilitation (6-12 Weeks)
- Splint/Cast Removal: After 6 weeks, the cast is removed.
- Radiographic Assessment: Obtain new radiographs to assess for early signs of fusion.
- Removable Orthosis: Transition to a custom-molded removable short arm thumb spica orthosis for protection during activities.
- Gentle Range of Motion (ROM): Initiate gentle, passive, and then active-assisted ROM exercises for the wrist and thumb. This includes:
- Wrist flexion and extension.
- Radial and ulnar deviation.
- Thumb interphalangeal and metacarpophalangeal joint flexion/extension.
- Forearm pronation and supination.
- Avoidance of Heavy Lifting: No heavy lifting or forceful gripping.
Advanced Rehabilitation (3-6 Months)
- Increased ROM: Progress to active ROM exercises and gentle stretching as tolerated.
- Strengthening: Introduce light strengthening exercises with putty, resistance bands, and light weights. Focus on grip strength, pinch strength, and forearm musculature.
- Functional Activities: Gradually incorporate functional activities of daily living.
- Weight-Bearing: Gradual progression to partial weight-bearing through the wrist, advancing to full weight-bearing as fusion progresses and pain allows.
- Work/Sport Specific Training: For athletes or those with physically demanding jobs, specific training protocols will be implemented.
Long-Term Follow-up (>6 Months)
- **
Additional Intraoperative Imaging & Surgical Steps
REFERENCES
References 1. Berger Ra, Imeada T, Berglund L, Et Al. Constraint And Material Properties Of The Subregions Of The Scapholunate Interosseous Ligament. J Hand Surg Am 1999;24A:953–962.
-
Garcia-Elias M, Geissler Wb. In Green Dp, Ed. Green’S Operative Hand Surgery, 5Th Ed. Philadelphia: Elsevier/Churchill Livingstone, 2005.
-
Lipton Cb, Ugwonali Of, Sarwahi V, Et Al. Reduction And Association Of The Scaphoid And Lunate For Scapholunate Ligament Injuries (Rasl). Atlas Hand Clin 2003;8:249–260.
-
Linscheid Rl. Scapholunate Ligamentous Instabilities (Dissociations, Subdislocations, Dislocations). Ann Chir Main 1984;3:323–330.
-
Linscheid Rl, Dobyns Jh, Beabout Jw, Et Al. Traumatic Instability Of The Wrist: Diagnosis, Classification, And Pathomechanics. J Bone Joint Surg Am 1972;54A:1612–1632.
-
Rosenwasser Mp, Miyasajsa Kc, Strauch Rj. The Rasl Procedure: Reduction And Association Of The Scaphoid And Lunate Using The Herbert Screw. Tech Hand Up Extrem Surg 1997;1:263–272.
-
Ruby Lk, Cooney Wp Iii, An Kn, Et Al. Relative Motion Of Selected Carpal Bones: A Kinematic Analysis Of The Normal Wrist. J Hand Surg Am 1988;13A:1–10.
-
Schädel-Höpfner M, Iwinska-Zelder J, Braus T, Et Al. Mri Versus Arthroscopy In The Diagnosis Of Scapholunate Ligament Injury. J Hand Surg Br 2001;26:17–21.
-
Schmitt R, Christopoulos G, Meier R, Et Al. Direct Mr Arthrography Of The Wrist In Comparison With Arthroscopy: A Prospective Study On 125 Patients [In German]. Rofo 2003;175:911–919.
-
Watson Hk, Weinzweig J, Zeppieri J. The Natural Progression Of Scaphoid Instability. Hand Clin 1997;13:39–49.
-
The wrist is kept immobilized for 4 to 6 weeks.
-
After 4 to 6 weeks, the thumb spica splint is removed, a removable splint is applied, and range-of-motion therapy is initiated.
-
Over time, therapy is advanced to strengthening exercises around 3 months postoperatively.
OUTCOMES
- Rosenwasser et al 3 reported on a series of 21 patients with a mean of 32 months of follow-up.
-
In this group, 95% of patients returned to their previous occupations. One-year postoperative scapholunate angles and intervals were corrected to within normal limits, with the scapholunate angle being corrected from 69 degrees preoperatively to 40 degrees postoperatively, and the scapholunate interval being corrected from 4.1 mm preoperatively to 1.4 mm postoperatively.
-
One patient was converted to a partial wrist fusion secondary to screw migration and failure of reduction. Another patient required removal of the screw 4 years postoperatively secondary to radial impingement and still demonstrated scapholunate stability after screw removal.
COMPLICATIONS
- Residual instability
-
Screw migration
-
Superficial radial sensory nerve injury
You Might Also Like