Chronic Achilles Tendon Rupture Reconstruction: An Intraoperative Masterclass in Tendon Transfer and Grafting
Key Takeaway
Join us in the OR for a detailed masterclass on chronic Achilles tendon rupture reconstruction. We'll meticulously cover patient positioning, surgical anatomy, and step-by-step techniques for peroneus brevis or gracilis tendon transfer, emphasizing critical pearls, pitfalls, and comprehensive postoperative management to ensure optimal patient outcomes.
Welcome, fellows, to the operating theater. Today, we're tackling a challenging yet incredibly rewarding pathology: the chronic Achilles tendon rupture. This isn't your straightforward acute repair; these cases demand meticulous planning, precise anatomical understanding, and advanced reconstructive techniques. Our goal is to restore robust plantarflexion and functional independence for our patients.
Understanding the Chronic Achilles Rupture
A rupture of the Achilles tendon is a common injury, but unfortunately, over 20% of acute injuries are initially misdiagnosed, leading to a chronic or neglected rupture. We typically define a chronic rupture as one with a delay in diagnosis or treatment exceeding 4 weeks.
Diagnostic Principles: Clinical and Imaging
Clinical diagnosis can be problematic in chronic cases because the gap between the ruptured tendon ends often fills with fibrous, non-functional scar tissue, making a clear defect less palpable.
- Calf Squeeze Test (Simmonds/Thompson Test): While a classic, remember a false positive can occur if the plantaris tendon is intact. We'll perform this with the patient prone and ankles clear of the table. A positive test indicates absence of plantarflexion upon calf compression.
- Knee Flexion Test (Matles Test): Again, performed prone with ankles clear. The patient actively flexes the knee to 90 degrees. If the Achilles is ruptured, the foot on the affected side will fall into neutral or dorsiflexion, rather than the expected plantarflexed position. Be aware of potential false positives due to neurological weakness.
- Palpable Gap: In acute ruptures, a clear gap is usually present. In chronic cases, this gap is often bridged by scar tissue, making it less distinct or even absent.
- Preserved Active Plantarflexion: Don't be fooled; patients with chronic ruptures often retain some active plantarflexion due to the compensatory actions of the tibialis posterior, peroneal tendons, and long toe flexors. This can mask the severity of the Achilles injury.
- Patient History: These patients often recall minimal trauma or a misdiagnosed ankle sprain. They commonly present with a limp and difficulty with daily activities, particularly ascending stairs.
Imaging and Adjunctive Studies
Given the challenges of clinical diagnosis, imaging is invaluable for confirming the diagnosis, assessing the extent of the defect, and guiding our surgical strategy.
- Plain Lateral Radiographs: Look for an irregular configuration of Kager's triangle – the fat-filled triangular space anterior to the Achilles tendon, between the posterior aspect of the tibia and the superior aspect of the calcaneus. Loss of this clear fat plane can suggest inflammation or scar tissue.
- Ultrasonography: A dynamic and cost-effective tool. In chronic ruptures, it typically demonstrates an acoustic vacuum within the tendon substance, surrounded by thick, irregular edges. This is a clear indicator of tendon discontinuity and scar formation.
- Magnetic Resonance Imaging (MRI): The gold standard for soft tissue evaluation.
- T1-weighted images: Will show disruption of signal within the tendon substance.
- T2-weighted images: Will demonstrate generalized high signal intensity within the rupture site, indicating edema and inflammation.
Pathogenesis and Risk Factors
The most common mechanism of injury involves pushing off with the weight-bearing forefoot while extending the knee. However, sudden, unexpected dorsiflexion or violent dorsiflexion of a plantarflexed foot can also lead to rupture. Predisposing factors include corticosteroid use, fluoroquinolone antibiotics, previous tendon pathology, and the inherent poor vascularity of the Achilles tendon, particularly in its watershed area.
Nonoperative Management?
For chronic Achilles tendon ruptures, the consensus among orthopaedic surgeons is clear: surgical intervention is the most appropriate treatment. Nonoperative management typically leads to persistent functional deficit and dissatisfaction.
Comprehensive Surgical Anatomy
Before we make our incision, let's review the critical anatomy we'll encounter.
The Achilles Tendon Complex
The Achilles tendon, or calcaneal tendon, is the thickest and strongest tendon in the human body, approximately 15 cm long.
* Gastrocnemius: Composed of medial and lateral heads originating from the femoral condyles, its fleshy belly extends to about the middle of the calf. Its fibers insert into a broad aponeurosis.
* Soleus: Lies deep to the gastrocnemius, originating from the posterior tibia and fibula. Its tendon merges with the deep surface of the gastrocnemius aponeurosis.
* Achilles Tendon Formation: These two muscles converge to form the robust Achilles tendon, which extends distally to insert into the posterior surface of the calcaneus. Throughout its length, particularly on its anterior surface, it receives muscle fibers from the soleus.
* Plantaris: A small, inconsistent muscle with a long, slender tendon that runs medial to the Achilles. If present and intact, it can sometimes contribute to false-negative Thompson tests. We may harvest it as an augmentation if needed.
Neurovascular Structures
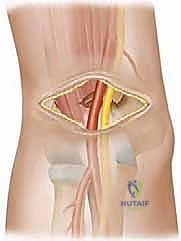
- Sural Nerve: This is our primary concern during the posterior ankle approach. It runs superficially, often crossing from the lateral aspect of the Achilles tendon to the posteromedial side. It's formed by branches from the tibial and common peroneal nerves and provides sensation to the lateral ankle and foot.
- CRITICAL WARNING: Our chosen incision will be medial to the Achilles to minimize the risk to this nerve.
- Tibial Nerve: Runs deep to the gastrocnemius and soleus, supplying the flexor hallucis longus and other deep posterior compartment muscles.
- Superficial Peroneal Nerve: Supplies the peroneus brevis and longus muscles.
Graft Harvest Anatomy
- Peroneus Brevis:
- Located in the lateral compartment of the leg, deep to the peroneus longus.
- Inserts onto the base of the fifth metatarsal.
- Its blood supply is maintained via the intermuscular septum when mobilized proximally, which is a significant advantage.
- The internervous plane for harvest lies between the peroneus brevis (superficial peroneal nerve) and the flexor hallucis longus (tibial nerve).
- Gracilis:
- A long, slender muscle in the medial thigh, part of the adductor group.
- Its tendon is one of the three tendons forming the pes anserinus (along with sartorius and semitendinosus), inserting onto the medial aspect of the proximal tibia, just distal to the tibial tuberosity.
- The gracilis tendon lies more superiorly than the semitendinosus at the pes anserinus insertion.
- Saphenous Nerve: Runs superficially in the medial thigh and knee region. We must be extremely careful during gracilis harvest to avoid injury to its infrapatellar branch, which provides sensation to the medial knee. A venous plexus is also often encountered distally.
Preoperative Planning and Patient Positioning
Fellows, meticulous preoperative planning is paramount.
- Imaging Review: We've thoroughly reviewed all MRI and ultrasound images to precisely estimate the tendon gap. This dictates our choice of reconstructive technique:
- Gap 5-9 cm: Peroneus brevis transfer.
- Gap 9-12 cm: Free autologous gracilis tendon graft.
- If these tendons have been previously used, we'd consider other options like FHL transfer or allografts, but for today, we'll focus on these primary methods.
- Patient Counseling: We've discussed the procedure, potential complications (especially wound healing issues and nerve injury), and the prolonged rehabilitation course with the patient.
- Tourniquet Placement: A pneumatic tourniquet is applied to the proximal thigh of the operative limb.
- Patient Positioning: Under general anesthesia, the patient is carefully positioned prone on the operating table.
- Ensure the ankles are clear of the operating table, allowing full range of motion, particularly maximal plantarflexion, which is crucial for tensioning our repair.
- Adequate padding must be placed under the chest, pelvis, and shins to prevent pressure injuries.
- The operative leg is prepped and draped in a sterile fashion, ensuring access to the entire lower leg and foot, and if a gracilis graft is planned, the medial thigh as well.
- Exsanguination and Tourniquet Inflation: The limb is thoroughly exsanguinated using an Esmarch bandage, and the tourniquet is inflated to 250 mmHg. This provides a bloodless field, critical for identifying delicate structures and ensuring precise dissection. The time of inflation is noted.
Step-by-Step Intraoperative Execution: The Operating Surgeon's Viewpoint
Alright team, let's begin. Scalpel, please.
The Standard Approach to the Achilles Tendon
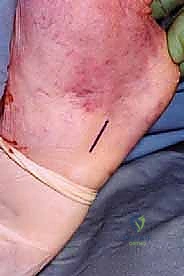
We're employing a 10- to 12-cm curvilinear skin incision, positioned medial to the medial border of the Achilles tendon. This trajectory is specifically chosen to avoid the superficial course of the sural nerve, which typically lies more laterally.
- Skin Incision: I'll make a precise, curvilinear incision through the skin.
- Subcutaneous Dissection: Now, carefully, we'll carry out sharp dissection through the subcutaneous fat down to the paratenon.
- Surgical Warning:
> Maintain thick skin flaps. This is absolutely vital. Thin skin flaps are highly susceptible to necrosis and wound breakdown, a notorious complication in Achilles surgery. Use gentle retraction and avoid excessive undermining.
- Surgical Warning:
- Paratenon Incision: If the paratenon is present and viable, we'll incise it longitudinally in the midline, along the length of our skin incision. In many chronic cases, however, the paratenon may be disrupted, scarred, or absent.
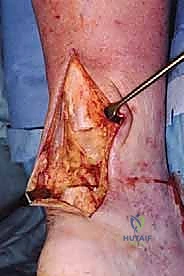
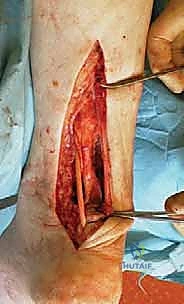
- Exposing the Ruptured Tendon: We'll gently retract the skin and subcutaneous tissues to expose the scarred rupture site.
Repair of Chronic Achilles Tendon Rupture with Peroneus Brevis Transfer (for defects < 9 cm)
This is our preferred method for moderate defects.
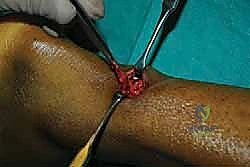
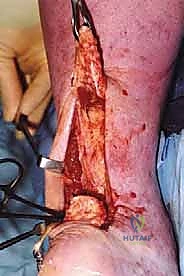
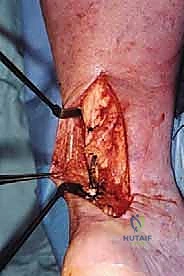
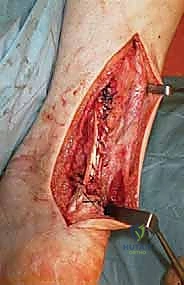
- Débridement of Achilles Tendon Ends: Now, observe how we meticulously débride the ruptured Achilles tendon ends. We'll use a no. 15 blade and fine scissors to excise all fibrous, non-functional scar tissue until we reach healthy, bleeding tendon tissue in both the proximal and distal stumps.
- Surgical Warning:
> Do not skimp on débridement. Leaving devitalized or scarred tissue will compromise the strength and healing potential of our repair. We need to create a clean, fresh defect. - Assessing the Defect: Once débrided, we can accurately assess the true defect size. Gently apply continuous traction to the proximal stump to mobilize it distally into the wound.
- Surgical Warning:
* TECH FIG 1 • Repair of chronic Achilles tendon rupture with peroneus brevis. A. Tendon ends are débrided to demonstrate true defect. B. Proximal stump mobilized into wound.
- Harvesting the Peroneus Brevis Tendon:
- Distal Incision: We'll make a separate 2.5-cm longitudinal incision directly over the base of the fifth metatarsal. This is the insertion point of the peroneus brevis.
- Distal Incision: We'll make a separate 2.5-cm longitudinal incision directly over the base of the fifth metatarsal. This is the insertion point of the peroneus brevis.
* TECH FIG 1 • (continued) C. Incision made over insertion of peroneus brevis on the base of the fifth metatarsal.
* Identifying Peroneal Tendons: Through this incision, we'll identify the peroneal tendons. Remember, the peroneus brevis lies deep and medial to the peroneus longus at this level, but it is muscular more distally than the peroneus longus.
* Deep Fascia Incision: The deep fascia overlying the peroneal tendons is incised to expose them.
* Detaching Peroneus Brevis: I'll place a stay suture (e.g., 2-0 FiberWire or similar non-absorbable suture) in the distal end of the peroneus brevis tendon. Then, using a no. 15 blade, we'll detach the tendon from its insertion on the base of the fifth metatarsal.
* TECH FIG 1 • (continued) D. Peroneus brevis insertion dissected.
* Proximal Mobilization: Now, we'll carefully mobilize the peroneus brevis tendon proximally through the original posteromedial Achilles wound.
* Surgical Pearl:
> We deliver the tendon using gentle, continuous traction. The key here is that the peroneus brevis tendon retains its blood supply from the intermuscular septum as it's pulled through the inferior peroneal retinaculum and proximally. This is a crucial advantage of this transfer.
* Internervous Plane: Remember, the internervous plane lies between the peroneus brevis (superficial peroneal nerve) and the flexor hallucis longus (tibial nerve). Our dissection follows this plane.
- Weaving the Peroneus Brevis Tendon through the Achilles Stumps:
- Distal Stump Passage: We'll make a small, transverse coronal incision (or two small medial and lateral incisions) in the distal Achilles stump. I'll pass the peroneus brevis tendon through this distal stump, from lateral to medial.
- Distal Stump Passage: We'll make a small, transverse coronal incision (or two small medial and lateral incisions) in the distal Achilles stump. I'll pass the peroneus brevis tendon through this distal stump, from lateral to medial.
* TECH FIG 1 • (continued) E. Tendon passed from lateral to medial in distal stump.
* Securing the Distal Weave: Now, we'll suture the edges of the coronal incisions in the Achilles tendon to the peroneus brevis tendon using 2-0 or 3-0 Vicryl. This prevents the incision from propagating and the peroneal tendon from cutting out.
* Proximal Stump Passage: Next, with the foot held in maximal plantarflexion to reduce tension on the repair, we'll pass the peroneus brevis tendon through the proximal Achilles stump, this time from medial to lateral.
* TECH FIG 1 • (continued) F. Tendon passed from medial to lateral in proximal stump.
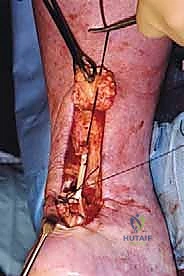
* Final Tensioning and Fixation: We'll tension the peroneus brevis graft appropriately, ensuring a firm, isometric repair. Then, we'll suture the peroneal tendon to the Achilles tendon at each entry and exit point using 2-0 or 3-0 Vicryl (Polyglactin 910 braided absorbable suture). This creates a robust weave and augments the repair.

* TECH FIG 1 • (continued) G. Completed repair.
Free Gracilis Tendon Graft for Chronic Ruptures (for defects > 9 cm)
For larger defects, we need a free graft, and the gracilis is an excellent choice due to its length and strength.
- Achilles Tendon Exposure and Débridement:
- We'll make a 12- to 15-cm longitudinal, slightly curvilinear skin incision medial and anterior to the medial border of the Achilles tendon, similar to our previous approach, again carefully protecting the sural nerve.
- If the paratenon is viable, it's incised longitudinally. Otherwise, we proceed directly to the rupture site.
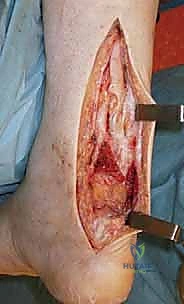
- As before, we meticulously excise all scar tissue from both the proximal and distal Achilles stumps until we reach healthy, bleeding tendon.
- Gentle, continuous traction is applied to the proximal stump to further deliver it into the wound and assess the true defect size.
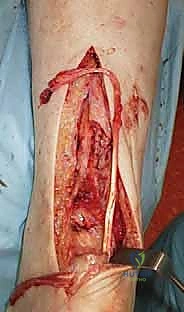
* TECH FIG 2 • Repair of chronic Achilles tendon rupture with gracilis tendon graft. A. Tendon ends débrided to reveal true defect.
* Surgical Pearl:
> If the remaining gap is still substantial, even after maximal plantarflexion and proximal stump mobilization, and exceeds 9 cm, we proceed with the gracilis harvest.
- Harvesting the Gracilis Tendon:
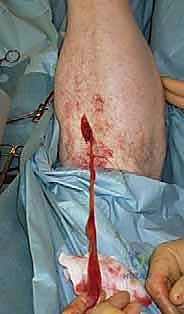
- Harvest Site Incision: We'll make a 2- to 3-cm vertical longitudinal incision on the medial aspect of the tibial tuberosity, centered over the distal insertion of the pes anserinus.
- Dissection to Sartorius Fascia: Carry out dissection deep to the fat, both medially and superiorly, using a small swab on an artery forceps to expose the sartorius fascia.
- Identifying Gracilis: Insert a curved retractor. Make a curved incision, approximately 1 cm long, along the superior margin of the pes anserinus into the sartorius fascia. Take extreme care to avoid the saphenous nerve, which runs superficially in this region.
- Creating a Window: Use blunt dissection with Mackenrodt scissors to create a window within the superior border of the sartorius, allowing access to the gracilis tendon. The gracilis tendon lies more superiorly than the neighboring semitendinosus tendon.
- Retrieval and Release: We'll use a curved Moynihan clip to retrieve the gracilis tendon. As the tendon is brought into the wound, an arthroscopic probe can help identify any proximal vincula (vascular attachments). These vincula must be meticulously sectioned to achieve full distal traction on the tendon.
- Diathermy: A venous plexus is often encountered at the distal end of the wound. Ensure careful diathermy for hemostasis.
- Complete Release Check: Before using the tendon stripper, all attachments to the tendon must be completely released. An assistant will place their hand over the calf and apply firm longitudinal traction. The absence of calf tethering confirms the complete release of remaining tendinous attachments.
- Tendon Stripper: Harvest the gracilis tendon with the tendon stripper, directing the instrument precisely in line with the tendon fibers, parallel to the thigh.
* TECH FIG 2 • (continued) B. Gracilis harvested.
* Back Table Preparation: Once harvested, the gracilis tendon is transferred to the back table, where it's meticulously freed of any remaining fat or muscle fibers.
- Weaving the Gracilis Tendon Graft through the Achilles Stumps:
- Distal Stump Passage: We'll make a small transverse incision in the distal stump of the Achilles tendon with a no. 11 scalpel blade. The gracilis tendon is then passed through this incision from medial to lateral.
- Distal Stump Passage: We'll make a small transverse incision in the distal stump of the Achilles tendon with a no. 11 scalpel blade. The gracilis tendon is then passed through this incision from medial to lateral.
* TECH FIG 2 • (continued) C. Tendon passed from medial to lateral in distal stump.
* Proximal Stump Passage: Next, with the foot held in maximal plantarflexion, the gracilis tendon is pulled proximally and passed through a small incision in the substance of the proximal Achilles stump, in a lateral-to-medial direction.
* TECH FIG 2 • (continued) D. Tendon passed from lateral to medial in proximal stump.
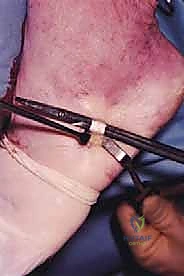
* Final Tensioning and Fixation: Before fully securing the graft, we ensure the foot is maximally plantarflexed to set the correct tension. The gracilis tendon is then firmly sutured to the Achilles tendon at each entry and exit point using 2-0 or 3-0 Vicryl (Polyglactin 910 braided absorbable suture).
* TECH FIG 2 • (continued) E. Completed repair.
* Augmentation (Optional): If there's a very large defect, and if present, the plantaris tendon can be harvested and used to reinforce the reconstruction.
Wound Closure
- Paratenon Closure: If the paratenon is present and viable, we'll carefully close it over the proximal stump using 2-0 Vicryl. This provides an additional layer of soft tissue coverage and can aid healing.
- Subcutaneous Closure: The subcutaneous fat layer is closed with a continuous 2-0 subcuticular Vicryl suture.
- Skin Closure: The skin is closed with a continuous 2-0 subcuticular Vicryl suture for a cosmetic finish.
- Dressing: Steri-Strips are applied, and the wound is dressed with sterile gauze.
Tourniquet Deflation
The tourniquet is now deflated, and the time is recorded. We'll observe the wound for any significant bleeding and achieve meticulous hemostasis.
💡 Pearls and Pitfalls
-
Preoperative Imaging:
> Imaging is not just useful, it's CRITICAL for confirming the diagnosis, precisely measuring the tendon gap, and thus determining the appropriate surgical strategy (peroneus brevis vs. gracilis). Don't rely solely on clinical exam for chronic cases. -
Indications for Graft Choice:
> Peroneus Brevis Transfer: Recommended for Achilles tendon defects less than 9 cm. It offers local tissue, retains its blood supply, and minimizes donor site morbidity.
> Free Gracilis Graft: Indicated for defects greater than 9 cm. Provides substantial length and strength, but requires a separate donor site and is a free graft, meaning initial revascularization is required. -
Patient Positioning:
> Prone position with thigh tourniquet and ankles clear of the table is non-negotiable. This allows full access to the posterior leg and permits maximal plantarflexion during graft tensioning, which is crucial for setting the correct length and avoiding overtensioning. -
Incision Placement:
> Our curvilinear approach, medial and anterior to the medial border of the Achilles tendon, is designed to significantly reduce the likelihood of sural nerve injury. The sural nerve is notoriously vulnerable with straight midline or lateral approaches. Always identify and protect it. -
Maintaining Skin Flap Viability:
> Surgical Warning:
> > Always raise thick skin flaps during your dissection. Aggressive or thin flap dissection will compromise the blood supply, leading to wound dehiscence or necrosis, a devastating complication in this region. Use gentle retraction and avoid excessive undermining. -
Gracilis Harvesting:
> Complete release of all attachments to the gracilis tendon is paramount before using the tendon stripper. Failure to do so can lead to an incomplete harvest, damage to the tendon, or injury to surrounding structures. Confirm release by applying traction and checking for calf tethering. Protect the saphenous nerve at the pes anserinus. -
Tensioning the Repair:
> Surgical Pearl:
> > When securing either the peroneus brevis or gracilis graft, ensure the foot is held in maximal plantarflexion. This allows the graft to be tensioned appropriately without being too tight, which could lead to restricted dorsiflexion postoperatively or compromise the repair. -
Intraoperative Complications & Salvage:
> * Sural Nerve Injury: If identified intraoperatively, primary repair with fine microsutures (e.g., 8-0 nylon) should be attempted. Postoperatively, manage with neuropathic pain medication and consider nerve blocks.
> * Inadequate Débridement: If devitalized tissue is suspected, extend débridement until healthy, bleeding tendon is observed. This might necessitate a larger graft.
> * Graft Pull-out: If sutures pull through the Achilles tendon stumps during tensioning, consider reinforcing with additional sutures, using larger bite sutures, or employing anchor devices in the calcaneus or tibia if the stump quality is very poor.
> * Wound Dehiscence: Manage with local wound care, debridement, and potentially vacuum-assisted closure (VAC) therapy. If severe, rotational flaps or free tissue transfer may be necessary.
Postoperative Care and Rehabilitation Protocol
Fellows, our work isn't done until the patient is safely through their rehabilitation. This is a critical phase for the success of our reconstruction.
-
Immediate Postoperative Care:
- Cast Application: Before the patient leaves the operating table, a below-knee plaster-of-Paris cast is applied with the ankle in maximal equinus (plantarflexion). This position minimizes tension on the repair.
- Elevation: The operated leg is kept elevated until discharge to minimize swelling.
- Crutch Training: Patients are taught to use crutches by an orthopaedic physiotherapist.
- Discharge: Patients are typically discharged the day after surgery.
-
Thromboprophylaxis:
- We provide thromboprophylaxis with Fragmin 2500 units (dalteparin sodium) subcutaneously once daily, or with 150 mg acetylsalicylic acid orally daily, continuing until the removal of the cast. This is crucial to prevent deep vein thrombosis (DVT).
-
Weight-Bearing Status:
- Patients are instructed to bear weight on the operated leg as able, but to keep it elevated as much as possible at home for the first 2 postoperative weeks. This allows for controlled loading while prioritizing wound healing and edema reduction.
-
Rehabilitation Progression:
-
Week 2 Postoperatively:
- The initial plaster cast is removed.
- A synthetic anterior below-knee slab is applied, maintaining the foot in maximal equinus. This slab is secured with three or four removable Velcro straps.
- A trained physiotherapist begins supervising gentle mobilization exercises of the ankle, isometric contraction of the gastrocsoleus complex, and gentle concentric contraction of the calf muscles. Inversion and eversion of the ankle are also encouraged to maintain subtalar and transverse tarsal joint mobility.
-
Weeks 2-6 Postoperatively:
- The patient continues using the removable anterior slab.
- Gradual increase in weight-bearing is encouraged as comfort allows.
- Physiotherapy progresses with increasing intensity of isometric and gentle concentric exercises. The goal is to gradually restore muscle activation without putting undue stress on the healing tendon.
-
Week 6 Postoperatively:
*
-
REFERENCES
-
Nellas ZJ, Loder BG, Wertheimer SJ. Reconstruction of an Achilles tendon defect utilizing an Achilles tendon allograft. J Foot Ankle Surg 1996;35:144–148.
-
Perez-Teuffer A. Traumatic rupture of the Achilles tendon: reconstruction by transplant and graft using the lateral peroneus brevis. Orthop Clin North Am 1974;5:89–93.
-
Pintore E, Barra V, Pintore R, et al. Peroneus brevis tendon transfer in neglected tears of the Achilles tendon. J Trauma 2001;50: 71–78.
-
Simmonds FA. The diagnosis of the ruptured Achilles tendon. Practitioner 1957;179:56–58.
-
Turco V, Spinella AJ. Achilles tendon ruptures: peroneus brevis transfer. Foot Ankle 1987;7:253–259.
-
Williams PL. Gray’s Anatomy, 38th ed. Edinburgh: Churchill Livingstone, 1995.
-
Young J, Sayana MK, Maffulli N, et al. Technique of free gracilis tendon transfer for delayed rupture of the Achilles tendon. Tech Foot Ankle Surg 2005;4:148–153.
-
Young JS, Sayana MK, McClelland D, et al. Peroneus brevis tendon transfer for delayed Achilles tendon ruptures. Tech Foot Ankle Surg 2005;4:143–147.
-
Gallant GG, Massie C, Turco VJ. Assessment of eversion and plantar flexion strength after repair of Achilles tendon rupture using peroneus brevis tendon transfer. Am J Orthop 1995;24:257–261.
-
Jennings AG, Sefton GK. Chronic rupture of tendo Achilles: longterm results of operative management using polyester tape. J Bone Joint Surg Br 2002;84B:361–363.
-
Maffulli N. Clinical tests in sports medicine: more on Achilles tendon. Br J Sports Med 1996;30:250.
-
Maffulli N. Rupture of the Achilles tendon. J Bone Joint Surg Am 1999;81A:1019–1036.
-
Maffulli N, Leadbetter WB. Free gracilis tendon graft in neglected tears of the Achilles tendon. Clin J Sport Med 2005;15:56–61.
-
Matles AL. Rupture of the tendo Achilles: another diagnostic sign. Bull Hosp Joint Dis 1975;36:48–51.
-
McClelland D, Maffulli N. Neglected rupture of the Achilles tendon: reconstruction with peroneus brevis tendon transfer. Surgeon 2004;2: 209–213.
-
Miskulin M, Miskulin A, Klobucar H, et al. Neglected rupture of the Achilles tendon treated with peroneus brevis transfer: a functional assessment of 5 cases. J Foot Ankle Surg 2005;44:49–56.
You Might Also Like