Open Reduction and Internal Fixation of Phalangeal Condylar Fractures: An Intraoperative Masterclass

Key Takeaway
Join us in the OR for a masterclass on phalangeal condylar fracture fixation. We'll meticulously cover hand anatomy, precise reduction techniques, K-wire and screw application, and crucial intraoperative decision-making. Learn to manage complex patterns and prevent complications for optimal patient outcomes, ensuring early mobilization and functional restoration.
Alright, fellows, gather 'round. Welcome to the operating theater. Today, we're tackling a challenging but critical injury: a phalangeal condylar fracture. These seemingly small fractures can lead to devastating long-term functional deficits if not managed meticulously. Our goal is always the same for intra-articular fractures: anatomic reduction, rigid fixation, and early mobilization.
Comprehensive Surgical Anatomy
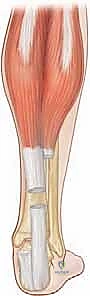
Let's begin by reviewing the intricate anatomy of the finger, specifically around the proximal interphalangeal (PIP) joint, which is most commonly affected.
Osteology and Articular Surface
The condyles of the proximal and middle phalanges form the articular surface of the PIP joint. These condyles are highly specialized, allowing for both flexion-extension and minimal rotational movement. The trochlear shape of the condyles, with its central groove and two condylar prominences, dictates the kinematics of the joint.
Ligamentous Structures
The stability of the PIP joint is primarily conferred by:
* Collateral Ligaments: These are crucial. Each PIP joint has two main collateral ligaments:
* Proper Collateral Ligament: Originates from the dorsal aspect of the proximal phalanx condyle and inserts into the volar aspect of the base of the middle phalanx. It's taut in flexion, providing stability.
* Accessory Collateral Ligament: Originates from the proximal phalanx condyle, volar to the proper collateral, and inserts into the volar plate. It's taut in extension.
* These ligaments, along with their associated periosteal sleeve, provide the primary soft tissue attachment to the condylar fragments.
* Volar Plate: A thick fibrocartilaginous structure on the volar aspect, reinforcing the joint capsule. It resists hyperextension and provides a stable surface for the flexor tendons.
* Extensor Mechanism: Dorsally, we have the extensor digitorum communis tendon, which trifurcates into a central slip inserting onto the middle phalanx and two lateral bands that rejoin to form the terminal tendon inserting onto the distal phalanx. The lateral bands are critical, as our approaches often navigate around or through them.
Neurovascular Anatomy
- Digital Arteries and Veins: The proper digital arteries and veins run along the midaxial line of each finger, volar to the collateral ligaments, supplying the condyles via small branches that travel intimately with the collateral ligaments.
- Digital Nerves: The proper digital nerves accompany the arteries and veins, also running midaxially.
- Surgical Warning:
> FATAL PITFALL: Disruption of these delicate neurovascular structures or excessive stripping of soft tissue attachments from small fracture fragments can compromise blood supply, leading to avascular necrosis (AVN) of the fragment, nonunion, or permanent sensory deficits. Always prioritize preserving these vital structures. - Muscular Intervals: Our approaches will utilize intervals between the central slip and lateral bands dorsally, or a midaxial plane to avoid direct injury to the extensor mechanism and neurovascular bundles.
Preoperative Planning & Patient Positioning
Thorough preoperative planning is paramount. It’s not just about looking at X-rays; it's about anticipating every step.
Patient History and Physical Findings
Our typical patient is often a young, active individual, like a 24-year-old male baseball player, who sustained an angular impact to the finger. These fractures can be subtle. The patient might still be able to bend the finger, and the fracture line itself can be deceptively benign on initial radiographs. However, even seemingly nondisplaced fractures have a high propensity for secondary displacement, which can lead to painful arthritic changes and rotational malalignment.
Key Clinical Assessments:
* Joint Subluxation: This is an absolute indication for surgical intervention. Assess carefully both clinically and radiographically.
* Rotational Deformity: With any displacement, a rotational deformity is common. The best way to assess this is to look end-on at the digit or evaluate the position of the fingernail in full PIP flexion.
* Angular Deformity: Subtle joint depression can lead to angular deformity. This is best assessed by examining the fingers in full extension, noting any scissoring or malalignment.
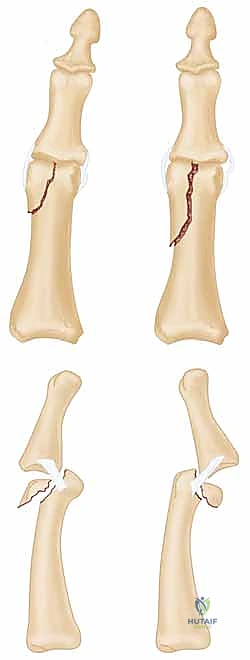
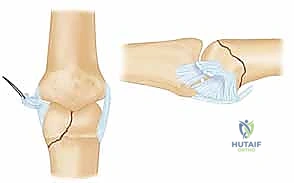
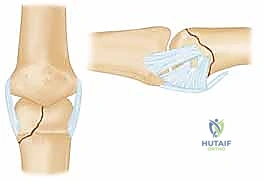
FIG 1 • Direction of applied force determines the fracture type.
Imaging and Diagnostic Studies
- Radiographs: Obtain multiple views – AP, true lateral, and oblique views are essential to fully characterize the fracture geometry. Fluoroscopy is incredibly helpful intraoperatively to get precise, real-time views.
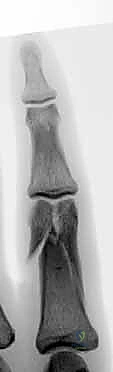
- CT Scans: Occasionally, a CT scan can be invaluable, especially for complex bicondylar or triplane fractures, or when there's significant comminution or articular depression, to fully understand the 3D architecture. Remember, osteochondral fragments often appear smaller than they are on plain films because cartilage is radiolucent. Hidden fracture lines are common and may only become apparent during surgery.
Fracture Classification and Fixation Strategy (Table 1)
The fracture pattern dictates our fixation strategy.
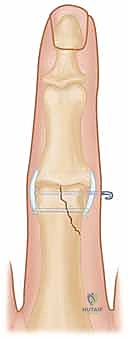
* Type I (Unicondylar, Short Oblique): Unstable. Often requires K-wires or small screws.
* Type II (Unicondylar, Long Oblique): Unstable, but often easier to fix than Type I. Screws are usually preferred for better stability.
* Type III (Dorsal Coronal): Can be stable (non-op/excision) or unstable with subluxation (K-wires/screws).
* Type IV (Triplane-Type Bicondylar): Highly unstable. Usually requires open reduction and dorsal-to-volar screws.
* Type V (Bicondylar): Highly unstable. Requires open reduction with screws, plates, or K-wires.
Surgical Goals (AO Principles):
1. Anatomic reduction of the articular surface.
2. Restoration of stability to allow early motion.
3. Minimizing soft tissue injury to prevent stiffness.
4. Early, protected mobilization to preserve joint function.
Patient Positioning and OR Setup
- Patient Position: Supine on the operating table.
- Arm Position: The affected arm will be placed on a specialized hand table, typically with a padded arm board. Ensure the arm is abducted and externally rotated comfortably.
- Tourniquet: A pneumatic tourniquet will be applied to the upper arm. We'll inflate it to 250 mmHg after exsanguination with an Esmarch bandage. This provides a bloodless field, which is critical for visualizing small fragments and delicate structures.
- Fluoroscopy: A mini C-arm is indispensable. It should be draped sterilely and positioned to allow easy access for AP, lateral, and oblique views without repositioning the patient or the hand. The surgeon and assistant should be able to view the monitor clearly.
- Traction (Optional): If an assistant is unavailable, or for particularly difficult reductions, finger-trap traction can be applied to the affected digit to help with ligamentotaxis. This is achieved by suspending the hand from an IV pole with finger traps on the affected and adjacent digits, providing gentle, sustained traction.
Step-by-Step Intraoperative Execution: The Operating Surgeon's Viewpoint
Alright, fellows, we're scrubbed in and ready. Let's get this done precisely.
Anesthesia and Initial Assessment
- Anesthesia: General anesthesia is preferred for these cases, allowing for complete muscle relaxation.
- Fluoroscopic Examination Under Anesthesia: Before incision, let's bring in the C-arm. I want to perform a fluoroscopic examination under anesthesia. This gives us a dynamic sense of joint stability and confirms the fracture fragment orientation. We'll stress the joint gently to assess stability and confirm any subluxation. This is also our last chance to confirm our planned approach and fixation strategy.
Surgical Approach: Choosing Wisely
The choice of approach is dictated by the fracture pattern and the need for exposure. Our primary goal is always minimal soft tissue disruption.
For Unicondylar Fractures (Types I, II, III)
- Dorsal-Lateral Approach (Preferred): This is my go-to for most unicondylar fractures.
- Incision: We'll make a slightly curvilinear dorsal-lateral incision over the PIP joint, extending approximately 1-1.5 cm proximal and distal to the joint line.
- Incision: We'll make a slightly curvilinear dorsal-lateral incision over the PIP joint, extending approximately 1-1.5 cm proximal and distal to the joint line.
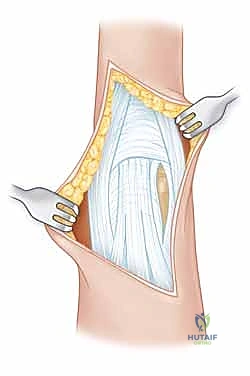
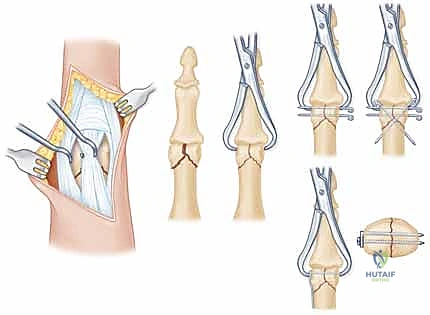
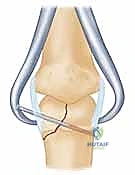
FIG 3 • A dorsal-lateral incision ( A ) with dissection between the lateral band and extensor mechanism ( B ) provides excellent exposure.
* Dissection: Carefully incise the skin and subcutaneous tissue. Identify the extensor mechanism. We will then dissect meticulously between the central slip and the lateral band. Use fine iris scissors or a small scalpel (15 blade) to create this interval.
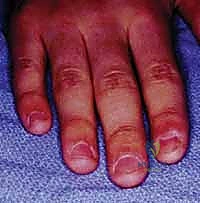
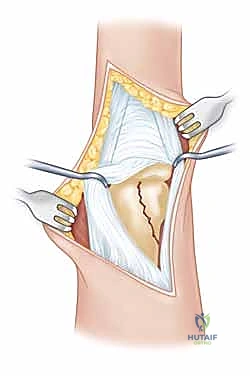
FIG 3 • A dorsal-lateral incision ( A ) with dissection between the lateral band and extensor mechanism ( B ) provides excellent exposure.
* Joint Capsule: Once the interval is created, carefully incise the joint capsule longitudinally to expose the fracture site. Use small retractors (e.g., Senn retractors) to gently spread the tissues and visualize the condylar fragment.
* Surgical Warning:
> CRITICAL PEARL: Always avoid stripping the small fracture fragments of their soft tissue attachments. These attachments carry the vital blood supply. Extensive stripping can lead to avascular necrosis and nonunion.
- Midaxial Approach: This approach is an alternative, especially if significant joint incongruity or comminution is absent. It aims to minimize extensor mechanism scarring.
- Incision: A straight midaxial incision along the side of the finger.
- Dissection: Dissect down to the collateral ligament and joint capsule, carefully retracting the neurovascular bundle volarly.
- Joint Capsule: Incise the capsule along the collateral ligament.
For Bicondylar or Triplane Fractures (Types IV, V)
These require a more global joint and fragment exposure.
* Dorsal Approach with Extensor Mechanism Modification:
* Incision: A dorsal, slightly curvilinear incision is made.
* Extensor Mechanism: To gain wider exposure, the extensor tendon may be split longitudinally in the midline. Alternatively, and often preferably, incisions can be made on its borders, allowing mobilization of the entire extensor mechanism as a flap.
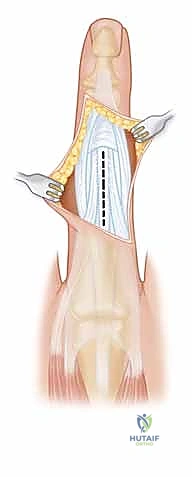
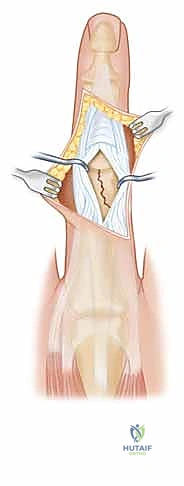
FIG 4 • A dorsal-lateral incision ( A ) with midline incision in the extensor mechanism ( B ) can provide additional exposure if needed.
* Repair: This approach requires careful repair of the extensor mechanism at the end of the case to restore function.
- Volar Approach (Rare, for Volar Coronal Shear Fractures): This is rarely used but necessary for specific volar coronal shear fractures.
- Incision: A Brunner-style volar zigzag incision provides excellent exposure while preventing contracture.
- Dissection: Retract the flexor tendons and their sheaths carefully.
- Volar Plate: If needed, reflect the volar plate. This can be done as a triangle-shaped flap, reflecting it on one side and a little up the lateral edge. For more complete exposure, make a transverse incision along the proximal edge of the volar plate, ensuring enough proximal cuff remains for reattachment. Elevate the volar plate on a distal hinge, repair the fracture, and then reattach the volar plate securely at the end.
Fracture Reduction: The Art of Manipulation
Now, the critical phase: achieving an anatomic reduction. This requires patience and precision.
- Initial Maneuvers (Percutaneous Attempt First):
- Ligamentotaxis: Apply gentle traction and rotation to the distal aspect of the finger. This can sometimes help align the fragments through the tension of the intact collateral ligaments and volar plate.
- Ligamentotaxis: Apply gentle traction and rotation to the distal aspect of the finger. This can sometimes help align the fragments through the tension of the intact collateral ligaments and volar plate.
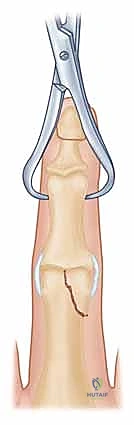
* Percutaneous Manipulation: For smaller, less displaced fragments, we can attempt percutaneous manipulation. Use a fine dental pick or a small blunt probe inserted through a tiny stab incision. Gently maneuver the fragment into reduction under constant fluoroscopic guidance.
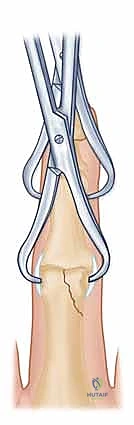
* Pointed Reduction Clamp: If the dental pick isn't enough, consider a pointed reduction clamp. Make a small stab incision, insert one prong into the stable condyle, and then carefully guide the other prong into the fracture fragment. With gentle, controlled rotation of the clamp, attempt to reduce the fragment.
* Surgical Warning:
> PITFALL: Resist the urge to use excessive clamp compression to force a reduction. These small fragments are delicate and can easily shatter, especially if comminuted. Gentle, precise manipulation is key.
* K-wire Joystick: If the fragment is large enough, a 0.035 K-wire can be used as a joystick to manipulate it into place. Drive the K-wire into the fragment, then use it as a handle to rotate and translate the fragment.
- Open Reduction: If closed or percutaneous methods fail, proceed to open reduction through one of the previously described approaches.
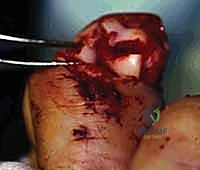
- Direct Visualization: With direct visualization, use small blunt hooks, dental picks, or a small periosteal elevator to meticulously reduce the fragment. Ensure perfect articular congruence.
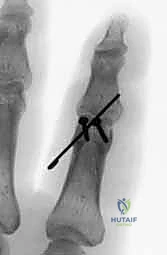
- Fluoroscopic Confirmation: Once you believe reduction is achieved, bring in the C-arm. Obtain AP, lateral, and oblique views to confirm the reduction. The view that best shows the original displacement will best confirm the reduction.
Temporary Fixation: Holding the Reduction
Once an anatomic reduction is achieved, we must hold it securely while applying definitive fixation.
* Pointed Reduction Clamp: A small pointed reduction clamp can be applied directly to the fragment and the main shaft to hold the reduction.
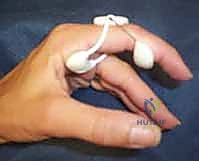
* Temporary K-wire: A small 0.028-inch or 0.035-inch K-wire can be drilled across the fracture line to temporarily stabilize the reduction. This temporary K-wire can later be removed, and its hole can sometimes be utilized for a definitive screw.
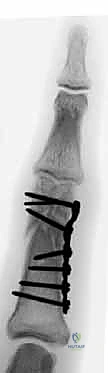
Definitive Fixation: K-wires vs. Screws
The choice between K-wires and screws depends on fragment size, comminution, and surgeon preference. In our practice, if we can achieve a percutaneous reduction, we often prefer multiple K-wires. If we have to open the joint, we lean towards the superior stability of screw fixation.
K-Wire Fixation
- Fragment Size: Use 0.028-inch K-wires. They are less likely to further fragment the bone and usually provide sufficient fixation.
- **
Additional Intraoperative Imaging & Surgical Steps
REFERENCES
-
Superficial heat (eg, fluidotherapy, moist heat, paraffin)
-
Ultrasound
-
Scar pad (eg, elastomere, Otoform K)
-
Iontophoresis with Iodex to soften scar
OUTCOMES
- In one series of 36 patients, the arc of motion of the PIP joint averaged 72 degrees with a 13-degree extensor lag. Patients with volar coronal fractures fared worse, with an average arc of 57 degrees. 5
-
Fixation must be secure enough to allow early motion.
-
Delay of motion of the hand by more than a few weeks significantly decreases final outcome. 2 Ideally, motion should be initiated in the immediate postoperative period.
-
Increases in motion may be obtained up to 1 year after the injury, although opportunity does decrease with time. 2
-
Dorsal capsulotomies and extensor tenolysis are options for patients lacking flexion.
-
Chin KR, Jupiter JB. Treatment of triplane fractures of the head of the proximal phalanx. J Hand Surg Am 1999;24:1263–1268.
-
Freeland AE, Benois LA. Open reduction and internal fixation method for fractures at the proximal interphalangeal joint. Hand Clinics 1994;10:239–250.
-
McCue FC, Honner R, Johnson MC, et al. Athletic injuries of the proximal interphalangeal joint requiring surgical treatment. J Bone Joint Surg Am 1970;52A:937–956.
-
O’Rourke SK, Gaur S, Barton NJ. Long-term outcome of articular fractures of the phalanges: an eleven year follow-up. J Hand Surg Br 1989;14:183–193.
-
Weiss APC, Hastings HH. Distal unicondylar fractures of the proximal phalanx. J Hand Surg Am 1993;18:594–599.
You Might Also Like