Mobility Total Ankle Arthroplasty: An Intraoperative Masterclass
Key Takeaway
Join us in the OR for a comprehensive masterclass on Mobility Total Ankle Arthroplasty. We'll meticulously cover patient selection, detailed surgical anatomy, critical preoperative planning, and a granular, real-time breakdown of every intraoperative step. Learn essential pearls, pitfalls, and post-operative management strategies to optimize patient outcomes in end-stage ankle arthritis.
Alright team, let's gather around. Today, we're performing a Mobility Total Ankle Arthroplasty (TAA) – a procedure that demands precision, a deep understanding of biomechanics, and meticulous soft tissue handling. This isn't just about replacing a joint; it's about restoring function to a complex, mitered hinge that is integral to the entire lower extremity kinetic chain.
Understanding the Indication: Why Are We Here?
First, let's review our patient. This 75-year-old gentleman presents with end-stage ankle arthritis, primarily post-traumatic, that has failed all nonoperative treatments. Remember, primary osteoarthrosis of the ankle is relatively rare compared to the hip and knee; post-traumatic arthrosis, often from intra-articular fractures, malunions, or chronic instability, is the most common etiology.
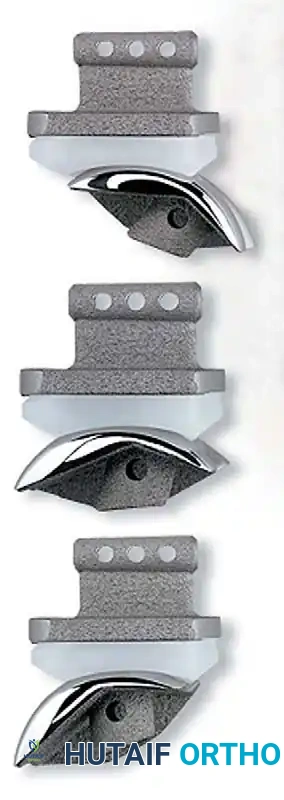
Our indications for a three-component, mobile-bearing TAA system like this one typically include:
* End-stage ankle arthritis unresponsive to conservative measures.
* Inflammatory arthropathy, such as rheumatoid arthritis, with progressive and proliferative synovial erosive changes that have failed medical management.
* Cases associated with chronic posterior tibial tendinopathy, leading to progressive valgus hindfoot deformity, eventual valgus tilt of the talus within the ankle mortise, potential lateral malleolar stress fractures, and compensatory forefoot varus.
We must always ensure our patient has satisfactory perfusion for healing and is not neuropathic, as established neuropathy or high risk of Charcot neuroarthropathy remains a contraindication. Intact motor function of the ankle and foot, particularly active dorsiflexion, is essential for a successful outcome.
Comprehensive Surgical Anatomy: A Refresher
Before we make a single incision, let's quickly review the critical anatomy. The ankle joint, or tibiotalar joint, is a highly congruent hinge joint.
- The Tibial Plafond: This is the distal articular surface of the tibia. It has a slight posterior slope in the sagittal plane. In the coronal plane, its articular surface is typically oriented 88 to 92 degrees relative to the lateral tibial shaft axis. The medial malleolus extends distally from the medial aspect of the plafond, articulating with the medial facet of the talus.
- The Fibula: The lateral malleolus, formed by the distal fibula, articulates with the lateral aspect of the talus. It plays a crucial role in ankle stability and bears approximately one-sixth of the axial load.
- The Talus: This unique bone has no muscular attachments. Approximately 60% of its surface area is covered by articular cartilage. The talar trochlea has a dual radius of curvature, wider anteriorly than posteriorly, which contributes to ankle stability in dorsiflexion. It articulates dorsally and medially with the tibial plafond and medially with the medial malleolus, and laterally with the lateral malleolus.
- The Distal Tibiofibular Syndesmosis: This strong fibrous joint, composed of the anterior inferior tibiofibular ligament (AITFL), posterior inferior tibiofibular ligament (PITFL), and the interosseous membrane, is vital for maintaining the integrity of the ankle mortise. We must be mindful of this complex when preparing our tibial cuts, ensuring we do not compromise its stability.
Neurovascular Structures and Muscular Intervals:
Our anterior approach requires a precise understanding of the neurovascular structures.
* Superficial Peroneal Nerve (SPN): This nerve lies subcutaneously, typically piercing the deep fascia in the distal leg to become superficial. It supplies sensation to the dorsum of the foot, except for the first web space. Its course is highly variable, and a consistent branch often crosses directly over or just proximal to the tibiotalar joint. Protection is paramount.
* Deep Peroneal Nerve (DPN): This nerve runs with the anterior tibial artery and vein (the deep neurovascular bundle) deep to the extensor retinaculum, between the tibialis anterior and extensor hallucis longus tendons. It innervates the tibialis anterior, extensor hallucis longus, extensor digitorum longus, and peroneus tertius muscles, and provides sensation to the first web space.
* Anterior Tibial Artery: This is the primary blood supply to the anterior compartment of the leg and dorsum of the foot (as the dorsalis pedis artery). It runs alongside the deep peroneal nerve.
* Muscular Intervals: Our approach utilizes the interval between the tibialis anterior (TA) tendon (medially) and the extensor hallucis longus (EHL) tendon (laterally). The TA is the primary dorsiflexor and medial invertor, while the EHL dorsiflexes the great toe and assists in ankle dorsiflexion.
Preoperative Planning: The Blueprint for Success
Preoperative planning is not just a formality; it's the bedrock of a successful TAA.
Imaging and Diagnostic Studies
We've meticulously reviewed our patient's imaging:
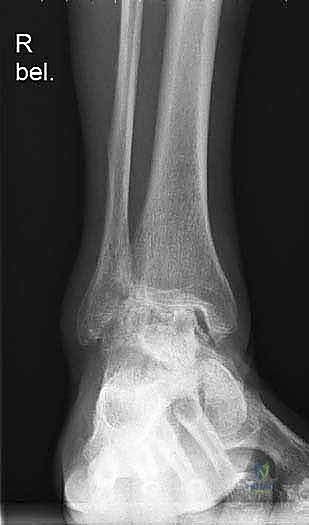
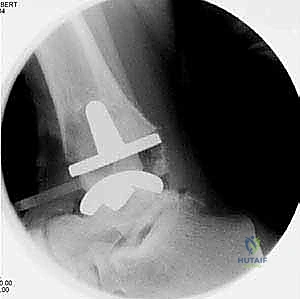
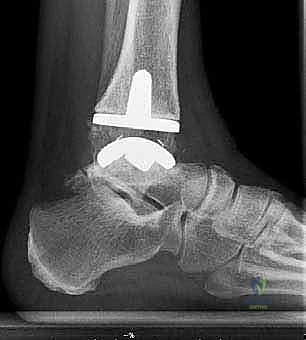
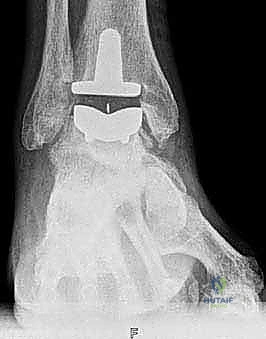
* Weight-bearing AP, lateral, and mortise views of the ankle: These are our foundational images. They reveal the extent of joint space narrowing, osteophyte formation, subchondral sclerosis, and any existing deformities in the coronal and sagittal planes.
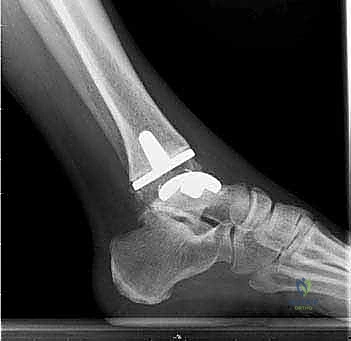
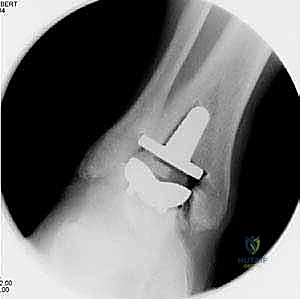
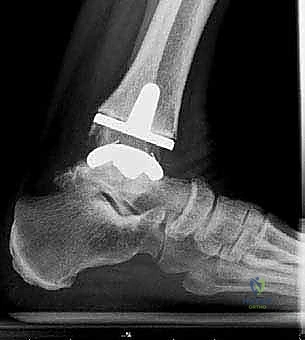
FIG 1 • Preoperative weight-bearing radiographs of a 75-year-old man with end-stage ankle arthritis. A. AP view of ankle.
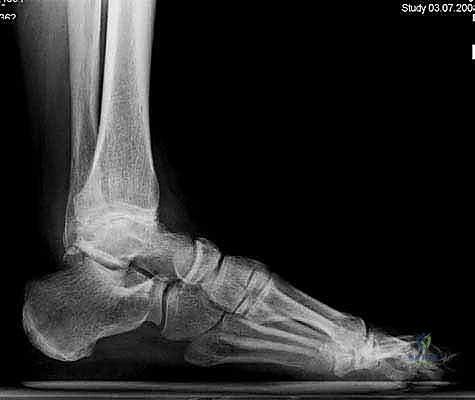
FIG 1 • Preoperative weight-bearing radiographs of a 75-year-old man with end-stage ankle arthritis. B. Lateral view of ankle.
* Weight-bearing mechanical axis (hip-to-ankle) views of both extremities: These are crucial. The ankle functions as part of a larger ankle-hindfoot complex. Optimal limb alignment from hip to foot is essential for implant longevity. We need to identify any proximal deformities that could lead to eccentric loading of the ankle implant.
* Weight-bearing AP, lateral, and oblique views of the foot: Especially important if we suspect associated foot deformities, which often need to be addressed concurrently or staged.
* CT scan of the ankle and hindfoot: For complex or ill-defined arthritis patterns, especially with deformity, a CT provides detailed bony anatomy, identifies malunions, and helps assess bone stock.
* MRI of the ankle: If we suspect avascular necrosis of the talus or distal tibia, an MRI is indispensable.
* Electrodiagnostic studies: Indicated if there's a lack of active dorsiflexion not attributable to Achilles contracture, posterior capsular tightness, or anterior impingement, to rule out neuropathy or nerve injury.
* Vascular studies (Doppler ultrasound, noninvasive studies): Absolutely mandatory if pulses are diminished or refill is unsatisfactory. We must confirm adequate perfusion to support wound healing and bone ingrowth.
Assessment of Alignment and Range of Motion
- Ipsilateral Limb Alignment: We've thoroughly examined the entire lower extremity, from hip to foot. We've determined whether the coronal plane alignment is passively correctable. This tells us if ligamentous releases or even corrective osteotomies of the distal tibia or foot, or hindfoot arthrodesis, might be required.
- Ankle-Foot Alignment: The total ankle needs a solid, well-aligned platform. Hindfoot, midfoot, and even forefoot malalignment must be recognized.
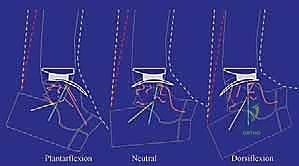
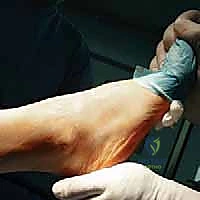
- Range of Motion (ROM): Preoperative ROM often dictates postoperative ROM. Our patient had significant stiffness, particularly limited dorsiflexion.

FIG 2 • Preoperative weight-bearing radiographs of same patient in Figure 1. A. Preoperative dorsiflexion.
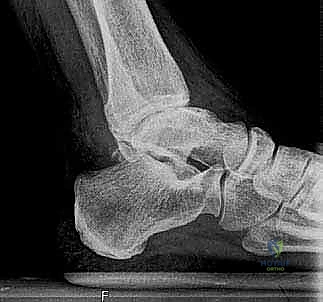
FIG 2 • Preoperative weight-bearing radiographs of same patient in Figure 1. B. Preoperative plantarflexion.
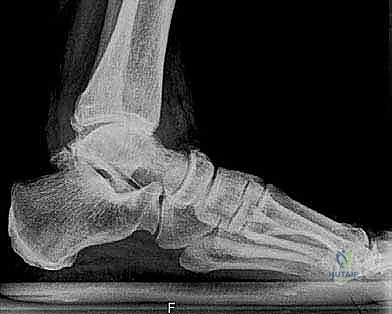
FIG 2 • (continued) C. Preoperative plantarflexion.
We've identified anterior tibiotalar osteophytes and some posterior capsular contracture as limiting factors. We anticipate needing to address these intraoperatively. A tight Achilles tendon would warrant a lengthening procedure, but in this case, it's not indicated.
Medications
- Anti-inflammatory agents: Our patient stopped NSAIDs preoperatively to limit perioperative bleeding risk.
- Rheumatoid medications: If our patient had inflammatory arthropathy, we would have considered stopping these perioperatively to optimize wound healing and bone ingrowth, in consultation with their rheumatologist.
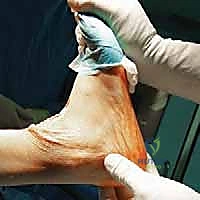
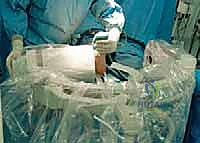
Patient Positioning and Anesthesia
Let's get our patient positioned.
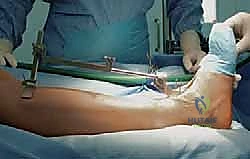
- Supine Position: Our patient is supine on the operating table.
- Foot Position: The plantar aspect of the operated foot is at the very end of the operating table, allowing for full range of motion and unimpeded access for instrumentation. The foot and ankle are well-balanced, with the toes directed straight to the ceiling, ensuring neutral rotation.
- Hip Bolster: Nurse, please confirm the bolster is securely placed under the ipsilateral hip. This prevents undesired external rotation of the hip and ensures the limb remains in a neutral alignment throughout the case.
- Tourniquet and Anesthesia: We are using a thigh tourniquet for a bloodless field, which is critical for visibility and precision. Our anesthesiologist has provided regional anesthesia with a popliteal block. This offers excellent postoperative pain relief, especially with a regional catheter. It also preserves hip and knee flexion-extension, facilitating early mobilization. If a popliteal block wasn't sufficient for tourniquet pain, a supplemental femoral nerve block or general anesthesia would be considered, though the femoral block would forfeit knee extension.
Surgical Management: The Intraoperative Masterclass
Now, let's scrub in. Dr. Smith, Dr. Jones, let's get started.
The Approach: Anterior Interval Dissection
1. Incision Planning and Skin Management:
"Alright team, let's begin. Dr. Smith, please mark our longitudinal midline incision over the anterior ankle. It will start approximately 10 cm proximal to the tibiotalar joint, about 1 cm lateral to the tibial crest, and extend distally just past the talonavicular joint. This length provides ample exposure for instrumentation and implant placement."
Surgical Warning: Always be mindful of skin tension. We perform deep, full-thickness retraction as soon as possible to limit the risk of skin complications. Direct tension on the skin margins can lead to wound dehiscence.
2. Deepening the Incision and Identifying Key Structures:
"Carefully incise the skin and subcutaneous tissue with a #10 blade. Meticulous hemostasis with bipolar cautery is essential at every layer to maintain a clear field."
3. Superficial Peroneal Nerve Protection:
"Now, fellows, let's identify and protect the superficial peroneal nerve. It’s crucial to locate this nerve early. It typically pierces the deep fascia proximally and courses distally. In our experience, there is a consistent branch that crosses directly over or immediately proximal to the tibiotalar joint. Dr. Jones, use fine blunt dissection to safely identify this nerve and gently retract it laterally with a vessel loop or small rake retractor. Its variability means we must be vigilant."
Surgical Warning: The superficial peroneal nerve is highly susceptible to injury during an anterior ankle approach. Inadvertent traction, direct transection, or even excessive cautery can lead to paresthesia, dysesthesia, or a painful neuroma. Always prioritize its protection.
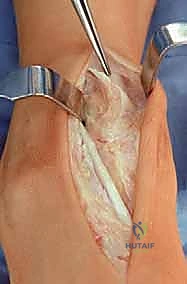
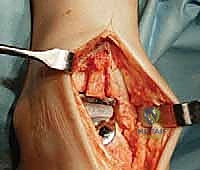
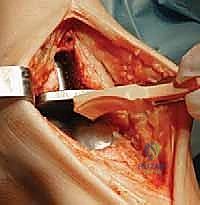
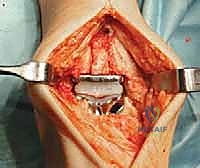
4. Extensor Retinaculum and Tendon Management:
"Next, we expose the extensor retinaculum. Identify the course of the extensor hallucis longus (EHL) tendon. We will sharply but carefully divide the retinaculum directly over the EHL tendon. Our goal is to use the interval between the tibialis anterior (TA) tendon and the EHL tendon."
"Dr. Smith, please retract the TA tendon medially. Dr. Jones, retract the EHL tendon laterally. We always attempt to maintain the TA tendon in its dedicated sheath. Preserving the retinaculum over the TA tendon helps prevent bowstringing of the tendon, which reduces stress on our anterior wound. Should there be a wound dehiscence, the TA tendon is not directly exposed. However, be aware that some patients do not have a dedicated sheath for the TA, making this more challenging."
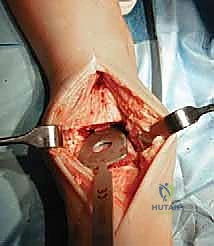
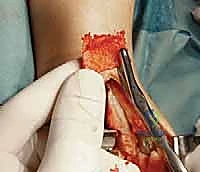
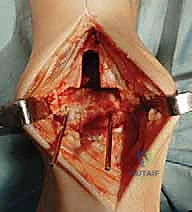
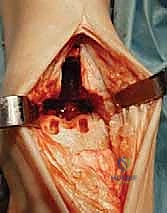
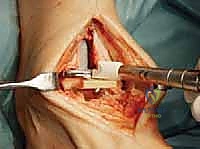
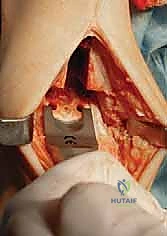
TECH FIG 1 • Anterior approach to the ankle. The interval between the tibialis anterior and extensor hallucis longus is used. The superficial peroneal nerve is retracted laterally.
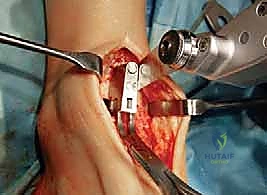
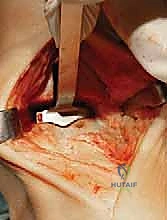
5. Deep Neurovascular Bundle Identification and Protection:
"As we deepen our dissection, we must be acutely aware of the deep neurovascular bundle – the anterior tibial artery and the deep peroneal nerve. These structures lie just lateral to the EHL tendon. Dr. Smith, use a blunt instrument, like a small Hohmann retractor or a right-angle, to carefully identify and retract this bundle laterally throughout the remainder of the procedure. Maintain constant vigilance to prevent any traction or direct injury."
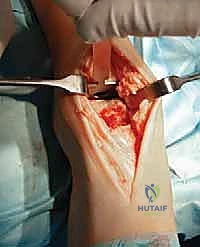
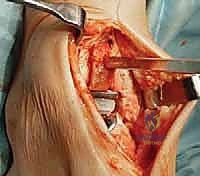
TECH FIG 1 • (continued) B. The deep neurovascular bundle is identified and retracted laterally.
Surgical Warning: Injury to the deep peroneal nerve can result in foot drop and loss of sensation in the first web space. Injury to the anterior tibial artery can lead to significant hemorrhage and compromise of distal perfusion. Always visualize and protect.
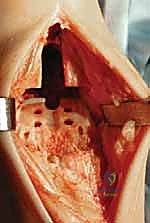
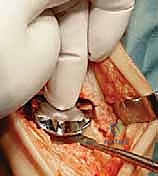
6. Capsulotomy and Periosteal Elevation:
"Now, we perform an anterior capsulotomy. Elevate the tibial and dorsal talar periosteum proximally, about 6 to 8 cm proximal to the tibial plafond, and distally to the talonavicular joint, respectively. Use a Cobb elevator for this, sweeping medially and laterally to expose the ankle joint, access the medial and lateral gutters, and visualize the medial and lateral malleoli. This broad exposure is crucial for accurate bony resection and implant placement."
7. Osteophyte Removal:
"Before we proceed with our cuts, we must remove any anterior tibial and talar osteophytes. These bony prominences can severely limit exposure and interfere with our instrumentation. Use a small oscillating saw or osteotome to carefully resect these. This step is critical for achieving adequate dorsiflexion postoperatively and ensuring proper seating of our guides."
TECH FIG 1 • (continued) C. Anterior osteophytes are removed.
External Tibial Alignment Guide
"Alright, now we move to our bony preparation, starting with the tibia. Precision here is non-negotiable for implant longevity and balanced kinematics."
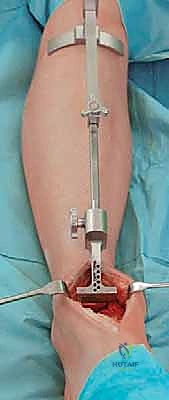
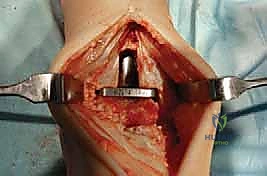
1. Positioning the Tibial Alignment Jig:
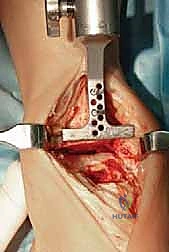
"Dr. Smith, let's bring in the external tibial alignment jig. Position it so that the clamp adjustment bar lies directly over the anterior crest of the tibia. Ensure the bar is parallel to the long axis of the tibia. In cases with significant deformity, we'll align it with the mechanical axis of the leg, referencing our preoperative templating."
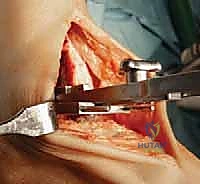
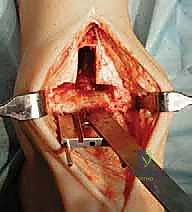
TECH FIG 2 • External tibial alignment guide parallel to the tibial shaft axis. A. Lateral view.
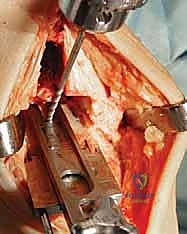
2. Stabilizing the Jig:
"The proximal end of this alignment jig is stabilized with a 2.5-mm stabilizing pin. Insert this carefully. Now, adjust the alignment to obtain proper positioning for the cutting block at the tibial plafond. The adjustment tube on the yoke post and the extending tibial rod should be perfectly parallel to the tibia."
TECH FIG 2 • (continued) B. Anterior view.
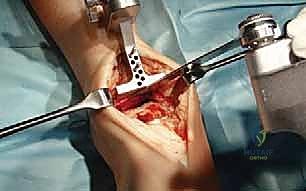
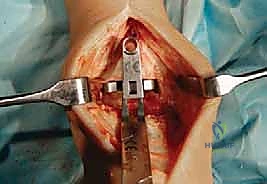
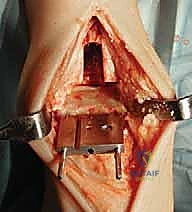
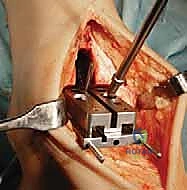
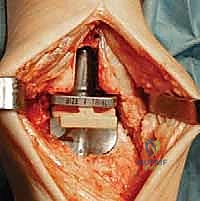
3. Referencing the Tibial Cutting Block:
"We reference the tibial cutting block to the medial and lateral sides of the talus. This helps ensure our cut is perpendicular to the mechanical axis and properly centered. Once satisfied with the position, drill two 2.5-mm pins through the guide holes to stabilize the tibial cutting block firmly to the tibia."
TECH FIG 2 • (continued) B. Anterior view.
TECH FIG 2 • (continued) C. Initial tibial preparation, cutting block set for initial resection.
"The configuration of these guide holes allows us to adjust the cutting block proximally or distally by increments of 2.5 mm. This is critical for optimizing the level of tibial resection, especially in cases with asymmetric wear."
Tibial Preparation: Initial Resection
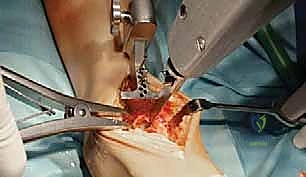
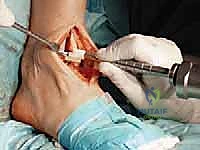
1. Performing the Initial Tibial Resection:
"Now, with our cutting block firmly in place, we'll perform the initial tibial resection using a small oscillating saw. Maintain constant irrigation to prevent thermal necrosis. Make a smooth, controlled cut."
TECH FIG 3 • Initial tibial preparation. A. Oscillating saw.
Surgical Warning: If there's an asymmetric wear pattern in the tibial plafond, the resection may not be perfectly congruent with the worn surface. However, the cut must be perpendicular to the tibial shaft axis or, with deformity, to the mechanical axis. Do not attempt to correct deformity with this initial cut; that will come later with implant balancing.
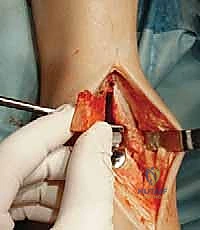
2. Protecting the Medial Malleolus:
"Before attempting to remove the resected tibial bone, perform a vertical tibial cut. This cut should be a vertical extension of the medial gutter of the ankle. This crucial step protects the medial malleolus from fracture during bone removal."
TECH FIG 3 • Initial tibial preparation. B. Vertical cut to complete initial tibial cut (protects medial malleolus from potential fracture).
Surgical Warning: Never lever on either malleolus while removing the resected bone. This is a common mechanism for iatrogenic malleolar fractures, which can severely compromise implant stability and lead to complications.
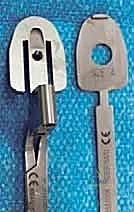
3. Assessing Resection Adequacy with the Gap Template:
"Once the initial bone is removed, use the gap template to confirm adequate tibial resection. This template matches the combined thickness of the tibial implant and the thinnest mobile polyethylene bearing. It should fit snugly into the resected space."
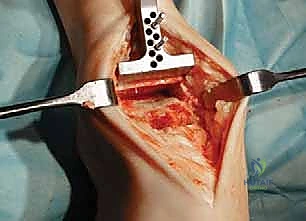
TECH FIG 3 • (continued) C. Gap template matches thickness of tibial base plate and the thinnest polyethylene bearing.
"If the guide does not fit, further bone resection is required. In our experience, for a stiff ankle like this one, we often need to resect an additional 2 or 3 mm of distal tibia beyond the minimum required to accommodate the combined implant thickness. This extra room facilitates easier balancing and insertion."
"If additional resection is needed, simply move the cutting block 2 mm more proximally on the same pins, maintaining the same plane as the initial cut. Then, repeat the resection."
TECH FIG 3 • (continued) D. Cutting block moved 2 mm more proximally on same pins to allow greater resection in same plane as initial cut.

TECH FIG 3 • (continued) E. Repeat resection.
Tibial Sizing
"Now that we have our initial tibial cut, let's determine the optimal tibial component size."
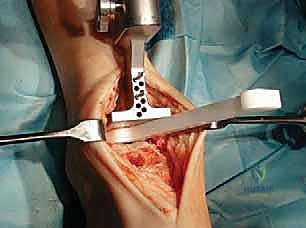
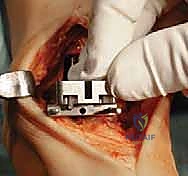
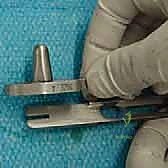
1. Using the Tibial Sizing Gauge:
"Dr. Jones, please bring in the tibial sizing gauge. Place it on the prepared tibial surface and hook it securely on the posterior aspect of the tibia. This gauge helps determine the optimal tibial component size in the AP dimension, based on the markings on its upper surface."
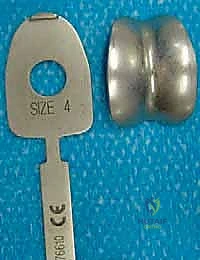
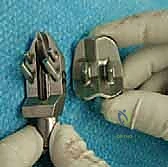
TECH FIG 4 • Tibial sizing. A. Tibial sizing gauge adjacent to corresponding tibial trial.
"The tibial components are sized 1 through 6, with 1 being the smallest and 6 being the largest. We want the largest possible implant that fits without impingement."
2. Confirming Medial-to-Lateral Dimension:
"Next, select the corresponding tibial profile guide to confirm that the size determined from the AP dimension is also appropriate in the medial-to-lateral dimension. If the profile guide indicates it's too large medially or laterally, then downsizing is necessary. We must ensure a good fit without overhang, which can lead to soft tissue irritation or stress shielding."
"Remember, the talar component may be of equal size or smaller than the tibial component, but it cannot be larger. This is a critical design feature to prevent impingement."
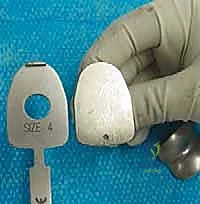
TECH FIG 4 • Tibial sizing. B. Tibial sizing gauge next to talar trial.
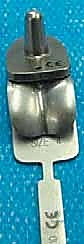
TECH FIG 4 • (continued) C. Corresponding tibial sizing gauge, tibial trial, and talar trial.
"Subsequent tibial cuts will be specific for the size of implant we select at this stage, so this decision is foundational."
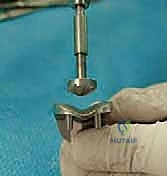
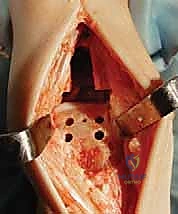
Tibial Window Resection
"With our tibial component size determined, we now prepare the tibia for the keel of the implant."
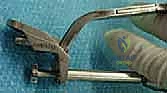
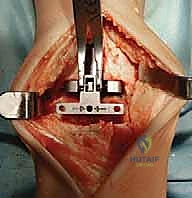
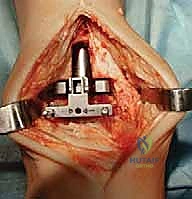
1. Assembling the Tibial Window Cutting Block:
"Dr. Smith, select the tibial template corresponding to the size we've just determined. Fit the tibial window cutting block to this tibial template and secure it with the system handle adapter. This assembly will guide our resection."
TECH FIG 5 • Tibial window resection. A. Tibial template with tibial window cutting block.
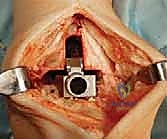
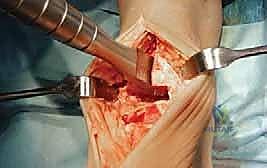
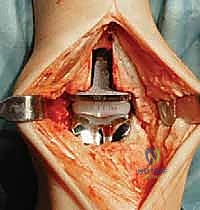
2. Positioning the Assembly:
"Place the entire assembly flush on the prepared tibial surface. Ensure the tibial template is flat against the resected plafond, and the tibial window cutting block is held firmly against the anterior tibia. The scissor distractor can be used to judiciously distract the ankle, supporting this tibial window cutting block-tibial template assembly and improving our exposure."
TECH FIG 5 • (continued) B. Tibial window cutting block in place.
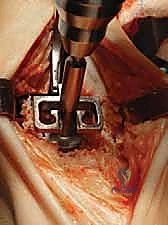
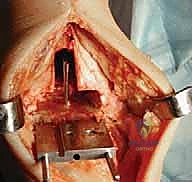
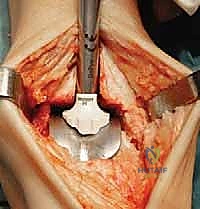
3. Drilling the Proximal Tibial Window:
"Now, use a 6-mm tibial drill to prepare the proximal aspect of the tibial window resection. Drill to the depth stop. This creates the initial entry point for our keel cut."
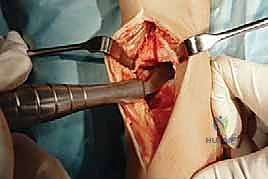
TECH FIG 5 • (continued) C. Drilling for proximal aspect of tibial window resection.
4. Stabilizing the Cutting Block:
"
Additional Intraoperative Imaging & Surgical Steps


REFERENCES
-
Patient satisfaction rates for total ankle arthroplasty exceed 90%, although follow-up data for patient satisfaction often do not exceed 5 years.
-
Overall survivorship analysis for currently available implants, designating removal of a metal component or conversion to arthrodesis as the endpoint, ranges from about 90% to 95% at 5 to 6 years and 80% to 92% at 10 to 12 years.
-
At the time of this writing there are no published results available for the Mobility total ankle arthroplasty.
-
Gougoulias N, Khanna A, Maffulli N. How successful are current ankle replacements? A systematic review of the literature. Clin Orthop Relat Res 2010;468(1):199–208.
-
Haddad SL, Coetzee JC, Estok R, et al. Intermediate and long-term outcomes of total ankle arthroplasty and ankle arthrodesis: a systematic review of the literature. J Bone Joint Surg Am 2007;89A:1899–1905.
-
Stengel D, Bauwens K, Ekkernkamp A, et al. Efficacy of total ankle replacement with meniscal-bearing devices: a systematic review and meta-analysis. Arch Orthop Trauma Surg 2005;125:109–119.
-
Wood PL, Sutton C, Mishra V, et al. A randomised, controlled trial of two mobile-bearing total ankle replacements. J Bone Joint Surg Br 2009;91B:69–74.
You Might Also Like