Arthroscopic Dorsal Radiocarpal Ligament Repair: An Intraoperative Masterclass
Key Takeaway
This masterclass guides you through arthroscopic dorsal radiocarpal ligament (DRCL) repair. We cover comprehensive wrist anatomy, meticulous preoperative planning, and granular, step-by-step intraoperative execution from a surgeon's perspective. Learn precise portal placement, suture management, and thermal augmentation. Critical pearls, pitfalls, and comprehensive postoperative rehabilitation protocols are emphasized for optimal patient outcomes in isolated and associated DRCL tears.
Welcome, fellows, to the operating theater. Today, we're tackling an often-underestimated cause of persistent wrist pain: tears of the dorsal radiocarpal ligament, or DRCL. While historically overlooked, we now understand that these tears are far more common than previously suspected and are beautifully amenable to arthroscopic repair. This procedure demands meticulous technique and a thorough understanding of wrist kinematics. Let's delve in.
The Dorsal Radiocarpal Ligament: Anatomy and Pathogenesis
The DRCL is an extracapsular ligament on the dorsum of the wrist, a critical secondary stabilizer. Its journey is quite distinct: it originates robustly from the tubercle of Lister on the dorsal aspect of the distal radius and courses obliquely in a distal and ulnar direction. Its primary attachment is to the tubercle of the triquetrum. However, it's not a singular cord; its radial fibers also provide significant attachments to the lunate and the lunotriquetral interosseous ligament (LTIL). This broad attachment pattern allows it to function effectively across the wrist's range of motion.
When we view the wrist arthroscopically from a volar radial (VR) portal, the DRCL is typically seen immediately ulnar to our standard 3-4 dorsal portal, positioned just underneath the lunate. It's important to recognize that the actual ligament fibers may not be readily visible unless a tear is present, as it's normally enveloped and protected by a thin, yet critical, epiligamentous sheath. This sheath, along with the ligament itself, is richly innervated, accounting for up to 80% of nerve endings in this region. This innervation suggests a significant proprioceptive role, similar to the anterior cruciate ligament in the knee, and underscores why repairing it can restore more than just mechanical stability.
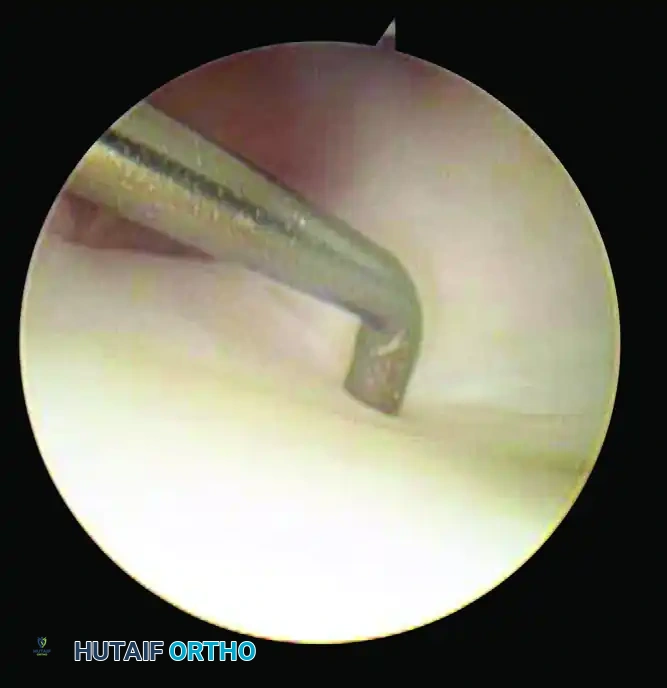
Figure 1A: Arthroscopic view of an intact Dorsal Radiocarpal Ligament (DRCL) from the Volar Radial (VR) portal. Notice the scapholunate interosseous ligament (SLIL) and the hook probe in the 3-4 portal.
DRCL tears have been implicated in a spectrum of carpal instabilities, ranging from volar and dorsal intercalated segmental instabilities (VISI/DISI) to midcarpal instability. We frequently observe these tears in conjunction with other significant ligamentous injuries, such as tears of the scapholunate interosseous ligament (SLIL), the lunotriquetral interosseous ligament (LTIL), and the triangular fibrocartilage complex (TFCC). This association highlights that DRCL tears are often part of a broader picture of radial and ulnar-sided carpal instability.

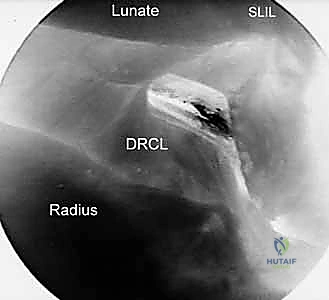
Figure 1B: Arthroscopic view from the VR portal showing a clear DRCL tear ().*
Consider the wrist as a complex interplay of primary and secondary stabilizers. The SLIL, LTIL, and TFCC are our primary stabilizers, bearing the brunt of load and maintaining carpal alignment. The capsular ligaments, including the radioscaphocapitate, radiolunotriquetral, ulnolunate, ulnotriquetral, dorsal radiocarpal, and dorsal intercarpal (DIC) ligaments, function as secondary stabilizers. The DIC, originating from the triquetrum and extending radially to the lunate, dorsal scaphoid groove, and trapezium, forms a lateral V-configuration with the DRCL, effectively acting as a dorsal radioscaphoid ligament.
While isolated DRCL tears can be solely responsible for chronic wrist pain, their presence alongside primary stabilizer injuries (SLIL, LTIL, TFCC) often signifies a greater degree or longer duration of carpal instability. This combined pathology typically portends a poorer prognosis if only the primary lesion is addressed. A chronic tear of a primary stabilizer can lead to compensatory attenuation or eventual tearing of these secondary capsular ligaments, including the DRCL, due to altered kinematics and cyclical stress.
Patient History and Physical Findings
Our typical patient with an isolated DRCL tear will present with complaints of intermittent dorsal midline wrist pain. This pain may be sporadic, lasting a few days, and is often precipitated or exacerbated by repetitive loading or torquing movements of the wrist. It's crucial to understand that there are no pathognomonic physical findings for an isolated DRCL tear. In the absence of other associated wrist pathology, the definitive diagnosis can often only be made at the time of arthroscopy.
However, we must remain vigilant for subtle clues. Some patients may exhibit mild tenderness directly over the tubercle of Lister. If associated pathology exists, then the physical findings will reflect that. For instance, with scapholunate instability, you'd expect scaphoid tenderness and a positive scaphoid shift test. With a TFCC tear, tenderness over the ulnar capsule, crepitus, and pain with ulnar loading of the pronated wrist are common. Midcarpal instability might yield a positive midcarpal shift test.
Unrecognized DRCL tears are a significant cause of treatment failure in patients with persistent dorsal wrist pain. The pain in non-dissociative carpal instability is often attributed to dynamic joint incongruity. It's plausible that the torn edge of the DRCL can impinge against the lunate or other carpal bones, creating a similar painful effect.
Imaging and Diagnostic Studies
Fellows, while imaging is invaluable for ruling out associated carpal pathology, it's generally ineffective at definitively diagnosing an isolated DRCL tear. Plain radiographs and conventional arthrograms are typically normal. Even MRI, our gold standard for soft tissue, can be misleading. I've seen cases where an MRI was misinterpreted as showing a dorsal ganglion due to a high fluid signal intensity over the dorsal capsule, when in fact it was a DRCL tear.
Therefore, our diagnostic algorithm often involves a systematic approach:
1. Clinical suspicion based on history and physical exam.
2. Plain radiographs (PA, lateral, oblique, clenched fist views) to assess for static carpal instability patterns, degenerative changes, or fractures.
3. MR arthrogram or double-row wrist arthrogram to meticulously evaluate the primary interosseous ligaments (SLIL, LTIL) and the TFCC. The presence of a DRCL tear, when combined with other wrist pathology, signifies a greater degree or longer duration of carpal instability and unfortunately, often connotes a worse prognosis.
We classify DRCL tears based on the presence or absence of associated carpal pathology, which guides our treatment strategy:
- Stage 1: Isolated DRCL tear.
- Stage 2: DRCL tear with associated SLIL or LTIL (Geissler stage 1 or 2) or TFCC tear.
- Stage 3A: DRCL tear with associated SLIL and/or LTIL (Geissler stage 3) and/or TFCC tear.
- Stage 3B: DRCL tear with SLIL and/or LTIL (Geissler stage 4) and/or TFCC tear.
- Stage 4: Chondromalacia with widespread carpal pathology.
Remember, the ligament with the highest Geissler grade determines the overall stage. Each successive stage denotes a longer standing or more severe condition, directly impacting the prognosis.
Nonoperative Management
Before we consider surgical intervention, a trial of nonoperative management is always indicated, especially for isolated DRCL tears. We typically initiate this with:
- Wrist splinting: A comfortable, removable below-elbow splint, maintaining the wrist in neutral position, for at least one month.
- Nonsteroidal anti-inflammatories (NSAIDs): To manage pain and inflammation.
- Activity modification: Strict avoidance of repetitive gripping, lifting, and torquing movements that exacerbate symptoms.
If the patient fails to respond adequately after this initial month, we then consider a radiocarpal cortisone injection. This is followed by an additional month of splinting and activity modification. Patients who continue to experience significant wrist pain after this comprehensive nonoperative trial are then candidates for advanced imaging (MR arthrogram) and, ultimately, arthroscopic evaluation and potential repair.
Surgical Management: Preoperative Planning
Now, let's transition to the surgical phase. Arthroscopic repair is particularly indicated for Stage 1 (isolated) DRCL tears, where results are highly favorable. We also consider repairs for Stage 2 and Stage 3A tears, provided the associated interosseous ligament or TFCC tear can also be addressed arthroscopically. However, for Stage 3B and Stage 4 tears, the outcomes of DRCL repair are less predictable due to the extensive combined pathologies, and we often need to consider more invasive open procedures such as SLIL reconstruction, capsulodesis, or even partial carpal fusions or proximal row carpectomy.
Preoperative Checklist:
- Review Imaging: Meticulously review all plain radiographs, MRIs, and arthrograms. This helps us anticipate associated pathologies and confirm the DRCL tear.
- Equipment Preparation:
- Arthroscopy Tower: Ensure a modern digital arthroscopy system is available for superior video quality, allowing direct recording.
- Arthroscope: A 2.7-mm, 30-degree angled arthroscope with a camera attachment is essential.
- Light Source and Monitor: Standard fiberoptic light source and high-definition video monitor.
- Diagnostic Instruments: A 3-mm hook-probe for precise palpation and assessment of intracarpal structures.
- Debridement Tools: Motorized shaver and suction punch forceps for any necessary debridement of frayed edges or synovitis.
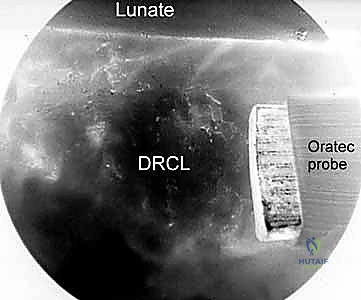
- Diathermy Unit: An Oratec radiofrequency probe (Smith and Nephew, NY) or similar device is crucial if we anticipate augmenting the repair with capsular shrinkage.
- Suture Management: A variety of curved and straight 18-gauge spinal needles for outside-in suture passage. A suture lasso or grasper is indispensable for retrieving suture ends.
- Traction Tower: A dedicated wrist traction tower, such as the Linvatec tower or the ARC wrist traction tower (designed by Dr. William Geissler), greatly facilitates instrumentation and visualization. This provides consistent, controlled traction.
Patient Positioning and Setup
Patient positioning is paramount for successful wrist arthroscopy.
- Supine Position: The patient is positioned supine on the operating table.
- Arm Abduction: The arm is abducted 90 degrees on a dedicated arm board, ensuring the shoulder is comfortably supported.
- Traction Application:
- We apply traction using a specialized wrist traction tower. This typically involves suspending the hand in finger traps (usually on the index and middle fingers, sometimes the ring finger for better ulnar deviation control) and attaching them to the traction tower.
- The forearm is secured to the arm board, preventing rotation.
- We typically initiate with 5 to 10 pounds of traction. This distends the joint space, allowing for optimal visualization and instrument maneuverability.
- Ensure the traction is applied axially, aligning with the forearm, to maximize joint distraction without causing undue stress on the shoulder or elbow.
- Fluoroscopy Setup: The C-arm fluoroscope should be draped and positioned to allow for easy anteroposterior (AP) and lateral views of the wrist without repositioning the patient or the arm. This is crucial for confirming portal placement and later for assessing any associated instability.
Comprehensive Surgical Anatomy for Portal Placement
Before we make any incisions, let's review the critical anatomy relevant to our portals. Neurovascular structures are always our primary concern.
Dorsal Portals (3-4, 4-5, 6U):
* These portals are established between the extensor tendon compartments.
* 3-4 Portal: Between the Extensor Pollicis Longus (EPL) (3rd compartment) and Extensor Digitorum Communis (EDC) (4th compartment). The dorsal sensory branch of the radial nerve is a potential risk, lying radially.
* 4-5 Portal: Between the EDC (4th compartment) and Extensor Digiti Minimi (EDM) (5th compartment). Again, branches of the dorsal sensory radial nerve and the dorsal cutaneous branch of the ulnar nerve are at risk.
* 6U Portal (Outflow): Ulnar to the Extensor Carpi Ulnaris (ECU) (6th compartment). The dorsal cutaneous branch of the ulnar nerve is a concern here.
* Midcarpal Portals (Radial and Ulnar): These are placed at the midcarpal level, distal to the radiocarpal joint line. Again, careful blunt dissection is key to avoid neurovascular structures.
Volar Radial (VR) Portal: This is our primary viewing portal for the DRCL repair, and its precise establishment is critical.
- Surface Anatomy: Locate the flexor carpi radialis (FCR) tendon. The incision will be approximately 2 cm longitudinal, centered over the FCR tendon in the proximal wrist crease.
- Deep Anatomy:
- FCR Tendon Sheath: We will incise the sheath and retract the FCR tendon ulnarly.
- Radial Artery: This is the most critical structure to protect. It lies radial to the FCR tendon. By retracting the FCR ulnarly, we protect the radial artery.
- Median Nerve: Lies ulnar to the FCR tendon, deep to the palmaris longus (if present). Retracting FCR ulnarly also helps protect the median nerve.
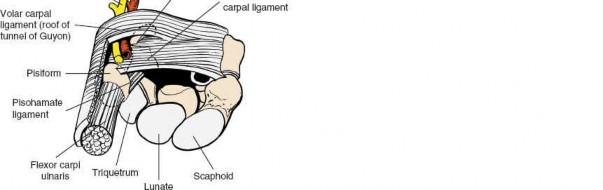
- Interligamentous Sulcus: After retracting the FCR, we will identify the floor of the FCR sheath, which overlies the interligamentous sulcus. This sulcus is formed between the radioscaphocapitate ligament (radial side) and the long radiolunate ligament (ulnar side). This is our target for cannula insertion.
- Neurovascular Risks: In addition to the radial artery and median nerve, be mindful of the palmar cutaneous branch of the median nerve, which can be quite variable in its course.
Step-by-Step Intraoperative Execution: The Arthroscopic DRCL Repair
Alright, fellows, let's get scrubbed in and begin.
1. Establishing Standard Dorsal Portals and Arthroscopic Survey
"We'll start by establishing our standard dorsal radiocarpal portals under careful visualization. Using a 22-gauge needle, we'll identify the radiocarpal joint space and inflate it with saline to distend the capsule. This initial distension provides critical working space."
- 3-4 Portal: "First, the 3-4 portal. Make a small stab incision, then use a blunt trocar and cannula to enter the joint. Always aim towards the scaphoid, away from the lunate, to avoid damaging articular cartilage. Once in, insert the 2.7-mm, 30-degree arthroscope."
- 4-5 Portal: "Next, the 4-5 portal. This will be our primary working portal for instruments. Again, stab incision, blunt trocar, and cannula. We'll use this for our hook probe, shaver, and later, for passing our suture needles."
- 6U Portal: "Finally, the 6U portal, positioned ulnar to the ECU, serves as our outflow portal. This ensures continuous irrigation and clear visualization."
"With our scope in the 3-4 portal, we'll perform a standard arthroscopic survey of the radiocarpal joint. Systematically examine the articular cartilage of the distal radius and proximal carpal row (scaphoid, lunate, triquetrum). Assess the integrity of the SLIL, LTIL, and TFCC. We're looking for any associated tears, fraying, or chondromalacia, which will influence our staging and overall treatment plan."
💡 Pearls and Pitfalls
Surgical Warning: When establishing dorsal portals, always use a blunt trocar after the initial skin incision. Visualize the tip of the trocar as it enters the joint capsule to prevent iatrogenic chondral damage to the radius or carpal bones. Maintain constant awareness of the extensor tendons and superficial nerves.
2. Establishing the Volar Radial (VR) Portal
"Now, for the critical VR portal, our window to visualize the DRCL tear directly. This portal provides an excellent en-face view of the dorsal capsule and the DRCL, which is often obscured from dorsal portals."
- Skin Incision: "We begin with a 2-cm longitudinal incision in the proximal wrist crease, precisely over the course of the flexor carpi radialis (FCR) tendon."
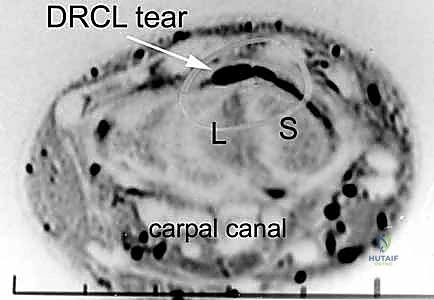
Figure 1A: Skin incision for the Volar Radial (VR) portal. Note the FCR (flexor carpi radialis) tendon as the anatomical landmark.
* FCR Sheath Exposure: "Carefully dissect down to expose the FCR tendon sheath. Use fine scissors or a small scalpel to divide the sheath longitudinally."
* FCR Tendon Retraction: "Retract the FCR tendon gently but firmly in an ulnar direction. This maneuver protects the radial artery, which lies just radial to the FCR tendon, and helps expose the underlying interligamentous sulcus."
* Joint Distension and Needle Localization: "With the FCR retracted, we'll use a 22-gauge needle to identify the radiocarpal joint space once more, directly through the floor of the FCR sheath. Inject saline to confirm intra-articular placement and distend the joint, ensuring a clear path for our instruments."
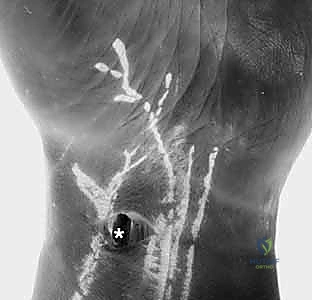
Figure 1B: Saline injection into the radiocarpal joint to distend the capsule, facilitating portal entry and visualization.
* Cannula Insertion: "Now, introduce a blunt trocar and a cannula through this identified floor of the FCR sheath. This position overlies the interligamentous sulcus between the radioscaphocapitate and long radiolunate ligaments. Advance carefully until you feel the 'pop' into the joint capsule."

Figure 1C: Insertion of the cannula through the floor of the FCR sheath, aiming for the interligamentous sulcus.
* Arthroscope Insertion: "Finally, insert the 2.7-mm, 30-degree angled arthroscope through this VR cannula. This will give us our primary working view for the DRCL repair. Adjust traction as needed to optimize the view."
3. Assessing and Preparing the DRCL Tear
"With our scope now in the VR portal, let's turn our attention to the DRCL. You'll observe the ligament immediately ulnar to the 3-4 portal, just beneath the lunate. We're looking for the characteristic fraying or detachment that signifies a tear."
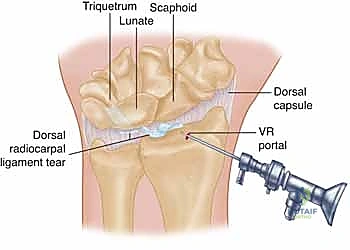
Figure 2A: A drawing illustrating a typical DRCL tear, often showing detachment or fraying from its radial or ulnar attachments.
"Here, you can clearly see the torn edge of the DRCL. It often appears voluminous or frayed, sometimes impinging into the joint space, which can be a source of the patient's pain."
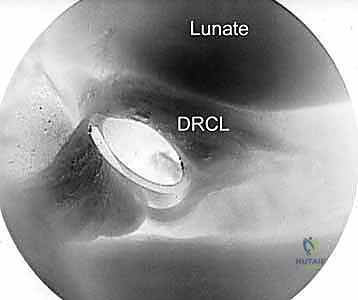
Figure 2B: Arthroscopic view of a DRCL tear from the VR portal. The torn edge is clearly visible.
"Use the hook-probe through the 4-5 portal to palpate the torn edge. Assess its mobility, the quality of the tissue, and the extent of the tear. Is it avulsed from Lister's tubercle, or is there a mid-substance tear? This assessment guides our repair strategy. If there's significant fraying or hypertrophic tissue, use the motorized shaver or suction punch forceps through the 4-5 portal to gently debride the edges, creating a fresh, bleeding surface for optimal healing. Be conservative with debridement; we want to preserve as much ligamentous tissue as possible."
💡 Pearls and Pitfalls
Surgical Warning: When debriding, maintain constant irrigation to prevent thermal damage from the shaver and to clear debris. Always visualize the shaver tip to avoid inadvertent damage to healthy cartilage or surrounding ligaments.
4. The Outside-In DRCL Repair Technique
"Now for the repair itself. We'll utilize an outside-in technique, which I find technically easier and more reproducible than the original inside-out method. Our goal is to reapproximate the torn DRCL to the dorsal capsule and its attachment sites, preventing impingement and restoring stability."
- Suture Passage - First Limb:
- "Through the 4-5 portal, we'll insert a curved 21-gauge spinal needle. Under direct arthroscopic visualization from the VR portal, carefully guide the tip of the needle to pierce the torn edge of the DRCL. Aim to capture a good bite of healthy, robust tissue."
- "Once the needle is through the ligament, advance it further until it exits the skin dorsally, adjacent to the 4-5 portal. Ensure it's not piercing any extensor tendons."
- "Thread one end of a 2-0 absorbable suture (e.g., PDS II or Vicryl) through the eye of this spinal needle."
- "Now, carefully withdraw the spinal needle, bringing the suture limb out through the skin incision of the 4-5 portal."
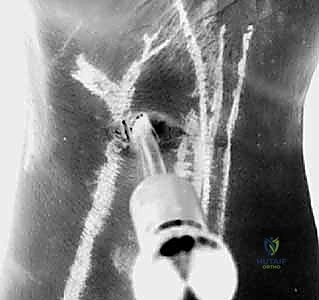
Figure 2C: Insertion of a curved spinal needle through the edge of the DRCL tear, guided by arthroscopic visualization.
- Suture Passage - Second Limb (Loop Formation):
- "Next, we'll repeat the process. Insert a second curved 21-gauge spinal needle, again through the 4-5 portal. This time, aim to pass it through a slightly different, but still healthy, part of the torn DRCL, creating a loop. The goal is to encircle the torn segment or bring its edges together."
- "Alternatively, you can use the same needle, re-inserting it. Pass the second limb of the 2-0 absorbable suture through this second needle."
- "Once the second limb of the suture is through the ligament, retrieve it using a suture grasper or snare inserted through the 3-4 portal. This creates a loop within the joint, encircling the torn DRCL."
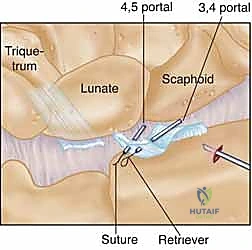
Figure 2D: Illustrates the outside-in technique using two spinal needles and a suture retriever to pass and retrieve the suture limbs, forming a loop around the torn ligament.
- Suture Retrieval and Knot Tying Preparation:
- "Now we have two suture ends exiting either through the 3-4 portal or the 4-5 portal, or one from each. The key is to ensure they are externalized safely."
- "Use a curved hemostat to carefully pull both ends of the suture underneath the extensor tendons. This is a critical step to prevent entrapment of the extensor tendons when we tie the knot. We want the knot to lie subcutaneously, not directly on the tendons."
- "Back off the wrist traction slightly. This reduces tension on the ligament and allows for easier approximation and knot tying."
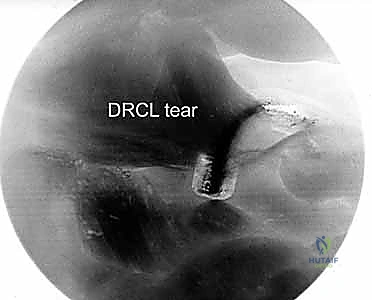
Figure 2E: Arthroscopic view showing the suture loop encompassing the torn DRCL, ready for externalization and tying.
- Knot Tying:
- "Once the sutures are safely retracted beneath the extensor tendons, tie a secure knot. I prefer a surgeon's knot followed by several square knots to ensure it holds. Tie the knot either at the 3-4 portal skin incision or the 4-5 portal skin incision, depending on where your suture ends are externalized."
- "As you tighten the knot, observe arthroscopically from the VR portal. You should see the torn DRCL being pulled up against the dorsal capsule, effectively preventing it from impinging into the joint and reapproximating the torn edges. This dorsal traction provided by the encircling suture is vital for stability."
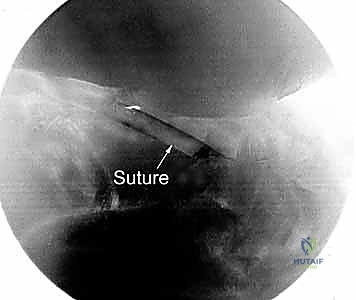
Figure 2F: Drawing of the completed DRCL repair, with the suture securing the torn ligament to the dorsal capsule.
Additional Intraoperative Imaging & Surgical Steps

REFERENCES
-
Bednar JM, Osterman AL. Carpal instability: evaluation and treatment. J Am Acad Orthop Surg 1993;1:10–17.
-
Hagert E, Garcia-Elia M, Forsgren S, et al. Immunohistochemical analysis of wrist ligament innervation in relation to their structural composition. J Hand Surg Am 2007;32A:30–36.
You Might Also Like