Lunotriquetral Ligament Repair and Augmentation: An Intraoperative Masterclass
Key Takeaway
This masterclass guides fellows through lunotriquetral ligament repair and augmentation, addressing ulnar-sided wrist instability. We cover comprehensive anatomy, meticulous preoperative planning, and step-by-step intraoperative execution, from incision to capsulotomy and ligament assessment. Emphasis is placed on neurovascular protection, precise instrument use, and critical decision-making. We also delve into pearls, pitfalls, and a robust postoperative rehabilitation protocol to ensure optimal patient outcomes for this complex wrist pathology.
Welcome, fellows, to the operating theater. Today, we're tackling a fascinating and often challenging pathology: lunotriquetral ligament instability. While less common and perhaps less understood than its scapholunate counterpart, an isolated injury to the lunotriquetral (LT) interosseous ligament complex can lead to significant wrist dysfunction and pain. Our goal today is to meticulously repair and, if necessary, augment this critical ligament to restore carpal stability and kinematics.
Understanding Lunotriquetral Instability: Anatomy and Pathophysiology
Before we make our incision, let's review the fundamental anatomy and biomechanics of the lunotriquetral complex. This understanding is paramount to successful surgical intervention.
Comprehensive Surgical Anatomy
The lunotriquetral interosseous ligament, much like the scapholunate ligament, is a C-shaped structure. It spans the dorsal, proximal, and palmar edges of the articulation between the lunate and the triquetrum.
- Palmar Portion: This is the thickest and biomechanically most crucial region of the entire LT complex. It plays a primary role in transmitting the extension moment of the triquetrum as it engages the hamate. Injury here significantly compromises stability.
- Dorsal Portion: While not as robust as the palmar component, the dorsal lunotriquetral ligament is vital as a rotational constraint. Its integrity is essential for preventing abnormal rotation between the lunate and triquetrum.
- Membranous Region: This central, more delicate part has minimal effect on rotation, translation, or distraction, primarily serving as a synovial barrier.
The lunate, fellows, is often described as a "balanced lunate" – it's torque-suspended between the scaphoid and the triquetrum. The scaphoid inherently tends to palmar flex, while the triquetrum tends to extend. The scapholunate and lunotriquetral ligaments act as critical tethers, balancing these opposing forces and ensuring the entire proximal carpal row moves in a coordinated fashion about the lunate.
When the lunotriquetral ligament complex is disrupted, this delicate balance is lost. Injuries can range from partial tears with dynamic dysfunction – which is the most common presentation – to complete dissociation with static collapse.
- Lunotriquetral Dissociation: This refers to a complete rupture of both the dorsal and palmar regions of the lunotriquetral ligament.
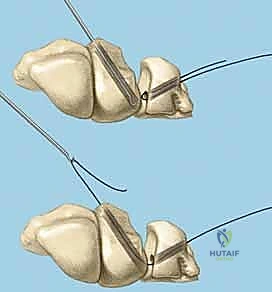
- Volar Intercalated Segment Instability (VISI): This is a more severe form of carpal collapse. While LT dissociation is a prerequisite, VISI requires additional compromise of secondary restraints, most notably the dorsal radiotriquetral ligament. Without the integrity of this extrinsic ligament, static carpal instability ensues, characterized by a volar-flexed lunate and an abnormal lunotriquetral angle. On a lateral radiograph, a normal lunotriquetral angle is approximately 14 degrees. In VISI, this angle can increase to -16 degrees or more, indicating volar flexion of the lunate.
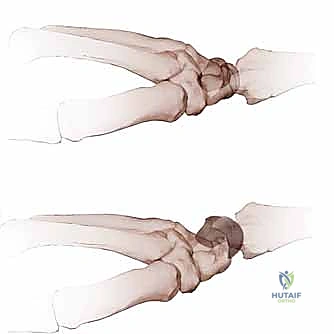
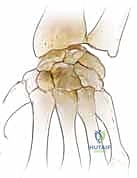
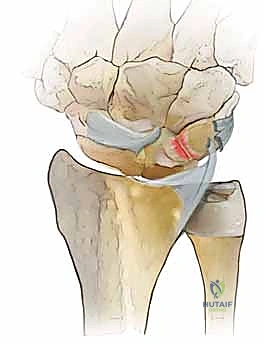
FIG 1 • A. Intact dorsal ligaments and normal carpal alignment. Loss of integrity of these secondary restraint structures, the volar-flexed position of the lunate, and the resulting volar intercalated segment instability (VISI) carpal collapse. B. Normal anatomic alignment of the carpus as viewed from a lateral radiograph. The lunotriquetral angle is 14 degrees. C. VISI carpal collapse visible on lateral radiograph. The lunate is volar-flexed and the lunotriquetral angle is 16 degrees. D. Rupture of the lunotriquetral interosseous ligament and the dorsal secondary restraint.
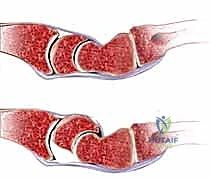
> **Surgical Warning:** Remember, fellows, VISI carpal collapse cannot be reproduced by simply sectioning the dorsal and palmar subregions of the LT ligament. The loss of integrity of the radiotriquetral ligament restraint is *required* to create static carpal instability. This highlights the importance of assessing secondary restraints intraoperatively.
LT ligament injuries can also occur in the context of more complex carpal trauma, such as Mayfield III and IV perilunate injuries, or in reverse perilunate injuries.
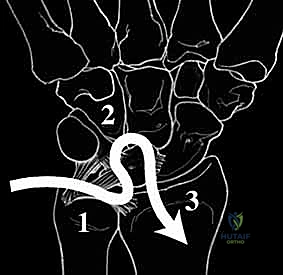
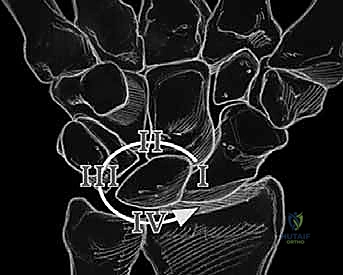
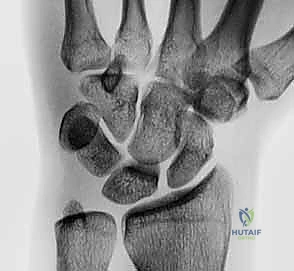
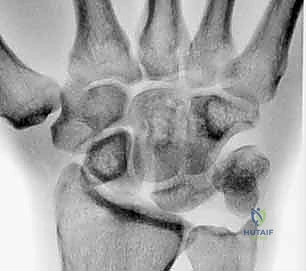
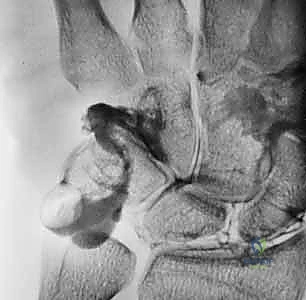
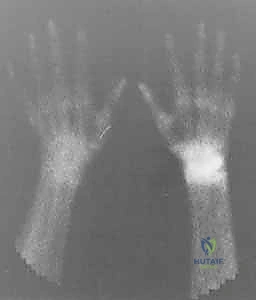
FIG 2 • A. Perilunate dislocation. B. Reverse perilunate injury (with permission, Mayo Foundation.)
Finally, fellows, consider the impact of positive ulnar variance. This can lead to LT ligament degeneration through chronic wear mechanisms or altered intercarpal kinematics, often seen in ulnar impaction syndrome. This is why we always assess ulnar variance preoperatively.
Neurovascular Risks
During our approach, we must be acutely aware of two critical neural structures:
- Dorsal Sensory Branch of the Ulnar Nerve (DSBUN): This nerve crosses the wrist dorsally and is highly susceptible to injury during skin incision and superficial dissection, especially on the ulnar side of the incision.
- Posterior Interosseous Nerve (PIN): This nerve terminates in the dorsal wrist capsule, providing sensation. A neurectomy of the PIN is often performed to partially denervate the dorsal wrist capsule and alleviate chronic pain. Its location over the capsule makes it vulnerable during capsulotomy if not identified and protected or resected intentionally.
Preoperative Planning and Patient Positioning
Thorough planning is the cornerstone of any successful wrist surgery.
Patient History and Physical Findings
Patients typically present with vague ulnar-sided wrist pain, either acutely post-trauma or as chronic pain. Key physical findings include:
- Dorsal lunotriquetral joint tenderness: Elicited directly over the LT interval.
- Dynamic Instability: Ulnar deviation with pronation and axial compression may elicit a painful "catch-up" clunk, indicating dynamic instability where the triquetrum "catches up" to the lunate. Real-time videofluoroscopy can be invaluable here.
- Provocative Tests:
- Ballottement Test: Increased anteroposterior laxity and pain when stabilizing the lunate and moving the triquetrum.
- Compression Test: Pain with axial compression, indicating LT or triquetrohamate joint pathology.
- Shear Test: Pain, crepitance, and abnormal mobility of the LT joint with shear forces.
- Limited Range of Motion and Diminished Grip Strength: Common secondary findings.
- Contralateral Comparison: Always compare findings with the unaffected wrist.
Imaging and Diagnostic Studies
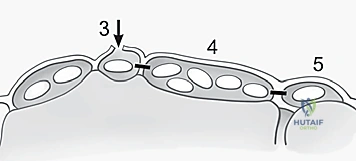
- Plain Radiographs: Often normal in dynamic LT instability. Clenched-fist anteroposterior, radial, and ulnar deviation views are essential. Look for disruption of Gilula arcs I and II, proximal translation of the triquetrum, or LT overlap, though a static LT gap is less common than in scapholunate injuries.
- Arthrography: Dye pooling or leakage at the LT interspace can indicate injury, but correlation with physical exam is crucial due to age-dependent degenerative changes.
- Technetium-99m Diphosphate Bone Scan: Useful for localizing acute injuries but less specific than arthrography.
- Magnetic Resonance Imaging (MRI): Improving, but still not entirely reliable for definitive LT ligament injury diagnosis.
Nonoperative Management
Initial treatment for most LT injuries involves immobilization with a splint or cast. My preference is an initial 4 weeks in a long-arm cast, followed by 4 weeks in a short-arm cast. Crucially, a pisiform lift (a pad molded underneath the pisiform) helps maintain optimal carpal alignment during healing. Midcarpal injections with local anesthetic and corticosteroid can provide temporary relief, especially by reducing inflammation. Acute injuries without radiographic changes may respond well to conservative care. However, if conservative management fails after a reasonable trial, surgical intervention is indicated. Importantly, a trial of nonoperative treatment does not appear to compromise the outcome of subsequent surgery.
Surgical Indications and Goals
Operative management is indicated for acute or chronic injuries unresponsive to conservative treatment. The primary goal of surgery is to restore rotational stability of the proximal carpal row and re-establish the natural alignment of the lunocapitate axis.
Preoperative Surgical Decisions
My preference, fellows, is to perform a diagnostic arthroscopy on patients with suspected LT ligament injuries. This allows for direct visualization of the articular surfaces and assessment of other intercarpal pathology, which can often be missed on imaging. If significant degenerative changes are present in the LT, radiocarpal, or midcarpal joints, or if there's a static VISI deformity that cannot be easily reduced, then partial or total carpal arthrodesis or even a proximal row carpectomy might be indicated. For significant ulna-positive or negative variance, ulna shortening or lengthening may also be considered.
Following arthroscopy, we typically have a second discussion with the patient about the findings and plan a definitive reconstructive or salvage procedure approximately 6 weeks later. Alternatively, for straightforward cases, a definitive procedure can be performed in a single surgical setting after thorough preoperative discussion.
For functional reconstruction of the LT ligament, we have several options:
* Direct ligament repair: If the ligament quality is good.
* Ligament reconstruction: Typically with a strip of extensor carpi ulnaris (ECU) tendon graft, if the native ligament is attenuated or irreparable. This is my preference based on institutional outcomes.
* Arthrodesis: This is generally avoided whenever possible due to higher complication rates and lower patient satisfaction, reserved for cases with significant degenerative changes or irreducible static instability.
When planning a direct dorsal LT ligament repair, always be prepared to proceed with ligament reconstruction if the quality of the native ligament is found to be poor intraoperatively.
Patient Positioning and Setup
Alright, team, let's get our patient positioned.
- Supine Position: The patient is supine on the standard operating room table.
- Hand Table: The affected arm is placed on a hand table, ensuring it's well-padded and stable. This allows for unimpeded access to the dorsal wrist.
- Regional Anesthesia: A long-acting axillary regional anesthetic block was placed preoperatively by our anesthesiologist. This is invaluable for postoperative pain control.
- Tourniquet Application: A nonsterile tourniquet is applied to the upper arm, proximal to the surgical drapes. We'll inflate this once we're ready to proceed with the incision.
- Prophylactic Antibiotics: Our patient has already received preoperative intravenous antibiotics, standard protocol for any open orthopedic procedure.
- Prep and Drape: The hand and arm are meticulously prepared and draped in standard sterile fashion, ensuring a wide field of view.
- Examination Under Anesthesia (EUA): Before we begin our incision, I always perform a thorough examination under anesthesia. This is a critical step to confirm our preoperative diagnosis and assess the dynamic stability without patient guarding. We're looking for any "catch-up" intercarpal clunks, as well as radioulnar clunks. This helps us confirm the degree of instability and plan our repair strategy.
Direct Lunotriquetral Ligament Repair: Intraoperative Execution
Now, fellows, let's begin the surgical repair. Focus on precision, anatomical landmarks, and meticulous dissection.
1. Incision and Initial Dissection
Our first step is to gain access to the dorsal wrist capsule.
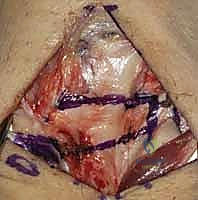
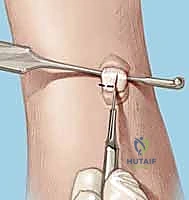
- Skin Incision: I'm making a longitudinal skin incision approximately 4-5 cm in length, centered directly over the third extensor compartment. This compartment houses the extensor pollicis longus (EPL) tendon. The incision should be roughly centered over Lister's tubercle, which you can palpate as a bony prominence on the dorsal aspect of the distal radius.

TECH FIG 1 • A. Axial image of dorsal wrist compartments with arrow indicating location for skin incision over third compartment. B. Skin incision centered over third dorsal compartment with superficial branch of the radial nerve (SBRN) and dorsal sensory branch of the ulnar nerve (DSBUN). Oval indicates tubercle of Lister. (Copyright © Mayo Clinic.)
> **Surgical Warning:** As you make your skin incision, be acutely aware of the **dorsal sensory branch of the ulnar nerve (DSBUN)**. This nerve runs subcutaneously along the ulnar side of the wrist and is highly vulnerable. Use careful, sharp dissection, identifying and protecting it with fine vessel loops or retractors. Similarly, the superficial branch of the radial nerve (SBRN) is on the radial side, though less likely to be in our direct field here.
- Subcutaneous Dissection: We'll carefully dissect through the subcutaneous tissue, identifying and ligating any superficial veins to maintain a clear field.
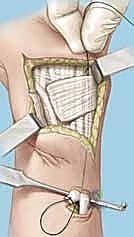
- Extensor Retinaculum Division: Now, we'll identify the extensor retinaculum. I'm dividing the retinaculum directly over the third extensor compartment, releasing the extensor pollicis longus (EPL) tendon. This allows us to mobilize the EPL radially, providing better access to the underlying capsule.
TECH FIG 3 • A. Dissection of septa to create ulnar-based flap of extensor retinaculum.
* Developing Retinacular Flaps: Next, we'll develop ulnar-based flaps of the extensor retinaculum. This involves carefully dividing the septa that separate the third, fourth, and fifth extensor compartments. Use a fine Metzenbaum scissors or a scalpel with a #15 blade to meticulously incise these septa. This maneuver allows us to reflect the retinaculum ulnarly, exposing the dorsal wrist capsule more broadly.
TECH FIG 3 • B. Preparing to reflect extensor retinaculum.

TECH FIG 3 • C. Retinaculum has been reflected ulnarly and extensor tendons are released.

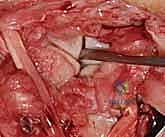
2. Posterior Interosseous Neurectomy (If Indicated)
At this stage, if not previously performed (e.g., during a prior arthroscopy), we will proceed with a posterior interosseous neurectomy. This denervates the dorsal wrist capsule, which can be highly effective in managing chronic dorsal wrist pain associated with LT instability.
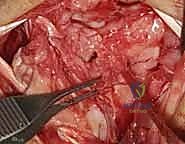
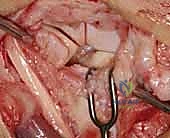
- Identification: The posterior interosseous nerve (PIN) is found lying directly on the dorsal wrist capsule, often just distal to the distal radius. It typically runs between the fourth and fifth extensor compartments. Carefully dissect the fat and connective tissue overlying the capsule to identify this delicate nerve.

TECH FIG 4 • A. Posterior interosseous nerve (PIN) visible overlying wrist capsule.
TECH FIG 4 • B. PIN identified and isolated.
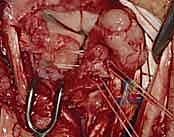
* Resection: Once identified and isolated, we will resect a segment of the PIN, typically 1 to 2 cm, to ensure complete denervation. Use fine scissors to make clean cuts.
TECH FIG 4 • C. Segment resected from PIN.
> **Surgical Pearl:** A clean neurectomy can significantly improve postoperative pain, especially in chronic cases. However, ensure you have correctly identified the PIN and are not inadvertently sacrificing other important structures.
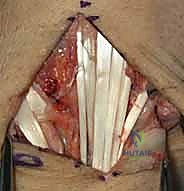
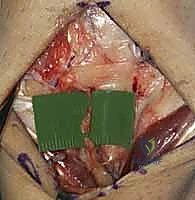
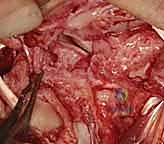
3. Capsulotomy and Joint Exposure
Now, we'll open the dorsal wrist capsule to inspect the carpal joints and the LT ligament directly.
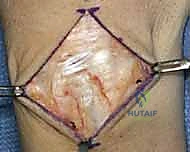
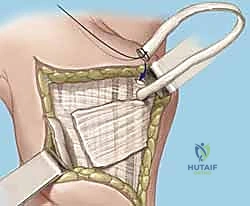
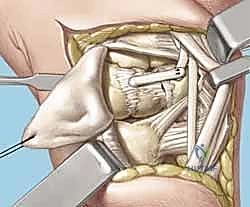
- Ligament-Splitting Capsulotomy: We'll perform a dorsal ligament-splitting capsulotomy, as described by Berger and Bishop. This approach is preferred because it preserves the integrity of the crucial dorsal radiocarpal and intercarpal ligaments, which are important secondary stabilizers.
- Identify Key Ligaments: First, identify the dorsal radiocarpal ligament (specifically the dorsal radiotriquetral ligament) and the dorsal intercarpal ligament. These form a "V" shape on the dorsal aspect of the wrist.
- Incision: The capsulotomy incision is made between these two ligaments, splitting the capsule longitudinally.
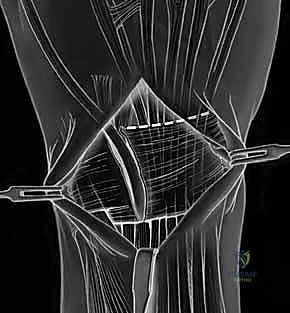
TECH FIG 5 • A. Dorsal ligament-splitting capsulotomy planned.
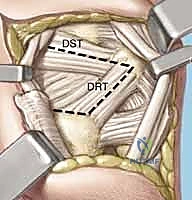
TECH FIG 5 • B. Dorsal ligament-splitting capsulotomy showing location of the dorsal radiotriquetral and scaphotriquetral ligaments.
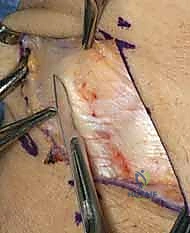
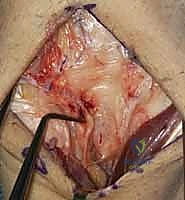
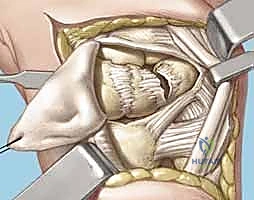
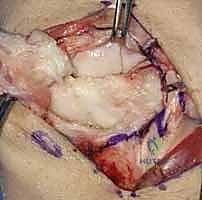
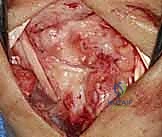
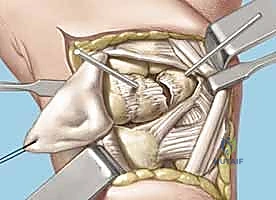
* Reflection: Carefully reflect the dorsal capsule radially and ulnarly, creating two flaps. Use fine stay sutures or small skin hooks to retract the capsule, providing excellent visualization of the underlying carpal bones and ligaments.
TECH FIG 5 • C. Dorsal capsule reflected radially.
TECH FIG 5 • D. Dorsal capsule reflected radially s
> **Surgical Warning:** When elevating the capsule, it is absolutely critical *not to dissect too deep* over the region of the lunotriquetral area. The lunotriquetral ligament is intimately related to the radiotriquetral ligament, and aggressive deep dissection can inadvertently injure this crucial extrinsic stabilizer, potentially exacerbating carpal instability. Maintain a superficial plane while reflecting the capsule.
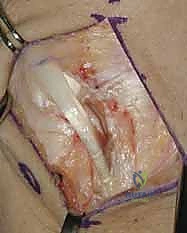
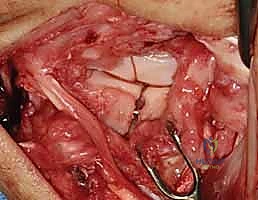
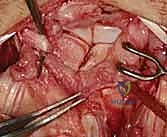
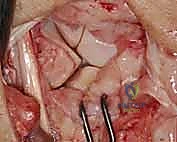
- Joint Inspection: With the capsule opened, we can now directly visualize the midcarpal and radiocarpal joint surfaces. Take a moment to thoroughly examine these for any arthritic changes, chondral damage, or other intercarpal pathology that might influence our repair strategy.
TECH FIG 5 • E. Midcarpal and radiocarpal joint surfaces exposed and examined for arthritic changes.
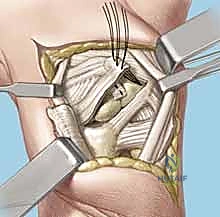
Now, direct your attention specifically to the **scapholunate and lunotriquetral ligaments**. Thoroughly examine the dorsal aspect of the lunotriquetral ligament. Assess its integrity, quality, and whether it appears suitable for direct repair. We're looking for clean tears that can be reapproximated versus attenuated, frayed tissue that would necessitate reconstruction. Perform dynamic stress tests under direct visualization to confirm the degree of instability.

> **Surgical Pearl:** If the ligament quality is poor, or if there's significant chronic attenuation, a direct repair will likely fail. This is the point where you transition your plan to a ligament reconstruction using a tendon graft, as discussed preoperatively. Always have your tendon harvest tray ready.
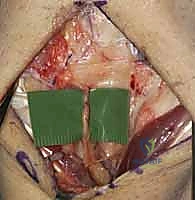
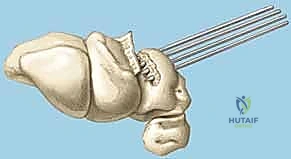
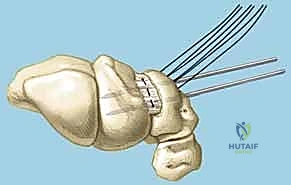
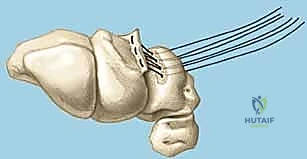
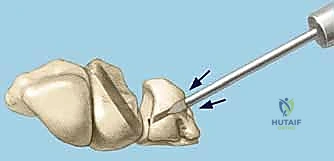
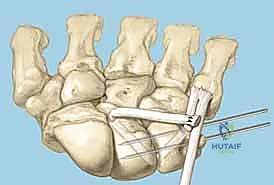
4. Lunotriquetral Reduction and K-Wire Fixation
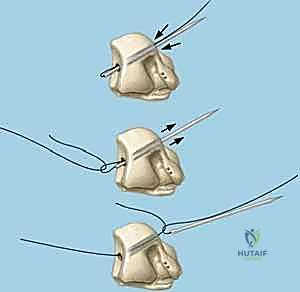
If a direct repair is feasible, our next critical step is to anatomically reduce the lunate and triquetrum and stabilize them.
- Reduction: Gently manipulate the wrist to reduce any existing VISI deformity or dynamic instability. This often involves applying a combination of extension and radial deviation to the triquetrum while stabilizing the lunate. The goal is to restore the normal alignment and relationship between the lunate and triquetrum. Confirm reduction visually and with gentle ballottement.
TECH FIG 6 • A. K-wire placed in triquetrum at a 45-degree angle.
TECH FIG 6 • B. K-wire advanced into lunate.
TECH FIG 6 • C. Second K-wire placed in lunotriquetral joint.
- K-Wire Placement: Once reduced, we need to temporarily stabilize the joint.
- First K-wire: Insert a 0.045-inch or 0.062-inch smooth K-wire into the triquetrum at approximately a 45-degree angle, aiming towards the lunate. Advance this wire across the lunotriquetral joint and into the lunate. Ensure good purchase in both bones.
- Second K-wire: Place a second K-wire across the lunotriquetral joint, ideally starting from the lunate and crossing into the triquetrum, or vice-versa, to provide rotational stability. This creates a more rigid construct.
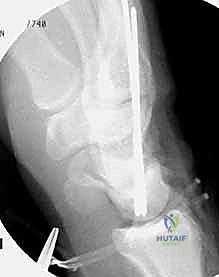
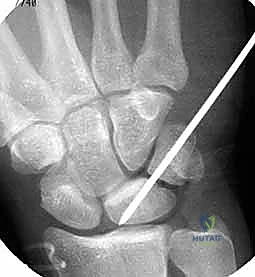
- Fluoroscopic Confirmation: Use intraoperative fluoroscopy to confirm anatomical reduction and optimal K-wire placement. Check both AP and lateral views. Ensure the wires are not impinging on articular surfaces or neurovascular structures.
<a href="/media/hutaif_opertive/hutaif-ch47-lunotriquetral-p25
Additional Intraoperative Imaging & Surgical Steps


REFERENCES
References 1. Beckenbaugh Rd. Accurate Evaluation And Management Of The Painful Wrist Following Injury. Orthop Clin 1984;15:289–306.
-
Beckenbaugh Rd. Accurate Evaluation And Management Of The Painful Wrist Following Injury: An Approach To Carpal Instability. Orthop Clin North Am 1984;15:289–306.
-
Berger Ra. The Gross And Histologic Anatomy Of The Scapholunate Interosseous Ligament. J Hand Surg Am 1996;21A:170–178.
-
Berger Ra, Bishop At. A Fiber-Splitting Capsulotomy Technique For Dorsal Exposure Of The Wrist. Tech Hand Upper Extrem Surg 1997;1:2–10.
-
Favero Kj, Bishop At, Linscheid Rl. Lunotriquetral Ligament Disruption: A Comparative Study Of Treatment Methods [Abstract Ss-80]. American Society For Surgery Of The Hand, 46Th Annual Meeting, 1991, Orlando.
-
Gilula La, Weeks Pm. Post-Traumatic Ligamentous Instabilities Of The Wrist. Radiology 1978;129:641–651.
-
Kleinman Wb. Diagnostic Exams For Ligamentous Injuries. American Society For Surgery Of The Hand, Correspondence Club Newsletter, 1985. No. 51.
-
Linscheid Rl, Dobyns Jh. Athletic Injuries Of The Wrist. Clin Orthop Relat Res 1985;198:141–151.
-
Palmer Ak, Dobyns Jh, Linscheid Rl. Management Of Post-Traumatic Instability Of The Wrist Secondary To Ligament Rupture. J Hand Surg Am 1978;3A:507–532.
-
Palmer Ak, Werner Rw. Biomechanics Of The Distal Radioulnar Joint. Clin Orthop Relat Res 1984;187:26–35.
-
Reagan Ds, Linscheid Rl, Dobyns Jh. Lunotriquetral Sprains. J Hand Surg Am 1984;9A:502–514.
-
Ritt Mj, Bishop At, Berger Ra, Et Al. Lunotriquetral Ligament Properties: A Comparison Of Three Anatomic Subregions. J Hand Surg Am 1998;23A:425–431.
-
Shin Ay, Weinstein Lp, Berger Ra, Et Al. Treatment Of Isolated Injuries Of The Lunotriquetral Ligament: A Comparison Of Arthrodesis, Ligament Reconstruction And Ligament Repair. J Bone Joint Surg Br 2001; 83B:1023–1028.
-
Shin Ay, Deitch Ma, Sachar K, Et Al. Ulnar-Sided Wrist Pain: Diagnosis And Treatment. Aaos Instr Course Lect 2005;54:115–128.
-
Shin Ay, Bishop At. Treatment Options For Lunotriquetral Dissociation. Tech Hand Upper Extrem Surg 1998;2:2–17.
-
Taleisnik J, Malerich M, Prietto M. Palmar Carpal Instability Secondary To Dislocation Of Scaphoid And Lunate: Report Of Case And Review Of The Literature. J Hand Surg Am 1982;7A:606–612.
-
Edema control and range-of-motion exercises of the digits are initiated immediately postoperatively.
-
Seven to 10 days after the procedure, the surgical splint is removed, sutures are removed, and a long-arm cast is applied for 6 weeks. A short-arm cast is then applied for an additional 4 to 6 weeks for a total period of immobilization of 10 to 12 weeks.
-
The Kirschner wires are removed at 10 to 12 weeks and wrist range-of-motion exercises are commenced.
OUTCOMES
- A high-quality tendon repair is vital for a successful outcome of the lunotriquetral tenodesis.
-
Several studies have shown that direct lunotriquetral ligament repair results in a successful clinical result. 5,9,11,15
-
Reagan et al 11 reported that six of seven cases of direct lunotriquetral ligament repairs were successful.
-
Favero et al 5 reported patient satisfaction of 90% with only one failure in 21 cases.
-
In high-demand patients such as laborers and athletes, rerupture or attenuation can occur and lead to late failure. Reconstruction with a strip of ECU tendon should be considered in this patient subgroup.
-
A review of clinical outcomes comparing lunotriquetral ligament repair, ligament reconstruction, and lunotriquetral joint arthrodesis at our institution showed that patients treated with ligament reconstruction have the lowest reoperation rate. 13
-
Rerupture after trauma and late attenuation appear to be common modes of long-term failure of direct repair.
-
Review of the clinical outcomes at our institution showed that reconstruction with a strip of ECU tendon as described can be an effective treatment. 3
You Might Also Like

