Mastering Perilunate & Lunate Dislocation Repair: An Intraoperative Guide to Greater and Lesser Arc Injuries
Key Takeaway
This masterclass guides orthopaedic fellows through the operative management of complex perilunate and lunate dislocations, encompassing both lesser and greater arc injuries. We meticulously detail surgical anatomy, preoperative planning, a combined dorsal and volar approach, precise reduction techniques, ligament repair, and fracture fixation. Emphasis is placed on real-time intraoperative decision-making, complication avoidance, and comprehensive postoperative care for optimal patient outcomes.
Alright, fellows, welcome to the operating theater. Today, we're tackling a challenging and often devastating wrist injury: perilunate and lunate dislocations, specifically focusing on the spectrum of lesser and greater arc injuries. These aren't just "wrist sprains"; they represent profound disruptions to carpal kinematics and stability, demanding meticulous attention to detail and precise surgical intervention. Nonoperative management, as you know, yields predictably poor results, leading to chronic pain, deformity, and progressive degenerative changes. Our goal today is to achieve an anatomical reduction and stable fixation to restore normal carpal mechanics and prevent long-term sequelae.
Understanding the Carpal Architecture: A Foundation for Repair
Before we even consider the incision, let's review the intricate anatomy of the carpus. It's a complex, intercalated system of dual rows that allows paired motion within the radial–ulnar and flexion–extension planes. Eight carpal bones, devoid of tendinous insertions, transmit motion passively, guided by a precise ligamentous architecture and bony geometry.
The Critical Ligamentous Network
The stability of the carpus relies heavily on its ligamentous structures, which can be broadly categorized into extrinsic and intrinsic ligaments.
- Volar Extrinsic Ligaments: These are the prime stabilizers, arranged in a double-V configuration. This arrangement creates a relative weakness between the V's, famously known as the space of Poirier.
- Inner-V Ligaments:
- Long Radiolunate (LRL)
- Radioscapholunate (RSL)
- Short Radiolunate (SRL)
- Ulnolunate (UL)
- Outer-V Ligaments:
- Radioscaphocapitate (RSC)
- Ulnotriquetrocapitate Complex (UTCC)
- Inner-V Ligaments:
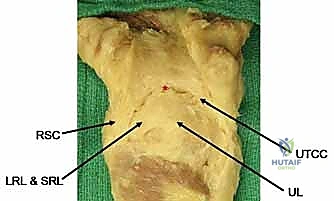
Figure 1A: Volar extrinsic carpal ligaments. Note the "space of Poirier" (), a critical area of capsular weakness.*
- Dorsal Extrinsic Ligaments: These provide less structural stability compared to their volar counterparts but are still crucial.
- Radiotriquetral (RT)
- Dorsal Intercarpal (DIC)
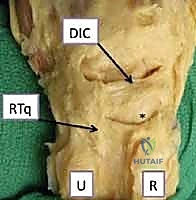
Figure 1B: Dorsal extrinsic carpal ligaments.
- Intrinsic Ligaments: These are direct intercarpal connections, providing intra-row stability.
- Scapholunate (SL) Ligament: Critical for scaphoid-lunate stability.
- Lunotriquetral (LT) Ligament: Important for lunate-triquetrum stability.
Pathogenesis: The Mechanism of Injury
These injuries typically result from high-energy events, often an axial load applied to a hyperextended and ulnarly deviated wrist. This mechanism places the volar structures under extreme tension and the dorsal structures under compression and shear. The energy dissipates in a predictable radial-to-ulnar direction.
- Lesser Arc Injuries: These are purely capsuloligamentous and progress through four stages, as described by Mayfield et al.:
- Stage I: Disruption of the scapholunate ligament.
- Stage II: Extension of injury through the space of Poirier.
- Stage III: Involvement of the UTCC and UL ligament.
- Stage IV: Complete lunate dislocation.
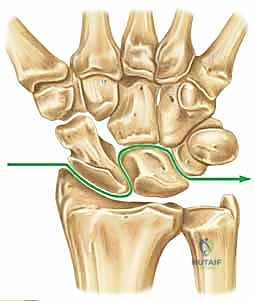
Figure 2A: Progression of capsuloligamentous injury in a lesser arc pattern.
- Greater Arc Injuries: These follow a similar progression but involve associated carpal fractures, commonly through the radial styloid, scaphoid, capitate, or triquetrum.
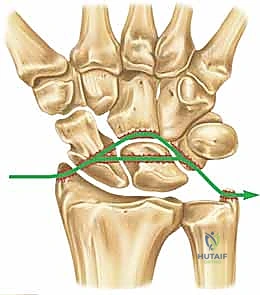
Figure 2B: Transscaphoid perilunate injury pattern, a common greater arc injury.
Preoperative Planning: The Blueprint for Success
Effective surgical management begins long before the first incision.
Patient History and Physical Findings
A typical history involves a fall onto an extended hand or a high-energy trauma. Patients present with severe pain, stiffness, and often significant swelling.
- Neurologic Examination: Crucial. Median neuropathy is common, especially with lunate dislocations where the lunate is displaced volarly into the carpal tunnel. It can range from dysesthesia to overt motor dysfunction. Acute carpal tunnel syndrome in this scenario is a surgical emergency.
- Palpation: Tenderness over specific carpal bones may indicate associated fractures in a greater arc injury.
- Special Tests: While tests like Watson, lunotriquetral shuck, and ulnar catch-up are valuable in chronic instability, they are often difficult to perform and of limited value in the acute, painful setting.
Imaging and Diagnostic Studies
Our primary diagnostic tools are high-quality radiographs.
- True PA and True Lateral Radiographs: These are paramount. Compare them to the uninjured wrist if possible.
- Perilunate Dislocations: On PA, observe disruption of Gilula's lines and the lunate assuming a triangular, rather than trapezoidal, shape. On the lateral view, the concentricity of the "C's" (distal radius, lunate, capitate) is lost, indicating dorsal dislocation of the capitate from the lunate fossa.
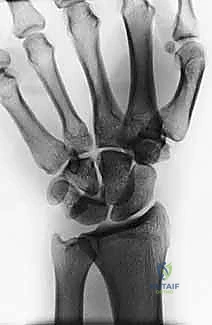
- Perilunate Dislocations: On PA, observe disruption of Gilula's lines and the lunate assuming a triangular, rather than trapezoidal, shape. On the lateral view, the concentricity of the "C's" (distal radius, lunate, capitate) is lost, indicating dorsal dislocation of the capitate from the lunate fossa.
Figure 3A: AP view of a perilunate dislocation, demonstrating loss of Gilula's lines.
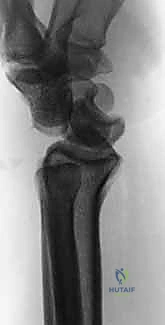
Figure 3B: Lateral view showing dorsal dislocation of the capitate out of the lunate fossa.
* Lunate Dislocations: The classic "spilled tea cup" sign on the lateral radiograph. The lunate is volarly displaced and flexed, often lying anterior to the volar cortex of the distal radius. The capitate articulates with the lunate fossa of the radius.
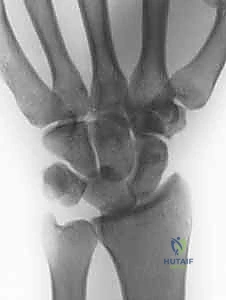
Figure 3C: AP view of a lunate dislocation, illustrating loss of Gilula's lines.
* Greater Arc Injuries: Carefully scrutinize for associated fractures, especially scaphoid waist or proximal pole fractures, but also capitate and triquetrum fractures.
* Other Views: Radial/ulnar deviation, flexion/extension, supinated, and clenched-fist views are often difficult to obtain acutely and rarely add significant value.
* Advanced Imaging: MRI, arthrography, or bone scan are not indicated in the acute setting after major wrist trauma. The diagnosis is clinical and radiographic.
Surgical Strategy and Decision-Making
Review all radiographs thoroughly. Determine the extent of ligamentous injury and whether bone anchors are needed. Assess osseous structures for fractures requiring K-wires or headless compression screws.
- Median Neuropathy: If present or impending, a carpal tunnel release is mandatory.
- Approach: The combined dorsal and volar approach is preferred. This is the only method that allows a true assessment of the entire pathology and provides the best opportunity for anatomic repair of all injured structures. An exclusive volar approach limits intercarpal ligament repair and bony fixation, while a dorsal approach alone can make lunate reduction challenging.
Patient Positioning and Setup
Alright, let's get our patient ready.
- Positioning: The patient will be in the supine position.
- Tourniquet: A well-padded pneumatic tourniquet is applied to the upper arm. Ensure adequate padding to prevent nerve compression.
- Hand Table: We'll use a radiolucent hand table. This is crucial for obtaining intraoperative fluoroscopic images without repositioning the limb.
- Fluoroscopy: The C-arm should be draped sterilely and positioned to allow easy acquisition of true PA and lateral views of the wrist. We'll need to be able to rotate it for oblique views if necessary.
- Traction (Optional): For initial closed reduction attempts, finger traps and a traction tower can be used, applying 10-15 lbs of in-line traction with the elbow flexed 90 degrees for 10-15 minutes to relax muscles. However, remember that closed reductions for lunate dislocations are frequently unsuccessful due to the volar capsular rent.
The Intraoperative Masterclass: Step-by-Step Execution
Now, let's scrub in. We'll start with the dorsal approach, as it's typically where we gain our initial access for reduction and posterior ligament repair.
Dorsal Approach: Incision and Dissection
Surgeon: "Scalpel, please. We'll begin with a universal dorsal skin incision. This curvilinear incision will extend from the distal radius, just ulnar to Lister's tubercle, distally towards the base of the third metacarpal. Maintain a full-thickness skin flap for optimal wound healing."
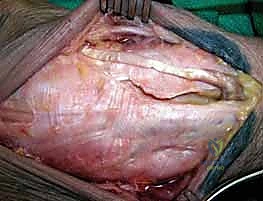
Figure 1A: Universal dorsal skin incision for the dorsal approach.
Surgeon: "Now, we meticulously raise medial and lateral skin flaps, exposing the extensor retinaculum. Identify the extensor compartments. Our primary access to the dorsal capsule will be through the interval between the third and fourth extensor compartments."
- Identifying Compartments:
- The first compartment contains the APL and EPB.
- The second compartment houses the ECRL and ECRB.
- The third compartment contains the Extensor Pollicis Longus (EPL).
- The fourth compartment contains the Extensor Digitorum Communis (EDC) and Extensor Indicis Proprius (EIP).
- The fifth compartment contains the Extensor Digiti Minimi (EDM).
- The sixth compartment contains the Extensor Carpi Ulnaris (ECU).
Surgeon: "First, we need to address the EPL. I'll incise the third extensor compartment longitudinally, just radial to the EPL tendon. We'll then carefully dissect the EPL tendon distal to the extensor retinaculum and transpose it radially. This prevents injury to the tendon during our subsequent carpal manipulation and stabilization, and it also helps prevent potential postoperative tendinopathy or rupture."
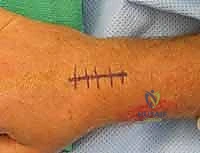
Figure 1B: The third extensor compartment is incised, and the EPL is transposed radially. The EDC tendons are visible.
Surgeon: "Next, we'll incise the fourth extensor compartment longitudinally, directly over the EDC tendons. Once incised, we'll retract the EDC tendons ulnarly. This exposes the dorsal capsule."
Surgeon: "At this point, we're often confronted with the sensory branch of the posterior interosseous nerve (PIN) running over the dorsal capsule. To prevent painful neuromas and to facilitate our capsular dissection, we'll identify and excise approximately one centimeter of the posterior interosseous nerve. This is a standard part of our procedure for dorsal wrist approaches."
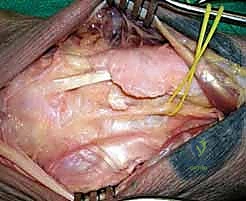
Figure 1C: The fourth extensor compartment is incised, and the EDC tendons are retracted ulnarly. The sensory branch of the posterior interosseous nerve (vessel loop) is sacrificed.
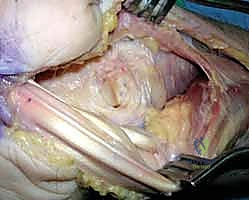
Surgeon: "Now that the dorsal capsule is visible, we need to gain access to the carpus. We'll make a capsular incision. Often, in these high-energy injuries, you'll find a transverse rent already present through the dorsal capsule and radiotriquetral ligament. We'll extend this rent carefully in both radial and ulnar directions to allow full visualization of the capitolunate interval and the entire carpus."
- Alternative Capsular Incision (Ligament-Sparing):
Surgeon: "Alternatively, especially if the existing rent is not ideal, we can perform a more extensile, ligament-sparing capsular incision. I'll incise the capsule in a radial direction along the dorsal distal radial lip, leaving a small cuff of tissue attached to the radius. This cuff will be crucial for later repair. Then, I'll incise ulnarly, along the dorsal radiotriquetral ligament and dorsal intercarpal ligament. This maneuver generates a radially based capsular flap, allowing excellent visualization."

Figure 1D: A ligament-sparing capsular incision may be made to visualize the carpus. Sc, scaphoid.
Surgeon: "At this stage, if the dislocation was not reducible closed, the capitate will be prominent dorsally, and the absence of the lunate in its normal position will be evident. We can now directly assess the articular injury, including any chondral damage or associated fractures."
Reduction and Fixation: Reconstructing Carpal Harmony
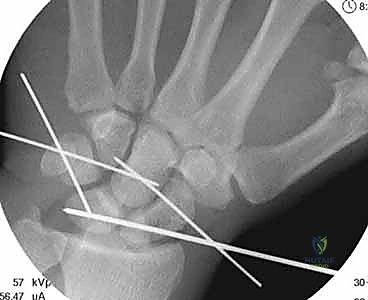
Surgeon: "Before we attempt the definitive reduction of the dislocation, we'll strategically place some Kirschner wires. This is a critical step to facilitate post-reduction stabilization. I'll use 0.045-inch or 0.062-inch Kirschner wires. We'll insert these transfixation pins into the triquetrum and scaphoid through our dorsal incision, in an in-to-out fashion."
- K-wire Placement:
Surgeon: "The starting point for these pins is through the centroid of the aspect of the proximal pole of the scaphoid and triquetrum that articulates with the lunate. We want them positioned so they can later be driven back into the lunate to stabilize the reduction. Advance them just enough so the tips slightly protrude from the volar aspect of the scaphoid and triquetrum, but not so far as to damage volar structures."
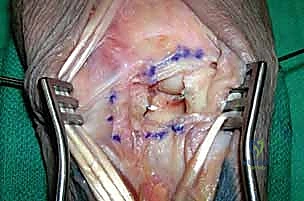
Figure 2: Transfixation pins are placed through the scaphoid and triquetrum before reduction of the lunate. This facilitates placement of these Kirschner wires and advancement into the lunate after reduction. The entry point is the centroid of the intercarpal joint on the scaphoid and triquetrum. The tips of the Kirschner wires are seen slightly protruding from the scaphoid and triquetrum. The lunate is displaced volarly and is not visible.
Surgeon: "A key pearl here: if there's an associated scaphoid fracture, we typically won't place a K-wire through the scaphoid for this initial step. A screw fixation for the scaphoid fracture will provide the necessary stabilization for the radial side of the carpus."
Surgeon: "Now, for the reduction. My assistant, please apply gentle manual traction to the hand. I'll apply volar pressure to the displaced lunate, which is often volarly dislocated into the carpal tunnel. I'll then insert a Freer elevator into the capitolunate joint, around the proximal pole of the capitate. Using a gentle 'shoehorn' maneuver, we'll lever the lunate back into its anatomical position within the lunate fossa of the radius. This often requires simultaneous wrist flexion and direct pressure."
Surgeon: "Once the lunate is reduced, we need to confirm our reduction with fluoroscopy. Assistant, please bring in the C-arm for true PA and lateral views. We're looking for the restoration of Gilula's lines on PA, and the concentricity of the 'C's' (distal radius, lunate, capitate) on the lateral view. The scapholunate angle should be between 40 to 60 degrees, and both the capitolunate and radiolunate angles should be less than 15 degrees. These are our radiographic benchmarks for an anatomical reduction."
Surgeon: "With the carpus reduced, we'll now insert additional transfixation pins percutaneously. These pins will stabilize the scaphoid and triquetrum to the capitate, providing crucial temporary stability to the midcarpal joint."
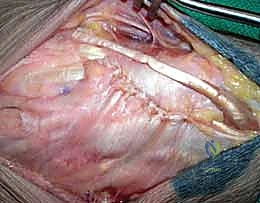
Figure 3A: Transfixation pins are percutaneously introduced to stabilize the scaphoid and triquetrum to the capitate.
Surgeon: "Now, let's address any associated carpal fractures. The most common is a scaphoid fracture, usually at its waist or proximal pole. For a non-comminuted fracture, we'll use a cannulated headless compression screw. We'll approach this with an antegrade technique, from proximal to distal, ensuring precise alignment under fluoroscopic guidance. For comminuted fractures, we'll apply autologous cancellous bone graft to the fracture site before final tightening of the screw. Fluoroscopy is absolutely essential here for accurate alignment and screw placement, preventing malunion or nonunion."
Surgeon: "Once the fractures are fixed and the carpus is reduced and temporarily stabilized with K-wires, we'll re-verify our radiographic parameters. The C shape of the distal radius, lunate, and capitate must be concentric."
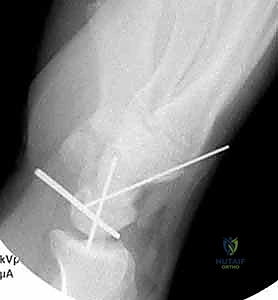
Figure 3B: The C shape of the distal radius, lunate, and capitate should be concentric, indicating proper reduction.
Ligament Repair: Restoring Intrinsic Stability
Surgeon: "With our bony architecture restored, our next critical step is ligamentous repair. First, we need to ensure absolute anatomic carpal realignment. Sometimes, despite the initial reduction, minor rotational malalignments can persist. We can use 0.045-mm Kirschner wires as 'joysticks' introduced into the scaphoid, lunate, and triquetrum to finely adjust their positions and achieve perfect alignment."
Surgeon: "Once alignment is confirmed, we'll advance those initial K-wires we placed through the scaphoid and triquetrum into the lunate. These provide critical transosseous stability across the scapholunate and lunotriquetral intervals."
Surgeon: "Now, let's turn our attention to the intercarpal ligaments. In lesser arc injuries, both the scapholunate and lunotriquetral ligaments are typically disrupted. In transscaphoid perilunate dislocations, the proximal pole of the scaphoid often remains attached to the lunate with an intact scapholunate ligament, but the radial side of the carpus is unstable due to the scaphoid fracture."
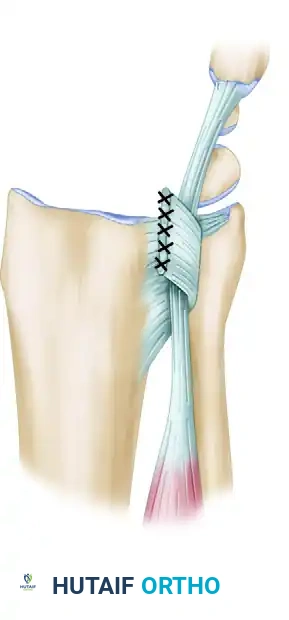
Surgeon: "Most often, these ligaments avulse from the scaphoid and the triquetrum. Therefore, we'll use small (about 2 mm) suture anchors with nonabsorbable suture (2-0 to 3-0) for reattachment. I'll place the anchors directly into the bony substance of the scaphoid and triquetrum where the ligaments have avulsed. It's crucial to avoid our previously placed Kirschner wires during anchor insertion."
Surgical Warning: Ensure proper tensioning of the ligament repair. Over-tensioning can lead to stiffness, while under-tensioning will result in persistent instability. Aim for a tension that mimics the contralateral wrist's natural laxity.
Surgeon: "What if the intercarpal ligaments are beyond direct repair due to severe comminution or poor tissue quality? In such cases, suture anchors may be unnecessary or ineffective. We then rely primarily on extrinsic capsuloligamentous healing, augmented by our K-wire stabilization, to establish stability. This underscores the importance of a robust capsular repair."
Volar Approach (If Combined)
Surgeon: "Now, we'll transition to the volar aspect. My assistant will carefully prepare the volar forearm and wrist for our next incision. This is crucial, especially if we have a lunate dislocation or significant volar capsuloligamentous injury, and certainly if there's any sign of median neuropathy."
Surgeon: "I'll make an extended carpal tunnel incision, following the thenar crease and extending proximally into the distal forearm. After incising the skin and subcutaneous tissue, we'll identify the transverse carpal ligament. I'll carefully incise the transverse carpal ligament, releasing the carpal tunnel."
-
Median Nerve Decompression:
Surgeon: "Upon opening the carpal tunnel, we'll immediately assess the median nerve. If there's any compression, we'll decompress it fully. We'll also evacuate any hematoma and perform a tenosynovectomy of the digital flexor tendons if they are inflamed or compromised. This ensures the nerve is free and the tendons can glide unimpeded." -
Volar Capsuloligamentous Repair:
Surgeon: "Once the carpal tunnel contents are retracted, we'll gain visualization of the volar capsuloligamentous structures and the characteristic semilunar rent, often found through the space of Poirier. We'll meticulously repair these volar capsuloligamentous injuries using nonabsorbable sutures to further stabilize the carpus. This volar repair is essential for long-term stability and preventing recurrent volar instability."
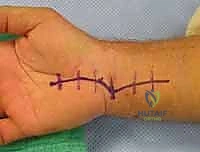
Closure: Securing Our Work
Surgeon: "With all repairs complete, we'll now close. On the dorsal side, the extended capsulotomy and any existing dorsal capsular injury are closed using strong, nonabsorbable suture. This is not just about closing a defect; it's about restoring the dorsal capsular tension, which contributes significantly to overall carpal stability."
Surgeon: "Remember, we transposed the EPL radially. We will leave the EPL tendon in this subcutaneous location, outside its compartment. This prevents impingement and potential rupture."
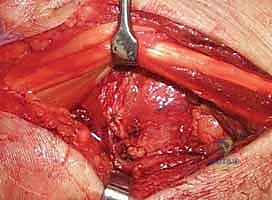
Figure 3C: The EPL tendon is left transposed in a subcutaneous location.
Surgeon: "Finally, we'll irrigate the wounds thoroughly. The subcutaneous tissue and skin are closed in a standard fashion using absorbable sutures for the subcutaneous layer and nonabsorbable sutures or staples for the skin. We'll place a sterile dressing and apply a well-padded sugar-tong splint or a cast, immobilizing the wrist in slight extension."
Pearls and Pitfalls: Navigating the Challenges
- Missed Diagnosis: The subtlety of some presentations means a high index of suspicion is paramount. Always get good quality PA and lateral X-rays. If in doubt, repeat imaging or refer.
- Incomplete Reduction: This is a recipe for disaster. Always verify reduction with fluoroscopy, checking Gilula's lines and carpal angles. Don't accept anything less than anatomical reduction. If closed reduction fails, proceed to open.
- Median Nerve Injury: Pre-existing or acute median neuropathy demands immediate carpal tunnel release. Failure to decompress can lead to permanent nerve damage.
- PIN Sacrifice: While standard, ensure the patient understands the potential for
Additional Intraoperative Imaging & Surgical Steps
REFERENCES
-
Pins may be removed at 8 weeks, and the patient may be converted to a removable splint to promote range of motion of the wrist.
-
At 12 weeks, strengthening is permitted with progressive resistance as tolerated.
-
Anticipated return to activities is 6 to 12 months.
OUTCOMES
- Outcomes will vary with regard to stiffness and grip strength.
-
More accurate anatomic reduction will lead to improved results. Sotereanos et al 5 used a dorsal–volar approach in 11 patients with perilunate dislocations and fracturedislocations. Good to excellent results were achieved in 9 of 11 patients.
-
Adkison JW, Chapman MW. Treatment of acute lunate and perilunate dislocations. Clin Orthop Relat Res 1982;164:199–207.
-
Apergis E, Maris J, Theodoratos G, et al. Perilunate dislocations and fracture dislocations: closed and early open reduction compared in 28 cases. Acta Orthop Scand Suppl 1997;275:55–59.
-
Cooney WP, Bussey R, Dobyns JH, et al. Difficult wrist fractures: perilunate fracture-dislocations of the wrist. Clin Orthop Relat Res 1987;214:136–147.
-
Mayfield JK, Johnson RP, Kilcoyne RK. Carpal dislocations: pathomechanics and progressive perilunar instability. J Hand Surg Am 1980;5:226–241.
-
Sotereanos DG, Mitsionis GJ, Giannakopoulos PN, et al. Perilunate dislocation and fracture dislocation: a critical analysis of the volardorsal approach. J Hand Surg Am 1997;22A:49–56.
-
Tavernier L. Les deplacements tramatiques du semilunaire. These, Lyons, 1906:138–139.
-
Walsh JJ, Berger RA, Cooney WP. Current status of scapholunate interosseous ligament injuries. JAAOS 2002;10:32–42.
You Might Also Like