Mastering the Distal Chevron Osteotomy: An Intraoperative Guide for Hallux Valgus Correction
23 Jan 2026 15 min read 1 Views
Key Takeaway
This masterclass guides fellows through the Distal Chevron Osteotomy for symptomatic hallux valgus. We'll cover preoperative planning, precise patient positioning, detailed surgical anatomy, and step-by-step intraoperative execution from incision to fixation. Emphasis is placed on preserving critical neurovascular structures, achieving stable osteotomy, and managing potential complications. Postoperative care and rehabilitation protocols are also thoroughly discussed.
Introduction to the Distal Chevron Osteotomy: A Masterclass in Hallux Valgus Correction
Welcome, my esteemed fellows, to the operating theater. Today, we delve into the nuances of the Distal Chevron Osteotomy, a foundational procedure for correcting symptomatic hallux valgus deformity. This is not merely a technical exercise; it's an art form requiring precision, anatomical mastery, and a deep understanding of biomechanics. Our goal is to restore proper alignment, alleviate pain, and prevent long-term complications, ensuring our patients return to full, active lives.
Indications for Distal Chevron Osteotomy
The primary indication for a Distal Chevron Osteotomy is a symptomatic hallux valgus deformity characterized by a moderate deformity with an intermetatarsal angle (IMA) of less than 15 degrees. It is absolutely crucial that the first metatarsocuneiform joint remains stable; instability here would necessitate a more proximal correction. Furthermore, this osteotomy is an excellent choice for correcting an abnormal distal metatarsal articular angle (DMAA). When patients present with minimal transfer metatarsalgia symptoms, this procedure often stands alone as a highly effective intervention. Remember, this is a procedure for the metatarsal head, not the joint itself, so joint congruency is paramount.
Preoperative Planning: The Foundation of Success
Before we even consider making an incision, meticulous preoperative planning is non-negotiable.
Radiographic Evaluation
We begin with AP and lateral weight-bearing radiographs of the foot. These are our blueprints. We meticulously evaluate:
* Metatarsal length: Discrepancies can lead to transfer metatarsalgia.
* Intermetatarsal Angle (IMA): As discussed, ideally less than 15 degrees for this procedure. We'll confirm reduction intraoperatively.
* Hallux Valgus Angle (HVA): This tells us the degree of lateral deviation of the great toe.
* Distal Metatarsal Articular Angle (DMAA): An abnormal DMAA, indicating an oblique articular surface, is a key target for correction with this osteotomy.
* Interphalangeal Angle: For cases where a proximal phalangeal osteotomy (e.g., an Akin osteotomy) might be required in conjunction to achieve full correction.
* Joint Congruency: Crucial. If the joint is incongruent, a simple chevron may not suffice.
* Presence of Osteophytes: We'll address these during the exposure.
* Size of the Bony Medial Eminence: This prominent bone will be resected.
* Position and Condition of the Sesamoids: Their subluxation is a hallmark of hallux valgus and their relocation is a key indicator of successful correction.
Patient Preparation
Our patient is scheduled for surgery on an outpatient basis. Before entering the sterile field, prophylactic antibiotics are administered to minimize the risk of infection. We typically use a broad-spectrum cephalosporin unless there's a known allergy. A thigh tourniquet is applied to ensure a bloodless field, which is critical for precise dissection and visualization of delicate structures.
Patient Positioning
The patient is positioned supine on the operating table. Crucially, a sandbag is placed under the ipsilateral buttock. This maneuver internally rotates the hip, ensuring the big toe points directly to the ceiling. This provides optimal access to the medial aspect of the foot and allows for accurate assessment of alignment during the procedure, preventing inadvertent rotation.
We initiate the procedure with a distal soft tissue release, typically performed through a first web space incision. This is a critical step to address the contracture of the lateral capsule and adductor hallucis tendon, which contribute significantly to the hallux valgus deformity.
Incision: A small, longitudinal incision is made in the first web space, just dorsal to the neurovascular bundle supplying the web.
Dissection: Carefully dissect down to the lateral aspect of the metatarsal head.
Release: Using a fine blade or scissors, we release the conjoined adductor hallucis tendon insertion from the lateral aspect of the proximal phalanx and lateral sesamoid. We also perform a capsulotomy of the lateral metatarsophalangeal (MTP) joint.
Surgical Warning:Take extreme care to avoid stripping the lateral metatarsal head soft tissues. Excessive stripping can compromise the vascularity of the metatarsal head, increasing the risk of avascular necrosis (AVN), a devastating complication. We are aiming for release, not devascularization.
2. Medial Approach and Medial Eminence Resection
Now, we shift our attention to the medial side, where we will perform the main osteotomy.
Medial Incision: We make a medial longitudinal incision extending from a point approximately 1 cm proximal to the medial eminence distally to the medial flare of the proximal phalanx. This incision can be extended distally if a concomitant proximal phalangeal osteotomy, such as an Akin, is deemed necessary after our initial correction.
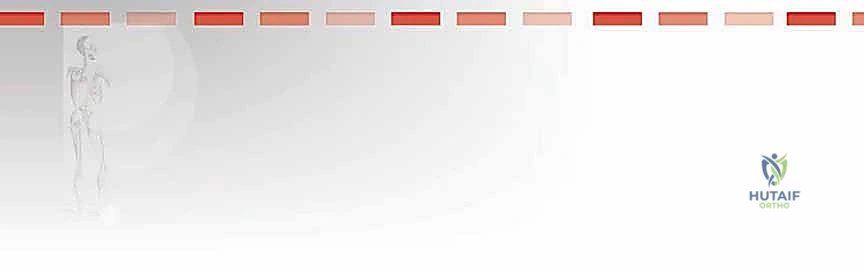
Surgical Warning: Immediately upon incising the skin, identify and protect the dorsal medial cutaneous nerve. This nerve is highly susceptible to iatrogenic injury, which can lead to painful neuromas or chronic regional pain syndrome. Use careful blunt dissection, often with a small army-navy retractor or Senn retractor, to mobilize and retract it dorsally.
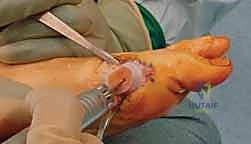
Capsular Incision: Once the nerve is protected, we incise the medial capsule sharply in a single longitudinal direction. This provides direct access to the medial eminence and the underlying MTP joint.
Image
TECH FIG 1 • A. After the skin is incised and the dorsomedial nerve is protected, the capsule is incised in a longitudinal fashion.
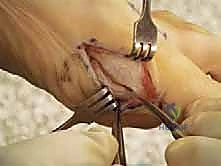
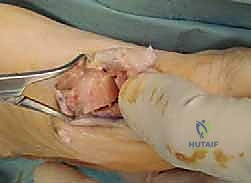
Medial Eminence Resection: With the joint exposed, we clearly identify the medial eminence. Using an oscillating saw, we resect this bony prominence. The resection should be precise, approximately 1 mm medial to the sagittal sulcus. This ensures we remove the prominent bone without over-resecting the articular cartilage.
Image
TECH FIG 1 • B. The medial eminence is resected.
Preservation of Plantar Vascular Supply: My fellows, this next step is arguably the most important part of the exposure: the identification and meticulous preservation of the plantar vascular supply to the metatarsal head. This critical blood supply typically enters the metatarsal head from the plantar aspect. The entire osteotomy must remain extracapsular on its plantar aspect. This plantar vascular supply must remain attached to the capital fragment (the displaced head fragment) to minimize any risk of avascular necrosis (AVN). Use a small periosteal elevator or a Freer elevator to gently elevate the dorsal capsule, but ensure the plantar attachments are undisturbed.
Image
TECH FIG 1 • C. Exposure and preservation of the plantar capsular attachment.
3. Defining the Osteotomy Apex
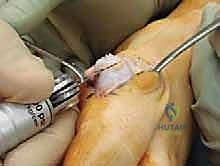
Before we make any saw cuts, we must precisely define our osteotomy apex.
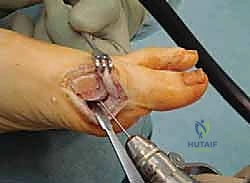
Apex Marking: The apex of our chevron osteotomy is defined as the center of an imaginary ellipse or circle started by the articular surface of the metatarsal. We mark this apex with a sterile surgical ink pen. This point will be the most proximal and central point of our V-shaped cut.
Image
TECH FIG 2 • A. An imaginary ellipse based on the articular surface is made and the center is marked with ink. This is used as the apex of the osteotomy.
4. Performing the Chevron Osteotomy
Now, with our apex marked and critical structures protected, we proceed with the osteotomy itself, performed in a step-wise manner.
Transverse (Plantar) Limb: Using a fine oscillating saw, we create the first limb of the osteotomy. This is the transverse (or plantar) limb, originating from our marked apex and extending towards the plantar surface of the metatarsal.
The obliquity of this cut can vary, but two factors are paramount:
The osteotomy must remain extra-articular. Ensure your saw blade does not violate the articular cartilage of the metatarsal head.
The plantar vascular supply must be maintained to the metatarsal head. This cut should pass just dorsal to the preserved plantar vascular attachments.
Complete this osteotomy through to the lateral side of the metatarsal.
Image
TECH FIG 2 • B. The longitudinal cut is performed, ensuring that the proximal limb is extra-articular and the vascular bundle is maintained to the head.
Vertical (Dorsal) Limb: Next, we perform the vertical osteotomy.
Position your saw blade at a 90-degree angle to the plantar cut.
Then, angle the saw blade to reduce this angle by 10 to 20 degrees. This creates the characteristic V-shape.
The exact angle is not absolutely crucial, but we find that aiming for an angle between 60 and 80 degrees produces a stable osteotomy. This angle provides sufficient bony contact for stability while allowing for effective lateral displacement.
Complete this osteotomy through to the lateral side to allow for subsequent displacement of the head fragment.
Image
TECH FIG 2 • C. The saw blade is placed at 90 degrees to the longitudinal cut and then angled to produce a chevron osteotomy of between 60 and 80 degrees.
Surgical Warning: While performing the vertical osteotomy, take meticulous care to protect the extensor hallucis longus (EHL) tendon. It lies dorsally and can be easily damaged by an errant saw blade. Retract it gently but firmly.
Image
5. Displacement and Compression of the Capital Fragment
With the osteotomy complete, we now achieve our correction.
Lateral Displacement: Use a sharp towel clip to grasp the proximal fragment of the metatarsal shaft. With your thumb, apply lateral displacement to the capital fragment (the metatarsal head). We typically allow a maximum of 50% displacement of the metatarsal head relative to the shaft. Excessive displacement can lead to instability or compromise vascularity. If displacement is difficult, a McDonald dissector can be used to gently tease the capital fragment laterally.
Image
TECH FIG 3 • A. The osteotomy is displaced and held with a clip.
In-line Compression: Once the desired displacement is achieved, apply in-line force to compress the head fragment onto the shaft. This action allows for cancellous impaction, which significantly aids in the immediate stability of the osteotomy while fixation is being achieved. You should feel a satisfying "crunch" as the cancellous bone engages.
Image
TECH FIG 3 • B. In-line compression is performed to impact the cancellous fragments together to increase stability.
6. Shaving Redundant Cortex and Capsular Imbrication
Shave Redundant Neck Cortex: After displacement, you will notice a protruding portion of the metatarsal neck on the medial side. Using a bone rongeur or a small oscillating saw, shave the redundant neck cortex, approximating to about 50% of the protruding portion. This smooths the contour and prevents impingement.
Medial Capsular Imbrication: Now, we address the medial capsule. While holding the hallux in a neutral or slightly abducted position with the aid of a swab, we imbricate the medial capsule with a strong absorbable suture. This tightens the medial capsule, helping to maintain the corrected position and prevent recurrence.
7. Fixation of the Osteotomy
Stable fixation is paramount for early mobilization and predictable healing.
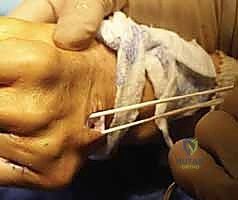
Fixation Choice: While a compression screw can be used, we prefer fixation using a 1.6-mm Kirschner wire for its simplicity and effectiveness in this particular osteotomy.
K-wire Insertion (Retrograde): We pass the Kirschner wire in a retrograde fashion under direct vision.
Start the wire from the plantar aspect of the metatarsal head, aiming obliquely across the osteotomy site.
The wire should traverse the capital fragment, cross the osteotomy, and engage securely into the proximal metatarsal fragment.
It exits through an appropriately placed small skin incision on the dorsal aspect of the foot.
Once the wire provides stable fixation, back the wire out a few millimeters so that its tip lies just deep to the articular cartilage, thus maintaining excellent fixation without penetrating the joint surface. This prevents joint irritation and potential damage.
Confirm the wire position with fluoroscopy.
8. Intraoperative Fluoroscopic Assessment
This is our final confirmation of successful correction.
Image Intensification: We bring in the image intensifier. With the foot placed flat on the image intensifier, we confirm several critical parameters:
Reduction in the intermetatarsal angle: Has our lateral displacement effectively reduced the IMA?
Proper placement of screws/Kirschner wire: Ensure no hardware is intra-articular or impinging.
Relocation of the sesamoids: The sesamoids should be centrally located beneath the metatarsal head, indicating adequate reduction of the MTP joint.
Assessment for Proximal Phalangeal Osteotomy: At this stage, we reassess the hallux valgus angle and the interphalangeal angle. If significant hallux valgus remains due to an abnormal interphalangeal angle, a concomitant proximal phalangeal osteotomy (Akin osteotomy) may be performed to achieve complete correction.
9. Wound Closure and Dressing
Wound Closure: We close the wound in layers. The deep subcutaneous tissues are approximated, followed by a continuous closure of the skin using Monocryl suture.
Forefoot Bandage: Finally, a forefoot bandage is applied to maintain the correction and provide gentle compression.
💡 Pearls and Pitfalls
Osteotomy Execution
Difficulty with Osteotomy Displacement: If you encounter resistance when attempting to displace the capital fragment, first meticulously check that all osteotomy cuts have been completed through to the lateral side. Often, a small bony bridge remains, preventing full mobilization. Use a small osteotome or saw blade to complete any incomplete cuts. If, after confirming complete cuts, displacement remains difficult, a limited lateral capsulotomy may be performed. Restrict these knife cuts strictly to the lateral soft tissues distal to the metatarsal head, carefully avoiding the plantar structures and the lateral collateral ligament to maintain stability. Over-release can lead to hallux varus.
Correcting an Abnormal Distal Metatarsal Articular Angle (DMAA)
Addressing DMAA: To effectively correct an abnormal DMAA, a small medial wedge from the vertical angle correction limb of the osteotomy can be performed. This means you remove a small wedge of bone from the medial aspect of the capital fragment during the vertical cut. While effective, this maneuver will inherently make the osteotomy more unstable due to the increased bone resection and altered contact surfaces. Therefore, care must be taken to achieve robust fixation with either a larger K-wire or, preferably, a compression screw to counteract this instability. Consider a longer period of protected weight-bearing.
Complications Postoperative Care
Potential Complications: Be vigilant for a range of potential complications, including: Avascular Necrosis (AVN) of the metatarsal head (often due to compromised vascularity), stiffness of the MTP joint (requiring early ROM), wound problems (dehiscence, infection), infection (requiring antibiotics or debridement), undercorrection (residual hallux valgus), overcorrection (hallux varus, a challenging complication), fractures (intraoperative or postoperative), chronic regional pain disorder (CRPS), and deep vein thrombosis (DVT). While delayed union and nonunion are rare complications with the use of stable fixation, they can occur, especially with poor bone quality or inadequate fixation.
Postoperative Management and Rehabilitation
My fellows, the surgery is only half the battle. Postoperative care is critical for a successful outcome.
Immediate Postoperative Period: If the patient's condition is stable and safe, they are typically discharged home on the day of surgery. We provide strict advice to elevate the foot whenever resting for the first 2 weeks. This minimizes swelling, reduces pain, and promotes wound healing.
Weight-Bearing Status: In most cases, patients are allowed to bear weight on their heel and lateral forefoot in a hard-soled postoperative shoe. This offloads the surgical site while allowing for limited ambulation. We emphasize avoiding direct pressure on the great toe.
Immobilization: Importantly, cast immobilization is generally not required for a well-fixed Chevron osteotomy. The stability provided by the osteotomy and fixation is usually sufficient.
First Follow-up (2 Weeks): The patient returns for their first follow-up at 2 weeks post-op. The wound is meticulously inspected for any signs of infection or dehiscence. At this time, the hallux is restrapped to maintain alignment, and patients are gently taught simple passive and active toe flexion–extension exercises. Early, gentle range of motion helps prevent stiffness.
Subsequent Follow-ups: K-wires are typically removed at 4-6 weeks post-op. Progressive weight-bearing and more aggressive physical therapy will be initiated based on radiographic healing and clinical progress. Full return to activity is usually anticipated around 3-4 months.
Thank you, fellows. This procedure, when executed with precision and anatomical respect, yields excellent results for our patients. Remember these principles, and you will achieve mastery.
REFERENCES
Kuhn MA, Lippert FG III, Phipps MJ, et al. Blood flow to the metatarsal head after chevron bunionectomy. Foot Ankle Int 2005; 26:526–529.
Nery C, Barroco R, Réssio C. Biplanar chevron osteotomy. Foot Ankle Int 2002;23:792–798.
Peterson DA, Zilberfarb JL, Greene MA, et al. Avascular necrosis of the first metatarsal head: incidence in distal osteotomy combined with lateral soft tissue release. Foot Ankle Int 1994;15:59–63.
Pinney S, Song K, Chou L. Surgical treatment of mild hallux valgus deformity: the state of practice among academic foot and ankle surgeons. Foot Ankle Int 2006;27:970–973.
Potenza V, Caterini R, Farsetti P, et al. Chevron osteotomy with lateral release and adductor tenotomy for hallux valgus. Foot Ankle Int 2009;30:512–516.
Schneider W, Aigner N, Pinggera O, et al. Chevron osteotomy in hallux valgus: ten-year results of 112 cases. J Bone Joint Surg Br 2004; 86B:1016–1020.
Singh SK, Jayasakera N, Nazir S, et al. Use of a polydioxone (PDS) suture to stabilize the chevron osteotomy: a review of 30 cases. J Foot Ankle Surg 2004;43:306–310.
Trnka HJ, Zembsch A, Easley ME, et al. The chevron osteotomy for correction of hallux valgus: comparison of findings after two and five years of follow-up. J Bone Joint Surg Am 2000;82A:1373–1378.
Trnka HJ, Zembsch A, Weisauer H, et al. Modified Austin procedure for correction of hallux valgus. Foot Ankle Int 1997;18:119–127.
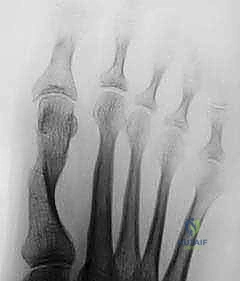
At 4 weeks postoperatively the osteotomy is assessed. The Kirschner wire is removed in the outpatient setting.
At 6 weeks the osteotomy is checked radiologically, and if there is consolidation at the line of the osteotomy, the patient is instructed to wear a wide shoe or sneaker and to progress to full weight bearing as tolerated. Strapping of the hallux is discontinued at this time.
OUTCOMES
- The chevron osteotomy is the most commonly performed distal chevron osteotomy for mild hallux valgus in the United States, 4 and outcomes are excellent. 2,5,9
AVN with the use of a lateral release remains a concern. Recent reports suggest very low rates of AVN when correcting moderate deformities with the chevron osteotomy with a lateral release. 1,3,5,7 The improved correction that we see with a lateral release means that we perform it in every case.
Evidence also now suggests that concern that the osteotomy should be reserved for patients under 50 years old may not be true, with equivalent results in differing age groups. 6,8