Volar Plate Arthroplasty: A Masterclass in PIP Joint Reconstruction
Key Takeaway
This masterclass guides fellows through Volar Plate Arthroplasty (VPA) for Proximal Interphalangeal (PIP) joint fracture-dislocations. We'll cover comprehensive surgical anatomy, meticulous preoperative planning, and granular intraoperative execution, from incision to K-wire fixation. Expect detailed instrument use, real-time decision-making, and extensive pearls to manage complications and optimize patient outcomes, ensuring stable, functional joint reconstruction.
Welcome, fellows, to the operating theater. Today, we're addressing a challenging yet rewarding injury: a chronic dorsal fracture-dislocation of the proximal interphalangeal (PIP) joint, which has led to significant instability and functional deficit. Despite optimal initial management, PIP and DIP joint fracture-dislocations often result in some degree of motion loss. Our goal today is to perform a Volar Plate Arthroplasty (VPA). This elegant technique provides a critical volar restraint against dorsal subluxation or dislocation, effectively resurfacing the injured volar articular portion of the joint using local tissue – the volar plate itself.
It's crucial to understand that even seemingly "minor" PIP joint injuries can lead to protracted symptoms like swelling, stiffness, and pain, often exceeding patient expectations. While VPA principles can apply to the DIP joint, we primarily utilize it for PIP joint stability, given the complexities introduced by the FDP insertion at the distal phalanx base for DIP exposure.
Understanding the Injury: Patient History, Physical Findings, and Pathogenesis
When you encounter these patients, a thorough history is paramount. Ask about the mechanism of injury – often longitudinal compression or hyperextension forces, common in sports. Note the time since injury, any prior injuries, and the direction of deformity. This information is vital for determining the most appropriate treatment strategy.
On physical examination, we'll carefully inspect the finger for swelling or deformity. Be aware that clinical deformity can be subtle, even with significant subluxation. We then assess the range of motion (ROM), specifically noting the degrees of PIP motion. In cases of joint subluxation, patients typically present with painful and markedly limited flexion. A PIP joint that remains dislocatable after attempted closed reduction demands surgical intervention for stability.
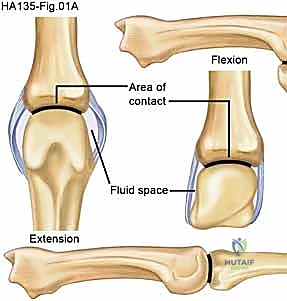
Pathogenesis: These injuries, particularly dorsal fracture-dislocations of the PIP joint, occur when a force drives the middle phalanx dorsally against the condyles of the proximal phalanx, damaging the volar articular surface of the middle phalanx. Chronic subluxation or dislocation, defined as more than six weeks post-injury, is common, especially when the initial injury is dismissed as a "sprain." This chronic instability leads to poor function and, inevitably, degenerative arthritis, characterized by limited and painful flexion.
Comprehensive Surgical Anatomy: Navigating the PIP Joint
Before we make any incisions, let's review the critical anatomy of the PIP joint. This is a complex hinge joint, and understanding its stabilizers is key to our success.
Ligamentous Structures
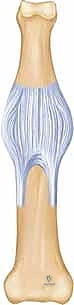
- Volar Plate (VP): This is our primary restraint against hyperextension instability. It lies palmar to both the PIP and DIP joints, separating the joint from the flexor tendons.
- Proximally: The VP is "swallowtail" shaped at its origin, connected to the proximal phalanx and the fiberosseous tendon sheath by the proximal checkrein ligaments. These ligaments are crucial for the VP's gliding motion and will be a point of potential release if we need to advance the plate.
- Distally: The VP is primarily cartilaginous. It inserts centrally via the periosteum and laterally with a conjoined insertion through the collateral ligaments.
- The volar plate normally glides proximally and distally with joint motion.
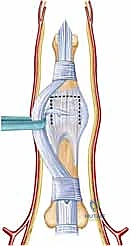
* Image Caption: A volar view of the PIP joint, illustrating the supporting ligamentous structures including the collateral ligaments and the volar plate, with flexor tendons deep to it.
- Collateral Ligaments: These originate on the dorsal radial and dorsal ulnar surfaces proximal to the joint.
- Proper Collateral Ligaments: Insert on the volar radial and volar ulnar surfaces distal to the joint.
- Accessory Collateral Ligaments: Insert into the lateral margin of the volar plate, creating a "box-type" configuration that provides significant stability.
- In subacute or chronic cases of dorsal subluxation, these ligaments often contract due to their oblique orientation, accentuating the deformity.
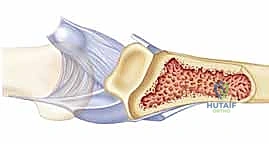
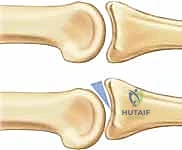
* Image Caption: A sagittal view of the PIP joint, showing the relative positions of the central slip, volar plate, proper and accessory collateral ligaments.
- Central Slip: Part of the extensor mechanism, inserting on the dorsal base of the middle phalanx. We must be mindful of this structure, especially when passing sutures dorsally.
Muscular and Tendinous Relationships
- Flexor Digitorum Superficialis (FDS): Inserts just distal to the volar plate on the middle phalanx. The forces exerted by the FDS, due to its direction of pull, can unfortunately accentuate dorsal subluxation of the middle phalanx base when the volar restraints are compromised.
- Flexor Digitorum Profundus (FDP): While less directly involved in PIP stability, it lies deep to the FDS and is the primary flexor of the DIP joint. Its presence is more critical for DIP VPA.
Neurovascular Structures
- Radial and Ulnar Neurovascular Bundles: These run along the sides of the digit, adjacent to the flexor sheath. They are incredibly vulnerable during our exposure, especially when we hyperextend the joint. Meticulous identification and mobilization are non-negotiable to prevent traction injuries.
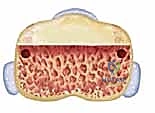
Osteology
- Proximal Phalanx: Its condyles articulate with the middle phalanx. A normal articular contour of the proximal phalanx is a prerequisite for a successful VPA.
- Middle Phalanx: The base of the middle phalanx is where the fracture-dislocation occurs, often involving the volar articular surface. We need to identify the intact dorsal cortex and dorsal articular surface, as these are required for VPA. Fractures typically involve over 30% of the middle phalanx base surface.
Preoperative Planning and Patient Positioning
Our preoperative evaluation began with imaging. Every patient with a PIP injury requires anteroposterior, lateral, and oblique radiographs to assess for fracture or subluxation.
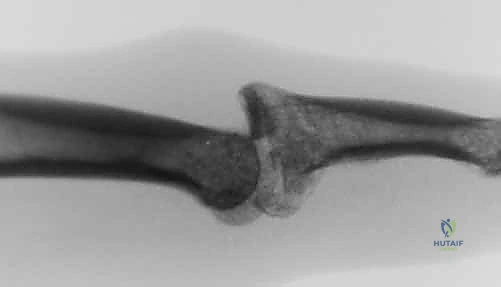
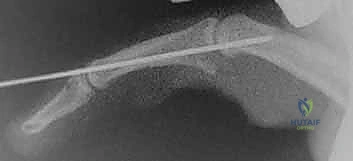
- Image Caption: A lateral radiograph demonstrating subluxation of the PIP joint, a common finding in these injuries.
A true lateral view of the PIP joint is mandatory to evaluate for subluxation. You'll often see a characteristic "dorsal V sign" at the joint on a true lateral radiograph, indicating that the articular surfaces are neither congruent nor parallel.
- Image Caption: PIP joint subluxations frequently exhibit a signature dorsal V sign on a lateral radiograph, as described by Light.
While articular defects can remodel in a concentrically reduced joint, the severity of the fracture and degree of middle phalanx involvement are often greater than they appear on plain films. Fluoroscopy is critical for dynamic evaluation of joint stability and obtaining magnified, perfect lateral views intraoperatively. CT scans are rarely needed but can precisely define articular surfaces and bone loss, especially in complex cases.
Indications for VPA
- Acute fracture-dislocations that remain unstable after closed reduction, particularly when the volar base of the middle phalanx is unreconstructable, or if less invasive techniques are unlikely to achieve a functional result.
- Chronic subluxations or dislocations, even up to two years following trauma, provided the conditions are met.
Contraindications and Considerations
- A normal articular contour of the proximal phalanx is a prerequisite.
- An intact dorsal cortex and dorsal articular surface are required on the middle phalanx.
- Fractures involving over 50% to 60% of the middle phalanx articular surface are less successfully treated with VPA, with recurrent subluxation being common.
- Involvement of the dorsal cortex is a contraindication.
- In chronic dislocations, anticipate soft tissue contracture and heterotopic bone, which will complicate dissection and reduction.
- If more than 65 degrees of flexion is required to maintain reduction after closed manipulation, surgical reconstruction should be strongly considered.
Our Setup Today
The patient is positioned supine on the operating table. The affected arm, in this case, the left hand, is placed on a specialized hand table. This allows optimal access and maneuverability. We have our intraoperative fluoroscopy unit (mini C-arm) positioned to easily obtain true lateral views of the injured PIP joint throughout the procedure. This dynamic visualization is critical. Finally, we'll operate under tourniquet control to ensure a bloodless field, which is essential for meticulous dissection in the hand.
Step-by-Step Intraoperative Execution: The Surgeon's View
Alright, fellows, let's begin. We've prepped and draped the hand, and the tourniquet is inflated.
1. Incision and Initial Exposure
"Scalpel, please. We'll start with a classic Bruner incision, centered precisely at the PIP flexion crease. I'm making two gentle limbs, creating a radially based flap. The vertex of our incision will be slightly ulnar, giving us better exposure as we elevate the flap."
- Image Caption: The planned Bruner incision, centered over the PIP flexion crease, with its vertex oriented towards the ulnar side.
"Now, with careful subcutaneous dissection, we'll elevate this flap. Identify the subcutaneous fat and keep our dissection superficial to the flexor sheath initially."
2. Neurovascular Bundle Identification and Mobilization
"As we deepen our dissection, we must be exquisitely careful. The radial and ulnar neurovascular bundles are immediately adjacent to our field, running along the sides of the digit. I'm using fine blunt dissection, typically with a mosquito hemostat or small blunt scissors, to identify and gently mobilize these bundles."
Surgical Warning: This is a critical step. Failure to identify and mobilize these bundles adequately is a common pitfall leading to traction injury, especially when we later hyperextend the joint. A nerve injury here can be devastating.
"See how we're carefully retracting them radially and ulnarly, creating a safe corridor? This prevents any undue tension or compression."

- Image Caption: Demonstration of the necessary mobilization of the neurovascular bundles to prevent traction injuries during the procedure.
3. Flexor Sheath Incision and Tendon Retraction
"Next, we need to access the deeper structures. The flexor sheath over the PIP joint is our next landmark. I'm going to make a rectangular incision in the flexor sheath, carefully staying between the A2 and A4 pulleys. This preserves the crucial A2 and A4 pulleys, which are essential for maintaining the mechanical efficiency of the flexor tendons."
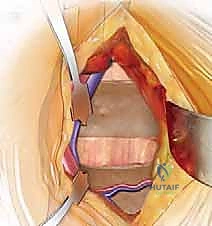
"We'll create a small rectangular flap of the flexor sheath. This flap will be carefully protected and kept moist for later repair. Now, gently retract the flexor tendons (FDS and FDP) either radially or ulnarly, as needed, to fully visualize the underlying volar plate. We want to do this atraumatically, minimizing any damage to the tendons."
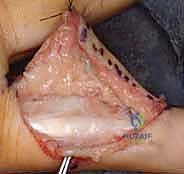
- Image Caption: Illustration showing the careful retraction of the flexor tendons and neurovascular bundles to expose the volar plate. The proposed incision for detaching and mobilizing the volar plate is outlined.
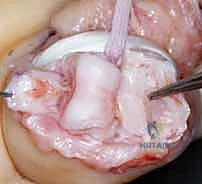
4. Detachment of the Volar Plate
"Now we're at the core of our reconstruction. We need to detach the volar plate from the middle phalanx. Our goal is to harvest a volar plate flap that is as long and broad as possible, ensuring adequate stability for our arthroplasty. It needs to be symmetrical radially and ulnarly to prevent any angular deformities post-operatively."
"I'm using a fine scalpel to carefully incise the volar plate from its distal attachments on the middle phalanx and from the proper and accessory collateral ligaments. We'll make these incisions along its radial-most and ulnar-most margins. Take care to include as much tissue as possible with the volar plate flap."
Surgical Warning: Be mindful not to damage the flexor tendons during this detachment. Use sharp, precise dissection.
"Once the volar plate is detached, we can now excise the remnants of the collateral ligaments. These are often contracted and contribute to the deformity."
5. Joint Hyperextension ("Shotgunning") and Debridement
"With the volar plate detached, we can now perform our 'shotgun' maneuver. I'm going to hyperextend the PIP joint to approximately 180 degrees. This provides maximal visualization of the base of the middle phalanx and the fracture defect."
"Look closely at the joint surface. We'll now carefully debride any small fragments of depressed articular cartilage or subchondral bone. These fragments can be saved; they might be useful later to provide additional support."
Surgical Warning: While debriding, be extremely careful to avoid over-resection. We must preserve the dorsal articular support of the middle phalanx, as its integrity is crucial for VPA success.
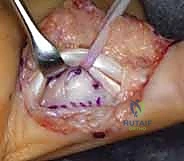
6. Shaping the Articular Surface of the Middle Phalanx
"Now, we need to prepare the recipient bed for our transposed volar plate. I'm taking a small, sharp osteotome and carefully fashioning a transverse trough across the middle phalanx. This trough will be at the juncture between the intact articular surface and the fracture defect. For finer work, a small curette or rongeur can be used to refine the trough."
"This trough must be symmetric in the coronal plane to prevent any angular deformity after reconstruction. The depth of the trough at its dorsal side should be precisely the thickness of our volar plate flap. This will allow for a smooth, congruent transition from the intact dorsal articular cartilage to the transposed volar plate, creating a new, functional articular surface."
- Image Caption: A schematic illustrating the bone resection to create the trough and the placement of needle holes relative to the collateral ligament stubs and central tendon.
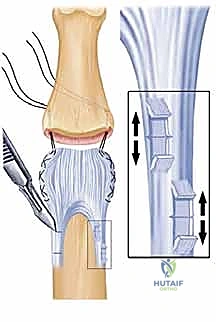
7. Transposing the Volar Plate
"Now for the reconstruction itself. I'm placing a 3-0 nonabsorbable grasping suture, using a modified Bunnell fashion, through both the ulnar-most and radial-most margins of our volar plate flap. We want a secure purchase here."
- Image Caption: Sutures are being placed through the margins of the volar plate in preparation for advancement and fixation.
"Now, the joint should be flexed to approximately 20 to 25 degrees. This slight flexion allows the volar plate to advance both distally and dorsally into our prepared trough."
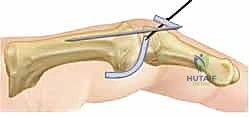
"Next, I'll take two straight Keith needles. Using a wire driver, I'll pass one needle through each side of the base of the middle phalanx. These needles are placed as far radially, ulnarly, and distally into the bone defect as possible, directed centrally. They should penetrate the dorsal cortex distal to the central slip insertion."
- Image Caption: Sutures are passed through the margins of the volar plate and then through the base of the middle phalanx using straight Keith needles. The volar plate will be advanced into the trough, resurfacing the PIP joint.
"Once the needles are through, we'll retrieve the sutures. Before tying, let's get a true lateral fluoroscopic view with the mini C-arm. We need to dynamically assess the reduction."
"Observe the fluoroscopy screen. The base of the middle phalanx should glide smoothly over the head of the proximal phalanx. Crucially, it should not hinge open dorsally. We're looking for a concentric reduction. We also want to confirm that the fingertip can touch the distal palmar crease, indicating approximately 110 degrees of flexion."
- Image Caption: A fluoroscopic image confirming the successful reduction and stabilization of the PIP joint after volar plate transposition.
"Now, under direct vision and fluoroscopic guidance, we'll gently tension the sutures as we flex the middle phalanx. This brings the volar plate precisely into the trough, creating that smooth transition from the intact dorsal base of the middle phalanx to our advanced volar plate."
"If we find that the PIP joint lacks substantial extension or has inadequate flexion, it may be necessary to gain further length in the volar plate. This can be achieved by carefully teasing the checkrein ligaments from their origin or, in more severe cases, by performing a fractional lengthening through step-cutting of these ligaments."
- Image Caption: Diagram showing bone resection, needle holes in relation to collateral ligament stubs and central tendon, emphasizing dorsal and lateral placement for maximum stability.
8. Securing the Volar Plate and Final Fixation
"With the reduction confirmed and the volar plate advanced, we can now secure our sutures. The most common method is to tie the sutures over a button dorsally. This provides broad, even pressure distribution."
"Alternatively, in situations where a button isn't preferred, the sutures can be tied directly onto the periosteum via a small incision distal to the central slip insertion. If you choose this method, you must be extremely careful to ensure the sutures do not entrap the lateral bands or injure the central slip of the extensor mechanism."
"In the acute setting, any fractured bone fragments we collected earlier during the volar plate detachment can be placed in the defect of the middle phalanx, distal to the advanced volar plate. This can provide additional structural support to the base of the phalanx."
"Finally, for immediate stability, we'll use a K-wire. I'm inserting a K-wire across the joint with the PIP joint in slight flexion, typically around 20-30 degrees, to maintain this reduction for approximately 3 weeks. This allows for initial soft tissue healing and prevents early redislocation."
- Image Caption: A lateral diagram of the completed Volar Plate Arthroplasty, showing the joint stabilized with a double-ended K-wire and the volar plate secured by sutures.
"As an alternative to K-wire fixation, an articulated external fixator could be used. This option allows for early controlled motion, which can be beneficial in certain circumstances, though it adds complexity."
"We'll now meticulously repair the flexor sheath flap, ensuring it covers the flexor tendons without impingement. Then, we'll close the Bruner incision in layers, paying attention to skin approximation for optimal scar cosmesis."
"Tourniquet down. Good job, team. Let's check for capillary refill and sensation. Everything looks good."
💡 Pearls and Pitfalls
- Recurrent Subluxation: This is a primary concern. The most common reasons are inadequate volar plate advancement, insufficient tensioning of the sutures, or premature mobilization.
- Salvage: Ensure meticulous technique in volar plate detachment to maximize length. Use dynamic fluoroscopy to confirm concentric reduction and stability throughout the full range of motion before final fixation. If subluxation persists after fixation, consider re-tensioning sutures or revising the K-wire placement. Fixation with a K-wire or articulated fixator for 2 to 3 weeks is strongly recommended to allow soft tissue healing.
- Loss of Flexion: A common complication if rehabilitation is not aggressive enough or if soft tissue contractures are not adequately addressed intraoperatively.
- Salvage: Aggressive, but controlled, range of motion exercises are essential post-operatively. During surgery, if the joint lacks adequate flexion, you must advance the volar plate distally by teasing the checkrein ligaments from their origin or performing a fractional lengthening through step-cutting.
- Neurologic Injury:
- Prevention: As we emphasized, meticulous dissection and identification of both radial and ulnar neurovascular bundles are absolutely required before "shotgunning" the joint open. Gentle retraction is key. Any signs of neuropraxia post-op (numbness, tingling) warrant immediate investigation.
- Loss of Extension: Some minor loss of extension is often expected with VPA, as we are effectively creating a new volar restraint. However, an unacceptable contracture can occur.
- Prevention: Failure to adequately lengthen the checkrein ligaments during volar plate transposition is a primary cause. If the joint cannot achieve near-full extension intraoperatively (before K-wire placement), further release of the checkrein ligaments is indicated.
- Angular Deformities: These can result from asymmetrical trough fashioning or uneven tensioning of the volar plate sutures.
- Prevention: Ensure the transverse trough is perfectly symmetrical in the coronal plane. Place sutures evenly and tension them equally on both radial and ulnar sides of the volar plate. Dynamic fluoroscopy can help assess alignment.
- Pin and Wire Track Infections: Common with transarticular pinning.
- Prevention: Strict sterile technique during insertion, meticulous wound care post-op, and prophylactic antibiotics. If infection occurs, early K-wire removal and antibiotic treatment are necessary.
- Pain and Stiffness: Inherent to joint trauma and surgery.
- Management: Aggressive hand therapy, pain management strategies, and patient education on realistic recovery timelines.
- Degenerative Arthrosis: A long-term risk, especially in chronic cases or if perfect reduction and stability are not achieved.
- Management: While VPA aims to prevent this, if it progresses, further interventions like arthrodesis or prosthetic arthroplasty may be considered in the future.
Postoperative Care and Rehabilitation
Our job isn't over when the patient leaves the OR. Postoperative care is just as crucial for a successful outcome.
- Immobilization: The K-wire maintaining PIP joint fixation will remain in place for 2 to 3 weeks. This period allows for initial soft tissue healing and stabilization of the transposed volar plate.
- Early Motion: While the PIP joint is pinned, we actively encourage motion of the DIP joint. Deficits in DIP motion have been reported after VPA, so maintaining this range is important.
- K-wire Removal: At 2 to 3 weeks, the K-wire will be removed in the clinic.
- Initiation of Active Motion: Immediately after K-wire removal, we will begin active flexion and extension exercises of the PIP joint.
- Extension Block Splinting: From weeks 3 to 6 after the operation, the patient will use an extension block splint. This splint allows full flexion but prevents hyperextension, protecting the healing volar plate reconstruction while encouraging safe range of motion. The block is gradually adjusted to allow increasing extension as healing progresses and stability is confirmed.
- Progressive Rehabilitation: After 6 weeks, the splint may be weaned, and a more aggressive, progressive rehabilitation program will be initiated with a certified hand therapist. This will focus on regaining full PIP flexion and extension, improving grip strength, and restoring functional use of the hand.
Complication Management
- Wound Dehiscence: Meticulous wound closure and sterile dressing changes are paramount. If dehiscence occurs, local wound care, antibiotics if infected, and sometimes secondary closure or skin grafting may be necessary.
- Hardware Failure (K-wire migration/breakage): Rare, but possible. If it occurs, the K-wire may need to be removed or replaced, potentially requiring a temporary return to the OR.
- Persistent Instability: If, despite our best efforts, the joint remains unstable, further surgical options may need to be explored, including revision VPA, arthrodesis, or even prosthetic replacement in select cases.
Remember, fellows, the goal of VPA is to restore a stable, functional PIP joint, preventing the debilitating cycle of chronic subluxation and degenerative arthritis. With careful planning, meticulous surgical technique, and dedicated postoperative rehabilitation, we can achieve excellent long-term outcomes for our patients. Thank you.
REFERENCES
-
After 6 weeks, the pullout suture, if one was used, is removed.
-
A dynamic extension splint may be used at 6 weeks if the achieved extension is not as expected based on intraoperative range of motion.
OUTCOMES
- More normal PIP motion is restored in acute injuries than in chronic injuries: 85 degrees of active PIP motion versus 60 degrees.
-
Patients can expect to see continued improvement in range of motion up to 1 year after VPA.
-
Mild contractures of the DIP joint (10 to 20 degrees) are common. Patients are encouraged in DIP motion during rehabilitation.
COMPLICATIONS
- Resubluxation or dislocation
-
Flexion contracture of the PIP or DIP joint
-
Blazar PE, Robbe R, Lawton JN. Treatment of dorsal fracture/ dislocations of the proximal interphalangeal joint by volar plate arthroplasty. Tech Hand Up Extrem Surg 2001;5:148–152.
-
Blazar PE, Steinberg DR. Fractures of the proximal interphalangeal joint. J Am Acad Orthop Surg 2000;8:383–390.
-
Bowers WH, Wolf JW, Nehil JL, et al. The proximal interphalangeal joint volar plate. I. An anatomical and biomechanical study. J Hand Surg Am 1980;5:79–88.
-
Burton RI, Campolattaro RM, Ronchetti PJ. Volar plate arthroplasty for osteoarthritis of the proximal interphalangeal joint: a preliminary report. J Hand Surg Am 2002;27:1065–1072.
-
Eaton RG, Malerich MM. Volar plate arthroplasty of the proximal interphalangeal joint: a review of ten years’ experience. J Hand Surg Am 1980;5:260–268.
-
Light TR. Buttress pinning techniques. Orthop Rev 1981;10:49–55.
-
Malerich MM, Eaton RG. The volar plate reconstruction for fracture-dislocation of the proximal interphalangeal joint. Hand Clin 1994;10:251–260.
-
Rettig ME, Dassa G, Raskin KB. Volar plate arthroplasty of the distal interphalangeal joint. J Hand Surg Am 2001;26:940–944.
You Might Also Like