Autologous Chondrocyte Implantation: A Masterclass in Cartilage Restoration

Key Takeaway
Welcome, fellows, to an in-depth operative masterclass on Autologous Chondrocyte Implantation (ACI). This two-stage procedure is a cornerstone for treating focal, full-thickness articular cartilage defects in young, active patients. We'll meticulously cover patient selection, detailed surgical anatomy, precise intraoperative technique, critical pearls, potential pitfalls, and comprehensive postoperative rehabilitation. Prepare to scrub in and master this advanced cartilage restoration technique.
Welcome, fellows, to the operating theater. Today, we're tackling a fascinating and critical procedure: Autologous Chondrocyte Implantation (ACI). This isn't just another knee surgery; it's a sophisticated biological reconstruction, a testament to our ongoing pursuit of true hyaline cartilage restoration. Once considered experimental, ACI has matured into an indispensable tool for a specific subset of patients, particularly young, active individuals suffering from debilitating focal chondral lesions. We've performed over 5,000 of these procedures in the U.S., a clear indicator of its established role.
The essence of ACI lies in its two-stage approach: first, harvesting healthy autologous chondrocytes and culturing them; second, implanting these expanded cells into a prepared chondral defect. The goal is to reconstitute the articular surface with a "hyaline-like" cartilage that offers superior mechanical properties and documented durability compared to the fibrocartilage produced by marrow stimulation techniques.
Understanding the Articular Cartilage: Our Target Tissue
Before we make any incision, let's re-establish our fundamental understanding of articular cartilage. This tissue, covering the ends of our long bones within synovial joints, is paramount for normal joint function. It acts as a resilient, load-bearing structure and provides a remarkably low-friction surface, essential for smooth articulation.
Microscopic Architecture
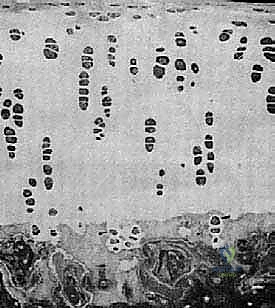
Articular cartilage is an intricate, highly specialized connective tissue, devoid of blood vessels, nerves, and lymphatic channels. Its metabolic needs are met primarily by diffusion from the synovial fluid. Histologically, it comprises four distinct zones, each with unique structural and functional characteristics:
- Superficial (Tangential) Zone: This outermost layer, parallel to the articular surface, contains flattened chondrocytes and collagen fibers oriented parallel to the surface. It's crucial for resisting shear forces and providing a smooth gliding surface.
- Middle (Transitional) Zone: Here, chondrocytes are more rounded, and collagen fibers are obliquely oriented. This zone absorbs compressive forces.
- Deep (Radial) Zone: Characterized by chondrocytes arranged in columns and collagen fibers oriented perpendicularly to the articular surface. This layer is vital for resisting compression and anchoring the cartilage to the subchondral bone.
- Calcified Zone: The deepest layer, adjacent to the subchondral bone, where the matrix is calcified. It's separated from the deep zone by the "tidemark," a critical anatomical boundary that defines the interface between cartilage and bone.
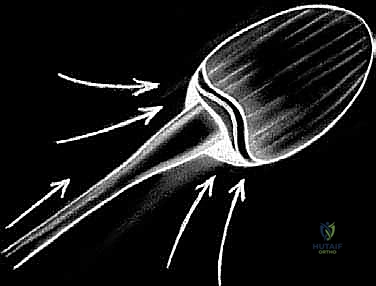
The chondrocyte, constituting only about 5% of the cartilage's weight, is the sole cell type responsible for maintaining the metabolic balance of the extracellular matrix. These cells synthesize and secrete the primary components:
- Water: Approximately 75% of cartilage weight, it's a critical component for hydration and load distribution.
- Collagen: Predominantly Type II (about 10% of weight), it provides the structural framework and tensile strength.
- Proteoglycans (Glycosaminoglycans): Around 10% of weight, these highly negatively charged molecules trap and hold water, imparting the tissue's compressive stiffness and resilience.
FIG 2 • A. Histology of articular cartilage.

FIG 2 • B. Chondrocyte and matrix with labels.
Pathogenesis of Cartilage Injury
Articular cartilage is unfortunately susceptible to traumatic injuries, leading to partial- or full-thickness chondral or osteochondral defects. Pathologic conditions like osteochondritis dissecans (OCD) or local osteonecrosis also contribute. The critical issue is the cartilage's limited, or often absent, capacity for intrinsic repair due to its avascular nature.
- Partial-thickness lesions: These have a very poor healing potential. Without access to the subchondral blood supply, an inflammatory response cannot be mounted, leaving a persistent defect.
- Full-thickness lesions: While these penetrate the subchondral plate, allowing progenitor cells from the bone marrow to migrate, the repair tissue is typically fibrocartilage. This fibrocartilage, though an attempt at healing, lacks the resilient mechanical properties of native hyaline cartilage and is prone to premature degeneration, delamination, and eventual joint destruction.
Patient Selection and Preoperative Planning: The Foundation of Success
The success of ACI hinges on meticulous patient selection and comprehensive preoperative planning. We're looking for the right patient, with the right lesion, and the right intra-articular environment.
Indications for ACI
- Symptomatic, weight-bearing, unipolar, focal full-thickness chondral injury: This is our sweet spot. We're addressing discrete lesions, not diffuse osteoarthritis.
- Outerbridge Grade III or IV lesions: These classifications, determined arthroscopically, indicate significant cartilage damage extending to or exposing subchondral bone.
- Outerbridge Classification (Table 1):
- Grade I: Articular surface swollen and soft; may be blistered.
- Grade II: Fissures and clefts < 1 cm in diameter.
- Grade III: Deep fissures extending to subchondral bone, > 1 cm in diameter; loose flaps and debris.
- Grade IV: Subchondral bone exposed.
- Outerbridge Classification (Table 1):
- Unstable osteochondritis dissecans fragment: ACI can be an excellent option for restoring the articular surface after fragment removal or failed fixation.
- Lesions typically larger than 1.5 to 2.0 cm²: While there's no strict upper size limit, ACI is particularly advantageous for larger defects where marrow stimulation techniques might yield less durable results.
- Physiologically young, active patients: These are individuals with high functional demands who are compliant with a rigorous and lengthy rehabilitation protocol. Age is less about chronological years and more about biological age and activity level.
Contraindications
- Osteoarthritis or bipolar lesions with characteristic radiographic Fairbanks changes: Joint space narrowing, osteophyte formation, subchondral bony sclerosis or cyst formation are red flags. ACI is not an osteoarthritis treatment.
- Comorbidities not addressed:
- Ligamentous instability (e.g., ACL insufficiency, medial/lateral collateral laxity): Even subtle laxity can create excessive shear forces, irreversibly damaging the maturing repair tissue. These must be addressed concomitantly or in a staged fashion.
- Meniscal pathology (significant loss of tissue): Menisci are crucial load distributors. Their absence leads to abnormal contact pressures. Meniscus transplantation may be required, either staged or concomitantly.
- Limb malalignment (varus/valgus): Biomechanical malalignment or patellar maltracking will subject the ACI repair to abnormal compressive and shear loads, leading to failure. Corrective osteotomies (proximal tibia or distal femur) or patellar realignment procedures must be performed.
- Coexisting inflammatory arthritis or active infections.
- Loose bodies or chondral flaps: These must be removed.
Preoperative Imaging and Assessment
Our diagnostic workup is exhaustive:
- Plain Radiographs: Weight-bearing anteroposterior (AP), notch, sunrise, and lateral views. While cartilage itself isn't visible, we assess joint space narrowing, bony defects, and overall limb alignment. Full-length lower extremity radiographs are crucial for assessing mechanical axis and planning potential osteotomies.

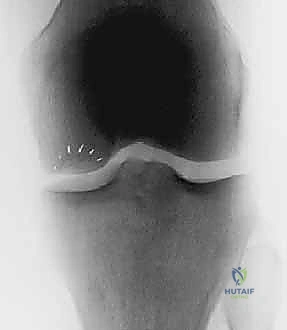
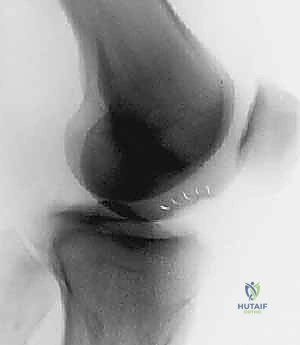
FIG 3 • Lateral ( A )

FIG 3 • and AP ( B ) radiographs of osteochondritis dissecans.
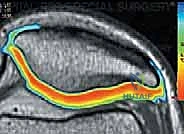
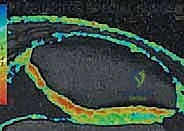
2. Magnetic Resonance Imaging (MRI): Our gold standard for cartilage assessment. MRI clearly demonstrates lesion size, location, depth, involvement of subchondral bone, and the number of lesions. Advanced sequences like T2-weighted mapping provide remarkable detail at the proteoglycan level, helping us assess cartilage quality and integrity. Postoperatively, MRI is invaluable for assessing defect fill, integration, and subchondral bone status.

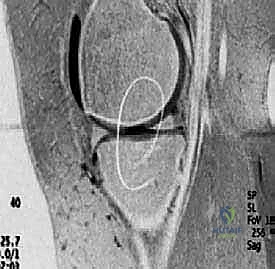
FIG 3 • C. MRI of articular cartilage lesion ( circled ) of the medial femoral condyle.

FIG 3 • D,E. T2-weighted MRI mapping of articular cartilage, showing normal articular cartilage and degenerated articular cartilage.
3. Optical Coherence Tomography (OCT): An emerging cross-sectional imaging technology using near-infrared light, providing noninvasive, high-resolution microstructural views of articular cartilage.
Preoperative Planning Checklist
- Patient Education: Ensure the patient fully understands the two-stage nature of the procedure, the extensive rehabilitation commitment, and realistic outcome expectations.
- Lesion Assessment: Confirm size, depth, and location. For bony deficits (e.g., large OCD lesions), plan for staged or concomitant bone grafting. If staged, allow 6 months for graft consolidation before ACI.
- Comorbidity Management: Plan for concomitant ligament reconstruction, meniscal transplantation, or osteotomy if indicated. This is critical for creating a stable, biomechanically sound environment for the ACI.
Stage 1: Arthroscopic Evaluation and Chondrocyte Harvest
The first stage is a diagnostic arthroscopy combined with cartilage biopsy. This is where we confirm our preoperative findings and harvest the precious cells.
Patient Positioning and Setup
"Alright team, let's get our patient positioned properly. We'll have him supine on the operating table. Ensure the entire lower extremity is prepped and draped from the iliac crest down to the toes. This allows us full range of motion, especially extreme knee flexion, which will be crucial later. A tourniquet will be applied to the upper thigh, ready for inflation."
- Positioning: Supine on the OR table.
- Tourniquet: Applied high on the thigh.
- Draping: Full sterile prep and drape of the entire lower extremity, ensuring hip and ankle mobility. A foot holder can be used to maintain knee flexion.
- Fluoroscopy: While not typically used for the harvest itself, have it available for potential associated procedures or if bony defects are suspected.
Arthroscopic Assessment: The Intraoperative Reality Check
"Now, let's begin with our diagnostic arthroscopy. This is our final, definitive assessment of the knee's intra-articular environment. Remember, undiagnosed pathology can doom an ACI, so be thorough."
- Standard Portal Placement: "We'll establish our standard anteromedial and anterolateral portals. Ensure good inflow and outflow to maintain clear visualization."
- Systematic Joint Survey: "I want a complete arthroscopic evaluation of all compartments: patellofemoral, medial tibiofemoral, and lateral tibiofemoral. Visually inspect every articular surface and then, critically, probe every suspicious area."
- Patellofemoral Joint: Check patellar tracking, trochlear groove, and the articular surfaces of both.
- Medial Compartment: Assess the medial femoral condyle, medial tibial plateau, and the medial meniscus.
- Lateral Compartment: Assess the lateral femoral condyle, lateral tibial plateau, and the lateral meniscus.
- Intercondylar Notch: Evaluate the ACL, PCL, and the notch walls for osteophytes.
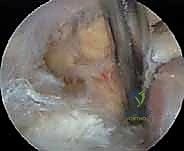
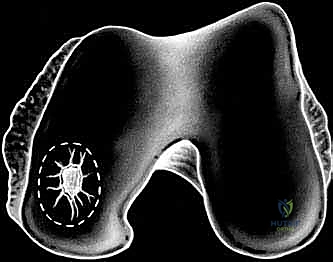
- Lesion Characterization: "When we find our target lesion, we need to characterize it precisely. Use a graduated probe to measure its anteroposterior and medial-lateral dimensions. This size estimation is paramount, as it dictates the number of chondrocytes we'll need to grow in culture."
- Depth: Probe the depth of the lesion. Is it full-thickness? Is subchondral bone exposed?
- Borders: Is it a contained defect with stable shoulders of healthy cartilage, or is it uncontained? Contained defects generally have better outcomes.
- Number and Location: Document all lesions, even small ones.

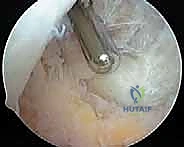
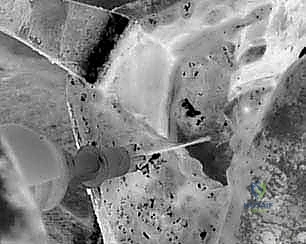
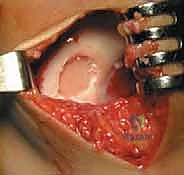
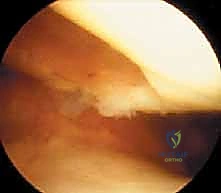
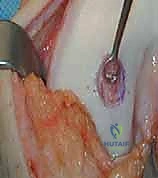
TECH FIG 1 • Arthroscopic view of a full-thickness medial femoral condyle lesion.

TECH FIG 1 • Arthroscopic view of a full-thickness medial femoral condyle lesion.
> **Surgical Warning:** "Do not underestimate the importance of a meticulous arthroscopic survey. Any unaddressed ligamentous instability, meniscal pathology, or significant malalignment will compromise your ACI outcome. If you find something unexpected that contraindicates ACI, you must be prepared to abort or stage the procedure appropriately."
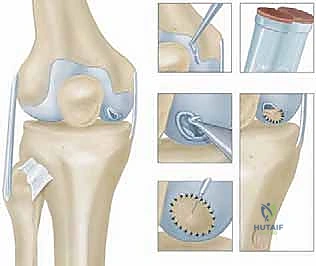
Cartilage Biopsy for Autologous Chondrocyte Culture
"Now that we've confirmed our patient is an ACI candidate and thoroughly assessed the joint, let's proceed with the cartilage biopsy. We need healthy, full-thickness articular cartilage from a non-weight-bearing area."
- Biopsy Site Selection: "The preferred harvest sites are the superior medial and lateral femoral condyle, or the intercondylar notch. These areas are typically non-weight-bearing and have minimal functional consequence from a small biopsy."
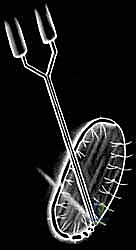
> Surgical Warning: "Never harvest from a weight-bearing area. This can create a new symptomatic defect and defeat the purpose of the entire procedure." - Instrument Selection: "We'll use either a ring curette or a curved notchplasty gauge. These instruments allow us to scoop out a full-thickness piece of cartilage cleanly."

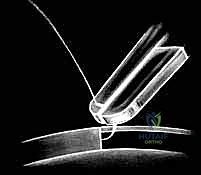
TECH FIG 2 • A. Ring curette for harvest.

TECH FIG 2 • B. Curved notchplasty gauge for harvest.
3. Harvest Technique: "Carefully score the cartilage with the instrument, ensuring you go down to the tidemark, but avoid penetrating the subchondral bone excessively. We need full-thickness cartilage, but not bone. Gently lift and remove the cartilage specimen."

TECH FIG 2 • C. Harvest site.

TECH FIG 2 • D. Harvested cartilage specimen.
4. Specimen Handling: "We typically aim for two full-thickness biopsies, each measuring approximately 5 x 8 mm, for a total weight of 200 to 300 mg. Immediately place the harvested cartilage in the sterile transport media provided by the cell culture laboratory. Ensure the container is sealed securely and labeled correctly with patient identifiers."

TECH FIG 2 • E. Specimen in transport media.
> **Surgical Warning:** "Strict adherence to sterile technique and proper handling of the biopsy specimen is paramount. Contamination or improper transport will render the cells unusable, requiring a repeat harvest or cancellation of the second stage."
"With the biopsy secured, we can conclude the first stage. Close your arthroscopic portals and send the patient to recovery. The cells will now go to the lab for 4 to 6 weeks of expansion."
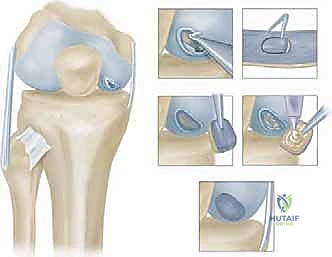
Stage 2: Implantation of Autologous Chondrocytes
Weeks later, the patient returns. Our cultured chondrocytes are ready. This is where we meticulously prepare the defect and implant the new cells.
Preoperative Planning (Stage 2)
- Cell Count Confirmation: Confirm with the cell culture lab that an adequate number of viable chondrocytes have been expanded for the size of the defect.
- Periosteal Patch Sizing: Based on the arthroscopic measurements from Stage 1, estimate the size of the periosteal patch needed.
- Instrument Tray: Ensure all specialized ACI instruments are available, including fine ophthalmic instruments, non-absorbable sutures (e.g., 6-0 Prolene or Vicryl), fibrin glue, and a specialized cell injection syringe.
Patient Positioning and Setup (Stage 2)
"Alright team, welcome back for Stage 2. The setup is similar to Stage 1. Patient is supine, entire lower extremity prepped and draped. Tourniquet on the thigh. We need excellent visualization, so ensure our lighting and magnification are optimal."
- Positioning: Supine on the OR table.
- Tourniquet: Applied high on the thigh.
- Draping: Full sterile prep and drape of the entire lower extremity.
- OR Table: Ensure the table allows for full knee flexion and extension without obstruction, as we'll need to manipulate the knee.
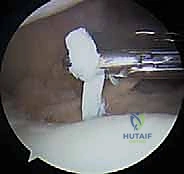
Surgical Approach: Arthrotomy
"For ACI, we typically use a small knee arthrotomy. A midline incision is usually recommended, followed by a medial or lateral parapatellar arthrotomy, depending on the location of the chondral defect. For a medial femoral condyle lesion, a medial parapatellar arthrotomy provides direct access."
- Skin Incision: "Make a midline skin incision, approximately 6-8 cm in length, centered over the patella. Deepen through the subcutaneous tissue with electrocautery, carefully identifying and preserving the infrapatellar branch of the saphenous nerve if possible, to minimize postoperative numbness."
-
Arthrotomy: "Now, incise the retinaculum and joint capsule using either a medial or lateral parapatellar approach. For our medial femoral condyle lesion, we'll perform a medial parapatellar arthrotomy. Carefully reflect the patella laterally to expose the femoral condyle. Maintain careful hemostasis throughout."
Surgical Warning: "Avoid excessive stripping of the soft tissues, as this can compromise local blood supply and healing. Be mindful of the patellar tendon and collateral ligaments."
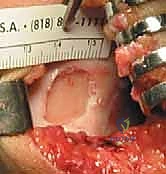
Defect Preparation: Meticulous Débridement
"This is a critical step, fellows. We must prepare a pristine bed for our new chondrocytes. Any remaining unstable cartilage or fibrous tissue will compromise integration."
- Visualization and Exposure: "With the patella retracted, fully expose the chondral defect. Ensure the knee is positioned to provide optimal access to the lesion."
- Débridement: "Using a small curette, chondroplasty burr, or a sharp scalpel (e.g., a #15 blade), meticulously debride the defect down to healthy, stable subchondral bone."
- Remove all unstable cartilage: Any loose or fibrillated cartilage at the lesion margins must be removed. The goal is
Additional Intraoperative Imaging & Surgical Steps


REFERENCES
-
Bachmann G, et al. [MRI in the follow-up of matrix-supported autologous chondrocyte transplantation (MACI) and microfracture]. Radiology 2004;44:773–782.
-
Beris AE et al. Advances in articular cartilage repair. Injury 2005;36: Suppl 4:S14–23.
You Might Also Like