Miniarthrotomy Ankle Arthrodesis: A Masterclass in Surgical Technique and Intraoperative Excellence
Key Takeaway
Join our masterclass on miniarthrotomy ankle arthrodesis. We'll meticulously cover patient selection, preoperative planning, precise intraoperative technique, comprehensive anatomical considerations, and essential pearls for achieving successful fusion in end-stage ankle arthritis, minimizing soft tissue disruption. This guide ensures fellows master every critical step.
Welcome, fellows, to the operating theater. Today, we're tackling an ankle arthrodesis using the miniarthrotomy technique – a powerful, minimally invasive approach for end-stage ankle arthritis. This procedure, when executed precisely, offers excellent fusion rates with reduced soft tissue morbidity. Pay close attention, as we'll walk through every critical step, from preoperative planning to the final closure, emphasizing the nuances that define successful outcomes.
Preoperative Considerations: Setting the Stage for Success
Before we even consider making an incision, a thorough understanding of the patient's condition, the underlying pathology, and the intricate anatomy of the ankle joint is paramount.
Understanding Ankle Arthritis
Ankle arthritis is a debilitating condition characterized by the progressive loss of joint cartilage and subsequent narrowing of the joint space. Its etiology is diverse:
* Posttraumatic Arthritis: This is, by far, the most common cause, often following intra-articular fractures, chondral or osteochondral injuries, or chronic instability.
* Inflammatory Arthritides: This category includes rheumatoid arthritis, mixed connective tissue disorders, gout, pseudogout, septic arthritis, and seronegative arthritides (such as those associated with psoriasis, Reiter syndrome, and spondyloarthropathy).
* Primary Osteoarthritis (Osteoarthrosis): This is less common in the ankle than in the hip or knee and is better characterized as osteoarthrosis, as it lacks a primary inflammatory component.
* Neuropathic Arthritis (Charcot Arthropathy): Typically associated with diabetes mellitus, alcoholism, spinal cord injuries, peripheral nerve injuries, hereditary sensorimotor neuropathy, congenital indifference to pain, tabes dorsalis, and leprosy.
* Primary Synovial Disorders: Such as pigmented villonodular synovitis.
Regardless of the etiology, we often observe a spectrum of concomitant findings, from bone sclerosis and hypertrophy to osteopenia or absorption, along with varying degrees of deformity and synovial proliferation. The natural history is a gradual progression of diffuse joint cartilage degeneration, osteophyte formation, and loss of joint space in the tibiotalar joint. In cases of chronic ankle ligament instability or malunion, cartilage wear can be asymmetric, leading to significant deformity.
Patient History and Physical Examination
Our patients with end-stage ankle arthritis typically present with severe ankle pain that profoundly interferes with activities of daily living. They often report an obvious limp and a sensation that their "foot is turning out" when walking. This is a compensatory hip external rotation mechanism to relieve the painful heel-to-toe gait. Recent literature underscores the debilitating nature of ankle arthritis, equating its impact to that of hip arthritis.
A comprehensive examination of the ankle and hindfoot joints is crucial:
* Soft Tissue Condition: Meticulously assess for previous scars, callosities, ulcers, or fistulas. Look for elimination or fullness of the gutters, which can indicate intra-articular fluid accumulation or hypertrophied capsular tissue.
* Vascular Status: Evaluate peripheral pulses, microcirculation (capillary refill), and obtain an ankle-brachial index (ABI). Neuropathy, vascular insufficiency, venous stasis disease, or skin compromise at the ankle may necessitate further evaluation or treatment before considering arthrodesis.
* Sensation: Perform light touch testing to rule out peripheral neuropathy, which is a contraindication for this specific technique due to the heightened risk of nonunion and complications.
* Stability: Perform anterior drawer and inversion/eversion stress tests to evaluate the integrity of the lateral collateral ligaments.
* Motor Strength: Conduct a manual motor test of the major muscular groups around the foot and ankle to identify any pre-existing weakness that might lead to hindfoot imbalance post-fusion.
* Range of Motion (ROM): Assess ROM of the ankle and hindfoot articulations.
* Loss of ankle dorsiflexion may result from significant tibiotalar arthrosis, impingement from large anterior tibiotalar osteophytes, Achilles tendon contracture, or a combination.
* Loss of plantarflexion may be related to significant tibiotalar arthrosis or subtalar pathology.
* Loss of hindfoot motion is indicative of subtalar pathology (arthritis, fibrosis).
* Pearl: We often perform diagnostic injections of the hindfoot articulations if symptomatic hindfoot arthritis is masked by the ankle arthritis. Ankle arthrodesis in the presence of unaddressed hindfoot arthritis and stiffness will leave the patient with persistent symptoms.
Imaging and Diagnostic Studies
- Plain Weight-Bearing Radiographs: These are our initial and most fundamental diagnostic tools. We require anteroposterior (AP), lateral, and mortise views of the ankle joint.
- These films determine the extent of arthritis, degree of deformity, presence of bone defects in the distal tibial plafond or talus, potential avascular necrosis (AVN) in either the talar body or distal tibia, and any concomitant hindfoot arthritis.
- The lateral and mortise views provide limited assessment of hindfoot articulations. If foot arthritis or deformity is suggested (e.g., pes cavus or pes planus), additional weight-bearing foot radiographs are essential.
- Full-length weight-bearing bilateral radiographs are critical for patients with suspected limb malalignment proximal to the ankle, as this technique is not suitable for significant proximal deformities.
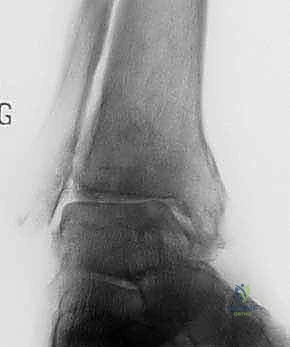
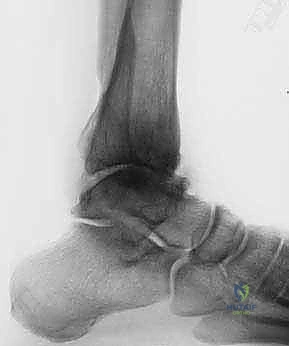
FIG 1 • AP and lateral weight-bearing radiographs of an arthritic ankle joint. Note the joint space narrowing with varus tilt of the talus ( A ), the anterior subluxation of the talus ( B ), and the presence of osteophytes (especially apparent in B ).
* Computed Tomogram (CT Scan): Provides exquisite detail of tibiotalar cysts and suspected hindfoot arthritis. While large cysts in the tibia, talus, or both do not contraindicate the miniarthrotomy arthrodesis, we recommend filling these defects with autograft or allograft to enhance fusion.
* Magnetic Resonance Imaging (MRI): If AVN is suggested by radiographs, MRI is typically helpful in confirming the diagnosis and assessing its extent. AVN is not an absolute contraindication to the miniarthrotomy procedure, but preoperative patient education is imperative due to a higher nonunion rate associated with AVN.
* Bone Scan (Technetium and Indium-labeled WBC): A combination three-phase technetium bone scan and an indium-labeled white blood cell scan are useful in ruling out or confirming suspected osteomyelitis, which would require prior treatment.
Differential Diagnosis
Beyond primary ankle arthritis, we must consider:
* Bone marrow edema
* Soft tissue pathology
* Distal tibial plafond or talar AVN
* Osteochondritis
Nonoperative Management
Before surgical intervention, patients should undergo a trial of nonoperative management:
* Pharmacologic Agents: Nonsteroidal anti-inflammatory agents (NSAIDs) for pain relief. For inflammatory arthropathies, rheumatologists may prescribe specific agents like gold, antimalarials, or immunosuppressives.
* Intra-articular Corticosteroid Injections: These should be used judiciously. Repeated injections can accelerate cartilage degeneration and the need for surgical treatment.
* Shoe Wear Modifications: High-top shoes restricting ankle motion or stiff-soled shoes with a rocker sole may provide significant pain relief.
* Orthoses: Polypropylene ankle-foot orthoses (AFOs), with or without hinges, or orthoses with double metal upright bars and calf sleeves, can effectively immobilize the joint and reduce pain.
Surgical Management: The Miniarthrotomy Technique
The miniarthrotomy technique for ankle arthrodesis was initially described for arthritic ankles without significant deformity, bone defects, or AVN. However, with evolving understanding and technique refinement, its indications have expanded.
Indications for Miniarthrotomy Ankle Arthrodesis
This procedure is suitable for end-stage ankle arthritis associated with:
* Marked joint space narrowing.
* Severe ankle pain interfering with daily activities and walking ability.
* Failure of comprehensive conservative treatment, including NSAIDs, intra-articular steroid injections, physical therapy, and ankle-foot orthoses.
* Absence of mechanical malalignment proximal to the ankle.
* A moderately deformed ankle joint, specifically varus or valgus deformities under 10 degrees.
* Less than 25% posterior or anterior subluxation of the talus.
* AVN of the talus involving less than 25% of its articular surface.
* Articular surface cavitations smaller than 1-2 cm.
* Intact sensation (absence of neuroarthropathy).
The inherent advantage of the miniarthrotomy technique is its minimal soft tissue and periosteal disruption, making it particularly well-suited for patients with some of these more challenging conditions, where larger exposures might compromise healing.
Preoperative Planning
Before we begin, a meticulous review of all imaging studies is essential. We assess preoperative ankle, lower leg, and hindfoot alignment to understand what corrections must be considered. We also re-evaluate the ankle and adjacent hindfoot joints for ROM and alignment. This comprehensive assessment allows us to anticipate challenges and plan our surgical strategy.
Patient Positioning
Let's get our patient positioned correctly.
1. Supine Position: The patient is positioned supine on the operating table.
2. Ipsilateral Buttock Support: Place a support, such as a bump or rolled blanket, under the ipsilateral buttock. This is crucial as it prevents the lower extremity from naturally falling into external rotation, allowing for balanced visualization and access to both the medial and lateral aspects of the ankle joint.
3. Draping: Ensure the leg is draped well above the knee. This allows us to use the patella as a reliable reference point for aligning the ankle arthrodesis in the sagittal and rotational planes.
4. Tourniquet: We typically do not routinely use a tourniquet for this procedure. The rationale is to allow us to visually confirm that bleeding cancellous bone surfaces, essential for successful fusion, have been created during our débridement. This direct feedback is invaluable.
Intraoperative Execution: The Miniarthrotomy Technique
Now, let's scrub in, fellows. We're ready to begin.
Exposure and Visualization of the Joint
We will create two small, strategic incisions, akin to standard ankle arthroscopy portals, to minimize soft tissue disruption while providing adequate access.
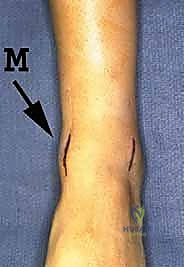
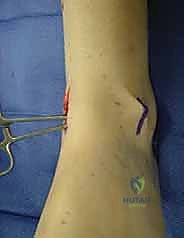
- Marking Incisions:
- Medial Incision: Identify the anterior tibial tendon. Our first incision, approximately 2.5 cm in length, will be made just medial to this tendon.
- Lateral Incision: Identify the peroneus tertius tendon. Our second incision, also approximately 2.5 cm, will be immediately lateral to this tendon.
TECH FIG 1 • Incision and exposure. A. Incisions used for the miniarthrotomy technique for ankle arthrodesis. The medial incision is indicated ( M ).
- Creating the Medial Incision:
- Skin Incision: Make the 2.5 cm skin incision just medial to the anterior tibial tendon.
- Subcutaneous Dissection: Carefully deepen the incision through the subcutaneous tissues.
- Surgical Warning:
> CRITICAL PEARL: Be acutely aware of the saphenous vein and nerve. They lie superficially in this region. Use meticulous subcutaneous dissection, blunt dissection with a hemostat, and careful retraction to avoid inadvertent injury. - Retinaculum and Capsule: Identify the ankle retinaculum and incise it along the same line as the skin incision. Retract the anterior tibial tendon medially to expose the joint capsule.
TECH FIG 1 • (continued) B. Exposure of the medial side of the joint.
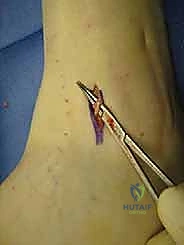
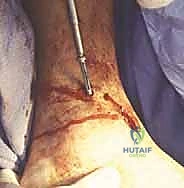
- Confirming Lateral Incision Position:
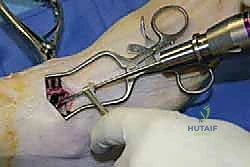
- Before making the lateral incision, we'll use a precise guide. Drive a hemostat through the medial incision, across the anterior aspect of the ankle joint, aiming laterally. This confirms the optimal, predetermined position for our lateral incision, ensuring direct access to the joint space.
- Before making the lateral incision, we'll use a precise guide. Drive a hemostat through the medial incision, across the anterior aspect of the ankle joint, aiming laterally. This confirms the optimal, predetermined position for our lateral incision, ensuring direct access to the joint space.
TECH FIG 1 • (continued) C. A hemostat is driven through the medial incision, across the anterior aspect of the ankle joint, and toward the lateral side, thus confirming the predetermined position of the lateral incision.
- Creating the Lateral Incision:
- Skin Incision: Make the 2.5 cm skin incision immediately lateral to the peroneus tertius tendon, guided by our hemostat.
- Subcutaneous Dissection: Deepen the incision through the subcutaneous tissues.
- Surgical Warning:
> CRITICAL PEARL: Exercise extreme caution here to avoid injury to the lateral branch of the superficial peroneal nerve. This nerve is highly susceptible to iatrogenic injury in this region. Use careful blunt dissection and identify and protect this nerve throughout the procedure.
TECH FIG 1 • (continued) D. Identification and protection of the lateral branch of the superficial peroneal nerve during deepening of the lateral incision through the subcutaneous tissues.
* Retinaculum and Capsule: Again, identify the ankle retinaculum and incise it along the same line as the skin incision. Retract the peroneus tertius tendon laterally to identify the joint capsule.
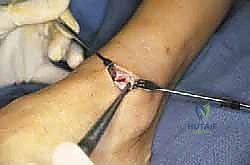
- Initial Débridement and Visualization Enhancement:
- Capsular Tissue Removal: Using sharp dissection or a rongeur, meticulously remove any hypertrophied capsular tissue from both the medial and anterolateral aspects of the joint. This significantly improves our working space and visualization.
- Osteophyte Resection: Resect most of the anterior osteophytes from the distal tibia using flexible chisels. This further enhances visualization and allows for better access to the anterior joint line.
- Cartilage Resection: Now, using curettes of various sizes and shapes and a set of small rongeurs, resect any visible cartilage from the anterior ankle joint. Our goal is to expose healthy subchondral bone.
TECH FIG 1 • (continued) E. Any visible cartilage of the anterior ankle joint is resected with curettes of various sizes and shapes and a set of small rongeurs.
TECH FIG 1 • (continued) F. Appearance of the ankle after completion of the exposure.
Preparation of the Articular Surfaces
This is the core of achieving a solid fusion. We need to create a bleeding, cancellous bone bed.
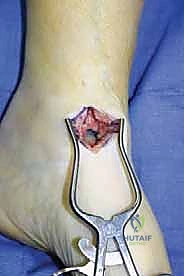
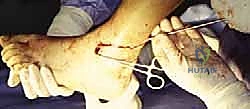
- Joint Distraction and Débridement:
- Insert a small lamina spreader into either the medial or the lateral joint space. This provides distraction, opening up the joint for better access.
- Through the contralateral incision, use various instruments—rongeurs, curettes, and chisels—to meticulously débride any remaining remnants of cartilage, synovial tissue, loose bodies, and sclerotic subchondral bone.
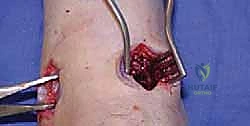
TECH FIG 2 • Preparation of the articular surfaces. A. A small lamina spreader is inserted into the lateral joint space, and further débridement is performed through the medial incision.
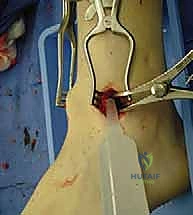
* Alternating Access: This process is alternated between the medial and lateral incisions, ensuring comprehensive débridement across the entire joint.

TECH FIG 2 • (continued) B. The position of the instruments has been alternated.
* Malleolar Débridement: Any remaining cartilage on the lateral articular surfaces of the talus and the articular surfaces of the malleoli must be meticulously removed.
- Addressing Deformity and Sclerotic Bone:
- Bone Wedges: When moderate deformity is present, small bone wedges may be resected to achieve the ideal joint position. This is a critical step for correcting alignment.
- Drilling Sclerotic Bone: Any dense sclerotic subchondral bone, particularly on the distal tibia, must be addressed to enhance revascularization and promote fusion. Use a 2.5-mm drill bit to create multiple perforations.
TECH FIG 2 • (continued) C. Any dense sclerotic subchondral bone of the distal tibia is drilled with a 2.5-mm drill bit to enhance revascularization.
* Surgical Warning:
> CRITICAL PITFALL: The use of a 2.5-mm drill bit is preferable to a Kirschner wire for this purpose. A Kirschner wire is more likely to create osteonecrosis at the drill sites due to heat generation, which can impede fusion.
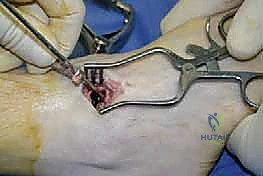
* Talus Drilling: Similarly, drill the talus to expose fresh, bleeding bone.
TECH FIG 2 • (continued) D. Drilling of the talus.
- Ensuring Bleeding Bone and Grafting:
- Irrigation: The joint must be irrigated frequently throughout this débridement phase. This allows for clear visualization of the cancellous bone surfaces and, crucially, confirms uniform bleeding, indicating viable bone ready for fusion.
- Irrigation: The joint must be irrigated frequently throughout this débridement phase. This allows for clear visualization of the cancellous bone surfaces and, crucially, confirms uniform bleeding, indicating viable bone ready for fusion.
TECH FIG 2 • (continued) E. The joint must be irrigated frequently to allow visualization of the cancellous bone surfaces and confirmation of uniform bleeding.
* Posterior Joint Access: Through these miniarthrotomies, the posterior 25% of the tibiotalar joint is not always fully accessed and therefore may not be completely prepared. In my extensive experience, properly preparing the anterior 75% of the joint is sufficient to achieve union rates that equal or even exceed those of other ankle arthrodesis techniques.
* Defect Filling: If you encounter any bone defects, fill them with cancellous allograft chips. This provides structural support and osteoconductive scaffolding.
Position of the Arthrodesis Site and Screw Placement
Achieving the correct alignment is paramount for long-term patient function and satisfaction.
-
Optimal Arthrodesis Position:
- While debates persist, the consensus is that the ankle should be fused in a neutral position in the sagittal plane.
- Aim for minimal valgus, up to 5 degrees.
- Ensure external rotation symmetric with the contralateral uninvolved side, usually no more than 5 to 10 degrees.
- Surgical Warning:
> CRITICAL PITFALL: Most importantly, we must avoid varus and internal rotation, both of which are poorly tolerated by patients and can lead to significant gait abnormalities and compensatory issues. - Rotational Alignment Pearl: I generally set the rotation by aligning the anterior tibial crest with the second metatarsal, with the foot in a subtalar neutral position. With the miniarthrotomy technique, the ankle anatomy is left relatively undisturbed, and excessive malrotation is rarely possible, which is a distinct advantage.
-
Provisional Fixation with Guide Pins:
-
I prefer to provisionally fix the ankle with three guide pins from a cannulated, self-tapping screw system. This allows for precise adjustments before definitive screw placement.
-
First Pin (Posterolateral to Anteromedial): Insert the first pin from the posterolateral aspect of the distal tibia, across the tibiotalar joint, and into the talar neck. This pin provides initial stability and helps control rotation.
-
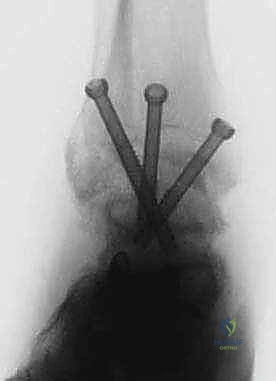
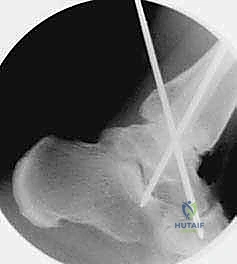
TECH FIG 3 • Provisional fixation with three guide pins. A. The first guide pin is inserted from the posterolateral aspect of the distal tibia, across the tibiotalar joint, and into the talar neck.
*   **Second Pin (Anteromedial to Sinus Tarsi):** The second pin is inserted from the anteromedial aspect of the tibia, directly above the medial malleolus, distally and anteriorly toward the sinus tarsi. This pin further enhances stability and compression.
<figure class="operative-step-slider my-4 text-center p-3 border rounded shadow-sm bg-light">
TECH FIG 3 • (continued) B. The second pin is inserted from the anteromedial aspect of the tibia directly above the medial malleolus distally and anteriorly toward the sinus tarsi.
*   **Third Pin (Lateral to Medial Talar Neck):** The third guide pin is inserted from the lateral aspect of the joint, anterior to the fibula, and directed toward the medial talar neck.
<figure class="operative-step-slider my-4 text-center p-3 border rounded shadow-sm bg-light">
TECH FIG 3 • (continued) C. The third guide pin is inserted from the lateral aspect of the joint anterior to the fibula and directed toward the medial talar neck.
* Surgical Note: Occasionally, there may not be enough space to insert this third pin if there isn't sufficient flare of the distal lateral tibia. In such cases, alternative fixation patterns may be considered, but three points of fixation are ideal.
-
Intraoperative Fluoroscopy:
- Once the guide pins are in place, we will use fluoroscopy to confirm optimal alignment in all planes (AP, lateral, and mortise views) and ensure proper pin trajectory and depth. Make any necessary adjustments to the pin positions at this stage.
-
Definitive Screw Placement:
- Once satisfied with the provisional fixation and alignment under fluoroscopy, we will over-drill for the cannulated screws according to the manufacturer's specifications.
- Measure the appropriate screw lengths.
- Insert the cannulated, self-tapping screws over the guide pins, ensuring adequate compression across the arthrodesis site.
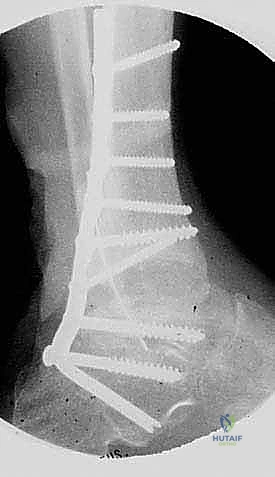
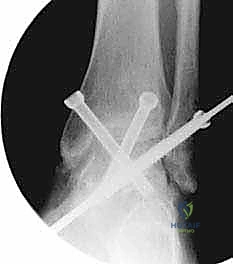
TECH FIG 3 • (continued) D. Three cannulated screws are inserted over the guide pins for definitive fixation of the arthrodesis.
* Surgical Warning:
> CRITICAL PEARL: Confirm screw head seating and adequate compression. Avoid stripping the bone or over-tightening, which can lead to hardware failure or poor purchase.
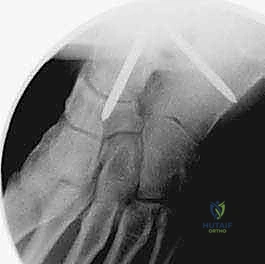
TECH FIG 3 • (continued) E. Final AP and lateral radiographs confirm appropriate screw placement and position of the arthrodesis.
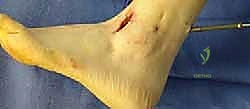
TECH FIG 3 • (continued) F. Appearance of the ankle after completion of the procedure.
Closure
With definitive fixation achieved and confirmed, we proceed to closure.
1. Irrigation: Copiously irrigate the surgical sites with sterile saline to remove any bone debris or blood clots.
2. Layered Closure: Close the retinaculum, subcutaneous tissues, and skin in layers using appropriate sutures.
3. Dressing: Apply a sterile dressing and a well-padded splint or cast to protect the ankle and maintain the arthrodesis position.
Postoperative Rehabilitation and Complication Management
Our work isn't done until the patient is safely on the road to recovery.
Postoperative Protocol
- Immobilization: The ankle will typically be immobilized in a non-weight-bearing cast or boot for 6-12 weeks, depending on bone quality, patient compliance, and radiographic evidence of fusion.
- Weight-Bearing Progression:
- Non-Weight-Bearing (NWB): Initial 6-8 weeks.
- Partial Weight-Bearing (PWB): Gradual progression after initial period, often in a walking boot, with close radiographic monitoring for signs of healing.
- Full Weight-Bearing (FWB): Permitted only after solid radiographic evidence of fusion is observed, typically 3-6 months post-surgery.
- Range of Motion (ROM): While the ankle joint itself is fused, we encourage early range of motion exercises for the adjacent joints, particularly the subtalar and midfoot joints, to prevent stiffness.
- DVT Prophylaxis: Standard DVT prophylaxis protocols are followed, which may include chemical prophylaxis (e.g., low molecular weight heparin) and mechanical prophylaxis (e.g., compression stockings, sequential compression devices).
Potential Complications and Management
- Nonunion: The most common complication.
- Management: If nonunion is suspected or confirmed, initial management may involve prolonged immobilization. If conservative measures fail, revision surgery with further débridement, bone grafting (autograft often preferred), and possibly plate fixation may be necessary. AVN is a known risk factor for nonunion.
- Malunion: Fusion in an unacceptable position (e.g., varus, excessive internal rotation).
- Management: Minor malunions may be managed with orthotics. Significant malunions causing pain or functional impairment may require revision osteotomy and re-arthrodesis.
- **Infection
REFERENCES
-
Buck P, Morrey BF, Chao EY. The optimum position of arthrodesis of the ankle: a gait study of the knee and ankle. J Bone Joint Surg Am 1987;69A:1052–1062.
-
Coester LM, Saltzman CL, Leupold J, et al. Long-term results following ankle arthrodesis for post-traumatic arthritis. J Bone Joint Surg Am 2001;83A:219.
B
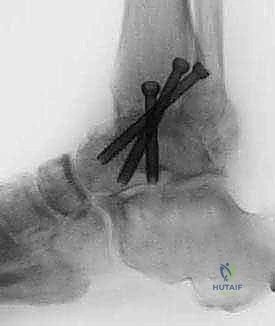
FIG 2 • AP and lateral postoperative radiographs are evaluated to ensure the desired alignment of the arthrodesis and check the screw position.
-
Coughlin MJ, Mann RA. Arthrodesis of the foot and ankle. In: Myerson MS, ed. Surgery of the Foot and Ankle, ed
-
St Louis: Mosby, 1999:651–699.
-
Dent CM, Patil M, Fairclough JA. Arthroscopic ankle arthrodesis. J Bone Joint Surg Br 1993;75B:830–832.
-
Miller SD, Paremain GP, Myerson MS. The miniarthrotomy technique of ankle arthrodesis: a cadaver study of operative vascular compromise and early clinical results. Orthopedics 1996;19: 425–430.
-
Myerson MS, Quill G. Ankle arthrodesis: a comparison of an arthroscopic and an open method of treatment. Clin Orthop 1991;268:84–95.
-
Ogilvie-Harris DJ, Lieberman I, Fitsialos D. Arthroscopically assisted arthrodesis for osteoarthrotic ankles. J Bone Joint Surg Am 1993;75A:1167–1174.
-
Paremain GD, Miller SD, Myerson MS. Ankle arthrodesis: results after the miniarthrotomy technique. Foot Ankle Int 1996;17:247–252.
-
Stamatis E, Myerson M. The miniarthrotomy technique for ankle arthrodesis. Tech Foot Ankle Surg 2002;1:8–16.
You Might Also Like