Transfibular Ankle Arthrodesis: An Intraoperative Masterclass for End-Stage Arthritis
Key Takeaway
This masterclass provides a comprehensive, scrubbed-in guide to transfibular ankle arthrodesis for end-stage arthritis. We meticulously detail preoperative planning, patient positioning, and the step-by-step intraoperative execution, emphasizing critical anatomy, neurovascular protection, and precise joint preparation. Fellows will gain insights into surgical pearls, potential pitfalls, and comprehensive postoperative management for optimal patient outcomes.
Alright team, gather 'round. Today, we're tackling an ankle arthrodesis via the transfibular approach. This is a workhorse procedure for end-stage ankle arthritis, especially when a stable, pain-free fusion is the primary goal. While total ankle arthroplasty has gained traction, fusion remains a robust and often preferred option for specific patient profiles, particularly those with high functional demands, significant bone loss, or a history of infection.
Let's begin by reviewing the fundamentals.
Understanding End-Stage Ankle Arthritis
End-stage ankle arthritis represents a progressive loss of articular cartilage between the tibial plafond and the talar dome. This leads to inflammation, osteophyte formation, increasing pain with motion and weight-bearing, and progressive loss of ankle motion. Patients typically present with anterior ankle pain exacerbated by weight-bearing and relieved by rest, often manifesting as a noticeable limp and difficulty walking on uneven terrain or inclines. Many report their foot "turning out" as a compensatory mechanism.
The etiology can be varied:
* Posttraumatic Arthritis: Most common, often following ankle fractures, pilon fractures, or talus fractures, or chronic ligament instability.
* Inflammatory Arthritides: Rheumatoid arthritis, gout, pseudogout, mixed connective tissue disorders.
* Neuropathic Arthropathy (Charcot): Especially in diabetic patients, which may require a more extensive fusion (e.g., tibiotalocalcaneal).
* Primary Arthritis: Relatively rare compared to hip and knee.
* Postinfectious Arthritis: Following septic arthritis or osteomyelitis.
* Osteonecrosis: Avascular necrosis of the talus or distal tibia.
* Idiopathic or Congenital: Less common presentations.
Patient Selection and Preoperative Evaluation
A thorough patient history is paramount. We need to ascertain their age, occupation, functional demands, and the degree of limitation imposed by their arthritic ankle. Critical elements include:
* Social History: Tobacco use is a major concern due to its detrimental effects on bone healing and wound healing. We strongly recommend cessation at least 4 weeks preoperatively and 8 weeks postoperatively. Assess their ability to maintain protected weight-bearing postoperatively, considering any upper extremity limitations.
* Medical History: Review medications, especially immunosuppressants for inflammatory arthritis. For diabetic patients, strict perioperative blood glucose control is non-negotiable. Any history of open fracture-dislocation or infection must trigger a comprehensive workup.
* Prior Surgeries: Document all previous procedures, particularly to the affected ankle. Reviewing prior operative reports is crucial for understanding the existing soft tissue envelope and potential challenges.
Physical Examination
This should be meticulous and comprehensive:
* Gait Analysis: Observe the patient's gait for a limp, compensatory external rotation at the hip, and overall hindfoot-ankle alignment.
* Alignment: Evaluate weight-bearing ankle and hindfoot alignment from posterior and lateral perspectives, noting varus/valgus or equinus deformities. This guides our intraoperative correction strategy.
* Range of Motion (ROM): Assess active and passive ROM of the ankle (dorsiflexion, plantarflexion) and hindfoot (inversion, eversion). Normal ankle ROM is approximately 20 degrees dorsiflexion and 50 degrees plantarflexion. Limited dorsiflexion is common. Isolate hindfoot motion by stabilizing the talar neck. Pre-existing hindfoot arthritis or stiffness may persist or worsen after ankle arthrodesis due to increased stress on adjacent joints.
* Neurovascular Status: Palpate dorsalis pedis and posterior tibial pulses, compare to the contralateral side, and assess capillary refill. Any asymmetry warrants further workup, including ankle-brachial indices or noninvasive vascular studies. Satisfactory circulation is essential for any reconstructive procedure.
* Soft Tissue Envelope: Carefully document previous surgical scars or trauma. The ankle has limited soft tissue reserves, making wound complications a significant risk. Plan the surgical approach to utilize existing favorable incisions or virgin skin where possible.
Diagnostic Studies
- Radiographs: Weight-bearing AP, mortise, and lateral views of the ankle and foot are mandatory. Non-weight-bearing films are insufficient for accurate alignment and joint space assessment. Look for the extent of arthritis, osteophytes, and retained hardware. Occasionally, full-length mechanical axis views of the lower extremity are needed to identify proximal malalignment that might require concomitant or staged correction.
- CT Scan: Provides exquisite detail of bony defects, subchondral cysts, and can better delineate adjacent hindfoot arthritis. In cases of suspected osteomyelitis or complex deformity, it's invaluable.
- MRI: Useful for confirming avascular necrosis of the talus or distal tibia, identifying effusions, abscesses, or early osteomyelitis.
- Laboratory Tests: If infection is suspected (history of open fracture, postoperative infection, erythema, warmth, draining sinus, or unusual radiographic changes), obtain WBC count with differential, ESR, and CRP. Consider joint aspiration for cell count, gram stain, and cultures. A technetium bone scan with tagged WBC study can be highly predictive for infection. If suspicion remains, a deep bone biopsy for frozen section and cultures is warranted at the start of the case.
Nonoperative Management
Before considering surgery, we ensure a thorough trial of nonoperative management:
* NSAIDs/COX-2 Inhibitors: Mainstay for pain and inflammation, with primary care physician approval.
* Intra-articular Corticosteroid Injections: Judiciously used for symptom flares, typically no more frequently than every 3 months.
* Shoe Modifications: Stiff-soled rocker-bottom shoes or solid ankle cushion heel (SACH) can provide relief.
* Bracing: Custom-molded AFOs, rigid leather lace-up braces, or double-upright bar braces can significantly limit ankle motion and reduce pain in more advanced cases.
Surgical Management: The Transfibular Approach
The primary indication for ankle arthrodesis is painful, end-stage ankle arthritis refractory to comprehensive nonoperative treatment, leading to progressive functional limitation.
Preoperative Planning: The Blueprint for Success
This is where we lay the groundwork, fellows. Don't underestimate this phase.
1. Adjacent Joint Assessment: Meticulously evaluate the subtalar and transverse tarsal joints. Moderate to severe arthritis in these adjacent joints is a relative contraindication to isolated ankle fusion, as it can lead to persistent symptoms or accelerated degeneration due to increased stress. In such cases, a tibiotalocalcaneal arthrodesis or a combined total ankle replacement with hindfoot fusion might be considered.
2. Overall Limb Alignment: Review those full-length films. Identify any proximal malalignment (internal/external rotation, varus/valgus, shortening) that may need correction either concomitantly or in a staged fashion. We want a neutral mechanical axis.
3. Hardware Templating: Based on radiographs and CT scans, mentally template your hardware. Consider screw length, diameter, and trajectory. For a transfibular approach, we're often looking at two or three large fragment cannulated screws (typically 6.5mm or 7.3mm) crossing the fusion site.
4. Osteotomy Planning: Determine the precise level and orientation of your fibular osteotomy. An oblique cut (proximal lateral to distal medial) is often preferred to avoid a sharp bony prominence.
5. Bone Graft: Plan for autogenous bone graft from the resected fibula. If additional graft is needed, consider an iliac crest bone graft or allograft.
Patient Positioning
"Alright team, let's get our patient positioned."
We'll place the patient supine on the operating table.
* Hip Bump: A large bump, typically a rolled blanket or a specialized foam wedge, is placed underneath the ipsilateral hip. This serves to internally rotate the limb slightly, bringing the lateral malleolus and fibula into a more accessible position for our approach.
* Tourniquet: A thigh tourniquet is routinely applied. Ensure adequate padding beneath it to prevent skin or nerve compression. We'll inflate this once the limb is prepped and draped, typically to 100 mmHg above systolic blood pressure or 300-350 mmHg, whichever is higher, for an average adult.
* Fluoroscopy: The C-arm should be positioned on the contralateral side of the patient, allowing for easy AP and lateral views of the ankle without repositioning the patient or the table. We need to confirm excellent images pre-incision.
* Padding: Ensure all pressure points are well-padded, especially the heels, elbows, and ulnar nerves. The arms are typically tucked at the patient's side.
Surgical Anatomy: A Refresher
Before we make our incision, let's quickly review the critical anatomy in our field.
* The Ankle Joint: A highly constrained hinge joint formed by the tibial plafond, the distal fibula, and the dome of the talus. It bears immense weight – up to five times body weight at heel rise. The articular cartilage is thin (1-2mm), and the contact area is relatively small.
* Lateral Malleolus/Fibular Anatomy: The fibula provides lateral stability. We'll be performing an osteotomy here.
* Ligamentous Structures:
* Anterior Inferior Tibiofibular Ligament (AITFL): Part of the syndesmosis, connecting the tibia and fibula anteriorly.
* Anterior Talofibular Ligament (ATFL): Primary restraint to anterior talar translation and inversion, connecting the fibula to the talus.
* Calcaneofibular Ligament (CFL): Connects the fibula to the calcaneus, stabilizing the subtalar joint and resisting inversion.
* Posterior Inferior Tibiofibular Ligament (PITFL): Posterior syndesmotic ligament, usually left intact in this approach.
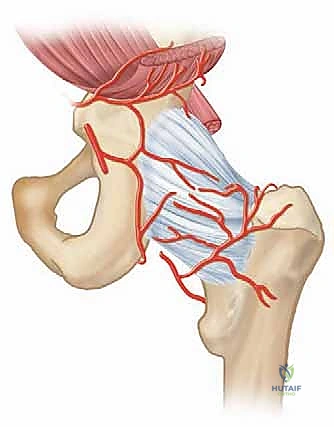
* Neurovascular Structures (CRITICAL!):
* Superficial Peroneal Nerve (SPN): Courses distally in the anterolateral compartment, piercing the deep fascia typically in the middle to distal third of the leg, then dividing into intermediate and medial dorsal cutaneous nerves. It's anterior to our incision and highly vulnerable. It provides sensation to the dorsum of the foot (except the first web space).
* Sural Nerve: Courses posteriorly and laterally, formed by branches of the tibial and common peroneal nerves. It runs near the posterior aspect of the fibula and supplies sensation to the lateral aspect of the foot and ankle. It's posterior to our incision.
* Peroneal Tendons (Peroneus Longus and Brevis): Run in a groove posterior to the lateral malleolus, contained within a common synovial sheath. They are posterior to our approach.
* Anterior Tibial Artery/Deep Peroneal Nerve: These are deep in the anterior compartment, well anterior to our primary dissection, but we must be mindful of them during anterior retraction.
* Posterior Tibial Artery/Tibial Nerve: These are posterior and medial to the ankle, protected by the posterior soft tissue hinge, but require careful posterior retraction.
Intraoperative Execution: The Transfibular Masterclass
"Scalpel, please, let's make this happen."
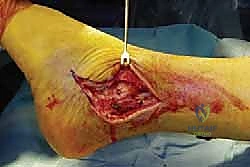
Incision and Initial Dissection
- Skin Incision:
- We'll make a generous curvilinear incision. It starts approximately 8 to 10 cm proximal to the tip of the fibula, centered over its posterior half.
- It then extends distally along the fibular shaft, curving anteriorly and distally over the sinus tarsi, extending another 6 to 8 cm toward the base of the fourth metatarsal.
- This length is crucial for adequate exposure and to allow for creation of full-thickness flaps without excessive tension.
- Technique: Use a #15 blade, making a single, confident incision through the skin.
-
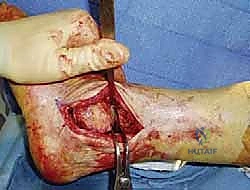
Subcutaneous Dissection and Flap Creation:
- Using Metzenbaum scissors and blunt dissection, we'll elevate full-thickness skin and subcutaneous tissue flaps. This means staying superficial to the deep fascia.
- Anteriorly: Carefully identify the deep fascia. The key here is to find the internervous plane between the sural nerve posteriorly and the superficial peroneal nerve anteriorly.
- Protecting the Superficial Peroneal Nerve: As we dissect anteriorly, we must be extremely vigilant for the superficial peroneal nerve. It typically pierces the deep fascia in the distal leg. We'll use careful blunt dissection and stay close to the fibula, dissecting subperiosteally to minimize the risk. A small self-retaining retractor can be placed carefully to hold the anterior flap, keeping the SPN out of harm's way.
- Posteriorly: Similarly, protect the sural nerve and the peroneal tendons. We'll perform a subperiosteal dissection of the fibula, elevating the peroneal tendons and their sheath posteriorly. This creates a safe plane.
-
Subperiosteal Exposure of the Fibula:
- Using a periosteal elevator (e.g., a Freer or Cobb elevator), we'll meticulously elevate the periosteum from the lateral and anterior aspects of the fibula.
- Key Pearl: We strip a minimal amount of fibular periosteum, focusing on the anterior aspect. The goal is to preserve a posterior hinge of fibular periosteum and soft tissues. This maintains some vascularity to the distal fibula, which is important if we plan to retain a portion of it, and also protects the posterior neurovascular structures.
Fibular Osteotomy and Joint Exposure
"Now, for the fibular osteotomy. Precision is key here."
-
Fibular Osteotomy:
- We'll perform the fibular osteotomy approximately 3 to 5 cm proximal to the level of the ankle joint. This provides ample room for joint exposure and allows for appropriate sizing of the bone graft.
- Technique: We prefer an oblique osteotomy, running from proximal-lateral to distal-medial. This creates a beveled edge, preventing a sharp bony prominence and potentially increasing the surface area for reattachment if desired. An alternative is a transverse osteotomy 6 to 8 cm proximal to the ankle.
- Instrument: Use a microsagittal saw with a narrow blade.
- Protection: Crucially, protect the surrounding soft tissues (peroneal tendons, nerves) with broad Hohmann retractors or malleable retractors placed circumferentially around the fibula.
- Osteotomy Completion: Once the osteotomy is complete, the distal fibula will be mobilized.
-
Ligament Transection:
- With the distal fibula now mobile, we need to release the ligaments that tether it to the tibia and talus.
- Order:
- Anterior Syndesmotic Ligaments (AITFL): Identify and transect these sharply with a #15 blade or fine scissors.
- Anterior Talofibular Ligament (ATFL): Transect this ligament.
- Calcaneofibular Ligament (CFL): Transect this ligament.
- Goal: This allows the distal fibula to hinge on the intact posterior soft tissues, maintaining some vascularity and protecting the posterior neurovascular bundle.
-
Fibular Resection and Bone Graft Harvesting:
- Traditionally, the entire distal fibula was resected. However, current practice favors a more conservative approach.
- Technique: Using the microsagittal saw in the sagittal plane, we will remove the medial third of the fibula. This creates a window into the ankle joint while preserving the lateral malleolus.
- Rationale: Preserving the malleoli is important because there have been reported successes in takedowns of ankle fusions and conversion to total ankle arthroplasty. Future conversion is impossible if the entire distal fibula is removed.
- Bone Graft: The resected medial third of the fibula is then morselized using a rongeur or bone mill and saved as autogenous bone graft. This will be packed into the fusion site later.
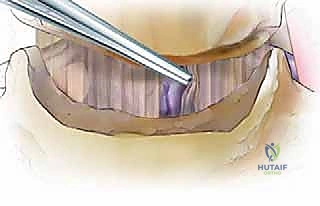
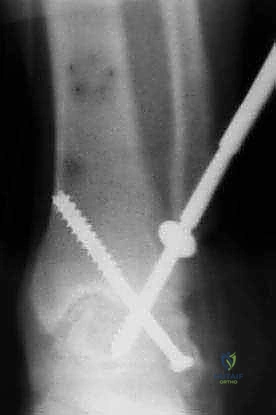
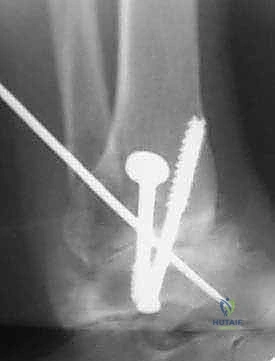
TECH FIG 1 • A. The fibula has been osteotomized proximal to the ankle joint and the dental Freer elevator is in the ankle joint.
Ankle Joint Preparation
"Now we're inside the joint, fellows. This is where we prepare the bed for fusion."
-
Soft Tissue Release and Osteophyte Removal:
- Distal Tibia: Further elevate the anterior joint capsule and periosteum from the distal tibia. This provides clear visualization of the tibial plafond.
- Osteophytes: Identify and remove any impinging osteophytes, particularly anteriorly, which can block proper reduction and lead to impingement post-fusion. Use an osteotome or rongeur.
- Posterior Release: Using a periosteal elevator (Cobb or Freer), carefully elevate the soft tissues from the lateral and posterior aspects of the distal tibia and from the posterior talus. This posterior release is critical to achieve adequate dorsiflexion and neutral alignment, but must be done cautiously to protect the posterior neurovascular bundle.
- Retractor Placement: Once adequately released, retractors can be safely placed. We typically use broad Hohmann retractors anteriorly and posteriorly about the distal tibia to protect the soft tissues and neurovascular structures.
-
Joint Distraction:
- "Let's get some distraction on this joint." We'll apply a joint distractor or a laminar spreader to fully expose the tibial plafond and the dome of the talus. This provides excellent visualization and working space.
- Technique: Place the tips of the distractor into the prepared joint space, ensuring stable purchase on the bone without damaging articular surfaces (if present) or subchondral bone. Gradually distract the joint.

TECH FIG 1 • B. Lamina spreader is used to distract the joint.
-
Limited Medial Arthrotomy (Optional):
- Occasionally, to ensure complete cartilage removal from the medial gutter of the ankle joint, we may perform a limited medial arthrotomy. This is done with a small incision on the medial side, allowing direct visualization and débridement.
-
Cartilage Removal and Subchondral Preparation:
- "This is the most critical step for achieving a solid fusion, gentlemen. No cartilage left behind."
- Methods for Joint Preparation: There are several techniques:
- Transverse Flat Cuts: Resecting parallel slabs of bone.
- Chevron Pattern: Creating interlocking V-shapes.
- Maintenance of Physiologic Subchondral Anatomy (Our Preference): We prefer to maintain the general contour of the tibiotalar joint.
- Rationale: This maximizes surface contact area, helps maintain limb length, and allows for subtle adjustments to tibiotalar alignment without sacrificing contact area.
-
Technique for Cartilage Removal:
- Use a combination of sharp elevators, osteotomes, curettes, and a high-speed burr.
- Elevators/Curettes: Start by peeling off the softer, superficial cartilage.
- Osteotomes: Use small, sharp osteotomes to scrape away adherent cartilage and remove any remaining subchondral cysts or sclerotic bone.
- High-Speed Burr: This is excellent for removing residual cartilage and contouring the surfaces.
- CRITICAL PEARL: Always use the burr with copious cold sterile water or saline irrigation. This minimizes thermal necrosis of the bone, which can impair fusion.
- Complete Débridement: Ensure all residual articular cartilage and sclerotic subchondral bone is removed from both the tibial plafond and the talar dome. The goal is to expose healthy, bleeding cancellous bone.
-
Subchondral Bone Penetration ("Feathering"):
- Once all cartilage is removed, we'll use a small-diameter drill (e.g., 2.0mm or 2.5mm) to penetrate the subchondral bone. Create multiple small holes, approximately 1 cm apart, across the entire fusion surface.
- Alternatively, a narrow chisel can be used to "feather" the surfaces, creating small fissures.
- Rationale: This penetration increases blood inflow to the arthrodesis site and significantly increases the surface area for fusion, promoting osteogenesis.
Alignment and Fixation
(The raw text ends here, so I will continue with the logical next steps for a complete arthrodesis.)
"With the joint surfaces meticulously prepared, we now focus on achieving optimal alignment and rigid fixation."
-
Restoring Alignment:
- Remove the joint distractor.
- Varus/Valgus: Aim for a neutral hindfoot alignment, or slight valgus (2-5 degrees). Excessive varus or valgus can lead to increased stress on adjacent joints and pain. Use fluoroscopy to confirm.
- Dorsiflexion/Plantarflexion: The ideal position for ankle arthrodesis is typically neutral dorsiflexion (0 degrees) or 1-2 degrees of plantarflexion. This allows for optimal gait mechanics. Avoid excessive plantarflexion (equinus) or dorsiflexion (calcaneus).
- Rotation: Ensure the foot is in neutral rotation relative to the tibia. Avoid external rotation of the foot, which is a common compensatory mechanism preoperatively.
- Fluoroscopic Guidance: Use the C-arm constantly to confirm alignment in both AP and lateral views. We'll look for:
- AP View: Neutral tibiotalar alignment, no varus/valgus tilt.
- Lateral View: Neutral or slight plantarflexion. A common reference is that the sole of the foot should be perpendicular to the tibia.
-
Bone Graft Application:
- Once optimal alignment is achieved and held, pack the morselized autogenous bone graft (from the resected fibula) into all available spaces within the fusion site, particularly in any gaps or defects. This acts as a biological scaffold and source of osteoinductive and osteoconductive factors.
-
Internal Fixation:
- "Now for the rigid internal fixation. This is crucial for stability and a successful fusion."
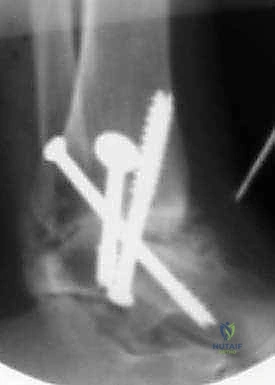
- Screw Placement: We typically use two or three large fragment cannulated screws (e.g., 6.5mm or 7.3mm) for compression and stability.
-
Technique:
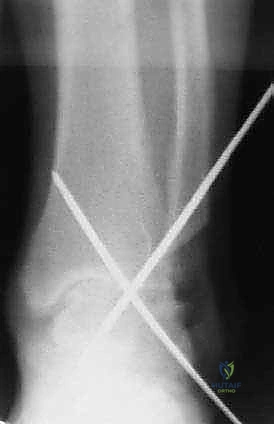
- Guide Wire Insertion: Under constant fluoroscopic guidance, insert guide wires for the screws. The goal is to achieve crossed screw fixation for maximum stability.
- First Screw: Often placed from the distal tibia, angling across the fusion site into the talar body.
- Second Screw: Can be placed from the talar neck, angling proximally across the fusion site into the tibia.
- Third Screw (Optional): Can be placed from the medial malleolus (if intact) or another trajectory to enhance stability.
- Pilot Hole Drilling: Once guide wire positions are confirmed fluoroscopically, drill pilot holes over the guide wires, ensuring appropriate depth.
- Countersinking (Optional): Countersink the screw heads if necessary to prevent soft tissue irritation.
- Screw Insertion: Insert the cannulated screws over the guide wires. Compressive technique is vital. As the screw is tightened, it should draw the tibia and talus together, creating interfragmentary compression across the fusion site.
- Fluoroscopic Confirmation: After each screw, confirm position and compression with AP and lateral fluoroscopic views. Ensure screws are not intra-articular in adjacent joints (subtalar, transverse tarsal) and do not impinge on neurovascular structures.
- Guide Wire Insertion: Under constant fluoroscopic guidance, insert guide wires for the screws. The goal is to achieve crossed screw fixation for maximum stability.
-
Fibular Reattachment (Optional): If the fibula was osteotomized and partially resected, the remaining fibular shaft can be reattached to the tibia using a single screw or a small plate, if desired for stability or cosmesis.
Surgical Warning: Ensure guide wires and screws do not penetrate the medial aspect of the ankle or impinge on the posterior neurovascular bundle. Always check multiple fluoroscopic views.
Wound Closure
"Excellent, fixation looks solid. Let's close this up meticulously."
- Irrigation: Copiously irrigate the wound with sterile saline to remove any bone dust or debris.
- Hemostasis: Achieve meticulous hemostasis using electrocautery.
- Layered Closure:
- Deep Fascia/Periosteum: Close the deep fascia and periosteum over the fibula with absorbable sutures (e.g., 2-0 Vicryl).
- Subcutaneous Layer: Close the subcutaneous layer with interrupted absorbable sutures (e.g., 3-0 Vicryl) to obliterate dead space and reduce tension on the skin.
- Skin: Close the skin with non-absorbable sutures or staples (e.g., 3-0 Nylon or staples).
- Dressing: Apply a sterile dressing, followed by a well-padded splint, typically a posterior splint with stirrups, maintaining the ankle in neutral dorsiflexion.
Pearls and Pitfalls
Pearls:
- Generous Incision: Don't skimp on incision length. Adequate exposure minimizes soft tissue tension and facilitates dissection.
- Subperiosteal Dissection: This is your safest plane for exposing the fibula and protecting neurovascular structures.
- Posterior Fibular Hinge: Preserving the posterior periosteum and soft tissues of the fibula helps maintain vascularity and protects the posterior neurovascular bundle.
- Meticulous Cartilage Removal: This is the single most important factor for achieving fusion. Leave no cartilage behind.
- Subchondral Penetration: "Feathering" or drilling holes increases surface area and blood supply.
- Copious Irrigation: Essential when using a high-speed burr to prevent thermal osteonecrosis.
- Fluoroscopy is Your Friend: Use it often and effectively to confirm alignment and hardware placement.
- Neutral Alignment: Aim for neutral dorsiflexion/plantarflexion and neutral hindfoot alignment for optimal gait.
Pitfalls and Salvage:
- Superficial Peroneal Nerve (SPN) Injury:
- Pitfall: Most common nerve injury. Occurs during skin incision, flap elevation, or anterior retraction. Presents as numbness/paresthesia on the dorsum of the foot or painful neuroma.
- Salvage: Meticulous dissection, identify and protect the nerve. If transected, consider primary repair if possible, or neurectomy with proximal implantation for painful neuromas.
- Inadequate Cartilage Removal/Nonunion:
- Pitfall: The most common cause of failed arthrodesis.
- Salvage: If detected early (e.g., at 3-6 months with persistent pain and radiographic lucency), aggressive revision surgery with repeat débridement, additional bone grafting (autograft or allograft), and potentially more robust fixation (e.g., plate and screws, or intramedullary nail) may be required.
- Malalignment:
- Pitfall: Varus, valgus, or equinus deformities can lead to persistent pain, adjacent joint arthritis, and gait abnormalities.
- Salvage: If significant and symptomatic, revision osteotomy and re-fusion in correct alignment. Prevention is key with careful preoperative templating and intraoperative fluoroscopic checks.
- Wound Complications (Dehiscence, Infection):
Additional Intraoperative Imaging & Surgical Steps
REFERENCES
COMPLICATIONS
- The incidence of wound complications and infections with ankle arthrodesis is roughly the same as in other elective foot and ankle cases. They can generally be managed with local débridement and antibiotics.
-
Delayed union and nonunion occur relatively infrequently after ankle fusion, with a nonunion rate of about 10%. Infection must be ruled out as the cause for nonunion. Aseptic tibiotalar nonunion may be successfully managed with removal of hardware, repeat preparation of the arthrodesis site, bone grafting, and more rigid fixation. In osteopenic bone or where there is substantial bone loss at the arthrodesis site, a tibiotalocalcaneal arthrodesis may be warranted and external fixation may need to be considered. 4,5 Other potential complications of ankle arthrodesis include malunion, symptomatic hardware, reflex sympathetic dystrophy (complex regional pain syndrome), the development of symptomatic arthritis in adjacent joints, deep venous thrombosis, pulmonary embolism, and late stress fracture.
-
Abidi NA, Gruen GS, Conti SF. Ankle arthrodesis: indications and techniques. J Am Acad Orthop Surg 2000;8:200–209.
-
Coester LM, Saltzman CL, Leupold J, et al. Long-term results following ankle arthrodesis for post-traumatic arthritis. J Bone Joint Surg Am 2001;83A:219–228.
-
Fuchs S, Sandmann C, Skwara A, et al. Quality of life 20 years after arthrodesis of the ankle: a study of adjacent joints. J Bone Joint Surg Br 2003;85B:994–998.
-
Haddad SL, Coetzee JC, Estok R, et al. Intermediate and long-term outcomes of total ankle arthroplasty and ankle arthrodesis. A systematic review of the literature. J Bone Joint Surg Am 2007; 89A: 1899–1905.
-
Levine SE, Myerson MS, Lucas P, et al. Salvage of pseudoarthrosis after tibiotalar arthrodesis. Foot Ankle Int 1997;18:580–585.
-
Thomas R, Daniels TR, Parker K. Gait analysis and functional outcomes following ankle arthrodesis for isolated ankle arthritis. J Bone Joint Surg Am 2006;88A:526–535.
-
Thordarson DB. Fusion in posttraumatic foot and ankle reconstruction. J Am Acad Orthop Surg 2004;12:322–333.
-
Wapner KL. Transfibular ankle fusion technique. Techniques Foot Ankle Surg 2002;1:17–23.
You Might Also Like