Flexor Tendon Tenolysis: An Intraoperative Masterclass for Restoring Digital Function
Key Takeaway
This masterclass guides fellows through flexor tendon tenolysis, a critical procedure for restoring digital motion post-injury. We cover detailed surgical anatomy, meticulous preoperative planning, and granular intraoperative execution, emphasizing precise adhesiolysis techniques. Learn to identify and address adhesions, manage pulleys, and navigate potential pitfalls, ensuring optimal functional outcomes and patient recovery through expert surgical and rehabilitative strategies.
Introduction: Navigating the Scarred Landscape of Flexor Tendon Adhesions
Alright, team, gather around. Welcome to the operating theater. Today, we're tackling one of the most challenging and yet incredibly rewarding procedures in hand surgery: flexor tendon tenolysis. This isn't just about cutting scar tissue; it's about restoring the intricate biomechanics of digital motion, giving our patients back the fundamental ability to grasp and manipulate.
The reality of flexor tendon trauma and subsequent repair is that adhesions are an all-too-common complication. These fibrous tethers severely limit the gliding capacity of the tendons within their fibro-osseous tunnels. Think of it like a rope trying to run through a constricted, sticky pipe. The extracellular matrix, a complex scaffold of collagen, proteoglycans, fibronectin, and elastin, plays a central, often detrimental, role in this healing process. Degradation products act as chemotactic signals, recruiting fibroblasts, leukocytes, and endothelial cells, initiating a cascade of scar formation.
Historically, these injuries, particularly those in the infamous "no man's land" or Zone II, were considered formidable. Early approaches often delayed definitive treatment, hoping to minimize adhesion formation, but this strategy proved largely ineffective. We now understand that within days of trauma, T cells and macrophages infiltrate the injury site, stimulating synovial cells to produce fibronectin. By one week, collagen types I and III accumulate, thickening the epitenon to five to seven cell layers, with fibronectin providing the scaffolding for the developing scar. These adhesions, whether from the injury itself or secondary to surgical manipulation, restrict tendon excursion, leading to limited digital function. When a patient has reached a plateau in their functional recovery despite diligent hand therapy, and their passive range of motion significantly exceeds their active range of motion, tenolysis becomes our surgical imperative.
The spectrum of managing flexor tendon adhesions is broad, ranging from nonoperative therapy to complex two-stage tendon reconstructions. However, when adhesions are localized and amenable to release, tenolysis can be a profoundly satisfying procedure. Our decision-making today will be dynamic, influenced by the quality of the involved tendon and the integrity of the surrounding sheath, much of which can only be fully assessed once we're scrubbed in.
Three primary types of adhesions are often encountered:
* Loose adhesions: Arising from subcutaneous tissue, allowing some tendon glide.
* Moderately dense adhesions: Originating from the synovial sheath or pulleys, significantly restricting motion.
* Dense adhesions: Arising from the bony floor or volar plate, often penetrating the dorsal aspect of the tendon, severely impeding movement.
Both moderately dense and dense adhesions are the primary targets of our procedure today, as they are the most restrictive. Remember, fellows, patient selection is paramount. We must ask ourselves: Is this patient truly committed to the extensive, often arduous, postoperative hand therapy? Will the functional improvement justify this complex, time-intensive process, or would an alternative, like an IP joint fusion or even amputation, offer a more predictable and beneficial outcome for their specific situation? These are the tough questions we must address preoperatively.
Comprehensive Surgical Anatomy: Navigating the Digital Landscape
Before we make any incision, let's review the critical anatomy of the flexor tendon system in the digits. This understanding is foundational to performing a safe and effective tenolysis.
The Flexor Tendon System
The digital flexor system comprises two main tendons:
* Flexor Digitorum Superficialis (FDS): This tendon bifurcates at the level of the proximal phalanx, forming two slips that insert onto the middle phalanx. Its primary action is PIP joint flexion.
* Flexor Digitorum Profundus (FDP): This tendon passes through the FDS bifurcation, continuing distally to insert onto the volar base of the distal phalanx. It is responsible for DIP joint flexion, and also contributes to PIP and MP joint flexion.
These two tendons glide in close proximity within a fibro-osseous tunnel, a highly constrained environment, particularly within Zone II (from the A1 pulley to the FDS insertion). This constrained space, combined with the relative motion between two tendons, is precisely why Zone II injuries are so prone to severe adhesion formation.
The Pulley System
The flexor tendons are held close to the bone by a series of fibrous retinacular pulleys, crucial for maintaining the mechanical advantage of the tendons and preventing bowstringing. These are divided into:
* Annular Pulleys (A1-A5): Strong, transverse bands.
* A1 pulley: Overlies the metacarpophalangeal (MP) joint, originating from the volar plate and metacarpal neck. It's often released in trigger finger surgery.
* A2 pulley: Located over the proximal phalanx, originating from the bone. It's critical for preventing FDS bowstringing and should be preserved if possible.
* A3 pulley: Overlies the proximal interphalangeal (PIP) joint, originating from the volar plate.
* A4 pulley: Located over the middle phalanx, originating from the bone. Crucial for FDP function and should also be preserved.
* A5 pulley: Overlies the distal interphalangeal (DIP) joint, originating from the volar plate.
* Cruciform Pulleys (C1-C3): Thinner, oblique bands located between the annular pulleys, allowing for tendon sheath collapse during flexion.
* C1 pulley: Between A1 and A2.
* C2 pulley: Between A2 and A3.
* C3 pulley: Between A3 and A4.
Preserving at least the A2 and A4 pulleys is generally considered essential for maintaining optimal flexor tendon mechanics. Compromise of these can lead to significant bowstringing and functional deficit.
Neurovascular Structures
Running along the lateral aspects of each digit are the digital nerves and arteries. Typically, there are two neurovascular bundles per digit (radial and ulnar), located volar to the midaxial line.
* Digital Nerves: These provide sensation to the digit and are critical for fine motor control and protective sensation. They are extremely delicate and susceptible to injury during dissection, especially in the presence of scar tissue which can obscure their normal anatomical planes.
* Digital Arteries: These provide the primary blood supply to the digit. Injury to a digital artery can compromise digital viability, particularly in a previously traumatized or replanted digit.
These bundles lie in the subcutaneous fat, often intimately associated with the flexor sheath and the planned incision lines. Meticulous dissection and careful retraction are absolutely essential to avoid iatrogenic injury.
Osteology
The phalanges (proximal, middle, distal) and their associated joints (MP, PIP, DIP) form the bony framework. Adhesions can often bind the tendons directly to the periosteum or volar plates of these bones, necessitating careful release. Evaluation for malaligned fractures or other bony pathology is critical, as these can independently limit motion and must be addressed.
Preoperative Planning: Laying the Foundation for Success
Our journey to restoring function begins long before the first incision. Meticulous preoperative planning is the cornerstone of a successful tenolysis.
Patient History and Physical Findings
First, we thoroughly review the patient's history. When was the original injury? What was the nature of the repair? What therapies have they undergone? Crucially, what are their functional limitations, and what are their expectations? We must ascertain their commitment to the intensive postoperative rehabilitation, as this is a major determinant of success.
On physical examination, we meticulously assess both passive and active range of motion (ROM) for all joints of the affected digit and hand.
* Active vs. Passive ROM: If passive ROM significantly exceeds active ROM, it strongly suggests a musculotendinous pathology, indicating either tendon adherence or an incompetent tendon (though for tenolysis, we assume intact tendons).
* Skin Integrity and Scars: Note the location and condition of previous scars. Are they soft and pliable, or are they indurated and tethered? This will guide our incision planning.
* Neurovascular Status: Document the neurovascular status of the digit. Any pre-existing deficits must be noted.
* Flexor Tendon Continuity:
* FDS Continuity: To test, hold adjacent digits in full extension at the MP, PIP, and DIP joints. Ask the patient to actively flex the PIP joint of the digit in question. Intact FDS fibers will allow isolated PIP flexion. Remember, this doesn't rule out a partial tear.
* FDP Continuity: Grasp the middle phalanx to stabilize the PIP joint and ask the patient to actively flex the DIP joint. Intact FDP fibers will allow isolated DIP flexion. Again, partial tears may be missed.
* Differential Diagnosis: We must rule out other causes of limited motion:
* Intrinsic Muscle Contracture (Lumbrical/Interosseous): Perform the Bunnell intrinsic tightness test. With the MP joint extended, passively flex the PIP joint. Then, with the MP joint flexed, passively flex the PIP joint. If there's less PIP flexion with the MP extended, intrinsic tightness is present. For lumbrical contracture, test PIP flexion with the finger radially or ulnarly deviated, or with the DIP flexed; less PIP flexion suggests lumbrical involvement.
* Extensor Contractures: Flex the wrist and MP joints, then assess PIP and DIP flexion. Limited IP joint flexion in this position suggests extensor contracture.
* Flexor Contractures: Extend the wrist and MP joints, then assess IP joint extension. Limited IP joint extension suggests flexor contracture.
* Capsular or Collateral Ligament Contractures: Assess passive ROM for joint stiffness.
* Landsmeer Test: To evaluate oblique retinacular ligament contracture. Passive extension of the PIP joint will result in DIP extension. Continued shortening can lead to a boutonnière deformity.
* "Seesaw Effect": Passively extend and flex DIP, PIP, and MP joints. If one joint is flexed and another can be extended, and vice versa, it suggests a non-articular contracture.
* Other Deforming Conditions: Malaligned fractures, rheumatoid arthritis, Dupuytren's disease, neurologic causes, burns, congenital anomalies, complex regional pain syndrome.
Imaging and Other Diagnostic Studies
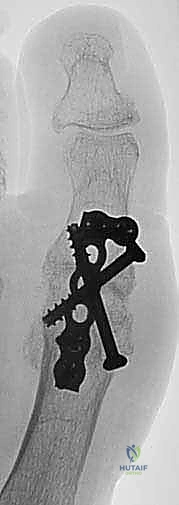
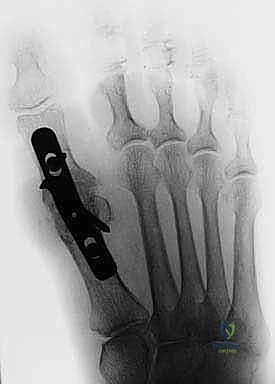
- Radiographs: Standard hand radiographs are essential to evaluate for bony and articular pathology, presence and location of implants, or skeletal deformity from avulsion injuries.
- CT Scans: May be helpful in selected cases for more detailed assessment of complex bony or articular pathology.
- MRI or Ultrasound: These can be invaluable in differentiating severe tendon adhesions from a partial or complete tendon rupture, or identifying capsular injury.
Timing of Tenolysis
The timing is crucial and often debated. Generally, we recommend waiting at least 3 months after the initial tendon repair or grafting procedure. More specifically, we look for a period of 4 to 8 weeks without measurable improvement in active motion despite intensive, appropriate hand therapy. This ensures that the initial healing phase has matured sufficiently and that inflammation has subsided, minimizing the risk of re-adhesion.
Prerequisites for Tenolysis
- Intact Tendons and Pulleys: Essential for the procedure's success.
- Plateau in Function: Despite appropriate therapy, the patient has reached a functional plateau.
- Greater Passive than Active ROM: A key indicator of mechanical restriction from adhesions.
- Healed Fractures and Wounds: All fractures must be consolidated, and wounds fully healed with soft, pliable skin and minimal inflammatory reaction around scars.
- Patient Cooperation: The patient must be cooperative with the rigorous postoperative therapy regimen.
Concomitant Procedures
We must carefully consider any concomitant procedures. Generally, these should be limited to those that will not negatively impact postoperative therapy.
* Capsulotomies: Often necessary for associated joint contractures (PIP or DIP) and can be performed. However, some authors caution that adding capsulotomies may lead to inferior results.
* Pulley Reconstruction: Should be avoided if possible in conjunction with tenolysis. While successful combined procedures have been described, it adds complexity and potential for increased re-adhesion.
* Procedures Requiring Immobilization: Absolutely not to be performed concomitantly with tenolysis. This includes tendon lengthening or shortening, free skin grafts, or osteotomies, as they would compromise the immediate, active motion required post-tenolysis.
Surgical Supplies and Preparedness
Ensure that all necessary surgical supplies are available, including specific instruments for adhesiolysis. Crucially, we must be prepared for the possibility of a staged tendon reconstruction, meaning implants and tools for that procedure should be readily accessible in case intraoperative findings reveal irreparable tendon damage or severe pulley compromise that precludes primary tenolysis.
Patient Positioning and Anesthesia: Setting the Stage
Patient Positioning
The patient is positioned supine on the operating table. The affected upper extremity is placed on a specialized hand table, ensuring comfortable access for the surgical team and adequate space for instrument placement. We use a lead hand splint to stabilize the wrist and hand, providing a stable platform for delicate digital surgery.
Anesthesia Options
The choice of anesthesia is critical and depends on several factors, including patient tolerance, complexity of the case, and surgeon preference.
* Local Anesthesia with Intravenous Analgesia and Tranquilizers: This technique, popularized by Schneider, allows the patient to actively flex the digit during surgery. This provides invaluable real-time feedback on the extent of adhesiolysis achieved and can be incredibly motivating for the patient to see immediate results.
* Technique: Local infiltration into the palm or a wrist block can be used.
* Limitation: The use of a tourniquet for hemostasis can induce motor paralysis after about 30 minutes, limiting the ability to test active flexion. Patient tolerance for a prolonged tourniquet under local anesthesia can also be an issue.
* Solution: A sterile forearm tourniquet can be inflated approximately 30 minutes into the procedure, allowing the upper arm tourniquet to be deflated, restoring motor function and improving patient comfort.
* Regional Anesthesia (e.g., axillary block): Provides excellent pain control and muscle relaxation, but typically prevents intraoperative active motion testing.
* General Anesthesia: Necessary for patients with questionable cooperation, low pain tolerance, contraindications to local/regional anesthesia, or when the expected duration of the procedure (especially if combined with other extensive procedures) exceeds the practical limits of regional or local blocks.
For today's case, we've opted for a regional block supplemented with IV sedation, allowing for a comfortable patient experience while maintaining the option for some intraoperative assessment if needed, though direct active flexion testing will be limited.
Intraoperative Masterclass: Step-by-Step Surgical Execution
Alright team, we're scrubbed in. Tourniquet is up, limb prepped and draped. Let's begin.
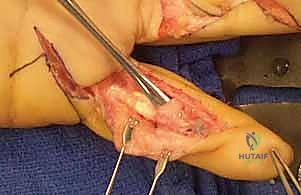
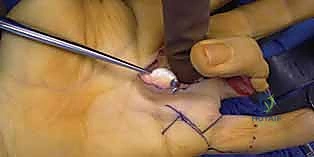
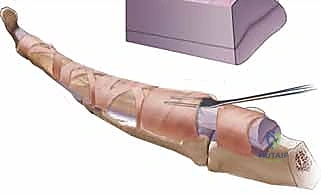
1. Incision Planning and Execution
Our first critical step is the incision. We must balance adequate exposure with minimizing further scarring and protecting vital structures. The choice depends heavily on previous scars.
- Brunner Zigzag Incision: This is our preferred approach for providing the most extensive exposure of the flexor tendons and the pulley system. It follows the natural flexion creases of the digit, creating Z-plasty flaps that minimize contracture during healing.
- Planning: We meticulously plan the apices of the zigzags to avoid placing them directly over the joints, which could lead to flexion contractures. The incision must be designed to incorporate or extend previous scars judiciously.
- Execution: Using a #15 blade, we make precise, clean skin incisions. Be mindful of the underlying neurovascular bundles.
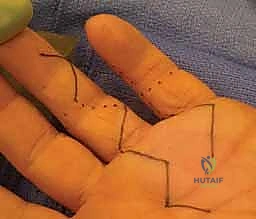
Figure 1: Incision planning, incorporating previous scars.
- Midlateral Incision: This approach is an alternative, particularly useful when previous scars are midlateral or if there's concern about wound tension directly over the tendon.
- Advantages: It protects the neurovascular structures dorsally by staying volar to them, and may result in less scar directly over the tendon, potentially reducing wound tension during early therapy.
- Disadvantages: Provides less direct exposure of the volar aspect of the tendon and pulleys, making extensive adhesiolysis more challenging.
- Execution: The incision is made along the midaxial line of the digit, carefully elevating the skin flap to expose the underlying neurovascular bundle and flexor sheath.
For our patient today, we have existing palmar scars on the ring finger, which we will extend using a Brunner-type exposure to gain optimal access. In the small finger, the previous scars were midlateral, and we will adapt our exposure accordingly.
FIG 1 • Either a zigzag (Brunner-type) incision or a midlateral incision can be used to expose the tendons. The incisions are designed taking into account the previous scars. In this case, the ring finger palmar scars (marked with a dotted line ) were extended ( solid line ) to a Brunner-type exposure. In the small finger, the scars ( dotted lines ) were midlateral and the exposure was planned in that fashion. (Courtesy of Dr. T.E. Trumble.)
2. Skin and Subcutaneous Dissection
Once the skin incision is made, we meticulously elevate the skin flaps.
* Neurovascular Protection: This is a critical step. Using fine dissecting scissors (e.g., tenotomy scissors) and fine forceps, we carefully identify and protect the digital neurovascular bundles. They lie in the subcutaneous fat, typically just volar to the midaxial line. Scar tissue can make this dissection challenging, obscuring normal anatomical planes. We must proceed slowly, identifying the fat planes and carefully pushing aside or retracting these vital structures.
> Surgical Warning: Always assume the neurovascular bundles are immediately beneath your dissection plane. Use blunt dissection whenever possible to sweep tissue away from potential nerve or artery locations. If you encounter scar tissue, dissect parallel to the expected course of the nerves.
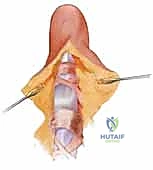
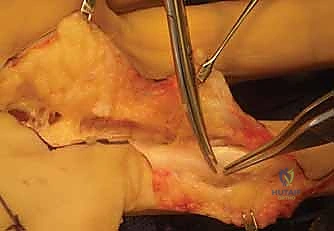
3. Exposing the Flexor Tendons
With the skin flaps elevated and neurovascular structures protected, we now approach the flexor tendon sheath.
* Start in Unaffected Areas: A key pearl here is to begin our exposure in a relatively unaffected region, either proximal or distal to the densest scar tissue. This allows us to identify normal anatomical planes and the healthy appearance of the tendon sheath, which then guides our dissection into the scarred areas.
TECH FIG 1 • A. The tendons are first exposed in an unaffected area, proximal and distal to the scar.
* Define Tendon Borders: Once exposed, we carefully define the borders of the adhesed tendons from the surrounding sheath and from each other. This is crucial for initiating the adhesiolysis.
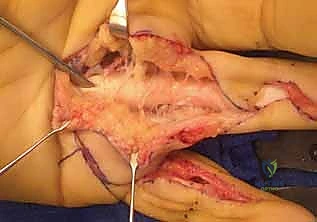
TECH FIG 1 • B. The borders of the adhesed tendons are defined from the sheath and from each other.
4. Adhesiolysis: Releasing the Tendons
Now comes the heart of the procedure: releasing the tendons from their restrictive adhesions. This requires patience, precision, and a variety of instruments.
- General Principle: Our goal is to achieve smooth, unimpeded gliding of the tendons. We must be as atraumatic as possible to the tendon surface itself, as further irritation can lead to re-adhesion.
- Initial Adhesiolysis:
- We begin by carefully lysing the adhesions around both flexor tendons, often elevating them as a single unit initially if they are severely bound together.
- Instruments of choice here include a Freer elevator, a #15 scalpel (used with extreme caution, often with the blade facing away from the tendon), or tenotomy scissors. The Freer elevator is excellent for blunt dissection along fascial planes and gently separating adhesions.
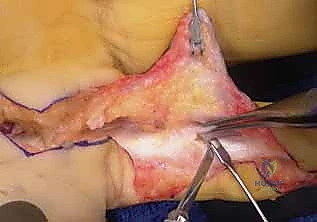
*TECH FIG 1 • C. A Freer elevator, as well as a scalpel or tenotomy scissors, may be used to lyse the adhesions surrounding the tendons
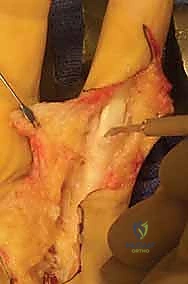
Additional Intraoperative Imaging & Surgical Steps

REFERENCES
-
Azari KK, Meals RA. Flexor tenolysis. Hand Clin 2005;21:211–217.
-
Bain GI, Allen BD, Berger AC. Flexor tenolysis using a free suture. Tech Hand Up Extrem Surg 2003;7:61–62.
-
Bayat A, Shaaban H, Giakas G, et al. The pulley system of the thumb: anatomic and biomechanical study. J Hand Surg Am 2002;27:628–635.
-
Birnie RH, Idler RS. Flexor tenolysis in children. J Hand Surg Am 1995;20A:254–257.
-
Buck-Gramcko D, Dietrich FE, Gogge S. Evaluation criteria in follow-up studies of flexor tendon therapy [in German]. Handchirurgie 1976;8:65–69.
-
Eggli S, Dietsche A, Eggli S, et al. Tenolysis after combined digital injuries in zone II. Ann Plast Surg 2005;55:266–271.
-
Fong KD, Trindade MC, Wang Z, et al. Microarray analysis of mechanical shear effects on flexor tendon cells. Plast Reconstr Surg 2005;116:1393–1404.
-
Foucher G, Lenoble E, Ben Youssef K, et al. A post-operative regime after digital flexor tenolysis: a series of 72 patients. J Hand Surg Br 1993;18B:35–40.
-
Golash A, Kay A, Warner JG, et al. Efficacy of ADCON-T/N after primary flexor tendon repair in zone II: a controlled clinical trial. J Hand Surg Br 2003;28B:113–115.
-
Goloborod’ko SA. Postoperative management of flexor tenolysis. J Hand Ther 1999;12:330–332.
-
Horii E, Lin GT, Cooney WP, et al. Comparative flexor tendon excursion after passive mobilization: an in vitro study. J Hand Surg Am 1992;17A:559–566.
-
Jaibaji M. Advances in the biology of zone II flexor tendon healing and adhesion formation. Ann Plast Surg 2000;45:83–92.
-
Jupiter JB, Pess GM, Bour CJ. Results of flexor tendon tenolysis after replantation in the hand. J Hand Surg Am 1989;14A:35–44.
You Might Also Like