Proximal Chevron Osteotomy with Locking Plate Fixation for Hallux Valgus Correction
Key Takeaway
Join us in the OR for a masterclass on proximal chevron osteotomy with locking plate fixation, a robust technique for significant hallux valgus correction. We'll meticulously cover patient positioning, intricate anatomy, step-by-step intraoperative execution, critical pearls to optimize outcomes, and strategies to manage potential pitfalls. This procedure offers stable fixation, early weight-bearing, and excellent functional results for our patients.
Welcome, fellows, to the operating theater. Today, we're tackling a significant hallux valgus deformity requiring a proximal chevron osteotomy with locking plate fixation. This procedure, while technically demanding, offers superior stability and correction for larger intermetatarsal angles compared to more distal osteotomies, allowing for both angular and translational displacement of the first metatarsal head. It’s a powerful tool in our armamentarium for comprehensive bunion correction.
Understanding the Pathology and Rationale
Hallux valgus is a complex deformity, not merely a bump on the side of the foot. It involves a lateral deviation of the great toe, often accompanied by pronation, and a medial deviation of the first metatarsal, leading to an increased intermetatarsal angle (IMA) between the first and second metatarsals. While over 138 techniques have been described, the proximal chevron osteotomy is a recognized method for correcting major bunion deformities, specifically targeting that increased IMA in the proximal portion of the first metatarsal.
Historically, fixation methods like pins and screws have had their limitations. Pins offer minimal inherent stability and carry a higher risk of infection. Traditional screws can struggle in osteoporotic bone. The advent of locking plates and locking screws has revolutionized our approach. These fixed-angle devices provide a significantly stronger and more stable construct, mitigating the risk of fixation failure and allowing for earlier weight-bearing. This stability is crucial, as it translates to less postoperative pain for the patient and a more predictable healing environment.
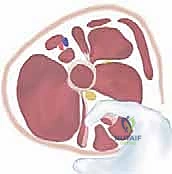
Comprehensive Surgical Anatomy
Before we make our incision, let's review the critical anatomy.
- Osteology:
- First Metatarsal: This is our primary target. It articulates proximally with the medial cuneiform at the tarsometatarsal (TMT) joint and distally with the proximal phalanx at the metatarsophalangeal (MTP) joint. The first metatarsal is generally robust, but its unique curvature and the relatively thin cortical bone in the metadiaphyseal region are important considerations for osteotomy planning and screw trajectory.
- Medial Cuneiform: The proximal articulation point. We must avoid violating this joint with our osteotomy or fixation.
- Proximal Phalanx: Articulates with the metatarsal head.
- Sesamoids: These two small bones are embedded within the flexor hallucis brevis tendons, lying in grooves on the plantar aspect of the first metatarsal head. In hallux valgus, they are often laterally subluxed, contributing to the deformity. Their release is crucial for adequate correction.
- Neurovascular Structures:
- Medial Dorsal Cutaneous Nerve: A branch of the superficial fibular nerve, it runs dorsomedially over the first metatarsal. It's highly susceptible to injury during the skin incision and superficial dissection. Injury can lead to painful neuromas or troublesome numbness.
- Medial Plantar Cutaneous Nerve (or branches of the medial plantar nerve): These nerves run along the plantar aspect of the first ray. While less exposed than the dorsal nerve during a dorsal approach, they are at risk during deep plantar dissection or if the incision extends too far plantarly.
- Dorsalis Pedis Artery and its branches: While usually more dorsal and lateral, care must be taken during deeper dissection, especially around the TMT joint.
- Plantar Arterial Arch: Located deeply. Excessive plantar dissection or long screws can risk injury.
- Muscular Intervals and Tendons:
- Abductor Hallucis: Runs along the medial border of the foot, superficial to the joint capsule. It's often retracted during our approach.
- Adductor Hallucis Tendon: The oblique and transverse heads insert into the lateral aspect of the proximal phalanx base and the lateral sesamoid. Its contracture contributes significantly to the hallux valgus deformity and requires release.
- Extensor Hallucis Longus (EHL) Tendon: Dorsal to the MTP joint. While not directly involved in our approach, it's a key anatomical landmark and must be protected.
- Flexor Hallucis Brevis (FHB) Tendons: Surround the sesamoids. The conjoined lateral head of the FHB, along with the adductor hallucis, forms the lateral soft tissue complex that requires release.
- Joint Capsule: The MTP joint capsule is often redundant medially and contracted laterally. We will address both aspects.
Preoperative Planning & Patient Positioning
Preoperative Planning:
Before the patient even enters the OR, meticulous planning is paramount.
1. Clinical Assessment: Evaluate the patient's symptoms, range of motion, and assess for any associated deformities like metatarsus adductus or hypermobility of the first ray.
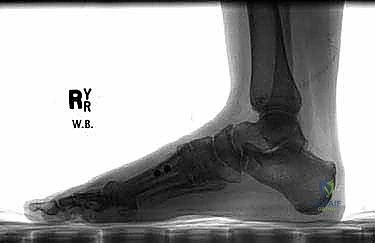
2. Radiographic Templating: Obtain weight-bearing anteroposterior (AP), lateral, and oblique radiographs.
* Measure the hallux valgus angle (HVA) and the intermetatarsal angle (IMA). This proximal chevron is ideal for IMAs generally exceeding 15-16 degrees, where distal osteotomies might be insufficient.
* Assess sesamoid position, joint congruity, and any degenerative changes.
* Template the osteotomy cut and planned translation. Visualize the amount of lateral translation needed to achieve the desired IMA correction.
* Consider plate and screw sizing. We typically use a low-profile, four-hole locking plate designed for foot osteotomies.
Patient Positioning:
1. Supine Position: The patient is positioned supine on the operating table.
2. Leg Prep: The entire lower extremity, from above the knee to the toes, is prepped and draped in a sterile fashion.
3. Thigh Tourniquet: A pneumatic thigh tourniquet is applied to ensure a bloodless field, which is critical for precise dissection and osteotomy. We will inflate it after exsanguination with an Esmarch bandage.
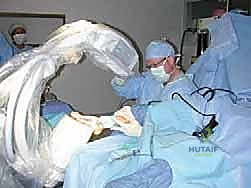
4. Fluoroscopy Setup: The C-arm is brought in and positioned to allow easy intraoperative AP and lateral views of the first ray without repositioning the patient or the foot. Ensure the image intensifier is draped sterilely.
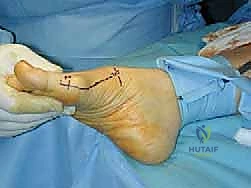
5. Foot Position: The foot is placed flat on the table, or slightly internally rotated if necessary, to optimize access to the medial aspect of the first metatarsal. A small bump under the ipsilateral hip can help maintain this position.
Step-by-Step Intraoperative Execution: The Masterclass
Alright, fellows, let's get scrubbed in. Tourniquet is up, field is prepped. We're ready to begin.
1. Approach: Skin and Capsular Incision
We'll use a single midmedial approach to the first metatarsal.
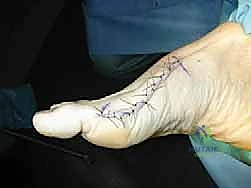
- Incision Marking: Identify the medial eminence of the first metatarsal head and the MTP joint line. We'll mark a longitudinal incision, approximately 6-8 cm in length, centered over the medial aspect of the first metatarsal, extending from just proximal to the MTP joint to the metatarsal shaft.
-
Skin Incision: Using a no. 10 blade, we'll make a sharp incision through the skin and subcutaneous tissues.
Surgical Warning:
Protect the medial dorsal cutaneous nerve! As you incise, be acutely aware of the course of the medial dorsal cutaneous nerve. It typically runs dorsomedially. Dissect carefully through the subcutaneous fat, identifying and retracting this nerve dorsally or plantarly as needed to protect it. Injury can lead to a painful neuroma or persistent numbness. -
Subcutaneous Dissection: Elevate thick skin flaps both dorsally and plantarly using a combination of sharp and blunt dissection with Metzenbaum scissors. Preserving thick flaps is crucial for robust wound healing and preventing skin necrosis, especially over the prominent hardware.
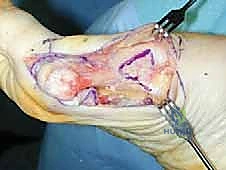
- Exposure of Joint Capsule: Once the subcutaneous tissues are reflected, the underlying first MTP joint capsule will be exposed.
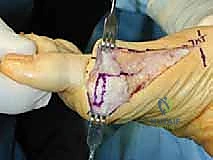
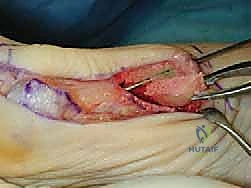
TECH FIG 1 • Thick skin flaps are preserved, and a vertical segment of redundant capsule is excised.
-
Capsular Incision and Resection: Now, let's address the capsule.
- First, we'll perform a vertical capsular resection. Using a no. 15 blade, carefully excise a segment of redundant capsule, approximately 3 to 5 mm in width, just proximal to the base of the proximal phalanx. This medial redundancy is characteristic of hallux valgus. This excision helps achieve a precise capsular repair at the end and prevents overstuffing.
- Next, make a dorsomedial incision in the capsule, parallel to the first metatarsal shaft. This incision should start proximally on the metatarsal shaft and extend distally towards the MTP joint, curving slightly plantarly to create a plantarly based capsular flap. This flap allows excellent exposure of the medial eminence and the entire metatarsal head and shaft.
Surgical Warning:
Maintain flap thickness! Ensure your capsular flap is of adequate thickness to hold sutures securely during closure. A thin, flimsy flap will not provide a strong repair.
2. Release of Lateral Joint Structures
This is a critical step to allow for proper correction of the hallux valgus deformity. Without adequate lateral release, you will struggle to achieve full correction and risk recurrence.
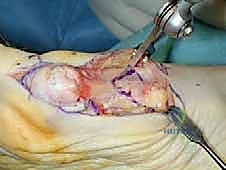
- Distraction: We'll begin by distracting the sesamoids from the first metatarsal head. Use a lamina spreader or a small bone hook to gently distract the MTP joint. This opens up the lateral gutter, making the adductor tendon and lateral capsule more accessible.
- Initial Release: Take a blunt Freer elevator. Carefully insert it into the lateral aspect of the MTP joint, between the metatarsal head and the lateral sesamoid. Gently sweep the Freer to develop a plane and initiate the release of the lateral soft tissues. Feel for the taut band of the adductor hallucis and the lateral collateral ligament.
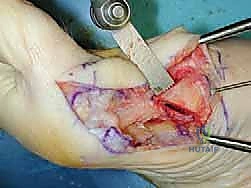
TECH FIG 2 • A. A plantar and proximally based capsular flap is created, and the capsule is released with a Freer elevator.
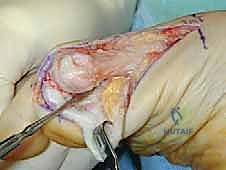
TECH FIG 2 • B. A no. 15 blade is used to complete the release of the lateral capsular attachment to the lateral sesamoid.
- Complete Release: Now, with a sharp no. 15 blade, carefully complete the release. This includes:
- The adductor hallucis tendon insertion on the lateral aspect of the proximal phalanx base and lateral sesamoid.
- The lateral collateral ligament.
- The lateral sesamoid suspensory ligament and any remaining tight lateral capsule.
- Perform this release from within the joint, ensuring you're not damaging the articular cartilage.
- Confirmation of Release: How do we know we've achieved a complete release? Gently manipulate the great toe. It should now be possible to bring the toe into approximately 15 degrees of varus through the MTP joint without undue force. If it feels tight, continue to explore and release any remaining lateral soft tissue constraints.
- Proximal Metatarsal Exposure: With the lateral release complete, retract the soft tissues to expose the proximal first metatarsal shaft, both dorsally and plantarly. This will be the site of our osteotomy. Use small Hohmann retractors or similar instruments to maintain exposure, ensuring protection of the soft tissues.
3. Metatarsal Osteotomy
This is the core of the correction. Precision here is paramount.
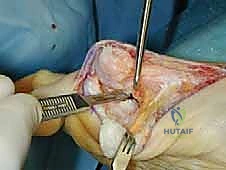
- Locate and Mark: First, confirm the location of the tarsometatarsal (TMT) joint. Palpate it, and if necessary, use fluoroscopy to confirm its exact position. We want to avoid violating this joint. Now, measure approximately 20 mm distally from the first TMT joint. This point will be the apex of our chevron osteotomy. Mark this apex at the midpoint in the dorsal-plantar direction of the metatarsal shaft.
- Osteotomy Design: We are performing a proximally based chevron osteotomy. This means the "V" shape points proximally. The angle of the chevron should be approximately 60 degrees. This angle provides a broad cancellous surface for healing and allows for good stability after translation.
-
Saw Technique: Using a microsagittal saw, carefully make the osteotomy cuts.
- Start with the dorsal limb of the chevron, cutting from the dorsal aspect towards the apex.
- Then, make the plantar limb cut, again from the plantar aspect towards the apex.
- Maintain the saw in the same plane for both cuts to ensure good bony apposition. This is critical for stable fixation and optimal healing.
- Do not plunge the saw too far dorsally or plantarly, as this can create stress risers or fracture the limbs of the osteotomy.
- Confirm that the osteotomy is completely released both plantarly and dorsally. Use a small osteotome or Freer elevator to gently pry the fragments apart if needed, ensuring no remaining bony bridges.
Surgical Warning:
Avoid thermal necrosis! Use copious irrigation during saw cuts to prevent thermal injury to the bone, which can impair healing.
Prevent fracture of osteotomy limbs! The proximal chevron osteotomy creates two limbs. Be gentle when manipulating the fragments to avoid inadvertent fracture, especially if the bone quality is compromised. -
Fragment Manipulation and Translation:
- Grasp the proximal fragment of the first metatarsal with a pointed towel clamp or a small bone clamp.
- Now, with controlled force, angulate the distal fragment laterally to decrease the 1-2 intermetatarsal angle.
- Simultaneously, translate the distal fragment 3 to 5 mm laterally. This lateral translation is key to narrowing the forefoot and correcting the metatarsus primus varus.
- Additionally, translate the distal fragment plantarly enough to coapt the superior (dorsal) portion of the chevron, leaving an opening in the plantar portion of the osteotomy. This plantar translation helps to plantarflex the metatarsal head, which can be beneficial in cases of metatarsal elevation or to offload the MTP joint.
TECH FIG 4 • A pointed towel clip is used to hold the proximal metatarsal while the shaft is angulated and translated laterally to decrease the 1–2 intermetatarsal angle and narrow the foot.
TECH FIG 4 • A K-wire is advanced from the TMT joint into the shaft to hold the correction temporarily.
- Temporary Fixation: Once you achieve the desired angulation and translation, secure this position temporarily with a 0.062-inch K-wire. Advance the K-wire from the dorsal aspect of the metatarsal shaft, across the osteotomy, into the proximal fragment, ensuring it does not enter the TMT joint. This allows us to assess the correction and apply our plate without losing the reduction.
4. Osteotomy Fixation
Now for the definitive fixation with our locking plate.
- Plate Selection and Positioning: We'll use a four-hole locking plate to bridge the osteotomy medially. Select a plate that is low-profile and appropriately sized for the first metatarsal. Position the plate centrally over the osteotomy site on the medial aspect of the metatarsal.
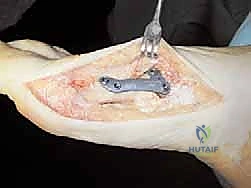
TECH FIG 5 • C. A four-hole locking plate is applied at the osteotomy site.
> **Surgical Warning:**
> **Plate Contouring:** If the plate requires contouring to match the bone's anatomy, **do not bend the plate through the locking holes**. Bending through the holes can deform the threads, preventing the locking screws from seating properly and compromising the fixed-angle construct. Bend the plate only in the segments between the screw holes.
-
Screw Insertion:
- Secure the plate temporarily with a non-locking screw in one of the central holes, or use a K-wire through a dedicated K-wire hole if available, ensuring good plate-to-bone apposition.
- Drill for the first locking screw. Measure the appropriate screw length. Insert the locking screw, ensuring it engages the plate and bone securely.
- Repeat this process for the remaining three locking screws. Aim for bicortical purchase where possible, but always be mindful of the plantar neurovascular structures.
- Care is exercised to avoid penetrating the TMT articulation with screws. Use fluoroscopy if there is any doubt about screw length or trajectory, especially for the most proximal screw.
-
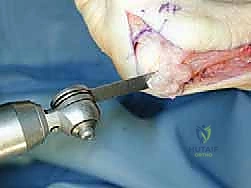
Bone Grafting: Remember the prominent proximal fragment created by our lateral translation? This piece of bone is valuable.
- First, clean the prominent proximal fragment of any remaining periosteum.
- Then, using a small saw or osteotome, remove this prominent portion, ensuring it is flush with the distal fragment.
TECH FIG 5 • A,B. The prominent proximal bone is removed with a saw. The opening created by plantar flexing the metatarsal creates a gap into which the removed bone may be impacted.
* The opening created by the plantar translation of the distal fragment in the chevron osteotomy is an ideal space for bone grafting. Take the largest removed portion of bone and gently impact it as a bone graft into this plantar gap. This provides additional structural support and promotes osteotomy healing.
-
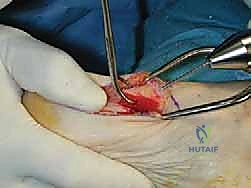
Medial Eminence Resection: Now, let's address the bunion itself.
- Identify the sagittal sulcus on the metatarsal head. This marks the articular cartilage margin.
- Using a microsagittal saw, remove the prominent medial eminence, cutting approximately 1 mm medial to the sagittal sulcus. This ensures adequate removal of the boney prominence without violating the articular surface. Smooth any sharp edges with a rasp.
-
Final Assessment:
- Once all screws are placed and the bone graft is impacted, remove the temporary K-wire.
- Manually assess the stability of the osteotomy. It should feel rock-solid with the locking plate.
- Confirm the correction and alignment of the first ray. The hallux valgus angle should be significantly improved, and the intermetatarsal angle should be within an acceptable range (typically 8-10 degrees).
- Perform fluoroscopy to confirm the final alignment, reduction of the intermetatarsal angle, and appropriate placement of hardware. Obtain AP and lateral views.
TECH FIG 6 • A,B. Correction of the hallux valgus angle and the 1–2 intermetatarsal angle is confirmed with fluoroscopy.
5. Capsule and Soft Tissue Closure
Meticulous soft tissue closure is essential for maintaining correction and preventing hardware prominence.
- Deep Tissue Coverage: First, ensure that the deep tissues are closed over the plate to avoid later plate prominence and irritation. Use absorbable sutures (e.g., 2-0 Vicryl) to bring the deeper soft tissues over the plate.
- Capsular Closure: Now, let's close the capsular flaps.
- Using 2-0 Vicryl interrupted sutures, meticulously repair the capsular flaps.
- As you close, hold the great toe in slight varus, approximately 2 degrees, and slight supination. This helps to counteract the natural tendency for the hallux to drift into valgus and pronation postoperatively. Remember, these tissues will stretch over time, so a slight overcorrection initially is often beneficial.

TECH FIG 7 • The capsular flaps are closed with 2-0 interrupted Vicryl sutures with the hallux held in good position. Soft tissue coverage of the plate also is obtained.
> **Surgical Warning:**
> **Do not overtighten the capsule!** While we want to maintain correction, excessive tension can lead to an iatrogenic hallux varus deformity, which can be even more debilitating than the original bunion. Check the MTP joint range of motion after capsular closure to ensure it's not excessively restricted.
> **Addressing Pronation:** If there is a significant pronation deformity of the hallux, capsular imbrication can be strategically used to derotate the toe.
- Subcutaneous Closure: Close the subcutaneous layer with interrupted absorbable sutures (e.g., 3-0 Vicryl) to obliterate dead space and provide a strong foundation for skin closure.
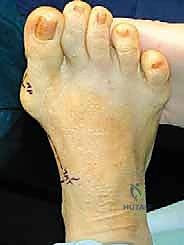
- Skin Closure: Finally, close the skin with interrupted vertical mattress 4-0 nylon sutures. This technique provides excellent eversion of the skin edges, promoting optimal cosmesis and wound healing.
- Dressing: Apply a compressive dressing to the foot, ensuring the great toe is held in the desired corrected position. This dressing provides gentle support and helps manage swelling.
💡 Pearls and Pitfalls
Let's discuss some critical points to ensure success and avoid complications.
- Exposure:
- Pearl: Always dissect thick tissue flaps during the initial approach. This is your best defense against wound healing complications, especially with hardware beneath. Use careful, sharp dissection with a no. 10 blade initially, then switch to Metzenbaum scissors
REFERENCES
References 1. Easley Me, Kiebzak Gm, Davis Wh, Et Al. Prospective, Randomized Comparison Of Proximal Crescentic And Proximal Chevron Osteotomies For Correction Of Hallux Valgus Deformity. Foot Ankle Int 1996;17: 307–316.
-
Gallentine Jw, Deorio Jk, Deorio Mj. Bunion Surgery Using Locking-Plate Fixation Of Proximal Metatarsal Chevron Osteotomies. Foot Ankle Int 2007;28(3):361–368.
-
Mccluskey Lc, Johnson Je, Wynarsky Gt, Et Al. Comparison Of Stability Of Proximal Crescentic Metatarsal Osteotomy And Proximal Horizontal “V” Osteotomy. Foot Ankle Int 1994;15:263–270.
-
Sammarco Gj, Russo-Alesi Fg. Bunion Correction Using Proximal Chevron Osteotomy: A Single-Incision Technique. Foot Ankle Int 1998; 19:430–437.
-
Bunion dressings are applied at the time of surgery, and sutures are removed 2 to 3 weeks from the date of surgery.
-
Heel weight bearing can be allowed immediately postoperatively, with advancement to weight bearing as tolerated in a regular shoe at 6 weeks postoperatively.
-
Radiographs are obtained at 6 weeks and 3 months.
You Might Also Like