
Welcome, fellows, to the operating theater. Today, we're tackling a common yet often technically demanding injury: traumatic disruption of the extensor mechanism. These injuries, due to the superficial location of the tendons, frequently present with concomitant damage to bone, skin, and joint structures. Our goal is to achieve a meticulous repair, restoring function and preventing long-term disability. Remember, early and appropriate treatment of acute injuries is paramount, as reconstruction of subacute and chronic cases is significantly more challenging and less effective.
Comprehensive Surgical Anatomy: Navigating the Dorsal Landscape
Before we make any incision, a profound understanding of the extensor anatomy is non-negotiable. The extensor mechanism is a complex, finely tuned system, and even minor disruptions can have significant functional consequences.
Extensor Tendon Zones of Injury (Verdan Classification)
Let's first orient ourselves with the Verdan zones, our roadmap for these injuries.
-
Fingers: Divided into eight zones, numbered distal to proximal.
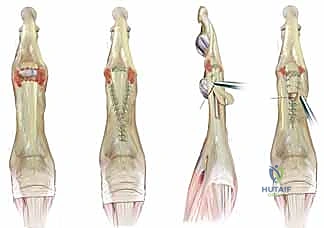
- Zone I: Over the distal interphalangeal (DIP) joint. Injury here typically involves the terminal extensor tendon, leading to a mallet finger deformity. The terminal tendon is thinner in the fingers than in the thumb.
- Zone II: Over the middle phalanx. Lacerations here can sometimes mimic Zone I injuries clinically. Be mindful of the converging lateral bands and their contribution to extension. Injury to the periosteum and middle phalanx can lead to increased swelling and tendon adherence.
- Zone III: Over the proximal interphalangeal (PIP) joint. This is the central slip territory. Disruption here can lead to a boutonnière deformity, especially if untreated, as the lateral bands migrate palmarly and become PIP flexors. Avulsion of the central slip is common with volar PIP joint dislocations.
- Zone IV: Over the proximal phalanx. Injuries here often involve only a portion of the extensor mechanism, as the extensor hood covers a significant circumference of the digit. A complete central slip laceration here may initially maintain PIP extension via the lateral bands, but a boutonnière can still develop.
- Zone V: Over the metacarpophalangeal (MCP) joint. Injuries can be open lacerations or closed sagittal band ruptures, leading to extensor tendon subluxation, most commonly ulnar subluxation due to radial sagittal band disruption. Always assume an open joint injury with any tendon laceration around the MCP joint.
- Zone VI: Over the dorsum of the hand. Here, the juncturae tendinum provide interconnections between EDC tendons, which can mask complete lacerations, making identification challenging.
- Zone VII: Over the wrist, through the extensor retinaculum. This zone involves the six distinct extensor compartments.
- Zone VIII: In the forearm, at the musculotendinous junction or muscle belly. Detecting concurrent posterior interosseous nerve injury can be difficult here.
-
Thumb: Divided into five zones, also distal to proximal. The terminal extensor tendon of the thumb is notably thicker than in other digits, making mallet injuries less common.
Extrinsic Extensor Tendons and Compartments
The extrinsic extensors originate from the lateral epicondyle and condyle, with musculotendinous junctions typically 3-4 cm proximal to the wrist. However, the EIP, EPL, APL, and EPB originate more distally from the ulna, radius, or both, and have more distal muscle fibers.
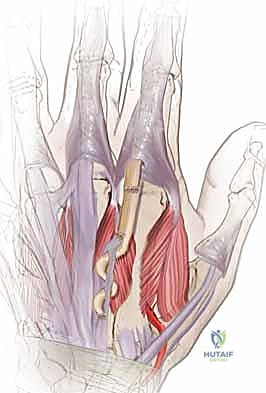
The fascia over these tendons thickens at the wrist to form the extensor retinaculum, which creates six distinct compartments.
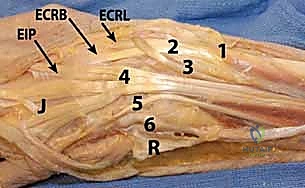
(Refer to the figure showing the wrist and hand extensor tendon anatomy with compartments.)
Let's review these critical compartments and their contents:
- Compartment 1: Abductor Pollicis Longus (APL) and Extensor Pollicis Brevis (EPB). This compartment is more palmar than the others.
- Compartment 2: Extensor Carpi Radialis Longus (ECRL) and Extensor Carpi Radialis Brevis (ECRB). These are the two primary wrist extensors.
- Compartment 3: Extensor Pollicis Longus (EPL). This tendon uniquely hooks around Lister's tubercle and goes to the thumb. Lacerations proximal to the MCP joint are associated with significant EPL retraction, often all the way to the wrist.
- Compartment 4: Extensor Digitorum Communis (EDC) (four tendons) and Extensor Indicis Proprius (EIP). The EIP is deep to the EDC tendons, has more distal muscle fibers, and passes beneath the junctura tendinum. The four EDC tendons originate from a common muscle belly, with progressively limited independence from index to small fingers.
- Compartment 5: Extensor Digiti Quinti (minimi) (EDQ or EDM). This is the independent extensor tendon for the small finger.
- Compartment 6: Extensor Carpi Ulnaris (ECU). The most ulnar extensor tendon, contributing to wrist extension and ulnar deviation.
Juncturae Tendinum: These interconnections between the EDC tendons, just proximal to the MCP joints, are vital. They provide collateral extension to adjacent digits, which can mask a complete laceration of a single EDC tendon in Zone VI. The EIP and EDQ are ulnar and deep to the EDC in the hand and at the MCP joint.
Intrinsic Extensor Tendons
Originating within the hand, these include the four dorsal interossei, three palmar interossei, and four lumbricals. The thenar and hypothenar muscles also contribute to interphalangeal extension.
- The intrinsic tendons join to form the conjoined lateral bands volar to the axis of the MCP joint.
- They continue dorsal to the axis of the PIP and DIP joints. This unique anatomical arrangement allows them to simultaneously flex the MCP joint and extend the PIP and DIP joints, in addition to providing digital adduction and abduction.
Neurovascular Risks
The dorsal cutaneous nerves are superficial and highly vulnerable during dissection, especially the radial sensory nerve and the dorsal digital nerves. Meticulous, sharp dissection and careful retraction are essential to prevent iatrogenic injury. The dorsal venous system is also extensive and can lead to significant bleeding if not managed carefully.
Preoperative Planning & Patient Positioning
Every successful surgery begins with thorough planning.
Patient Assessment and Diagnostic Studies
- History: Mechanism of injury, timing (acute vs. subacute/chronic), hand dominance, occupation.
- Physical Examination:
- Skin and soft tissue: Assess for open wounds, contamination, tissue loss, and signs of infection. This dictates débridement and potential need for soft tissue coverage.
- Neurovascular status: A complete neurologic examination is critical. Be aware that concurrent posterior interosseous nerve injury can be masked by proximal extensor muscle lacerations.
- Tendon examination: This is paramount.
- Extrinsic extensors: Test with the wrist in neutral, resisting MCP extension.
- EIP: Test by resisting index finger extension with the other fingers flexed.
- EDQ: Test by resisting small finger extension with other fingers flexed.
- Digital examination: Look for extensor lag, weakness, or pain with resisted extension at the PIP or DIP joints. Remember, isolated PIP extension can be maintained by intrinsic muscles even with complete extrinsic extensor lacerations.
- Juncturae effect: Lacerations proximal to the juncturae tendinum (Zone VI) may show nearly full motion, but with weakness on strength testing. This is a critical diagnostic point.
- Partial lacerations (<50%): If active extension is full, pain is minimal, and strength is good, conservative treatment may be considered. Otherwise, surgical exploration is indicated.
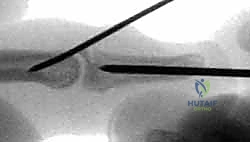
- Imaging:
- Plain radiographs: Absolutely necessary to rule out fractures, foreign bodies, pre-existing injury, or arthrosis. For example, a bony mallet finger or central slip avulsion fracture.
- Ultrasound or MRI: Occasionally useful for suspected radiolucent foreign bodies or to fully evaluate complex tendon injuries, though clinical exam often guides treatment.
Anesthesia Considerations
- Distal to PIP joint: Local anesthesia with a digital tourniquet is often sufficient.
- Proximal injuries (wrist, forearm): An upper arm tourniquet is typically required, necessitating general or regional anesthesia. Regional blocks (e.g., brachial plexus block) can offer excellent intraoperative analgesia, muscle relaxation, and prolonged postoperative pain relief, which is invaluable for early rehabilitation. Anticipate surgical time; if under 30 minutes, a regional block might suffice alone.
Preoperative Planning Checklist
- Wound management: If infected, thorough irrigation and débridement, followed by antibiotics. Delayed primary repair (7-14 days later) is often indicated, though earlier for EPL lacerations proximal to the MCP joint and EDC lacerations proximal to the junctura.
- Tendon reconstruction: Anticipate the need for tendon graft or transfer in subacute injuries or those with significant tendon loss. This is especially true for EPL lacerations proximal to the MCP joint, which can be difficult to repair primarily even 2 weeks post-injury.
- Instrumentation: Ensure availability of fine hand instruments, micro-suture, loupe magnification (essential), and potentially a microscope for nerve repair if indicated.
- Splinting materials: Have all necessary splinting materials ready for immediate postoperative application.
Patient Positioning and Preparation
- Standard positioning: The patient is positioned supine on the operating table.
- Arm setup: The affected arm is abducted and placed on a specialized hand table, ensuring comfortable access for the surgical team.
- Tourniquet application: A carefully padded pneumatic tourniquet is applied to the upper arm.
- Inflation pressure: Typically set to 100 mmHg above the patient's systolic blood pressure. Adjustments may be needed for obese patients (slightly higher) or children/small arms (slightly lower). Always ensure the pressure is sufficient to achieve a bloodless field without causing undue tissue ischemia.
- Preparation and draping: The limb is prepped and draped sterilely from above the elbow to the fingertips. This allows for full range of motion assessment intraoperatively and facilitates the application of dressings and splints before drape removal.
Step-by-Step Intraoperative Execution: The Operating Surgeon's Viewpoint
Alright, fellows, let's scrub in. The tourniquet is up, the field is prepped, and we have a clear view. Magnification is on.
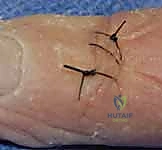
1. Incision and Initial Exposure
"Scalpel, please, a #15 blade."
We begin by extending the existing skin laceration, if present. If it's a closed injury or a small puncture wound, we'll make a well-planned incision.
- Incision Principles:
- Longitudinal incisions: On the dorsum of the hand and fingers, these can safely cross over joints, unlike on the flexor surface.
- Avoid long, narrow skin flaps: These are prone to necrosis. Design your incision to provide ample exposure without compromising skin viability. Often, a gentle curvilinear or S-shaped extension provides better access.
- Exposure: The goal is to adequately expose the injured structures, allow for retrieval of retracted tendons, and provide sufficient access for meticulous suture placement, all while minimizing skin tension during retraction.
"Let's make a generous incision, fellows, ensuring we have clear visualization. Remember, inadequate exposure leads to suboptimal repair."
2. Subcutaneous Dissection and Hemostasis
"Fine forceps, Metzenbaum scissors, and bipolar cautery."
- Meticulous Dissection: Carefully incise the subcutaneous tissue. This is where we encounter the dorsal cutaneous nerves and the superficial venous system.
- Dorsal Cutaneous Nerves: These are highly susceptible to injury. Identify them early and protect them with careful blunt dissection and retraction. Use nerve hooks or small vessel loops.
- Dorsal Veins: These can bleed profusely if not managed. Use bipolar electrocautery sparingly and precisely to coagulate small vessels. Larger veins should be ligated or carefully retracted.
- Hemostasis: Maintain a bloodless field. If there's any doubt about hemostasis, we'll deflate the tourniquet before closure to address any bleeders.
"Take your time here. Patience is key. We want to preserve every viable structure."
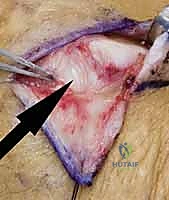
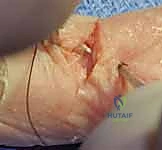
3. Wound Exploration and Débridement
"Irrigation, suction, and a small curette."
- Thorough Exploration: In a bloodless field, we meticulously explore the wound. If the injury is over a joint, we must explore the joint to assess for capsular tears, intra-articular foreign bodies, or chondral damage.
- Débridement: Remove all devitalized tissue, foreign bodies, and debris. This is critical to prevent infection and promote healing. Use a gentle curette or fine rongeur for bony fragments.
- Joint Irrigation: If the joint capsule is violated, irrigate thoroughly with saline to remove contaminants.
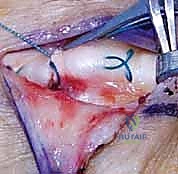
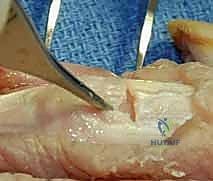
4. Tendon Identification and Retrieval
"Fine hooks, stay sutures, and magnification."
- Identify Tendon Ends: In a complete laceration, the tendon ends will often retract.
- Proximal Retraction: Extensor tendons, especially the EPL and EDC tendons proximal to the juncturae, can retract significantly. Use gentle traction on the digit or wrist to bring the distal stump into view. For the proximal stump, we may need to extend the incision further proximally.
- Retrieval: Use fine hooks or small mosquito clamps to gently grasp the tendon ends. Sometimes, a "milking" maneuver of the muscle belly proximally can help bring the retracted end into the field. If retraction is severe, a small incision proximally and threading a red rubber catheter or small clamp can help retrieve the tendon.
- Assessment: Determine if the laceration is partial or complete, and identify all involved tendons (e.g., EDC, EIP, EDQ, sagittal bands). Remember the masking effect of juncturae tendinum in Zone VI.
"Once we've identified both ends, we'll place temporary stay sutures to prevent further retraction and facilitate repair."
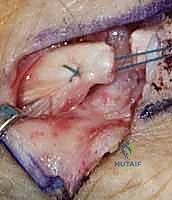
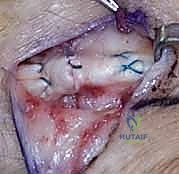
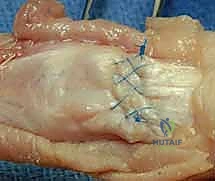
5. Specific Repair Techniques by Zone
Now, let's address the repair itself, tailored to the specific zone of injury. We'll use 4-0 or 5-0 non-absorbable braided polyester suture (e.g., Ethibond, Fiberwire) for most repairs, often with a core suture technique augmented by a peripheral running epitendinous suture.
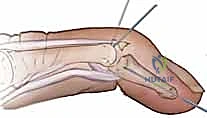
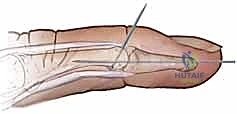
Zone I: Terminal Tendon Repair (Mallet Finger)

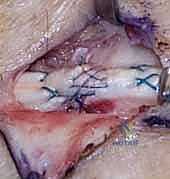
"Here we have a classic mallet finger, fellows. Disruption of the terminal extensor tendon at the DIP joint."
- Technique: We'll perform a direct repair of the terminal tendon to its insertion on the distal phalanx.
- Suture Placement: Using a modified Kessler or Bunnell technique, pass the core sutures through the tendon and then anchor them securely into the distal phalanx either through drill holes or by incorporating periosteum.
- Augmentation: A running epitendinous suture (e.g., 6-0 Prolene) will provide additional strength and a smoother gliding surface.
- Bony Mallet: If there's a significant bony avulsion fragment, we can attempt to reduce and fix it with a small K-wire or suture anchor. If the fragment is too small or comminuted, direct tendon repair is still the primary goal.
- DIP Joint Fixation: For unstable repairs or bony mallets, we may temporarily fix the DIP joint in full extension with a transarticular K-wire (0.028" or 0.035"). This provides a tension-free environment for tendon healing.
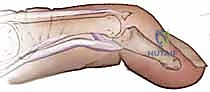
"Ensure the DIP joint is in neutral extension, not hyperextension, to avoid skin issues."
Zone II: Middle Phalanx Extensor Repair
- Technique: Direct end-to-end repair of the extensor tendon or lateral bands.
- Suture: Core suture (modified Kessler) followed by epitendinous repair.
- Considerations: Be mindful of the delicate nature of the tendon here. Avoid excessive bulk with your repair, which can lead to adherence.
Zone III: Central Slip Repair (PIP Joint)
"This is a critical area, fellows. Untreated central slip injuries lead to boutonnière deformity."
- Technique: Direct end-to-end repair of the central slip.
- Suture: Use a strong core suture technique (modified Kessler or modified Bunnell) and reinforce with a running epitendinous suture.
- Associated Avulsion: If there's a central slip avulsion with a bony fragment, reduce and fix the fragment with a small K-wire or pull-out suture if possible.
- PIP Joint Fixation: For complete central slip lacerations, it's often prudent to temporarily fix the PIP joint in full extension with a transarticular K-wire (0.035" or 0.045") for 3-4 weeks to protect the repair.
"It's crucial to restore the central slip's continuity to prevent the lateral bands from migrating volarly and becoming PIP flexors."
Zone IV: Proximal Phalanx Extensor Repair
- Technique: Direct repair of the extensor mechanism. These often involve partial lacerations.
- Suture: If more than 50% of the tendon width is involved, repair with a core suture and epitendinous repair. Longitudinal lacerations or those less than 50% may not require repair if function is maintained.
- Considerations: The extensor hood is broad here. Ensure a smooth repair to prevent adherence.
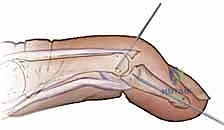
Zone V: MCP Joint Extensor Repair (Sagittal Band / EDC)
"Here, we're dealing with the sagittal bands and the EDC tendon over the MCP joint."
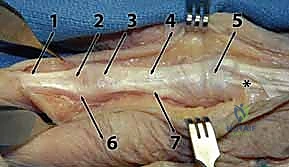
(Refer to figure showing digital extensor mechanism, including sagittal band.)
- Sagittal Band Repair: If there's a rupture, typically of the radial sagittal band allowing ulnar subluxation of the EDC, we'll repair it directly.
- Technique: Use small, non-absorbable sutures (e.g., 5-0 or 6-0) to reattach the sagittal band to the extensor tendon or the volar plate.
- Considerations: Ensure the EDC tendon is centered over the MCP joint after repair.
- EDC Tendon Repair: If the EDC is lacerated, perform a direct end-to-end repair.
- Suture: Modified Kessler core suture and epitendinous repair.
- Joint Exploration: As mentioned earlier, always assume an open joint injury with lacerations in this zone. Thoroughly explore and irrigate the MCP joint.
Zone VI: Dorsum of Hand Extensor Repair (EDC, EIP, EDQ)
"This is where the juncturae can deceive us, fellows. Don't be fooled by partial extension."
- Identification: Meticulously identify all lacerated tendons. The EIP and EDQ are deep and ulnar to the EDC tendons. Ensure you haven't missed a completely transected EDC that is still showing some function due to an intact junctura from an adjacent digit.
- Technique: Direct end-to-end repair for each lacerated tendon.
- Suture: Modified Kessler core suture and epitendinous repair.
- Considerations: Ensure individual tendon gliding after repair. Avoid excessive bulk that could lead to adherence within the relatively confined dorsal hand space.
Zone VII: Wrist Extensor Repair (Through Retinaculum)
"At the wrist, we navigate the extensor retinaculum and its six compartments."
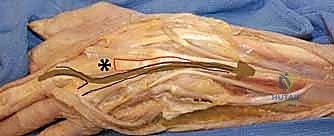
(Refer to figure showing wrist and hand extensor tendon anatomy with compartments.)
- Retinaculum Management: Carefully incise the extensor retinaculum longitudinally over the injured compartment(s). This allows for full visualization and tendon retrieval.
- Tendon Identification: Identify the specific tendons within their respective compartments (APL, EPB, ECRL, ECRB, EPL, EDC, EIP, EDQ, ECU). Retraction can be significant, especially for the EPL.
- Technique: Direct end-to-end repair of each lacerated tendon.
- Suture: Strong core suture (e.g., modified Kessler or Krackow) and epitendinous repair.
- Retinaculum Closure: After tendon repair, the retinaculum can be repaired loosely or left open if there's concern for swelling or to prevent scar adherence. If repaired, use a Z-plasty or simple interrupted sutures to prevent constriction.
Zone VIII: Forearm Extensor Repair (Musculotendinous Junction/Muscle Belly)
- Technique: Repair of the musculotendinous junction or muscle belly.
- Suture: Use strong, non-absorbable sutures (e.g., 3-0 or 4-0) with a locking stitch (e.g., Krackow or figure-of-eight) to hold the muscle tissue.
- Debridement: Remove any clearly devitalized muscle tissue.
- Considerations: Achieving a tension-free repair can be challenging here due to muscle elasticity. Position the wrist and fingers to minimize tension on the repair.
- Nerve Injury: Be highly vigilant for concurrent posterior interosseous nerve injury.
6. Assessment of Repair and Range of Motion
"Now that our repairs are complete, let's assess them."
- Tourniquet Deflation (Optional): If the repair is stable, we may briefly deflate the tourniquet to check for active range of motion and ensure the repair holds tension. Re-inflate for final hemostasis.
- Passive Range of Motion: Gently move the digits and wrist through their full passive range of motion.
- Gliding: Ensure smooth gliding of the repaired tendons.
- Tension: Assess for appropriate tension. Too loose, and you'll have an extensor lag; too tight, and you risk rupture or restricted motion.
7. Hemostasis and Closure
"Tourniquet down, please. Let's achieve meticulous hemostasis."
- Deflate Tourniquet: Once all repairs are complete and assessed, deflate the tourniquet.
- Hemostasis: Identify and coagulate any bleeding vessels using bipolar cautery. Drains are seldom needed for extensor tendon repairs in the hand and wrist.
- Wound Irrigation: Irrigate the wound thoroughly with sterile saline.
- Skin Closure: Close the skin with fine sutures (e.g., 5-0 or 6-0 nylon). In the fingers and hand, close skin only. More proximally, in the forearm, limited subcutaneous sutures may be used if needed to approximate deeper layers, but avoid excessive bulk.
"A clean, dry field is essential for optimal healing."
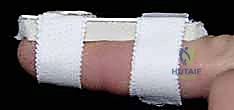
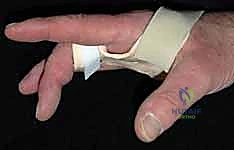
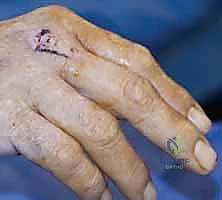
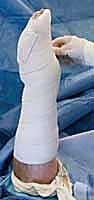
8. Dressing and Splint Application
"Now for the final crucial step: protective splinting."
- Dressing: Apply a sterile, non-adherent dressing over the incision.
- Splinting: The type of splint depends on the zone of injury and the specific repair. This is applied before the patient leaves the OR, ensuring proper positioning.
Extensive Pearls and Pitfalls
Pearls for Success
- Magnification is Your Friend: Always use loupes; a microscope may be beneficial
Additional Intraoperative Imaging & Surgical Steps

REFERENCES
-
Bendre AA, Hartigan BJ, Kalainov DM. Mallet finger. J Am Acad Orthop Surg 2005;13:336–344.
-
Carl HD, Forst R, Schaller P. Results of primary extensor tendon repair in relation to the zone of injury and pre-operative outcome estimation. Arch Orthop Trauma Surg 2007;127:115–119 [e-pub Sept. 30, 2006].
-
Crosby CA, Wehbe MA. Early protected motion after extensor tendon repair. J Hand Surg Am 1999;24A:1061–1070.
-
Doyle JR. Extensor tendons: Acute injuries. In Green DP, ed. Operative Hand Surgery, 4th ed. New York: Churchill Livingstone; 1999:1950–1987.
Detailed Chapters & Topics
Dive deeper into specialized chapters regarding repair-following-traumatic-extensor-tendon-disruption-in-the-hand-wrist-and-forearm