Knee Arthroscopy Masterclass: Comprehensive Intraoperative Techniques & Anatomy
Key Takeaway
This masterclass guides fellows through knee arthroscopy, covering comprehensive anatomy of the tibiofemoral and patellofemoral joints, menisci, and crucial ligaments. We detail preoperative planning, patient positioning, and meticulous portal placement. Learn step-by-step diagnostic arthroscopy, identifying pathologies in the suprapatellar pouch and assessing patellar tracking, all from a master surgeon's perspective.
Welcome, fellows, to the operating theater. Today, we're performing a diagnostic and potentially therapeutic knee arthroscopy. This is a foundational procedure, a video-assisted surgical intervention for intra-articular disease, and mastering it requires not just manual dexterity, but a profound understanding of knee anatomy and biomechanics.
Comprehensive Surgical Anatomy of the Knee Joint
Let's begin by reviewing the intricate architecture of the knee. Remember, every incision, every instrument pass, must be guided by this knowledge.
The Tibiofemoral Articulation
The knee is primarily divided into three compartments: the patellofemoral joint, the lateral tibiofemoral joint, and the medial tibiofemoral joint.
Medial Tibiofemoral Compartment:
The medial tibial plateau is a critical structure. Observe its larger dimension in the sagittal plane compared to its lateral counterpart. It presents a concave surface designed to articulate with the convex medial femoral condyle. However, its curvature is flatter than the femoral condyle, creating an inherent incongruence. Without proper load distribution, this would lead to focused, high-point contact stresses and accelerated cartilage degeneration.
The medial meniscus is our primary solution to this biomechanical challenge. It's a C-shaped fibrocartilaginous structure situated along the perimeter of the medial tibiofemoral articulation. In cross-section, it's triangular, with its wider, vascularized area along the periphery – the "red-red" zone. This meniscus significantly enhances congruence between the articulating surfaces, participates in load sharing, and effectively decreases point contact pressures across the joint.
It is firmly anchored to the tibial plateau at its posterior and anterior ends via the meniscal roots. The deep medial collateral ligament (MCL) attaches to the central body of the medial meniscus, providing crucial stability. Additionally, it's attached to the joint capsule along its entire periphery. A key anatomical feature is that the undersurface of the medial meniscus is not adherent to the tibial plateau, allowing us to gently lift it for thorough inspection, particularly when we suspect undersurface tears.
Lateral Tibiofemoral Compartment:
Now, let's shift our focus to the lateral side. The lateral meniscus is shaped more like an 'O' than a 'C' and covers approximately 75% of the lateral tibiofemoral articulation. This extensive coverage is necessitated by the unique geometry of the bony structures here: both the lateral femoral condyle and the lateral tibial plateau are convex surfaces. To achieve appropriate congruence and distribute forces, a larger, more mobile meniscus is essential.
The popliteus tendon provides stability to the posterior body of the lateral meniscus, inserting onto it via three popliteomeniscal fascicles: the anteroinferior, posterosuperior, and posteroinferior. Anterior and posterior to this tendon's insertion, a recess of the joint capsule exists that does not insert onto the periphery of the meniscus. This anatomical arrangement grants the lateral meniscus significantly greater mobility compared to its medial counterpart, which has implications for its tear patterns and repair strategies.
Originating from the posterior horn of the lateral meniscus are two important ligaments that insert into the femur: the ligament of Wrisberg, which travels posterior to the posterior cruciate ligament (PCL), and the ligament of Humphrey, which travels anterior to the PCL. These are crucial to identify during posterior compartment arthroscopy.
The Patellofemoral Joint
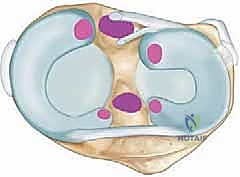
This compartment is comprised of the suprapatellar pouch, the patella itself, its articulation with the femur (the trochlea), the medial and lateral femoral condyles, and the medial and lateral patellofemoral ligaments.
The patella is the largest sesamoid bone in the body, featuring a medial and a lateral facet that articulate with their respective femoral condyles. Centrally, an apex sits within the trochlea. The patella boasts the thickest articular cartilage in the body, a testament to its role in withstanding forces up to five times body weight during daily activities. Normally, the patella begins to engage the trochlea at approximately 20 degrees of knee flexion and fully engages by 45 degrees. During arthroscopy, we can visualize the medial facet of the patella making contact with the medial femoral condyle; lack of this contact at these specific flexion angles suggests patellar malalignment.
The suprapatellar pouch is a potential space that becomes distended with fluid during arthroscopy. Within this area, we commonly encounter adhesions (especially in revision cases), synovial plicae, and loose bodies. Synovial plicae are embryonic remnants, bands of synovium that, depending on their size and location, can contribute to snapping sensations and inflammation. Critically, in the suprapatellar pouch, they often create hidden recesses or "porta" – centralized holes through which loose bodies can enter and become sequestered, making their retrieval challenging.
The medial and lateral patellofemoral ligaments are thickenings of the medial and lateral retinacula, respectively. They originate centrally on the patella and insert onto the medial and lateral epicondyles of the femur. The medial patellofemoral ligament (MPFL) is a primary stabilizer against lateral patellar dislocation; its disruption or attenuation often predisposes to recurrent dislocations, frequently necessitating operative repair. Conversely, the lateral patellofemoral ligament and retinaculum are often targeted for release in efforts to restore proper patellofemoral alignment in cases of lateral patellar hyperpressure syndrome.
The Intercondylar Notch and Cruciate Ligaments
Between the medial and lateral tibiofemoral articulations lies the intercondylar notch. This is a non-articular portion of the knee that extends distally and posteriorly from the trochlea. Significant bony variation exists in the width of this notch; a stenotic notch may necessitate a notchplasty or notch widening, especially during anterior cruciate ligament (ACL) reconstruction, to prevent graft impingement.
Residing within the intercondylar notch are the ACL and PCL.
The ACL originates at the posterolateral aspect of the inner wall of the notch, typically around the 10:30 position on a right knee (1:30 on a left knee). It inserts centrally and anteriorly on the tibia, slightly posterior to the anterior horn of the lateral meniscus and approximately 7 mm anterior to the PCL fibers in the sagittal plane.
The PCL originates from the anterior aspect of the medial wall of the notch, with a broad origination spanning from about 12 o’clock to 3:30 on a right knee. This robust ligament travels posterior to the ACL and inserts centrally on the posterior aspect of the tibial plateau, approximately 10 to 15 mm inferior to the joint line. During PCL reconstruction, extreme caution is warranted as its fibers run quite close to the posterior root of the medial meniscus. Deviating medially during debridement in this region risks iatrogenic injury to the meniscus and potentially the neurovascular structures posteriorly.
In the most anterior aspect of the notch, we find the transverse meniscal ligament. This ligament originates from the anterior horn of the medial meniscus, distinct from its anterior root, and inserts onto the anterior horn of the lateral meniscus, anterior to its anterior root. It's crucial to differentiate this normal anatomical structure from a true meniscal tear, as it can be mistaken for one on MRI.
The Gutters
Finally, let's not forget the gutters. The medial gutter is a fold of synovium in the posteromedial aspect of the joint, a notorious hiding spot for loose bodies. A thorough diagnostic arthroscopy always includes careful ballottement of this space to ensure no potential sources of pain or mechanical symptoms are overlooked. The posterolateral compartment also has its own recesses, often explored via a posterolateral portal.
Preoperative Planning: Laying the Foundation for Success
Before we even begin draping, meticulous preoperative planning is paramount. Each patient presents a unique anatomical and pathological profile, demanding a tailored approach.
Case Review and Equipment Verification
Surgeon's Directive: "Fellows, always ensure you've thoroughly reviewed the patient's history, physical examination findings, and all imaging studies – especially MRI – prior to surgery. This is not merely a formality; it's crucial for anticipating potential challenges and confirming the diagnosis."
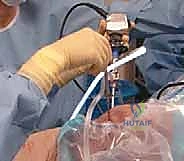
We must confirm that all necessary equipment is available and functional. This includes various arthroscopic scopes (30-degree and 70-degree), cannulas, blunt and sharp trocars, shaver blades, arthroscopic punches, graspers, probes, and specialized instruments for specific procedures (e.g., meniscal repair devices, chondroplasty tools).
Patient Confirmation and Examination Under Anesthesia (EUA)
Surgeon's Directive: "On the day of surgery, we will reconfirm the laterality of the procedure directly with the patient, performing a 'timeout' and 'sign your site' protocol. Verify that there have been no changes in their symptoms since their last office visit. This final check is non-negotiable."
Once the patient is under anesthesia, we perform a comprehensive examination under anesthesia (EUA). This is a critical step, as muscle relaxation allows for a more sensitive and accurate assessment of joint stability and range of motion. We'll systematically check:
* Lachman test and Anterior Drawer: To assess ACL integrity.
* Posterior Drawer and Sag Sign: To assess PCL integrity.
* Varus and Valgus Stress Tests (at 0 and 30 degrees flexion): To evaluate collateral ligament stability.
* Patellar Apprehension Test and Patellar Grind Test: To assess patellofemoral stability and pain.
* Full Range of Motion: To identify any fixed flexion deformities or limitations.
* Comparison to Contralateral Knee: Always compare findings to the unaffected knee for a baseline.
This EUA is crucial for reconfirming our diagnosis and understanding the precise nature of the injury, which directly informs our intraoperative strategy.
Patient Positioning: Stability and Access
Proper patient positioning is fundamental for optimal visualization and instrument maneuverability during arthroscopy.
Surgeon's Directive: "We will position the patient supine on the operating table. The operative knee should be as close to the edge of the bed as safely possible to allow for maximum knee flexion and extension."
Leg Support Options
The choice of leg support (thigh holder versus lateral post) is often based on surgeon preference and patient body habitus.
- Thigh Holder: This is a common setup. The surgical leg is placed in a well-padded thigh holder, allowing the foot of the bed to be dropped to 90 degrees for full knee flexion. Alternatively, the leg can be abducted and brought over the side of the bed.
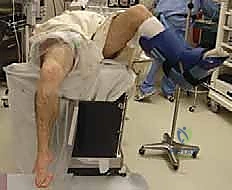
FIG 2A • Use of a thigh holder for the right surgical leg, with left leg elevated and protected in a “well-leg” holder.
* Lateral Post: For very large or pediatric knees, commercial knee holders may not provide adequate support or fit. In these cases, a lateral post, positioned just proximal to the joint line on the lateral side, is preferred. The contralateral leg is placed in a well-padded leg holder or secured to the bed with circumferential padding, ensuring no pressure points.
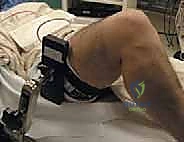
FIG 2B • Use of a lateral post for right knee positioning during arthroscopy.
Surgeon's Directive: "Regardless of the chosen support, always ensure adequate padding at all pressure points to prevent nerve palsies or skin breakdown. We must also verify that we can achieve the necessary knee flexion and extension, especially if we need to drop the foot of the bed for posterior compartment access or specific meniscal repairs."
Tourniquet and Prep
A pneumatic tourniquet is typically applied high on the thigh, over soft padding, to provide a bloodless field, which is critical for clear arthroscopic visualization. Standard sterile prep and draping are then performed, ensuring a wide sterile field that allows for full range of motion of the knee.
Portal Placement: The Key to Arthroscopic Success
The approach and portal placement are highly dependent on the specific arthroscopic knee procedure planned. However, mastering fundamental portal placement is the absolute key to successful knee arthroscopy. Inaccurate portals lead to poor visualization, instrument impingement, and increased risk of iatrogenic damage.
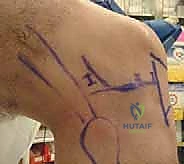
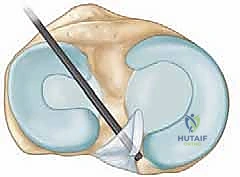
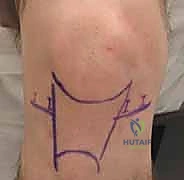
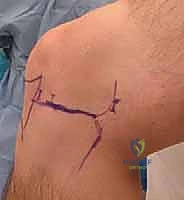
TECH FIG 1 • Artist’s rendition ( A ) and anterior view ( B ) of the right knee showing portal placement of far lateral, anterolateral, anteromedial, and far medial portals and their relationships to the inferior pole of the patella, the medial and lateral joint line, and the patellar tendon. C. Medial view of right knee showing anteromedial, far medial, and posteromedial portal placement and their relationships to the medial tibial plateau and medial femoral condyle. D. Lateral view of right knee far lateral, anterolateral, and posterolateral portal placement and their relationships to the lateral tibial plateau, lateral femoral condyle, fibula, and biceps tendon.
Marking Landmarks
Surgeon's Directive: "Before any incision, we will meticulously mark the key anatomical landmarks on the skin with a sterile surgical marker. This provides a constant reference point throughout the procedure."
- Inferior pole of the patella: A crucial reference for anterior portals.
- Patella tendon: Defines the central axis for anterior portals.
- Tibial tubercle: An important distal landmark.
- Medial and lateral tibial joint lines: These lines are essential for accurately placing the anterolateral and anteromedial portals, typically just above the joint line.
Anterior Portals
Anterolateral Portal
Surgeon's Directive: "The anterolateral portal is our primary portal for arthroscopic visualization. We will create it just lateral to the patella tendon, typically inferior to the inferior aspect of the patella, or referenced from the tibial plateau. I prefer to use the inferior pole of the patella as my primary reference."
- Location: Just lateral to the patellar tendon, typically 1-2 cm inferior to the inferior pole of the patella. Alternatively, it can be referenced 1 cm above the lateral tibial joint line.
- Incision: A 1 cm long incision. I typically make a vertical incision, but some surgeons prefer a horizontal incision, which theoretically may aid in preventing inadvertent laceration to the infrapatellar branch of the saphenous nerve. However, careful dissection negates much of this risk.
- Neurovascular Risks: The infrapatellar branch of the saphenous nerve is the primary structure at risk.
- Technique Pearl: Always ensure your incision is not too close to the patellar tendon, as this can limit instrument mobility. Aim slightly inferior to the patella to avoid scuffing the articular cartilage of the patella or femoral condyle upon insertion.
Anteromedial Portal
Surgeon's Directive: "The anteromedial portal serves as our primary working portal. Its precise position is highly dependent on the specific pathology we need to address, whether it's meniscal surgery, chondroplasty, or addressing pathology in the intercondylar notch."
- Location: Traditionally, it is slightly more inferior than the anterolateral portal and just medial to the patellar tendon. However, be liberal in adjusting its location to optimize your surgical goals. Use a spinal needle to localize the optimal placement before making your skin incision.
- Neurovascular Risks: The saphenous nerve and vein are in proximity to this area and are at risk of injury. Careful, blunt dissection after skin incision is crucial.
- Technique Pearl: The ideal anteromedial portal allows instruments to reach the posterolateral compartment without impingement and the posteromedial compartment with minimal torque. For medial meniscal work, a slightly more anterior and inferior placement might be beneficial to get a better angle on the posterior horn.
Superior Portals
Superomedial or Superolateral Portal
Surgeon's Directive: "A superior portal can be placed either medial or lateral to the quadriceps tendon. My preference is a superolateral portal, as it tends to result in less vastus medialis oblique (VMO) inhibition postoperatively."
- Location: Approximately 2.5 cm proximal to the superior pole of the patella, at the edge of the quadriceps tendon.
- Uses: This portal is versatile. It can be used as an inflow or outflow portal, or to perform procedures within the suprapatellar pouch (e.g., loose body removal, medial retinaculum plication, synovectomy, or dynamic evaluation of patellar tracking).
- Neurovascular Risks: Medially, the saphenous nerve and femoral vessels are a concern, though less so with a superolateral approach.
- Technique Pearl: Careful blunt dissection through the quadriceps tendon is important to avoid excessive tendon damage.
Central Portal
Central (Transpatellar) Portal
Surgeon's Directive: "The central transpatellar portal is less commonly used due to potential scarring of the patellar tendon, but it provides direct access to the intercondylar notch when other portals are insufficient."
- Location: A vertical incision through the central third of the patellar tendon at the level of the joint line.
- Uses: Primarily used to facilitate access to the intercondylar notch. Occasionally required for performing a modified Gillquist maneuver (examination of the posterior horns of the menisci through the intercondylar notch) in patients with a stenotic intercondylar notch.
- Neurovascular Risks: Minimal, but patellar tendon integrity is paramount.
- Technique Pearl: If used, ensure minimal disruption to the patellar tendon fibers to prevent weakening and potential future rupture.
Posterior Portals
Posterior portals provide direct access to the posterior compartments of the knee, which are often difficult to visualize and instrument from anterior portals.
Posteromedial Portal
Surgeon's Directive: "When pathology presents in the posteromedial knee, such as a posterior horn meniscal tear or loose body, the posteromedial portal becomes our primary working window. To assess proper placement, we'll perform a modified Gillquist maneuver."
- Technique: Introduce the 70-degree arthroscope through the anterolateral portal (or anteromedial, depending on your primary viewing portal). Advance the scope into the intercondylar notch and then into the posterior medial compartment. Transilluminate the skin overlying the posteromedial capsule.
- Localization: Place a spinal needle at the center of the transilluminated skin. This position should be approximately 1 to 2 cm above the medial joint line. Crucially, ensure this portal is anterior to the semimembranosus tendon and posterior to the medial collateral ligament.
- Incision: Once comfortable with the needle position, make a 1 cm skin incision with a no. 11 blade.
- Insertion: Carefully insert a cannula with a blunt obturator, penetrating the capsule with gentle, controlled pressure. This blunt insertion helps protect the soft tissues, particularly the saphenous nerve and vein, and reduces fluid extravasation.
- Neurovascular Risks: The saphenous nerve and vein are the primary structures at risk medially. The popliteal artery and vein are deeper posteriorly.
Posterolateral Portal
Surgeon's Directive: "The indications and technique for the posterolateral portal are similar to those for the posteromedial portal, but we must be acutely aware of the distinct neurovascular structures in this region."
- Technique: Perform the modified Gillquist maneuver, transilluminating the skin overlying the posterolateral capsule with the 70-degree arthroscope.
- Localization: Place a spinal needle at the center of the transilluminated skin, about 1 to 2 cm above the lateral joint line. Before making the skin incision, ensure the planned incision is anterior to the biceps femoris tendon to avoid injury to the common peroneal nerve. This portal should be at the lateral aspect of the posterolateral compartment to avoid the large neurovascular structures (popliteal artery/vein) more centrally.
- Incision & Insertion: Make a 1 cm skin incision with a no. 11 blade, then place a cannula with a blunt obturator to penetrate the capsule. This blunt technique is vital
Additional Intraoperative Imaging & Surgical Steps
REFERENCES
-
Deep vein thrombosis prophylaxis may be accomplished with a compression dressing from the toes to the thigh, elevation, mobilization, and ankle pumps.
-
Regardless of postoperative weight-bearing status, most patients will require crutches for mobility.
-
Cryotherapy has been shown to improve pain scores after knee arthroscopy and is recommended.
-
Motion and weight-bearing status are determined by the procedure performed and the patient’s needs.
-
Pain control with narcotics will likely be necessary for the first few weeks.
COMPLICATIONS
- Infection
-
Loss of motion
-
DeLee JC. Complications of arthroscopy and arthroscopic surgery: results of a national survey. Arthroscopy 1985;1:214–220.
-
Furie E, Yerys P, Cutcliffe D, et al. Risk factors for arthroscopic popliteal artery laceration. Arthroscopy 1995;11:324–327.
-
Gillquist J, Hagberg G. A new modification of the technique of arthroscopy of the knee joint. Acta Chir Scand 1976;142:123–130.
-
Hungerford DS, Barry M. Biomechanics of the patellofemoral joint. Clin Orthop 1989;241:203.
-
Jaureguito JW, Greenwald AE, Wilcox JF, et al. The incidence of deep venous thrombosis after arthroscopic knee surgery. Am J Sports Med 1999;27:707–710.
-
Kim TK, Savino RM, McFarland EG, et al. Neurovascular complications of knee arthroscopy. Am J Sports Med 2002;30:619–626.
-
Williams JS Jr, Hulstyn MJ, Fadale PD, et al. Incidence of deep vein thrombosis after arthroscopic knee surgery: a prospective study. Arthroscopy 1995;11:701–705.
You Might Also Like