Key Approaches for External Fixation: Humerus, Radius, Ulna, Wrist

Key Takeaway
This topic focuses on Key Approaches for External Fixation: Humerus, Radius, Ulna, Wrist, Approaches for external fixation involve anchoring pins or wires into bones like the humerus, radius, ulna, pelvis, femur, tibia, fibula, and ankle. These fixators provide stability for open fractures, polytrauma, or temporary immobilization when soft tissues are severely injured. Pin placement is critical to avoid nerve/vessel damage and ensure effective treatment.
Introduction and Epidemiology
External fixation remains a cornerstone in the management of complex orthopedic trauma, particularly in scenarios involving severe soft tissue compromise, polytrauma, and bone loss. Although a wide variety of external fixators can be constructed, they all fundamentally consist of only two elements: pins or wires inserted into the bone to anchor the device to the skeleton, and external connectors (bars or rings) to provide stability.
Pins may be inserted by transfixing the limb (transfixion pins), or most commonly, they may stop just beyond the far cortex of the bone into which they are inserted (half pins). Wires always transfix the limb. Transfixion pins or wires can be connected at both their ends; therefore, external fixators that use these pins or wires provide the greatest structural stability. Because transfixion pins or wires transfix the soft tissues on both sides of the bone, they tether soft tissues more significantly than half pins do. This makes it difficult to mobilize joints above and below the external fixator. Fixators using transfixion pins or wires are generally reserved for situations that require the greatest stability, such as distraction osteogenesis or definitive management of highly unstable periarticular fractures.
Skeletal pins are usually inserted through small open incisions in the skin in a controlled fashion, with careful dissection of the soft tissues. Exceptions occur where nerves are in close proximity to pin placement, such as the distal third of the radius, where a larger mini-open approach is mandatory. Studies of cross-sectional anatomy in cadaveric material reveal a large number of possible pin placements for any given bone in any given position, but clinical application restricts these to validated "safe zones."
There are three main uses for external fixators in the upper extremity. First, fixators may be used as a temporary method of immobilizing a fracture in cases where the soft tissues are so injured that immediate open surgery is impossible. These fixators frequently span joints, and the pins used are ideally placed outside the zone of injury so that they do not interfere with subsequent definitive surgery. Second, fixators may be used as a way of stabilizing long bone fractures in cases of polytrauma, adhering to the principles of Damage Control Orthopedics. Finally, the most common indication for the use of an external fixator is in open fractures. These injuries usually are associated with fracture displacement, and the normal anatomy frequently is distorted. When skeletal pins are used, nerves and vessels may be damaged as they course down the limb. Distortion of the normal anatomy or normal anatomic variation may make apparently safe routes hazardous.
Epidemiologically, the utilization of external fixation in the upper extremity has evolved. While internal fixation remains the gold standard for definitive management of most upper extremity fractures, external fixation is indispensable in the acute phase of Gustilo-Anderson Type IIIB and IIIC open fractures, massive crush injuries, and wartime or ballistic trauma.
Surgical Anatomy and Biomechanics
Biomechanical Principles of External Fixation
The rigidity of an external fixator system that uses pins can be modified in many ways to suit the clinical requirement. As mentioned previously, transfixion pins provide more stability than do half pins. However, the use of half pins is far more common in the upper extremity to minimize soft tissue tethering.
Several critical factors dictate the biomechanical stiffness of the construct:
1. Pin Diameter: The bending stiffness of a pin is proportional to the fourth power of its radius. Increasing the pin diameter is the single most effective way to increase construct stability. However, pin diameter should not exceed one-third of the bone's diameter to prevent stress risers and iatrogenic fractures.
2. Pin Spread: Spreading the pins widely within a single bone segment increases the rigidity of the system.
3. Number of Pins: Increasing the number of pins per segment (typically 2 to 3) adds to the rigidity.
4. Radial Preload: Stability is increased by utilizing pins that are slightly tapered, which creates radial preload at the pin-bone interface, enhancing purchase and reducing loosening.
5. Bar Configuration: The number of bars used increases stability. Furthermore, the closer the longitudinal bars are to the skin (without causing pressure necrosis), the more stable the construct will be.
6. Multiplanar Fixation: Biplanar constructs offer superior resistance to bending and torsional forces compared to uniplanar constructs.

Placement of the pins is influenced not only by the underlying anatomy but also by the biomechanical requirements of the fixation system. Soft tissue damage also may dictate pin position, forcing the surgeon to adapt the construct to the available safe zones.
Topographic Anatomy and Safe Zones
Understanding the cross-sectional anatomy of the upper extremity is critical for safe pin placement.

Humerus Safe Zones
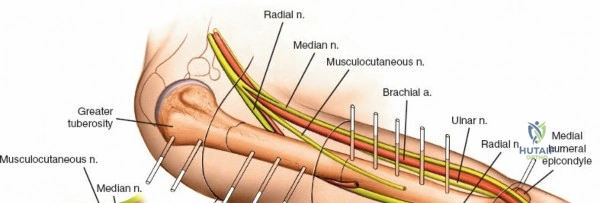
The humerus presents significant challenges due to the course of the radial nerve, axillary nerve, and brachial artery.
* Proximal Third: The safe zone is located laterally. Pins can be placed from lateral to medial, avoiding the axillary nerve, which runs transversely approximately 5 to 7 cm distal to the lateral acromion.
* Middle Third: This is the most hazardous region. The radial nerve spirals from posterior to anterior along the spiral groove. Anterolateral pin placement is generally safe if placed distal to the deltoid insertion, but open dissection to the periosteum is mandatory.
* Distal Third: The radial nerve pierces the lateral intermuscular septum to enter the anterior compartment. Pins are typically placed posteriorly or posterolaterally, directly through the triceps tendon or muscle belly, ensuring the radial nerve is protected anteriorly.
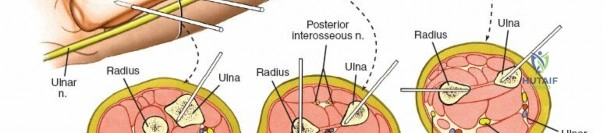
Radius Safe Zones
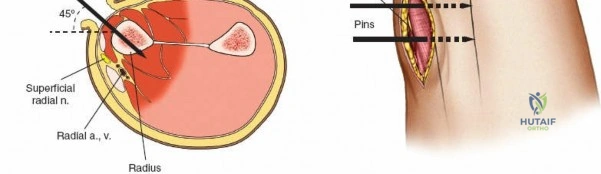
* Proximal Third: The posterior interosseous nerve (PIN) courses through the supinator muscle. Pin placement in the proximal radius is highly hazardous and generally avoided unless absolutely necessary. If required, a formal dorsal approach (Thompson) is used to visualize and protect the PIN.
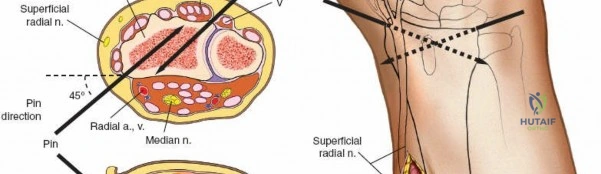
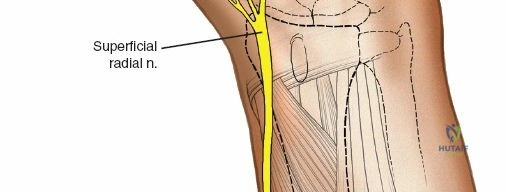
* Middle Third: Pins can be placed dorsolaterally. The superficial radial nerve (SRN) and cephalic vein must be protected.
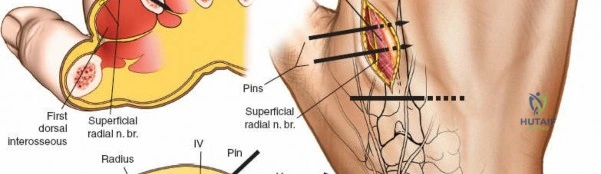
* Distal Third: The SRN emerges from beneath the brachioradialis approximately 9 cm proximal to the radial styloid. Pins are typically placed at a 45-degree angle between the extensor carpi radialis longus (ECRL) and brachioradialis, or directly laterally. A mini-open approach is critical here.
Ulna Safe Zones
The ulna is the most accessible bone in the upper extremity for external fixation. The entire subcutaneous border from the olecranon to the ulnar styloid is a safe zone. Pins are placed directly from dorsal to volar or ulnar to radial, easily avoiding the ulnar artery and nerve which lie volar to the flexor carpi ulnaris.
Wrist and Metacarpal Safe Zones
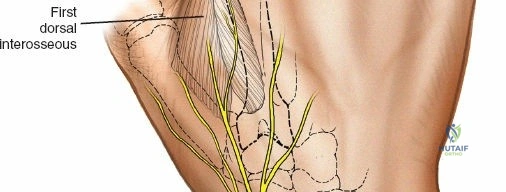
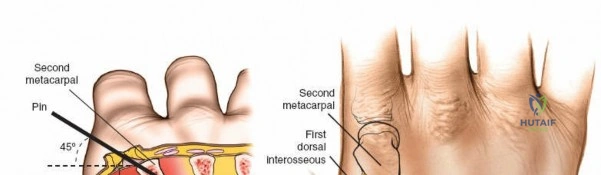
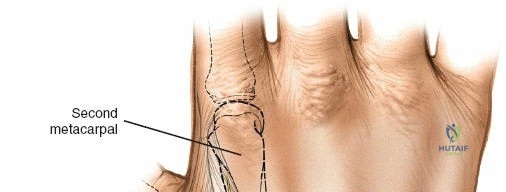
For spanning wrist fixators, distal pins are placed in the second metacarpal. The safe zone is the dorsoradial aspect of the second metacarpal base and shaft. The first dorsal interosseous muscle and extensor tendons must be respected. The radial artery courses proximally in the anatomic snuffbox and must be avoided during basal metacarpal pin insertion.
Indications and Contraindications
The decision to utilize external fixation in the upper extremity relies on a careful assessment of the soft tissue envelope, the patient's physiological status, and the fracture pattern.
| Category | Operative Indications for External Fixation | Non Operative Management or Alternative Fixation |
|---|---|---|
| Soft Tissue Status | Gustilo-Anderson IIIB and IIIC open fractures; massive crush injuries; degloving injuries; burns overlying the fracture site. | Closed fractures with minimal soft tissue injury (prefer internal fixation); Gustilo-Anderson I or II (often amenable to immediate internal fixation). |
| Patient Physiology | Polytrauma patients in extremis requiring Damage Control Orthopedics (DCO); severe hemodynamic instability. | Stable polytrauma patients (Early Total Care); isolated injuries in hemodynamically stable patients. |
| Infection | Infected nonunions; active osteomyelitis requiring bone resection and transport; septic arthritis requiring joint spanning. | Aseptic nonunions (often treated with plating and bone grafting). |
| Fracture Pattern | Highly comminuted periarticular fractures (e.g., distal radius, pilon-type injuries of the elbow) where internal fixation cannot achieve stability without devascularizing bone. | Simple fracture patterns (transverse, short oblique) amenable to intramedullary nailing or plating. |
| Deformity | Limb lengthening; complex multiplanar deformity correction (Ilizarov/Taylor Spatial Frame). | Acute, simple angular deformities easily corrected with osteotomy and plating. |
Contraindications to external fixation are relatively few but must be considered. Absolute contraindications include the absence of safe anatomical corridors for pin placement due to prior surgery, severe vascular disease precluding adequate healing of pin tracts, or profound systemic sepsis where the source is not orthopedic.
Relative contraindications include severe osteopenia or osteoporosis, which compromises the pin-bone interface and increases the risk of premature loosening. Additionally, patients with severe psychiatric disorders or non-compliance may not tolerate the postoperative care required for external fixation, leading to catastrophic pin tract infections or construct failure.
Pre Operative Planning and Patient Positioning
Thorough preoperative planning ensures that the external fixator is applied efficiently and safely, without compromising future definitive surgical approaches.
Imaging and Templating
Standard orthogonal radiographs of the affected limb, including the joints above and below the injury, are mandatory. In cases of periarticular fractures (e.g., intra-articular distal radius or distal humerus fractures), a preoperative CT scan is highly recommended to understand the articular comminution and plan pin placement outside the planned surgical field for future open reduction and internal fixation (ORIF).

Equipment Selection
The surgeon must select the appropriate fixator system based on the bone involved.
* Humerus: Large fragment systems (5.0 mm half pins, 11 mm carbon fiber bars).
* Forearm (Radius/Ulna): Medium fragment systems (4.0 mm half pins, 8 mm bars).
* Wrist/Hand: Mini or small fragment systems (3.0 mm to 4.0 mm half pins, 4 mm to 6 mm bars).

Patient Positioning
Positioning varies depending on the segment being stabilized.
* Humerus: The patient is typically positioned supine on a radiolucent table. A bump is placed under the ipsilateral scapula to elevate the shoulder. The C-arm is brought in from the contralateral side or from the head of the bed. The arm must be draped free to allow for full manipulation and circumferential access.
* Forearm and Wrist: The patient is positioned supine with the affected arm extended on a radiolucent hand board. The C-arm is positioned perpendicular to the hand board. This allows for easy acquisition of posteroanterior (PA) and lateral fluoroscopic views without moving the fracture site excessively. A sterile tourniquet may be applied but is rarely inflated unless severe hemorrhage is encountered, as direct visualization of neurovascular structures is preferred.
Detailed Surgical Approach and Technique
The fundamental technique for pin insertion remains consistent across all anatomical regions to minimize complications. Skin incisions for pin insertion must be longitudinal and generous enough to prevent skin tension against the pin. After the skin incision, blunt dissection using a curved hemostat is performed down to the periosteum. A tissue protection sleeve and trocar are inserted. The bone is pre-drilled using a sharp drill bit to prevent thermal necrosis, which is a primary cause of early pin loosening and infection. The pin is then inserted manually or under power at low speed, ensuring bicortical purchase.
Humerus External Fixation
Humeral external fixation is most frequently utilized for damage control in polytrauma or for severe open fractures.
Proximal Humerus Pin Placement
1. Identify the safe zone on the lateral aspect of the proximal humerus, distal to the axillary nerve.
2. Make a longitudinal incision over the lateral aspect of the greater tuberosity or proximal diaphysis.
3. Bluntly dissect through the deltoid muscle fibers down to the bone.
4. Insert the drill sleeve, pre-drill with a 3.5 mm or 4.0 mm bit, and insert a 5.0 mm half pin.
5. Confirm bicortical purchase with fluoroscopy.
Distal Humerus Pin Placement
1. The distal pins are typically placed posteriorly to avoid the radial nerve.
2. Make a longitudinal incision over the posterior aspect of the distal humerus, proximal to the olecranon fossa.
3. Split the triceps bluntly down to the periosteum.
4. Insert the tissue protector, pre-drill, and place the 5.0 mm pins from posterior to anterior.
5. Ensure the pins do not penetrate the anterior cortex excessively to avoid injury to the brachial artery or median nerve.
Construct Assembly
Connect the proximal and distal pins with pin-to-bar clamps and an 11 mm carbon fiber rod. Reduce the fracture under fluoroscopic guidance using manual traction. Tighten the clamps to secure the reduction. A biplanar construct can be created by adding anterior pins proximally and connecting them to the primary frame.
Radius External Fixation
External fixation of the radial diaphysis requires meticulous attention to the superficial radial nerve and the posterior interosseous nerve.
Mid-to-Proximal Radius Pin Placement
1. Supinate the forearm to move the PIN dorsally and radially.
2. Make an incision over the dorsolateral aspect of the radius.
3. Dissect between the extensor carpi radialis brevis (ECRB) and the extensor digitorum communis (EDC).
4. Use retractors to carefully protect the PIN.
5. Insert the tissue sleeve, pre-drill, and place a 4.0 mm pin bicortically.

Distal Radius Pin Placement
1. Identify the interval between the brachioradialis and the ECRL.
2. Make a 2-3 cm longitudinal incision.
3. Carefully identify and retract the superficial radial nerve branches.
4. Place the drill sleeve directly on the radial styloid or slightly proximal, aiming ulnarward and slightly dorsally.
5. Insert 3.0 mm or 4.0 mm pins.

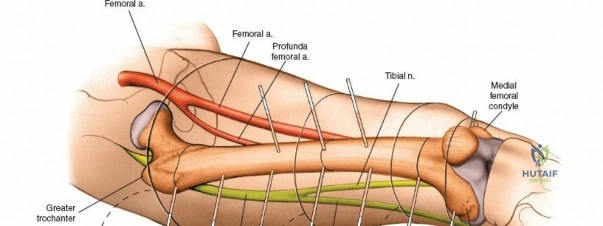
Ulna External Fixation
The ulna is straightforward due to its subcutaneous border.
- Palpate the subcutaneous crest of the ulna.
- Make stab incisions over the planned pin sites (typically two proximal and two distal to the fracture).
- Dissect bluntly to the periosteum.
- Place the tissue sleeve and drill perpendicular to the longitudinal axis of the bone.
- Insert 4.0 mm pins bicortically.
- Connect the pins with an 8 mm rod and reduce the fracture.
Wrist Spanning External Fixation
Wrist spanning fixators are the workhorse for highly comminuted distal radius fractures or radiocarpal fracture-dislocations.

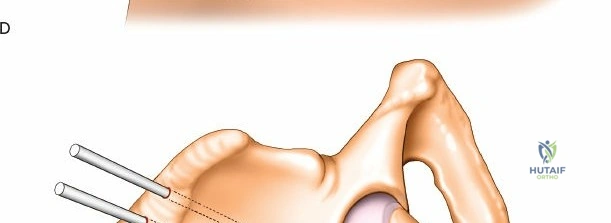
Metacarpal Pin Placement
1. Make two 1 cm incisions over the dorsoradial aspect of the second metacarpal.
2. Dissect bluntly, protecting the dorsal sensory branches of the radial nerve and the extensor tendons.
3. Place the tissue sleeve at a 45-degree angle to the dorsal and lateral planes to maximize purchase in the metacarpal shaft.
4. Pre-drill and insert two 3.0 mm pins.
Proximal Radius Pin Placement
1. Make incisions over the dorsolateral aspect of the radius, approximately 10-12 cm proximal to the radiocarpal joint.
2. Dissect bluntly to avoid the SRN.
3. Insert two 4.0 mm pins.

Construct Assembly and Reduction
Connect the metacarpal pins and the radius pins with a multi-pin clamp or individual pin-to-bar clamps. Apply longitudinal traction to utilize ligamentotaxis to restore radial length and radial inclination. Volar tilt is often restored by translating the distal fragment or applying a slight volar directed force before tightening the frame. Confirm reduction with PA and lateral fluoroscopy.

Complications and Management
Complications associated with external fixation are frequent but typically manageable if identified early. Meticulous surgical technique during application is the most effective preventative measure.
| Complication | Incidence | Etiology and Risk Factors | Management and Salvage Strategies |
|---|---|---|---|
| Pin Tract Infection | 10% - 30% | Thermal necrosis during drilling; skin tension on the pin; inadequate daily pin care; prolonged fixator time. | Grade I/II (Checketts-Otterburn): Local wound care, oral antibiotics. Grade III/IV: Intravenous antibiotics, pin removal, debridement, and replacement at a new site. |
| Neurovascular Injury | 2% - 5% | Blind pin insertion; failure to use tissue protection sleeves; unrecognized anatomical variations (e.g., radial nerve in humerus, SRN in distal radius). | Immediate removal of the offending pin. Formal exploration and nerve repair if complete transection is suspected. Prevention via mini-open technique is paramount. |
| Pin Loosening | 5% - 15% | Thermal necrosis; osteoporosis; excessive mechanical loading; single-cortex purchase. | Remove loose pin. If the construct loses stability, insert a new pin in a separate safe zone and reconfigure the frame. |
| Loss of Reduction | 5% - 10% | Inadequate construct stiffness (e.g., pins too close to fracture, insufficient number of pins); patient non-compliance. | Frame adjustment under fluoroscopy. Addition of supplementary pins or bars to increase construct rigidity. |
| Joint Stiffness | 15% - 40% | Tethering of muscle units (especially with transfixion pins); prolonged immobilization; complex regional pain syndrome (CRPS). | Aggressive early mobilization of non-spanned joints (e.g., fingers in a wrist-spanning fixator). Early conversion to internal fixation when soft tissues permit. |
| Delayed Union / Nonunion | 5% - 15% | Excessive construct rigidity preventing micromotion; inadequate initial reduction; significant bone loss or soft tissue stripping. | Dynamization of the frame (loosening specific clamps to allow axial loading). Conversion to internal fixation with bone grafting. |

Pin tract infections are the most ubiquitous complication. The Checketts-Otterburn classification is widely used to grade these infections and guide treatment. Minor inflammation with slight discharge responds well to local care, while frank purulence and radiographic evidence of osteolysis necessitate pin removal.
Neurovascular complications, while less common, carry significant morbidity. The radial nerve is at highest risk during humeral fixation, while the superficial radial nerve is frequently irritated or injured during distal radius fixation. Adherence to the mini-open technique, utilizing blunt dissection to the periosteum, is the standard of care to mitigate this risk.
Post Operative Rehabilitation Protocols
The success of external fixation is heavily reliant on appropriate postoperative care and rehabilitation.
Pin Site Care
Protocols for pin site care vary, but the consensus emphasizes the removal of crusts to prevent fluid entrapment and the use of a cleansing agent. Daily or twice-daily cleaning with chlorhexidine solution or sterile saline is recommended. Hydrogen peroxide should be avoided as it is cytotoxic to healing granulation tissue. Sterile gauze or specialized sponges can be applied around the pin sites to absorb exudate and limit skin motion against the pin.
Edema Control and Mobilization
Immediate postoperative elevation of the extremity is critical to control edema, which can exacerbate soft tissue tension around the pins. Active and passive range of motion of all uninvolved joints must begin immediately. For example, in a patient with a spanning wrist fixator, aggressive metacarpophalangeal (MCP) and interphalangeal (IP) joint mobilization is mandatory to prevent tendon adhesions and digital stiffness. The elbow and shoulder must also be mobilized to prevent capsular contractures.


