Dorsal Block Pinning for Proximal Interphalangeal Joint Fracture-Dislocations
Key Takeaway
Welcome to the OR, fellows. Today, we're tackling an unstable proximal interphalangeal (PIP) joint fracture-dislocation using dorsal block pinning. This technique offers stability while promoting early motion. We'll meticulously cover comprehensive anatomy, precise preoperative planning, granular intraoperative execution, and critical pearls to ensure optimal patient outcomes and minimize complications. Prepare for an in-depth, hands-on masterclass.
Introduction: The Unforgiving PIP Joint and Its Dorsal Fracture-Dislocations
Welcome to the operating theater, fellows. Today, we're addressing a common yet notoriously challenging injury: the proximal interphalangeal (PIP) joint fracture-dislocation. Often dismissed by the layman as a mere "jammed finger," the reality is that sufficient force can lead to a complex injury pattern that, if not treated meticulously, can result in lifelong pain, stiffness, and functional impairment. Our focus today will be on the dorsal block pinning technique, a versatile and effective method for managing unstable PIP fracture-dislocations.
The PIP joint, anatomically, is primarily a hinge joint, designed for robust flexion and extension. However, it does permit a few degrees of motion in the coronal and axial planes, which contributes to its overall functional dexterity. A healthy PIP joint boasts remarkable stability, particularly in full extension, where the intricate "tongue-and-groove" articulation between the bicondylar head of the proximal phalanx and the reciprocal concave surfaces of the middle phalanx achieves maximal congruity. As the joint flexes, this stability shifts reliance to its critical ligamentous structures.
Pathogenesis of Dorsal PIP Fracture-Dislocations
The most common direction for PIP joint dislocation is dorsal displacement of the middle phalanx. This injury typically results from simultaneous hyperextension and axial compression forces, often seen when a ball impacts the fingertip. The sequence of structural failure is critical to understand:
- Volar Plate Disruption: The primary restraint to hyperextension, the volar fibrocartilaginous plate, is typically the first structure to fail. It can avulse from its distal insertion on the middle phalanx, often taking a fragment of bone with it.
- Collateral Ligament Damage: The radial and ulnar collateral ligaments, crucial for mediolateral stability, are then stressed. These can be partially or completely torn.
- Articular Fragmentation: A significant avulsion fracture of the middle phalanx base, where the volar plate inserts, is a common feature.
- Central Slip Imbalance: With the volar restraints compromised, the unopposed pull of the central slip of the extensor tendon accentuates dorsal displacement, making reduction difficult to maintain.
We classify these injuries to guide our treatment strategy:
- Type I Injury (Mild): Partial disruption of collateral ligaments and the volar plate at its distal insertion. Articular surfaces remain intact, and the joint is stable. Non-operative management is typically indicated.
- Type II Injury (Moderate): More substantial force, leading to bilateral longitudinal splitting of the collateral ligaments in addition to volar plate rupture. Complete dorsal displacement is possible, but the joint is usually stable after reduction. Non-operative extension block splinting is often effective.
- Type III Injury (Severe):
- Stable: Avulsion fracture of the middle phalanx base, but the joint remains stable after reduction if less than 30% to 40% of the articular surface is involved, as collateral ligament integrity is maintained.
- Unstable: If the fracture involves more than 40% to 50% of the articular surface, collateral ligament support is significantly compromised. The joint exhibits persistent dorsal subluxation of the middle phalanx due to the unopposed pull of the extensor tendon and lack of volar restraints. These are the injuries where operative intervention, such as dorsal block pinning, becomes crucial.
Comprehensive Surgical Anatomy for PIP Joint Procedures
Before we make any incision or place any hardware, a thorough understanding of the regional anatomy is paramount. This isn't just theory, fellows; it's your roadmap to safety and success.
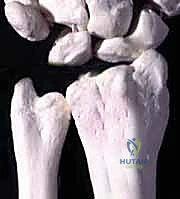
Osteology and Articular Surfaces
- Proximal Phalanx Head: This is a bicondylar structure, forming a convex articular surface. The trochlea has a central groove and two condyles.
- Middle Phalanx Base: The reciprocal concave articular surface of the middle phalanx base articulates with the proximal phalanx head. The volar lip of the middle phalanx is where the volar plate inserts, and it's the site of the critical avulsion fracture in these injuries.
- Articular Cartilage: Remember, our goal is to preserve this delicate tissue. Any iatrogenic damage can lead to premature osteoarthritis.
Ligamentous and Capsular Structures
- Volar Plate: This is a thick fibrocartilaginous structure on the palmar aspect of the joint. It originates proximally from the proximal phalanx (ligamentous portion) and inserts distally into the base of the middle phalanx (cartilaginous portion). Its primary role is to prevent hyperextension.
- Checkrein Ligaments: These are thin, fibrous bands that connect the volar plate to the proximal phalanx, preventing excessive proximal migration of the volar plate during flexion.
- Collateral Ligaments:
- Proper Collateral Ligaments: These originate from the head of the proximal phalanx and insert into the base of the middle phalanx. They are taut in flexion and lax in extension, providing mediolateral stability.
- Accessory Collateral Ligaments: These originate from the head of the proximal phalanx and insert into the volar plate. They are taut in extension and lax in flexion.
- Dorsal Capsule: Much thinner than the volar plate, it's intimately associated with the extensor mechanism.
Extensor Mechanism
- Central Slip: This is the primary extensor of the PIP joint, inserting into the dorsal base of the middle phalanx. Its unopposed pull is a key driver of dorsal subluxation in unstable injuries.
- Lateral Bands: These contribute to PIP extension and DIP flexion.
- Extensor Hood: A complex fibrous aponeurosis that integrates the extensor tendons, lumbricals, and interossei.
Neurovascular Structures
- Digital Nerves and Arteries: These run along the radial and ulnar sides of each digit, just volar to the mid-axial line. They are extremely vulnerable during percutaneous pin placement.
- Course: They typically lie deep to the skin and subcutaneous tissue, superficial to the flexor tendon sheath.
- Risk: When inserting K-wires, especially from the dorsal-lateral or dorsal-medial aspects, you must be acutely aware of their proximity. A misplaced pin can cause permanent sensory loss or vascular compromise.
Surgical Warning: Always visualize the trajectory of your K-wire in your mind's eye relative to the neurovascular bundles. Palpate the lateral aspects of the digit to estimate their course.
Preoperative Planning: Setting the Stage for Success
Meticulous planning is the cornerstone of any successful surgical outcome, especially in hand surgery where precision is paramount.
Patient History and Physical Examination
Before surgery, we must have a comprehensive understanding of the injury.
- Mechanism of Injury: How did it happen? This often provides clues about the forces involved and potential injury patterns.
- Time from Injury: The likelihood of a favorable result diminishes significantly after 6 weeks due to scar formation and contracture.
- Previous Treatments: Any attempts at reduction or splinting?
- Neurovascular Status: Documented integrity of sensation and perfusion is critical before any anesthetic block.
- Visual Assessment: Observe the resting cascade of the fingers. Disruption of this normal flexion cascade, where digits progressively flex from radial to ulnar, can indicate a significant injury.
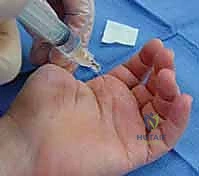
FIG 2C. Passive stability evaluation.
* Palpation: Pinpoint tenderness helps localize specific ligamentous or bony injuries. Tenderness over the volar aspect of the middle phalanx base suggests a volar plate avulsion fracture.
* Stability Assessment: After administering a digital or wrist block for patient comfort, gently manipulate the PIP joint.
* Fluoroscopic Stress Testing: This is invaluable. Observe the joint under AP, lateral, and oblique fluoroscopic views as you apply gentle lateral and dorsovolar shearing stresses, both in full extension and at 30 degrees of flexion.
* Redisplacement: Note the exact angle of flexion at which redisplacement occurs. Instability in extension suggests disruption of both volar plate and collateral ligaments. Instability beyond 70 degrees of flexion points predominantly to collateral ligament damage. Loss of active extension implies central slip injury.

FIG 2B. Digital block technique.
Imaging Studies
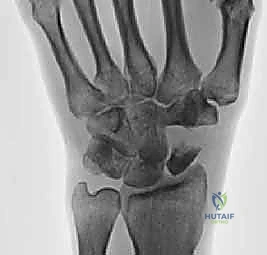
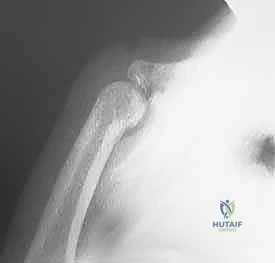
- Standard Radiographs: Obtain high-quality anteroposterior, true lateral, and oblique views of the injured digit only. "Fanned four-finger lateral" views of the entire hand are often inadequate and can miss subtle fracture-dislocations.
- Fluoroscopy: As mentioned, indispensable for dynamic assessment of stability and confirming concentric reduction.
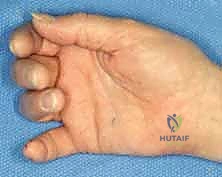
FIG 2A. Disruption of resting flexor cascade. (Note: Image caption from original text was "A. Disruption of resting flexor cascade." but the image itself shows fluoroscopy, so I will align with the visual content.)
* CT Scan: Occasionally indicated, especially for complex articular depression or highly comminuted fractures, to fully delineate the fracture pattern and guide fragment fixation if open reduction is considered.
Surgical Indication and Alternatives
Dorsal block pinning is indicated for unstable PIP fracture-dislocations (typically Type III unstable) where:
* Closed reduction does not achieve or maintain a congruent reduction.
* The fracture involves more than 40% to 50% of the volar articular surface.
* Non-operative extension block splinting is not feasible due to patient compliance issues, significant swelling, or digit morphology.
Remember, fellows, intraoperative decision-making is key. Be prepared for alternative procedures like ORIF for large, minimally comminuted fragments, or volar plate arthroplasty for highly comminuted volar fragments. Ensure all necessary equipment is available.
Patient Counseling and Expectations
Before the procedure, ensure the patient has realistic expectations regarding the outcome. Stiffness, pain, and a thickened joint contour are common sequelae even with optimal treatment. Emphasize the importance of postoperative rehabilitation and compliance.
Preoperative Preparation
- Hygiene: Instruct the patient to keep the hand clean, trim fingernails, and avoid any additional skin injury.
- Anesthesia: A regional block (axillary, supraclavicular) or general anesthesia is typically preferred for this procedure, allowing for a bloodless field with a tourniquet. A local digital block can be used for initial assessment but is often insufficient for the procedure itself.
Patient Positioning and Setup
The setup in the OR is critical for optimal visualization and access.
- Positioning: The patient is positioned supine on the operating table. The affected upper extremity is abducted and placed on a specialized hand table.
- Tourniquet: A well-padded pneumatic tourniquet is applied to the proximal upper arm. This will be inflated after exsanguination of the limb to provide a bloodless field, which is crucial for identifying anatomical landmarks and preventing neurovascular injury. Typical inflation pressure is 250-300 mmHg, or 100 mmHg above systolic blood pressure.
- Fluoroscopy: The C-arm is positioned for easy access to obtain AP, lateral, and oblique views of the PIP joint without repositioning the patient or sterile field. It should be draped sterilely.
- Sterile Prep and Drape: The entire hand and forearm are prepped with an antiseptic solution (e.g., chlorhexidine or povidone-iodine) and draped in a standard sterile fashion, exposing only the surgical field.
Step-by-Step Intraoperative Execution: Dorsal Block Pinning Masterclass
Now, let's get scrubbed in, fellows. We'll proceed with the dorsal block pinning technique. This is a percutaneous procedure, so no formal skin incision or deep dissection is required for the pinning itself, but precision is paramount.
1. Initial Assessment and Reduction under Anesthesia
With the patient anesthetized and the tourniquet inflated, perform a final assessment.
- Palpation: Re-palpate the joint for any subtle deformities or instability.
- Stress Testing: Under fluoroscopic guidance, gently stress the joint to confirm the degree and direction of instability. This helps confirm your preoperative diagnosis and guides your reduction maneuver.
Your primary goal now is to achieve a concentric reduction of the PIP joint.
- Reduction Maneuver: Grasp the middle phalanx firmly. Apply gentle, sustained axial traction to disimpact the joint. While maintaining traction, hyperflex the PIP joint to 90 degrees or more. Simultaneously, apply direct volar pressure to the dorsal aspect of the middle phalanx base to reduce it back onto the proximal phalanx head.
- Fluoroscopic Confirmation: Immediately confirm concentric reduction with fluoroscopy in both AP and true lateral views. Ensure there is no residual subluxation or gapping.
Fluoroscopic confirmation of concentric reduction.
Surgical Warning: If concentric reduction cannot be achieved or maintained, even after repeated attempts, consider soft tissue interposition (e.g., a ruptured volar plate, collateral ligament, or even a small bony fragment). In such cases, an open reduction may be necessary to clear the joint. Be prepared to convert.
2. K-wire Placement: The Dorsal Blocking Pin
Once you have a stable, concentrically reduced joint, we proceed with placing the K-wire. The principle here is to insert a K-wire into the proximal phalanx, creating a mechanical block that prevents the middle phalanx from hyperextending and re-dislocating dorsally, while still allowing full flexion.
- Choose Your Wire: We'll use a smooth K-wire, typically 0.035-inch or 0.045-inch in diameter. The smaller diameter is often preferred in the digits to minimize bone removal and potential for articular damage, but a 0.045-inch wire offers more rigidity.
- Joint Positioning: Maintain the PIP joint in 90 degrees or more of flexion. This is absolutely critical. Hyperflexion of the joint serves two purposes:
- It ensures the extensor mechanism (central slip) is relaxed and displaced dorsally, minimizing the risk of tethering it with the K-wire.
- It positions the proximal phalanx head optimally for pin insertion, allowing the pin to pass through the dorsal aspect without entering the articular surface.
- Entry Point Selection: Identify the distal, dorsal aspect of the proximal phalanx. The ideal entry point is just proximal to the PIP joint line, slightly off-center (either radially or ulnarly) to avoid the central slip of the extensor tendon. If you place it centrally, you risk tethering the extensor mechanism, which can limit future joint flexion.
- Palpation: Palpate the dorsal aspect of the proximal phalanx head. You want to enter the bone just proximal to the articular cartilage.
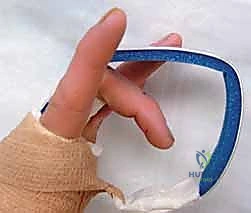
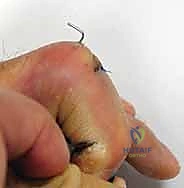
- Skin Incision: A small stab incision with an 11-blade scalpel can facilitate K-wire entry and prevent skin tenting.
Clinical view of K-wire entry point.
* K-wire Insertion Angle: Insert the K-wire percutaneously, aiming in a retrograde direction, approximately 30 degrees off the long axis of the proximal phalanx. The angle is crucial to ensure the pin is within the bone and not crossing the joint.
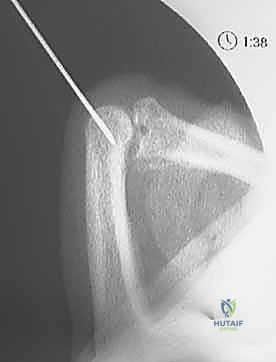
* Fluoroscopic Guidance (Constant Monitoring):
* Initial Entry: Advance the K-wire slowly with a power drill or by hand. Confirm its entry into the bone of the proximal phalanx on both AP and lateral fluoroscopic views.
* Guidance through Shaft: Guide the wire through the shaft of the proximal phalanx, aiming slightly volar.
* Target Depth: Advance the K-wire until its tip lies just proximal to the articular cartilage of the proximal phalanx head. The tip should not enter the joint space. This is your blocking point.
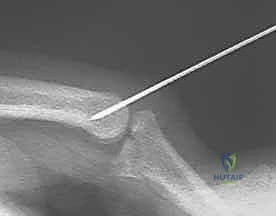
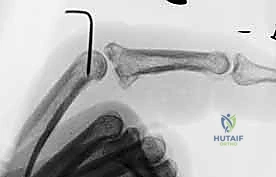
Fluoroscopic view of K-wire in proximal phalanx (AP).
Fluoroscopic view of K-wire in proximal phalanx (Lateral).

Fluoroscopic view of K-wire in proximal phalanx, demonstrating blocking position.
3. Confirming the Blocking Effect and Stability
This is a critical step, fellows. The pin must effectively block hyperextension without restricting necessary flexion.
- Test Extension Block: Gently extend the PIP joint. The middle phalanx should come to a hard stop against the K-wire, preventing full extension and dorsal subluxation. The exact angle of allowed extension will depend on the stability required, typically allowing 20-30 degrees of extension.
- Test Flexion: Gently flex the PIP joint. It should be able to flex fully to 90 degrees or more without impingement from the K-wire. If flexion is restricted, your pin is likely too long or is tethering the extensor mechanism.
- Fluoroscopic Verification: Confirm the blocking effect and joint congruity in all ranges of motion under fluoroscopy.
- Neurovascular Check: Release the tourniquet temporarily to assess capillary refill and sensation in the digit. Ensure no compromise. Re-inflate the tourniquet.
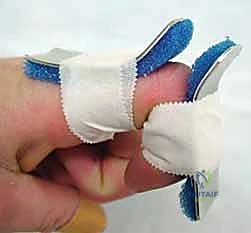
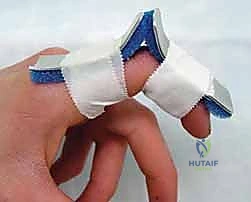
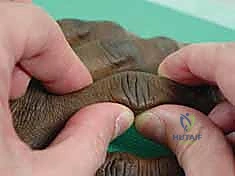
Clinical image of K-wire in place, demonstrating allowed flexion.
Clinical image of K-wire in place, demonstrating blocked extension.
4. Pin Management and Closure
- Cut the Pin: Once satisfied with the pin's position and stability, bend the K-wire and cut it short, leaving just enough length protruding from the skin to allow for easy removal in the clinic. The bent end helps prevent migration and provides a handle for removal.
- Pin Dressing: Apply a sterile dressing around the pin site. This typically involves a small piece of gauze or foam dressing to protect the skin and absorb any exudate, secured with tape.
- Final Radiographs: Obtain final AP and lateral radiographs to document pin position and joint reduction.
- Tourniquet Release: Release the tourniquet permanently. Confirm adequate perfusion of the digit.
Extensive Pearls and Pitfalls
Fellows, every procedure has its nuances and potential complications. Anticipating these and knowing how to manage them is the mark of a master surgeon.
Pearls for Success
- Hyperflexion is Key: Always place the pin with the PIP joint in maximal flexion (>90 degrees) to avoid extensor tethering.
- Fluoroscopy is Your Friend: Use it constantly. Don't guess. Every millimeter counts in the hand.
- Off-Center Placement: Slightly radial or ulnar to the central slip is safer than dead center.
- Adequate Block, Not Over-Block: The goal is to prevent dorsal subluxation, not to completely immobilize the joint in a fixed position. Allow for some extension (e.g., 20-30 degrees) if stability permits, to encourage earlier functional recovery.
- Smooth K-wires: Always use smooth K-wires to minimize soft tissue and bone damage, and to facilitate removal.
Potential Pitfalls and Salvage Strategies
- Failure to Achieve Concentric Reduction:
- Pitfall: Persistent gapping or subluxation after attempted closed reduction.
- Salvage: Suspect soft tissue interposition (volar plate, collateral ligament). Convert to open reduction. A volar approach is typically used to excise or repair the interposed tissue and directly reduce the fracture.
- Extensor Tendon Tethering:
- Pitfall: The patient has limited active flexion post-operatively, or you feel resistance during intraoperative flexion testing. This occurs if the pin passes through or too close to the central slip.
- Salvage: If identified intraoperatively, reposition the pin. Remove the existing pin and reinsert it slightly more laterally or medially. If identified post-operatively, the pin may need early removal, potentially sacrificing some stability, or revision surgery.
- Neurovascular Injury:
- Pitfall: Digital nerve paresthesia or digital artery compromise (pallor, absent capillary refill) during or after pin placement.
- Salvage: Immediately remove the pin. Assess the digit. If symptoms resolve, you may re-attempt pinning with a revised trajectory. If symptoms persist, consider exploration to assess for direct nerve/vessel injury. Prevention is paramount: know your anatomy, use slow drilling, and maintain a safe trajectory.
- Pin Tract Infection:
- Pitfall: Ery
Additional Intraoperative Imaging & Surgical Steps
REFERENCES
References 1. Agee Jm. Unstable Fracture Dislocations Of The Proximal Interphalangeal Joint: Treatment With The Force Couple Splint. Clin Orthop Relat Res 1987;214:101–112.
-
American Society For Surgery Of The Hand. General Principles Of Management. In The Hand: Primary Care Of Common Problems. New York: Churchill Livingstone, 1985:1–17.
-
Blazar Pe, Robbe R, Lawton Jn. Treatment Of Dorsal Fracture/ Dislocations Of The Proximal Interphalangeal Joint By Volar Plate Arthroplasty. Tech Hand Up Extrem Surg 2001;5:148–152.
-
Deitch Ma, Kiefhaber Tr, Comisar Br, Et Al. Dorsal Fracture Dislocations Of The Proximal Interphalangeal Joint: Surgical Complications And Long-Term Results. J Hand Surg Am 1999;24A: 914–923.
-
Dias Jj. Intraarticular Injuries Of The Distal And Proximal Interphalangeal Joints. In: Berger Ra, Weiss Ac, Eds. Hand Surgery. Baltimore: Lippincott Williams & Wilkins, 2004:153–174.
-
Dionysian E, Eaton Rg. The Long-Term Outcome Of Volar Plate Arthroplasty Of The Proximal Interphalangeal Joint. J Hand Surg Am 2000;25:429–437.
-
Dobyns Jh, Mcelfresh Ec. Extension Block Splinting. Hand Clin 1994;10:229–237.
-
Eaton Rg, Littler Jw. Joint Injuries And Their Sequelae. Clin Plast Surg 1976;3:85–98.
-
Eaton Rg, Malerich Mm. Volar Plate Arthroplasty For The Proximal Interphalangeal Joint: A Review Of Ten Years’ Experience. J Hand Surg Am 1980;5:260–268.
-
Glickel Sz, Barron Oa, Catalano Lw Iii. Dislocations And Ligament Injuries In The Digits. In Green Dp, Hotchkiss Rn, Pederson Wc, Et Al, Eds. Green’S Operative Hand Surgery, Ed
-
Philadelphia: Elsevier, 2005:343–388.
-
Green A, Smith J, Redding M, Et Al. Acute Open Reduction And Rigid Internal Fixation Of Proximal Interphalangeal Joint Fracture Dislocation. J Hand Surg Am 1992;17:512–517.
-
Hamer Dw, Quinton Dn. Dorsal Fracture Subluxation Of The Proximal Interphalangeal Joints Treated By Extension Block Splintage. J Hand Surg Br 1992;17:586–590.
-
Incavo Sj, Mogan Jv, Hilfrank Bc. Extension Splinting Of Palmar Plate Avulsion Injuries Of The Proximal Interphalangeal Joint. J Hand Surg Am 1989;14:659–661.
-
Inoue G, Tamura Y. Treatment Of Fracture-Dislocation Of The Proximal Interphalangeal Joint Using Extension-Block Kirschner Wire. Ann Chir Main Memb Super 1991;10:564–568.
-
Kiefhaber Tr, Stern Pj. Fracture Dislocations Of The Proximal Interphalangeal Joint. J Hand Surg Am 1998;23:368–380.
-
Kraemer Ba, Gilula La. Phalangeal Fractures And Dislocations. In Gilula La, Ed. The Traumatized Hand And Wrist: Radiographic And Anatomic Correlation. Philadelphia: Wb Saunders, 1992: 105–170.
-
Leibovic Sj, Bowers Wh. Anatomy Of The Proximal Interphalangeal Joint. Hand Clin 1994;10:169–178.
-
Robinson Me Jammed Finger. Emedicine Web Site. Http://Www. Emedicine.Com/Sports/Topic55.Htm. Updated April 27, 2006. Accessed August 16, 2006.
-
Salter Rb, Simmonds Df, Malcolm Bw, Et Al. The Biological Effect Of Continuous Passive Motion On The Healing Of Full-Thickness Defects In Articular Cartilage: An Experimental Investigation In The Rabbit. J Bone Joint Surg Am 1980;62A:1232–1251.
-
Schenck Rr. Classification Of Fractures And Dislocations Of The Proximal Interphalangeal Joint. Hand Clin 1994;10:179–185.
-
Strong Ml. A New Method Of Extension-Block Splinting For The Proximal Interphalangeal Joint. J Hand Surg Am 1980;5:606–607.
-
Twyman Rs, David Hg. The Doorstop Procedure: A Technique For Treating Unstable Fracture Dislocations Of The Proximal Interphalangeal Joint. J Hand Surg Br 1993;18:714–715.
-
Vercillo Ap, Squier Rc, Ritland Gd, Et Al. Finger Dislocations In Alcoholics. Conn Med 1987;51:293–295.
-
Viegas Sf. Extension Block Pinning For Proximal Interphalangeal Joint Fracture Dislocations: Preliminary Report Of A New Technique. J Hand Surg Am 1992;17:896–901.
-
Zook Eg, Van Beek Al, Wavak P. Transverse Volar Skin Laceration Of The Finger: Sign Of Volar Plate Injury. Hand 1979;11:213–216.
-
The patient should have a thermoplastic splint fabricated for protection and should begin a supervised program with a hand therapist 3 to 5 days after surgery.
-
Gentle active range-of-motion exercises are allowed immediately and should be encouraged in most cases.
-
If the injury is especially serious—eg, injuries that required volar plate arthroplasty or that contained significant comminution—immobilization for up to 2 weeks may be indicated. 14
-
Pin care must be explained carefully and performed regularly.
-
The pin is removed 3 weeks after surgery, and vigorous active flexion and extension are encouraged. Reverse blocking is initiated.
-
Full extension should be limited for 1 additional week. 14
-
Active and passive joint exercises, including dynamic extension splinting, is initiated after 6 to 8 weeks of therapy, until full motion is achieved.
-
Buddy taping or wrapping can be used, if added, longerterm protection is needed.
OUTCOMES
- The outcome for intervention into PIP fracture-dislocations depends mostly on the severity of the initial injury.
-
Because few cases of extension block pinning used as the sole intervention are available in the literature, it is difficult to assess the long-term outcome of the procedure.
-
Inoue and Tamara 14 reported the use of extension block pinning in 14 cases of fracture-dislocation of the PIP joint with an average fracture fragment size of 38% of the articular surface (range 25% to 60%). Ten patients regained full range of motion, and four patients regained a more limited range (89, 65, 64, and 40 degrees, respectively). The average ROM for all patients was 94.4 degrees.
-
The authors attributed the four cases with less satisfactory results to the use of a 60-degree extension block splint postoperatively in one patient and significant comminution in the other three patients.
-
Viegas 24 reported the use of this technique in three cases of fracture-dislocation of the PIP joint. One case involved a 45% single fragment fracture seen 1 day postinjury and another a 35% comminuted fracture seen 17 days post-injury. Following pin removal and 1 month of passive and active exercises, both patients regained full range of motion. A third case involved a 75% comminuted fracture seen 2 days post-injury. The patient’s ROM after pin removal was 30 to 65 degrees. Because the patient did not return for further care, no final outcome was available.
-
Twyman and David 22 reported the use of this technique in two cases of fracture-dislocation of the PIP joint. The extent of injury in each patient was not specified, but quick recovery to satisfactory ROM in both patients was reported (20 to 100 degrees and 15 to 110 degrees, respectively).
COMPLICATIONS
- Persistent pain and swelling
-
Stiffness
-
Flexion contracture and extensor lag
-
Redisplacement of the joint and persistent subluxation
-
Angulation and rotation of the middle phalanx
-
Weakness
-
Boutonniere deformity
-
Post-traumatic arthritis (not necessarily symptomatic)
You Might Also Like