Mastering Open Scapholunate Ligament Repair and Dorsal Capsulodesis Augmentation: An Intraoperative Guide
Key Takeaway
This masterclass guides fellows through open scapholunate ligament repair and augmentation. We detail patient positioning, comprehensive wrist anatomy, precise surgical steps from incision to fixation, and critical pearls for managing SLIL instability. Learn intraoperative decision-making, meticulous dissection, hardware application, and essential postoperative care to ensure optimal patient outcomes for acute and reducible chronic tears.
Welcome, fellows, to the operating theater. Today, we're addressing one of the most common and potentially debilitating forms of carpal instability: a scapholunate interosseous ligament, or SLIL, injury. Left untreated, this can lead to a predictable and progressive pattern of wrist arthritis known as Scapholunate Advanced Collapse, or SLAC wrist. Our goal today is to meticulously repair and augment the SLIL, restoring carpal kinematics and preventing this degenerative cascade.
Understanding Scapholunate Instability
Before we make any incisions, let's quickly review the pathology. SLIL injuries range from dynamic instability, where radiographic changes are only seen with stress, to static instability, where characteristic changes are present on routine plain radiographs. We differentiate between acute tears, typically less than 6 weeks from injury, which are often amenable to primary ligament repair, and chronic tears, beyond 6 weeks, which frequently necessitate more robust ligament reconstruction or augmentation procedures. Crucially, we also assess for fixed versus reducible deformities; only reducible deformities are suitable for soft tissue repairs like the one we're performing today.
Diagnostic Insights
While MRI, CT arthrography, and even ultrasound offer valuable clues, their diagnostic accuracy for SLIL tears can be variable. For instance, MRI sensitivity ranges from 25% to 60%, and CT arthrography is highly sensitive for dorsal tears but less so for palmar components. Remember, a negative result on these studies does not definitively rule out a ligamentous injury. This is why arthroscopy remains the gold standard for definitively diagnosing SLIL tears and assessing their severity, especially the critical dorsal component.
On plain radiographs, we look for five characteristic findings:
* Terry Thomas sign: A scapholunate gap exceeding 3 mm on a PA radiograph.
* Cortical ring sign: Hyperdensity of the scaphoid cortex on PA view due to increased scaphoid flexion.
* Angular changes:
* Scapholunate angle: Normal is 30-60 degrees; >60 degrees suggests SLIL injury.
* Capitolunate angle: Normal is ±15 degrees; >15 degrees suggests SLIL injury.
* Radiolunate angle: Normal is ±10 degrees; >10 degrees suggests SLIL injury.
* Quadrangular lunate: The lunate appears rectangular on PA view as it moves into extension.
* Disruption of Gilula’s lines: The smooth, concentric arcs outlining the carpal rows are interrupted.
Differential Diagnosis
When evaluating a patient with suspected SLIL instability, always consider:
* Dynamic SLIL instability or partial SLIL tear
* Radiocarpal arthritis
* Scaphoid fracture
* Kienböck or Preiser disease
Patient History and Physical Findings
Typically, these patients present after a fall on an outstretched hand, experiencing acute onset of dorsal wrist pain and often mild swelling. During your physical exam, pay close attention to the Watson scaphoid shift test, which can elicit pain and subluxation of the scaphoid, indicating instability. Assess passive range of motion in both wrists for comparison.
Nonoperative Management
It's important to understand that nonoperative methods, such as immobilization, NSAIDs, and activity modification, have shown very limited success in treating dynamic or static acute scapholunate ligament injuries. Studies have demonstrated minimal symptom reduction even after 12 weeks of such treatment for dynamic instability. This underscores the need for surgical intervention in appropriate cases.
Preoperative Planning and Patient Positioning
Our operative plan begins with meticulous setup.
1. Anesthesia: We'll proceed with either general or regional anesthesia, tailored to patient preference and comorbidities.
2. Patient Positioning:
* The patient is positioned supine on the operating table.
* We utilize a specialized hand table, securely attached to the main operating table. This hand table is positioned such that it faces the corner opposite the anesthesia team, allowing ample space for the anesthesiologist and their equipment.
* The operative arm is then placed on the hand table.
* An upper arm non-sterile tourniquet is applied to the upper arm, ensuring appropriate inflation for exsanguination and hemostasis during the procedure.
3. Fluoroscopy Setup:
* The C-arm fluoroscope is brought in from the opposite corner, perpendicular to the patient's wrist. This setup allows for unimpeded AP and lateral views without repositioning the patient or the hand table.
* Pearl: Drape the fluoroscope and keep the C-arm parallel and elevated above the floor. This allows you to maintain sterility and easily maneuver the C-arm above the hand table throughout the case.
4. Preparation and Draping:
* The operative arm is meticulously prepped with an antiseptic solution from the shoulder to the fingertips.
* Sterile drapes are then applied, leaving sufficient slack in the armboard portion of the drape. This slack is crucial to allow the sterile wrist traction tower to slide under the arm, proximal to the elbow.
* The operative wrist is then suspended in the wrist traction tower, applying gentle but firm traction. This provides distraction of the carpal rows, improving visualization and facilitating reduction maneuvers.
5. Diagnostic Arthroscopy:
* Before making our larger open incision, we always advocate for diagnostic wrist arthroscopy. This is the gold standard for confirming SLIL pathology, assessing the precise degree of instability, and confirming reducibility.
* We typically use the 3-4 portal for viewing with a 2.7-mm arthroscope.
* The 6U portal is established for outflow, usually with an 18-gauge needle connected to sterile IV tubing.
* The 4-5 portal is reserved for instrument placement, such as a 1-mm arthroscopic probe.
* We carefully probe the SLIL in both the radiocarpal and midcarpal joints. A 1-mm probe passable in the scapholunate interval and rotatable 360 degrees indicates a Geissler Grade III lesion. A "drive-through" sign, where the 2.7-mm arthroscope itself can pass through the scapholunate interval, signifies a Geissler Grade IV lesion, indicating complete disruption.
* Midcarpal arthroscopy is particularly effective in revealing the true degree of instability.
Comprehensive Surgical Anatomy
As we proceed, let's keep the critical anatomy in mind.
* Dorsal Wrist: Our incision will be longitudinal, just ulnar to Lister's tubercle. This prominent bony landmark guides our approach.
* Extensor Compartments: We'll encounter the extensor retinaculum, a fibrous band that holds the extensor tendons in place. Specifically, we'll open the third extensor compartment to transpose the Extensor Pollicis Longus (EPL) tendon.
* Neurovascular Structures: Be vigilant for the superficial radial nerve branches on the radial side and the dorsal cutaneous nerve of the ulna on the ulnar side. These nerve branches are typically within the subcutaneous flaps we raise and are highly susceptible to iatrogenic injury. Blunt dissection and careful flap elevation are paramount.
* Dorsal Capsule and Ligaments: Deep to the retinaculum, we'll expose the dorsal capsule, the dorsal radiocarpal (DRC) ligament, and the dorsal intercarpal (DIC) ligament. The dorsal SLIL is the strongest and most critical component for stability. The DIC ligament, running obliquely from the triquetrum to the lunate and scaphoid, can also be involved in high-energy injuries, avulsing from its attachments.
* Carpal Bones: We are focusing on the scaphoid and lunate. In a typical SLIL injury, the scaphoid tends to flex and pronate, while the lunate extends, leading to a Dorsal Intercalated Segmental Instability (DISI) deformity. Our reduction maneuvers will aim to correct this.
Open Scapholunate Ligament Repair: The Masterclass Begins
Our indications for direct SLIL repair, with or without dorsal capsulodesis, include Geissler Grade III or IV complete SLIL tears, injuries less than 6 weeks old (though repairable tissue can sometimes be found up to 3 months), minimal degenerative changes in the radiocarpal and midcarpal joints, static radiographic changes that are reducible, and adequate remaining SLIL tissue for primary repair.
1. Incision and Exposure
- Initial Incision: We'll begin by making a standard longitudinal dorsal skin incision, approximately 5-6 cm in length, positioned just ulnar to Lister's tubercle. This provides direct access to the third extensor compartment and the dorsal wrist capsule.
- Subcutaneous Dissection: Using a combination of sharp and blunt dissection, carefully elevate full-thickness skin flaps radially and ulnarly.
- Surgical Warning:
> Superficial Radial Nerve: Be extremely cautious during this step. The superficial radial nerve branches are typically found within these subcutaneous flaps on the radial side. Use gentle spreading dissection parallel to the nerve fibers to avoid transection or contusion.
- Surgical Warning:
- Extensor Retinaculum: Identify the extensor retinaculum. We will incise the retinaculum directly over the third extensor compartment, which houses the extensor pollicis longus (EPL) tendon.
- EPL Transposition: Once the third compartment is open, carefully lift the EPL tendon. We'll transpose the EPL tendon into the radial subcutaneous space, effectively moving it out of our surgical field. This protects the tendon and provides better access to the dorsal capsule.
- Capsular Exposure: Now, we're exposing the dorsal capsule and the dorsal extrinsic radiocarpal ligaments—specifically, the dorsal radiocarpal (DRC) and dorsal intercarpal (DIC) ligaments.
2. Dorsal Capsulotomy and SLIL Assessment
- Capsular Incision: We'll make a dorsal capsular incision, creating a 1 to 1.5-cm ulnar-based flap. This flap will run parallel to the DIC ligament and will include portions of both the dorsal capsule and the DRC/DIC ligaments. Leaving the capsule attached ulnarly is strategic; it provides us with a robust capsular flap that can be used later for capsulodesis or augmentation of our repair if needed.
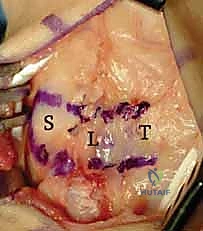
* Here, you can see the exposure and the ulnar-based dorsal capsular flap. The DIC parallels the more distal transverse limb of the flap. Note the scaphoid (S), lunate (L), and triquetrum (T).
* Surgical Warning:
> Capsular Flap Creation: When creating this flap, ensure it is at least 1 cm wide to provide a broad enough tether for the scaphoid. Plan the flap length carefully to ensure it can adequately cross the scapholunate joint and reach the scaphoid waist if capsulodesis is required.
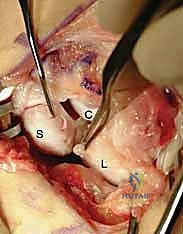
* SLIL Exposure: With the capsule opened, we now have direct visualization of the scaphoid, the lunate, and the disrupted scapholunate interosseous ligament. Observe carefully for any existing arthritic changes in the radiocarpal and midcarpal joints, as well as the precise location of the SLIL disruption. Typically, the SLIL avulses off the scaphoid, leaving a stump attached to the lunate. Also, assess for any injury to the DIC ligament, which can sometimes avulse from its scaphoid and lunate attachments in high-energy injuries.
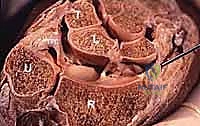
* Observe the flexed scaphoid (S) and the extended lunate (L), characteristic of a DISI deformity. The capitate (C) is visible distally. Note the complete disruption of the SLIL. The arrow points to our ulnar-based capsular flap.
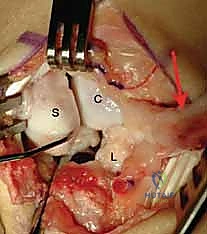
* Here, you can clearly see the scaphoid on the left, and the SLIL stump still attached to the lunate on the right, held by the forceps. The capitate head is distal to the lunate.
3. Joystick Kirschner Wire Placement for Reduction
- Placement Strategy: To correct the DISI deformity and achieve an anatomic reduction, we'll place two 0.062-inch smooth Kirschner wires as "joysticks"—one into the scaphoid and one into the lunate.
- Scaphoid Joystick: Place the scaphoid K-wire distally in the scaphoid, angling it proximally. This allows us to derotate and extend the flexed scaphoid. Initially, you'll primarily see the radiocarpal articular surface of the scaphoid due to its flexion.
- Lunate Joystick: Similarly, place the lunate K-wire proximally, angling it in a distal direction. This allows us to flex the extended lunate.
- Positioning: Ensure these wires are placed parallel to the scapholunate joint, approximately 5 mm from the articular surface, and in positions where they will not impede the path of our subsequent transarticular K-wires.
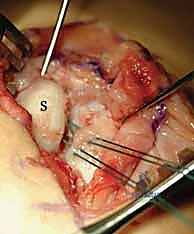
* Here, you can see the suture anchor placed in the scaphoid. The sutures are passed through the SLIL. Note the divergent joystick Kirschner wires in the scaphoid and lunate, ready for reduction.
* Pearl: Place the joystick Kirschner wires distal and slightly volar to prevent them from interfering with the placement of the suture anchors and the transarticular K-wires. A small 1-cm longitudinal skin incision with blunt dissection and a guide can be used to prevent injury to superficial radial nerve branches during K-wire insertion.
* Reduction Maneuver: Now, gently bring the scaphoid and lunate joystick K-wires together. This maneuver will simultaneously take the scaphoid out of its flexed position and the lunate out of its extended position, correcting the DISI deformity and preliminarily reducing the scapholunate joint into its anatomical alignment.
4. SLIL Footprint Preparation and Suture Anchor Placement
- Footprint Preparation: With the joint preliminarily reduced, identify the anatomical insertion site for the dorsal SLIL on the dorsal ulnar portion of the scaphoid. Use a small burr or curette to carefully roughen this footprint to bleeding bone. This promotes healing and integration of the repaired ligament.
- Suture Anchor Insertion: Insert one or more mini suture anchors (2.0 or 2.5 mm) directly into this prepared SLIL footprint on the scaphoid. Ensure secure seating of the anchors.
- Suture Passage: Carefully pass the sutures emanating from the suture anchors through the remaining SLIL stump. Use a small suture passer or a curved needle to ensure a secure bite through the ligamentous tissue. Do not tie these sutures yet; we will tie them after definitive reduction and K-wire fixation.
* Again, observe the suture anchor placed into the scaphoid at the dorsal SLIL footprint. The sutures are passed through the SLIL stump. The joystick K-wires are in place, ready to achieve reduction.
5. Definitive Reduction and Kirschner Wire Fixation
- Final Reduction: With the joystick K-wires, meticulously achieve the final, anatomical reduction of the scapholunate joint. Confirm appropriate alignment visually and with fluoroscopy.
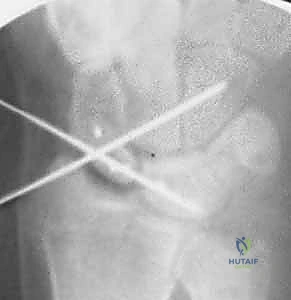
- Transarticular K-wire Placement: Once the joint is perfectly reduced, we will drive two 0.045-inch smooth Kirschner wires:
- Scapholunate Fixation: Drive one or two K-wires from the scaphoid into the lunate, traversing the reduced scapholunate joint. These provide primary stability to the repaired ligament.
- Scaphocapitate Fixation: Drive one or two additional 0.045-inch K-wires through the waist of the scaphoid into the capitate. This provides additional rotational stability to the scaphoid.
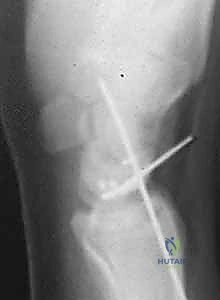
* Here, you can see the joint after reduction and SLIL repair. The Kirschner wires in the scaphoid and lunate are now parallel, correcting the DISI deformity. The transarticular K-wires are placed from radial to ulnar, passing through the scapholunate interval and scaphocapitate interval.
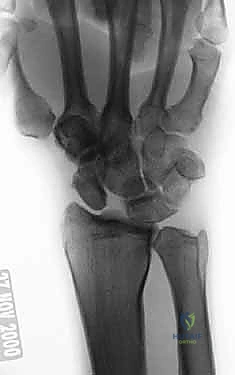
* An AP intraoperative fluoroscopic image demonstrating precise Kirschner wire placement across the scaphocapitate joint and the reduced scapholunate joint. Suture anchors are visible in the scaphoid at the dorsal SLIL footprint.
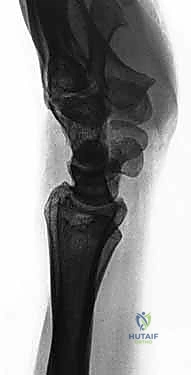
* A lateral intraoperative fluoroscopic image confirming accurate Kirschner wire placement and the reduced scapholunate joint. Note the suture anchors in the scaphoid.
* Suture Tying: With the joint now securely reduced and stabilized by the K-wires, proceed to tie the suture anchor sutures. This secures the avulsed SLIL to its prepared footprint on the scaphoid.
* K-wire Management: Remove the joystick K-wires. For the transarticular K-wires, we will cut them below the skin level, burying them.
* Pearl: Burying the Kirschner wires minimizes the risk of pin tract infection, although it necessitates a minor procedure for removal in the operating room later.
6. Posterior Interosseous Nerve Neurectomy (Optional)
- Consideration: At this point, we often consider performing a posterior interosseous nerve (PIN) neurectomy. This can help to alleviate chronic dorsal wrist pain.
- Technique: Identify the PIN on the floor of the fourth extensor compartment. Carefully cauterize the nerve and its accompanying vessel, then resect a segment of the nerve.
7. Capsular and Wound Closure
- Capsular Closure: Close the dorsal capsule over the repaired SLIL using 3-0 absorbable suture. This provides an additional layer of stability.
- Extensor Retinaculum Repair: Transpose the EPL tendon back into its anatomical position and repair the extensor retinaculum with 3-0 absorbable suture.
- Skin Closure: Close the subcutaneous layers and skin in a standard fashion.
Direct SLIL Repair with Dorsal Capsulodesis Augmentation
In cases of a tenuous SLIL repair, chronic scapholunate dissociation (beyond 6 weeks) without arthritis, or if the deformity is reducible but requires additional stability, we augment the repair with a dorsal capsulodesis.
- Initial Steps: Perform the SLIL repair exactly as described above, utilizing the same ulnar-based dorsal capsular incision and flap creation.
- Capsular Flap Positioning: After the primary SLIL repair is completed and secured, swing the ulnarly-based capsular flap over the scapholunate interval. Carefully plan the precise location for its attachment to the scaphoid waist. The goal is to secure this flap under tension to further reinforce and stabilize the scapholunate joint.
- Additional Suture Anchors: Place one or two mini suture anchors (1.8 or 2.0 mm) into the scaphoid at the determined location for the flap's distal attachment. Additionally, place another mini suture anchor dorsal-centrally into the lunate.
- Suture Passage and Tensioning: With the capsular flap pulled taut, pass the sutures from the scaphoid suture anchors through the distal aspect of the flap. Then, pass the sutures from the lunate anchor through the central aspect of the flap. Estimate the suture locations carefully to maximize stabilization of the scapholunate joint.
- Final Securing: Once all sutures from both the scaphoid and the lunate are passed through the capsular flap, tie them down securely. This creates a strong dorsal tether, augmenting the primary SLIL repair.

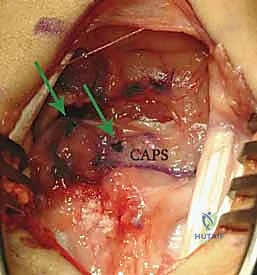
* This image demonstrates the repair augmentation with the ulnar-based capsular (CAPS) flap. Notice the suture anchor knots (arrows) and the placement of the distal suture anchor at the scaphoid, reinforcing the dorsal intercarpal ligament footprint.
💡 Pearls and Pitfalls
Fluoroscope Management: Always drape the fluoroscope and keep the C-arm parallel and elevated above the floor. This allows you to maintain sterility and easily maneuver the C-arm above the hand table without contamination.
Buried Kirschner Wires: While buried Kirschner wires minimize the risk of pin tract infection, they do necessitate a return to the operating room for removal. Discuss this with your patient preoperatively. Ensure the wires are cut flush or slightly below the skin to prevent irritation.
Posterior Interosseous Nerve Neurectomy: Consider this adjunct procedure to manage chronic dorsal wrist pain. Carefully identify the nerve on the floor of the fourth extensor compartment, cauterize it and its accompanying vessel, and resect a segment. Ensure you are not mistaking it for a motor branch.
Joystick Kirschner Wire Placement for Reduction:
- Scaphoid: Place the K-wire distal in the scaphoid, angling proximally. Remember the scaphoid is typically flexed, and initially, you will primarily visualize the radiocarpal articular portion.
- Lunate: Place the K-wire proximally in the lunate, angling distally to correct its extended position.
- Crucially, place these joystick K-wires in positions where they will not impede the path of the transarticular scapholunate and scaphocapitate Kirschner wires that provide definitive fixation.
Transarticular Kirschner Wire Placement: Place these wires distal and slightly volar to prevent them from affecting the placement of suture anchors for the SLIL repair or capsulodesis. Always use a 1-cm longitudinal skin incision with blunt dissection and a guide to prevent injury to superficial radial nerve branches during insertion. Confirm trajectory with fluoroscopy in both AP and lateral planes.
Capsular Flap Creation for Dorsal Capsulodesis: When performing dorsal capsulodesis, ensure the flap of capsular tissue is at least 1 cm wide. This width provides a broad and strong tether for the scaphoid. Carefully plan the flap length to ensure it is long enough to cross the scapholunate joint effectively and reach the scaphoid waist for secure reattachment under appropriate tension. Too short, and it won't provide stability; too long, and it may not provide adequate tension.
Postoperative Care and Complications
Our responsibility extends far beyond the operating room. Meticulous postoperative management is critical for successful outcomes.
1. Immediate Immobilization:
* Immediately after surgery, the wrist is immobilized in a short-arm thumb spica splint. This provides initial protection and prevents early motion that could jeopardize the repair.
**2. Early Follow-
Additional Intraoperative Imaging & Surgical Steps
REFERENCES
-
Forced hyperextension (push-ups) and axial loading are especially restricted during the 4to 6-month postoperative period.
-
Blatt G. Capsulodesis in reconstructive hand surgery: dorsal capsulodesis for the unstable scaphoid and volar capsulodesis following excision of the distal ulna. Hand Clin 1987;3:81–102.
-
Dao KD, Solomon DJ, Shin AY, et al. The efficacy of ultrasound in the evaluation of dynamic scapholunate ligamentous instability. J Bone Joint Surg Am 2004;86A:1473–1478.
-
Darlis NA, Weiser RW, Sotereanos DG. Partial scapholunate ligament injuries treated with arthroscopic debridement and thermal shrinkage. J Hand Surg Am 2005;30A:908–914.
-
Gajendran VK, Peterson B, Slater RR, et al. Long-term outcome of dorsal intercarpal ligament capsulodesis for chronic scapholunate dissociation. J Hand Surg Am 2007;32A:1323–1333.
-
Geissler WB, Freeland AE, Savoie FH, et al. Intracarpal soft tissue lesions associated with an intra-articular fracture of the distal end of the radius. J Bone Joint Surg Am 1996;78A:357–365.
-
Linscheid RL, Dobyns JH, Beabout JW, et al. Traumatic instability of the wrist: diagnosis, classification, and pathomechanics. J Bone Joint Surg Am 1972;54A:1612–1632.
-
Schmid MR, Schertler T, Pfirrmann CW, et al. Interosseous ligament tears of the wrist: comparison of multi-detector row CT arthrography and MR imaging. Radiology 2005;237:1008–1013.
-
Schweitzer ME, Brahme SK, Hodler J, et al. Chronic wrist pain: spinecho and short tau inversion recovery MR imaging and conventional MR arthrography. Radiology 1992;182:205–211.
-
Szabo RM, Slater RJ, Palumbo CF, et al. Dorsal intercarpal ligament capsulodesis for chronic, static scapholunate dissociation: clinical results. J Hand Surg Am 2002;27A:978–984.
-
Taleisnik J. Post-traumatic carpal instability. Clin Orthop Relat Res 1980;149:73–82.
-
Viegas SF, Patterson RM, Hokanson JA, et al. Wrist anatomy: incidence, distribution, and correlation of anatomic variations, tears, and arthrosis. J Hand Surg Am 1993;18:463–475.
-
Watson K, Ballet FL. The SLAC wrist: scapholunate advanced collapse pattern of degenerative arthritis. J Hand Surg Am 1984; 9:358–365.
-
Weiss AP, Akelman E, Lambiase R. Comparison of the findings of triple-injection cinearthrography of the wrist with those of arthroscopy. J Bone Joint Surg Am 1996;78A:348–356.
-
Wintman BI, Gelberman RH, Katz JN. Dynamic scapholunate instability: results of operative treatment with dorsal capsulodesis. J Hand Surg Am 1995;20:971–979.
OUTCOMES
- Results following direct SLIL repair with capsulodesis are highly variable.
-
By not crossing the radiocarpal joint with the capsulodesis, theoretically wrist motion will be maximized.
-
Szabo et al 9 showed mean loss of wrist flexion of 10 degrees, extension of 15 degrees, radial deviation of 20 degrees, and ulnar deviation of 11 degrees at 2 years of follow-up for chronic ( 6 weeks) SLIL tears treated with DIC capsulodesis.
-
Grip strength was unchanged from the preoperative assessment (mean 41).
-
Results of the procedure typically do not hold over time radiographically.
-
Minimum 5-year follow-up for chronic SLIL tears treated with DIC capsulodesis showed 4 :
-
Immediate postoperative scapholunate angle of 56 degrees at 5 years increased to 62 degrees
-
Immediate postoperative scapholunate gap of 2.6 mm at 5 years increased to 3.5 mm
-
Also, 50% of wrists show arthritic changes at 5 years.
-
Radiographic changes have not correlated with clinical results over time. 4
-
Wrist flexion decreased 19 degrees at 5-year follow-up compared with preoperative values.
-
Extension and radial and ulnar deviation remained unchanged at 5 years from the immediate postoperative values shown above. 9
-
Grip strength remained unchanged at 5 years (mean 43).
-
Outcome instrument scores at 5 years (Mayo Wrist Score)
-
38% excellent, 19% good, 31% fair, 12% poor outcomes
-
No correlation between subjective pain scores and radiographic changes has been shown at 5 years.
-
The surgeon should keep skin flaps thick when dissecting on top of the extensor retinaculum (this keeps the superficial radial nerve branches within the flaps).
-
The surgeon should make a small stab incision to bluntly dissect down to bone to minimize risk of nerve injury during pin placement.
You Might Also Like