Plantarflexion Opening Wedge Medial Cuneiform Osteotomy (Cotton Osteotomy): An Intraoperative Masterclass
Key Takeaway
Join us in the OR for a detailed masterclass on the Plantarflexion Opening Wedge Medial Cuneiform (Cotton) Osteotomy. We'll meticulously cover patient selection, comprehensive surgical anatomy, precise intraoperative technique, critical pearls and pitfalls, and essential postoperative management for correcting fixed forefoot varus in adult flatfoot deformity.
Welcome, fellows, to the operating theater. Today, we're addressing a crucial component of multiplanar pes planovalgus deformity: the fixed forefoot varus. Our procedure, the Plantarflexion Opening Wedge Medial Cuneiform Osteotomy, often referred to as the Cotton osteotomy, is a powerful tool to restore the medial column's alignment and, as F.J. Cotton described in 1936, the "triangle of support" of the static foot. This procedure is rarely performed in isolation, typically complementing hindfoot and midfoot reconstructions. Let's walk through this complex case from start to finish.
Understanding the Deformity: Natural History and Pathogenesis
Forefoot varus, characterized by the first metatarsal resting dorsally to the plane of the lesser metatarsals, is a common sequela of adult acquired flatfoot deformity, primarily due to posterior tibial tendon insufficiency. While its exact natural history hasn't been extensively studied, we presume it progresses with the underlying pes planovalgus. Over time, this chronic instability and subluxation, particularly at the first tarsometatarsal (TMT) or naviculocuneiform joints, can lead to localized osteoarthritis.
This deformity arises when the posterior tibialis tendon, a critical dynamic stabilizer of the medial column, fails. The static stabilizers—the spring ligament complex and the plantar intertarsal ligaments, including the long plantar ligament—become attenuated under repetitive dorsally directed weight-bearing forces. This can result in a fixed forefoot varus, even without overt osteoarthritis, due to capsular stiffness. It's also seen in congenital pes planus and post-traumatic conditions.
Patient History and Physical Findings
When evaluating our patients, we're looking for specific complaints and signs. They often describe localized pain along the dorsal medial column of the midfoot, specifically around the tarsometatarsal or naviculocuneiform joints. Pressure-related discomfort beneath the base of the first metatarsal or cuneiform is also common, a direct result of excessive weight bearing at the apex of the plantar medial column sag.
The physical examination is paramount in quantifying the deformity. We begin by placing the hindfoot into the "subtalar neutral" position with the patient seated. This is critical for isolating the forefoot component.
With the hindfoot held in neutral and the talonavicular joint congruent, we apply a dorsally directed force to the fourth and fifth metatarsal heads until the ankle is dorsiflexed to the neutral position.
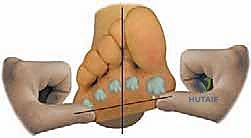
If the first metatarsal head rests above the transverse plane of the fifth metatarsal, forefoot varus is present. We quantify this clinically as mild, moderate, or severe.
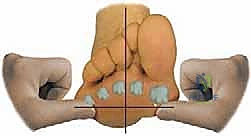
We also assess if the deformity is passively correctable by manual pressure, which helps guide nonoperative management. A fixed deformity, as in today's case, is a strong indication for surgical intervention.
Imaging and Other Diagnostic Studies
Radiographic assessment is crucial for confirming our clinical findings and planning. We obtain standing AP, lateral, and medial oblique views of the involved foot. These help determine the presence of subluxation or osteoarthritis at the first tarsometatarsal or naviculocuneiform joints.
The lateral standing radiograph is essential for quantifying the dorsiflexion of the first ray by measuring the lateral talo–first metatarsal angle. We also identify the apex of the deformity, which could be at the talonavicular, naviculocuneiform, or first tarsometatarsal joint. A weight-bearing AP radiograph of the ankle can reveal a valgus tilt of the talus within the mortise, indicating deltoid insufficiency, which may require concomitant medial ankle stabilization procedures.
Comparison with the contralateral foot's standing radiographs, especially in cases of acquired flatfoot superimposed on congenital pes planovalgus, can help differentiate the extent of deformity attributable to posterior tibial tendon insufficiency.
Nonoperative Management
For passively correctable forefoot varus, custom-molded total contact foot orthoses with medial posting under the hindfoot and midfoot, and additional lateral forefoot posting to promote first ray plantarflexion, can be effective. However, for fixed deformities, an accommodative orthosis with medial posting or a medial sole wedge is typically used. If orthoses alone fail, a custom-made gauntlet-style brace or an articulated ankle-foot orthosis may be indicated. However, in our patient today, with a fixed deformity and persistent symptoms despite conservative measures, surgery is the appropriate next step.
Comprehensive Surgical Anatomy
Before we make our incision, let's review the critical anatomy.
Osteology
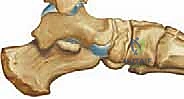
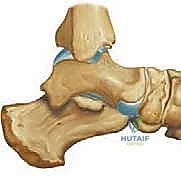
The medial cuneiform is the largest of the cuneiforms. It articulates proximally with the navicular, distally with the base of the first metatarsal, and laterally with the middle cuneiform. The first tarsometatarsal joint and the naviculocuneiform joint are key points of potential instability in flatfoot deformity. The osteotomy will be performed through the midportion of the medial cuneiform, ensuring we maintain stability by preserving the plantar cortex and periosteum, which acts as a tension band or hinge.
Muscular Intervals and Tendons
Our approach will be dorsal. We'll develop the interval between the extensor hallucis longus (EHL) tendon, which we'll retract medially, and the extensor hallucis brevis (EHB) tendon, retracted laterally. The tibialis anterior tendon inserts primarily into the medial cuneiform and the base of the first metatarsal. A medial approach to the cuneiform would be significantly more challenging due to the need for extensive dissection and retraction of this robust tendon, increasing soft tissue morbidity.
Neurovascular Structures
- Superficial Peroneal Nerve: Several dorsal cutaneous branches of the superficial peroneal nerve cross our surgical field. We must meticulously identify and gently retract these to prevent injury, which can lead to painful neuromas or persistent sensory deficits.
- Deep Peroneal Nerve: This nerve runs deeper, typically between the EHL and EHB, and provides motor innervation to the extensor digitorum brevis and sensation to the first web space. While less directly at risk with a purely dorsal approach to the cuneiform, careful deep dissection is always warranted.
- Dorsalis Pedis Artery: This artery, the continuation of the anterior tibial artery, lies deep to the EHL tendon, often between the EHL and the EHB/EDB tendons. It is a critical structure and must be protected during deeper dissection and hardware placement.
Preoperative Planning
For today's case, we've carefully reviewed the standing radiographs. We've templated the approximate size of the bone graft needed, anticipating a 4 to 6 mm wedge to achieve the desired plantarflexion. This is based on the lateral talo–first metatarsal angle and the clinical assessment of the first ray's position relative to the fifth metatarsal.
We've prepared for an allograft bone wedge from the bone bank, specifically a frozen tricortical iliac crest allograft, which has proven reliable in our experience without complications. If circumstances required, we would be prepared to harvest an autograft from the ipsilateral iliac crest, but for this procedure, allograft is our preference.
Patient Positioning and Setup
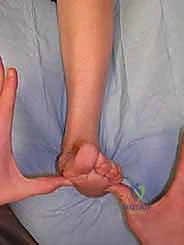
Our patient is positioned supine on the operating table. We've placed a small pad under the ipsilateral buttock to internally rotate the foot, bringing it into a neutral position and optimizing our dorsal exposure. A tourniquet has been applied high on the thigh to ensure a bloodless field, which is critical for precise dissection and osteotomy. The C-arm fluoroscopy unit is prepped and draped, ready for intraoperative imaging from both lateral and AP views to guide our osteotomy and confirm correction.
Surgical Management: The Cotton Osteotomy
Alright, fellows, let's begin. We're under tourniquet control now.
1. Incision and Initial Dissection
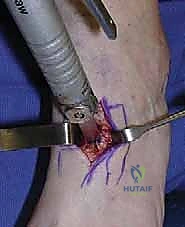
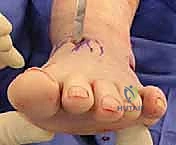
"Scalpel, please. We'll make a dorsal longitudinal skin incision approximately 5 to 6 cm in length, centered over the medial cuneiform and extending slightly distally towards the base of the first metatarsal. This provides excellent exposure while minimizing soft tissue stripping."
"Now, through the skin and subcutaneous tissue. Use your Metzenbaum scissors for careful, sharp dissection. Identify any crossing cutaneous branches of the superficial peroneal nerve. Dr. Smith, please use these fine nerve hooks to gently free up and retract these branches medially and laterally. We want to protect them meticulously to avoid any postoperative neuromas or sensory deficits."
2. Exposing the Medial Cuneiform
"Next, we'll develop our interval. The extensor hallucis longus tendon is medial, and the extensor hallucis brevis tendon is lateral. Use your Army-Navy retractors to gently separate these tendons, exposing the dorsal portion of the medial cuneiform. We need to clearly identify the first tarsometatarsal joint distally and the joint between the medial and middle cuneiforms laterally. It is important to note, we are not opening the joint capsule of the first tarsometatarsal joint. Our focus is purely on the cuneiform."
3. Planning the Osteotomy
"C-arm ready, please. We'll use fluoroscopic guidance to precisely identify the midportion of the medial cuneiform. This is crucial. I'm drawing a saw cut line on the bone now. Usually, this line is at or just proximal to the plane of the second tarsometatarsal joint. This position ensures optimal leverage for plantarflexion and avoids compromising the naviculocuneiform or first TMT joints."
4. Performing the Osteotomy
"Microsagittal saw, please. Now, carefully make a transverse osteotomy in a dorsal-to-plantar direction through the midportion of the medial cuneiform. The key here, fellows, is to cut down to, but not through, the plantar cortex. We want to preserve that plantar cortex and its associated periosteum. This acts as our hinge, providing stability and facilitating controlled opening."
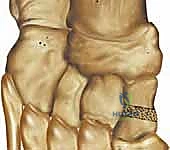
TECH FIG 2 • The osteotomy is made dorsal to plantar across the midportion of the first cuneiform. A narrow elevator or retractor is placed into the 1, 2 intercuneiform joint to prevent inadvertent osteotomy of the second cuneiform.
"Once the dorsal three-quarters or so are cut, switch to a thin osteotome. Gently advance it to complete the osteotomy, ensuring the plantar periosteum remains intact. This hinge is vital for maintaining the integrity of the medial column and preventing dorsal displacement of the distal fragment."
Surgical Warning:
- Do not violate the plantar cortex. Cutting through the plantar cortex will destabilize the osteotomy, making controlled opening and graft impaction much more challenging, and increasing the risk of dorsal displacement or malunion.
- Protect adjacent joints. Ensure your osteotomy blade does not inadvertently enter the first tarsometatarsal joint distally or the naviculocuneiform joint proximally, or the articulation with the middle cuneiform laterally. A narrow elevator or retractor placed into the 1, 2 intercuneiform joint can help prevent inadvertent osteotomy of the second cuneiform.
5. Opening the Osteotomy and Measuring the Gap
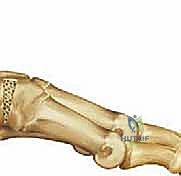
"Now, Dr. Patel, gently pull the osteotome distally. This will lever open the medial cuneiform osteotomy and plantarflex the first ray. We're looking for the first metatarsal head to drop down to the level of the other metatarsal heads, especially the fifth, restoring Cotton's 'tripod' configuration. An assistant can apply plantar-directed pressure on the first metatarsal to aid in this opening."
TECH FIG 3 • An assistant levers the osteotomy open to depress the first metatarsal head while the surgeon determines when the forefoot varus deformity has been adequately corrected.
"Using a ruler, measure the amount of opening of the cuneiform osteotomy needed. On average, we find a 4 to 6 mm wedge of bone graft is sufficient to plantar-displace the first metatarsal to the desired level."
6. Preparing and Inserting the Bone Graft
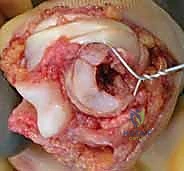
"We have our pre-sized allograft wedge ready. I'll use the microsagittal saw to fine-tune its shape, ensuring the dorsal cortex of the iliac crest wedge matches the width of our measured dorsal opening gap. The cancellous bone surfaces of the graft must be oriented to be adjacent to the exposed cancellous surfaces of the osteotomized cuneiform for optimal integration."
"Now, Dr. Smith, maintain that plantar-directed pressure on the first metatarsal. I'll use a narrow osteotome to lever the cuneiform osteotomy open maximally. Bone tamp, please. I'm impacting the bone graft wedge from dorsal to plantar into the medial cuneiform osteotomy. Feel that solid impaction? That's critical for primary stability."
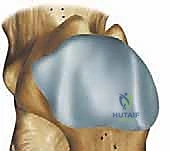
TECH FIG 4 • The interposition bone graft wedge is placed into the dorsal opening in the first cuneiform to depress the first metatarsal and correct the forefoot varus deformity.
TECH FIG 4 • The interposition bone graft wedge is placed into the dorsal opening in the first cuneiform to depress the first metatarsal and correct the forefoot varus deformity.
"Once the main wedge is securely seated, I'm placing small amounts of morselized cancellous bone graft, either from the allograft piece or from adjacent autograft if available, medially and laterally around the bone wedge. This fills any remaining gaps and promotes robust healing."
7. Fixation
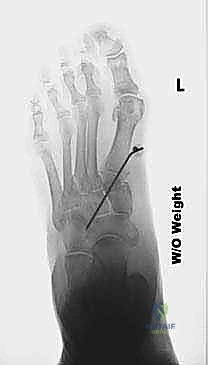
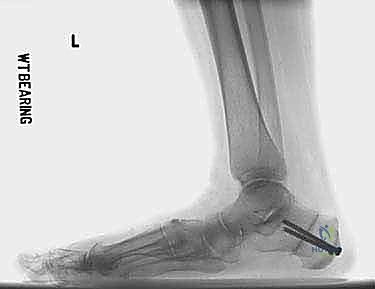
"The osteotomy, with the impacted bone wedge and intact plantar hinge, is inherently stable due to surrounding ligamentous support and compression. However, to prevent any dorsal displacement of the bone block until early healing occurs, we'll use percutaneous fixation."
"K-wire driver, please. I'm inserting a percutaneous pin, typically a 0.062-inch K-wire, across the osteotomy site, engaging both the proximal and distal fragments and the bone graft. Fluoroscopy confirms optimal placement. This pin acts as a temporary buttress."
"I'll bend the protruding portion of the pin to 90 degrees at the skin level to prevent migration and apply a pin cap. This will be removed in the clinic later."
"Sometimes, depending on the overall construct and other procedures, we might consider a small dorsal screw for additional compression, but as a rule, dorsal screw fixation is often unnecessary and can lead to prominence, frequently requiring hardware removal down the line."

8. Contouring and Closure
"Now for final contouring. Microsagittal saw or power rasp, please. I'm smoothing down any portions of the graft that extend beyond the surface of the cuneiform, either medially or dorsally, and reducing any prominence of the cuneiform that may have been created by the distraction osteotomy. This prevents soft tissue irritation and improves cosmesis."
"Irrigate the wound thoroughly, fellows. We'll close the wound in layers: deep fascia, subcutaneous tissue, and finally the skin with a running subcuticular suture for a clean closure."
💡 Pearls and Pitfalls
Fixation Problems
- Dorsal screw prominence: While tempting for rigid fixation, dorsal screws often become prominent, causing pain and requiring secondary removal. Percutaneous K-wire fixation, combined with the inherent stability of the impacted graft and intact plantar hinge, is usually sufficient.
- Pin migration/infection: Meticulous pin site care postoperatively is crucial. Early signs of infection warrant immediate attention. If a pin migrates, it must be removed.
Contouring Bone
- Irregular graft edges: After impaction, the graft may protrude. It's essential to smooth these edges with a microsagittal saw or power rasp to prevent soft tissue irritation, especially given the superficial location of the medial cuneiform.
Osteotomy Execution
- Inadvertent complete cut: If the plantar cortex is breached, the hinge is lost, and the osteotomy becomes unstable. This may necessitate additional fixation, such as a small plate or crossing screws, to maintain stability and prevent dorsal displacement.
- Incorrect osteotomy level: Using fluoroscopy and careful anatomical landmarks (e.g., plane of the second TMT joint) is critical to ensure the osteotomy is in the mid-cuneiform, maximizing leverage and avoiding joint violation.
- Neurovascular injury: Always identify and protect the superficial peroneal nerve branches. Blunt dissection and careful retraction minimize risk.
Graft Sizing and Impaction
- Too small/large graft: An undersized graft will lead to undercorrection or instability. An oversized graft can cause overcorrection or difficulty with impaction, potentially fracturing the cuneiform. Preoperative templating and intraoperative measurement are key.
- Inadequate impaction: The graft must be firmly impacted to achieve primary stability. A loose graft is prone to displacement or nonunion.
Postoperative Care and Complication Management
"Alright, fellows, the immediate postoperative phase is just as critical as the surgery itself."
Immediate Postoperative Care
- Dressing: The pin site is dressed, and we apply a compressive, bulky Robert Jones type of dressing. This includes medial, lateral, and posterior plaster slab splints, all covered with an elastic wrap. This provides excellent immobilization and reduces swelling.
REFERENCES
-
Johnson JE, Cohen BE, DiGiovanni BF, et al. Subtalar arthrodesis with flexor digitorum longus transfer and spring ligament repair for treatment of posterior tibial tendon insufficiency. Foot Ankle Int 2000;21:722–729.
-
Johnson JE. Plantarflexion opening wedge cuneiform osteotomy for correction of fixed forefoot varus. Tech Foot Ankle Surg 2004; 3:2–8.
-
Myerson MS, Corrigan J, Thompson FM, et al. Tendon transfer with calcaneal osteotomy for treatment of posterior tibial tendon insufficiency: a radiological investigation. Foot Ankle Int 1995; 16:712–718.
-
Alvarez RG, Marini A, Schmitt C, et al. Stage 1 and II posterior tibial tendon dysfunction treated by a structured nonoperative management protocol: an orthosis and exercise program. Foot Ankle Int 2006:27:2–8.
-
Augustin JF, Sheldon SL, Berberian WS, et al. Nonoperative treatment of adult acquired flatfoot with the Arizona brace. Foot Ankle Clin North Am 2003;8:491–502.
-
Cotton FJ. Foot statics and surgery. N Engl J Med 1936;214:24–27.
-
Hirose CG, Johnson JE. Plantarflexion opening wedge medial cuneiform osteotomy for correction of fixed forefoot varus associated with flatfoot deformity. Foot Ankle Int 2004;25:568–574.
You Might Also Like