Percutaneous Midfoot Osteotomy with External Fixation: An Intraoperative Masterclass
Key Takeaway
Join us in the OR for a detailed masterclass on percutaneous midfoot osteotomy using the Gigli saw and external fixation. We'll cover intricate anatomy, meticulous surgical steps from initial incision to hardware application, critical pearls, and comprehensive postoperative management to correct complex midfoot deformities effectively and safely, preserving joint function and minimizing soft tissue insult.
Welcome, fellows, to the operating theater. Today, we're tackling a challenging yet incredibly rewarding procedure: the Percutaneous Midfoot Osteotomy with External Fixation. This technique, utilizing the venerable Gigli saw, offers a minimally invasive solution for complex uniplanar and multiplanar midfoot deformities, a significant improvement over traditional open methods. Our goal is to restore pedal alignment, optimize weight-bearing kinematics, alleviate pain, and re-establish functional gait while meticulously preserving adjacent joint motion and vital soft tissues.
Comprehensive Surgical Anatomy of the Midfoot
Before we make any incision, a thorough understanding of the midfoot anatomy is paramount. The midfoot is the critical bridge connecting the hindfoot and forefoot, extending from the midtarsal joint (Chopart's joint) distally to the Lisfranc joint proximally. It comprises the navicular, cuboid, and three cuneiform bones (medial, intermediate, lateral). Normal gait relies on the complex, synergistic actions of these joints.
Osteology and Articulations
- Navicular: Articulates with the talar head proximally, and the three cuneiforms distally.
- Cuboid: Articulates with the calcaneus proximally, and the fourth and fifth metatarsals distally. It also has a medial articulation with the lateral cuneiform and navicular.
- Cuneiforms (Medial, Intermediate, Lateral): Articulate with the navicular proximally and the first, second, and third metatarsals distally, respectively.
The specific osteotomy level we choose—be it the talocalcaneal neck, cuboid-navicular, or cuboid-cuneiform—depends entirely on the deformity's apex and the mobility of the subtalar joint. For stiff or fused subtalar joints, a talocalcaneal neck osteotomy may be indicated. However, with a mobile subtalar joint, our focus shifts to the cuboid-navicular or cuboid-cuneiform levels to preserve hindfoot motion.
Muscular Intervals and Tendon Protection
The percutaneous nature of this procedure demands an intimate knowledge of the surrounding tendons to ensure safe passage of our instruments and the Gigli saw.
- Dorsal Aspect:
- Tibialis Anterior Tendon: Runs medially. We must ensure our dorsal dissection passes below this tendon to protect it.
- Extensor Digitorum Longus and Extensor Hallucis Longus Tendons: These run centrally and laterally on the dorsum. Our lateral dorsal dissection will pass below these.
- Lateral Aspect:
- Peroneus Longus and Brevis Tendons: These run along the lateral aspect of the cuboid. Extreme caution is needed to avoid injury, especially when the Gigli saw exits the bone laterally.
- Plantar Aspect:
- Intrinsic Foot Muscles: These form the bulk of the plantar vault.
- Flexor Digitorum Longus and Flexor Hallucis Longus Tendons: These run deep on the plantar aspect.
- Abductor Hallucis Muscle: Located along the medial plantar border. Its osseous attachments may require release during derotation corrections.
Neurovascular Risks
Protecting the neurovascular bundles is paramount during any foot surgery, especially with percutaneous techniques where direct visualization is limited.
- Dorsal Neurovascular Structures:
- Dorsalis Pedis Artery: A continuation of the anterior tibial artery, running along the dorsum of the foot, typically between the extensor hallucis longus and extensor digitorum longus tendons. Deep to our dorsal percutaneous dissection plane.
- Deep Peroneal Nerve: Accompanies the dorsalis pedis artery.
- Superficial Peroneal Nerve: Divides into intermediate and medial dorsal cutaneous nerves, supplying sensation to the dorsum of the foot. These branches are superficial and highly susceptible to injury during skin incisions and superficial dissection.
- Plantar Neurovascular Structures:
- Medial and Lateral Plantar Arteries and Nerves: Branches of the posterior tibial artery and nerve, running deep within the plantar vault. Our subperiosteal dissection across the plantar aspect is designed specifically to protect these vital structures by staying directly on bone.
Any transgression of the subperiosteal plane risks direct injury to these critical structures.
Preoperative Planning and Patient Positioning
Thorough preoperative planning is the cornerstone of a successful outcome.
Clinical and Radiographic Assessment
- Clinical Examination: This is critical. We assess the patient's gait, joint range of motion, flexibility of the deformity (stiff vs. flexible), and the degree of rotational deformity (supination and pronation). Understanding the flexibility dictates our intraoperative correction strategy.
- Radiographic Planning:
- We obtain weight-bearing anteroposterior (AP), lateral, and oblique views of the foot.
- Center of Rotation Angulation (CORA): This is precisely determined from the radiographs. The CORA dictates the ideal level for our osteotomy. We want to place our osteotomy at or very near the CORA to achieve pure translation or angulation without creating secondary deformities.
- Templating: We use radiographic templates to conceptualize the correction, estimate the degree of angulation or translation required, and plan the external fixator construct.
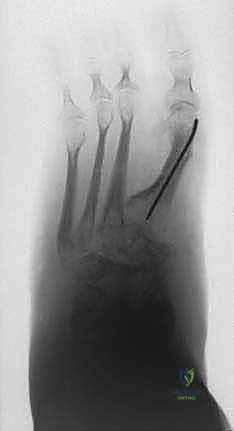
- Example: For a midfoot adduction deformity, as seen in the patient in FIG 1, we meticulously measure the angle and plan our osteotomy to achieve a straight lateral border of the foot.
Patient Positioning and Setup
- Operating Table: The patient is placed in a supine position on a radiolucent table. This allows unrestricted fluoroscopic imaging throughout the procedure.
- Hemisacral Bump: A small bump is placed under the ipsilateral hip. This subtly internally rotates the hip, bringing the foot into a more neutral, forward-facing position, which greatly facilitates obtaining true AP fluoroscopic images of the foot.
- Tourniquet: A non-sterile thigh tourniquet is applied. While we will inflate it during the osteotomy phase to ensure a bloodless field, keeping it non-sterile allows us to flex the knee to 90 degrees intraoperatively. This knee flexion is advantageous for optimizing AP fluoroscopic views of the foot, especially when targeting the hindfoot or midfoot.
- Fluoroscopy Setup: The C-arm is positioned for optimal AP and lateral views of the foot. It will be draped sterilely. We'll ensure the C-arm can move freely without obstruction.
- Prep and Drape: Standard sterile preparation and draping of the entire lower extremity, from the tourniquet down to the toes. We ensure adequate exposure for both the osteotomy site and the planned external fixator application.
Step-by-Step Intraoperative Execution: The Operating Surgeon's Viewpoint
Alright, fellows, let's get scrubbed in. We've planned this meticulously. The goal here is precision and protection.
Identifying the Osteotomy Level
- Fluoroscopic Guidance: First, let's bring in the C-arm. We'll obtain clear AP and lateral fluoroscopic views of the midfoot.
- Wire Placement: I'm going to take a 1.8-mm Ilizarov wire. Under direct fluoroscopic guidance, I'll place this wire directly on the skin, aligning it precisely with our preoperatively determined osteotomy level. This is our reference line.
- Marking: Using a sterile marking pen, we'll mark the exact level of the osteotomy on both the AP and lateral aspects of the foot, corresponding to the wire's position. This ensures our incisions and saw passage are perfectly aligned.
The Percutaneous Gigli Saw Technique
This technique requires four precise transverse percutaneous incisions and meticulous subperiosteal dissection to protect all vital structures.
TECH FIG 1 • Percutaneous Gigli saw osteotomy of the midfoot. A. There are three levels in the midfoot at which a Gigli saw is passed percutaneously: the talocalcaneal neck, the cuboid-navicular bones, and the cuboid-cuneiform bones. The illustration shows a cuboid-cuneiform level osteotomy. Four small incisions are used to pass the saw: one medial plantar, one lateral plantar, and two dorsal incisions.
-
Incision 1: Plantar Lateral Border
- Action: I'll make the first transverse incision, approximately 1 cm in length, at the plantar lateral border of the foot, directly over our marked osteotomy line.
- Dissection: Now, take a sturdy periosteal elevator. I'll introduce it through this incision and perform a meticulous subperiosteal dissection. We need to hug the bone tightly, creating a subperiosteal tunnel across the entire plantar vault of the foot.
- Rationale: This subperiosteal plane is critical. It protects the delicate plantar neurovascular bundles and tendons by keeping them superficial to our dissection. Rock the elevator gently against the bone to ensure complete separation of the periosteum and soft tissues from the bone surface along the planned cut.
- Advance: I'll maneuver the elevator across the entire plantar arch until I feel it tent the skin on the plantar medial aspect of the foot.
-
Incision 2: Plantar Medial
- Action: Where the skin is tented by the periosteal elevator on the plantar medial side, I'll make our second transverse incision, again about 1 cm.
- Remove Elevator: Once this incision is made, I'll remove the periosteal elevator. We now have a clear subperiosteal tunnel across the plantar aspect of the midfoot.
-
Incision 3: Dorsal Medial (Lateral to Tibialis Anterior Tendon)
- Action: Reintroducing the periosteal elevator through Incision 2 (medial plantar), I'll now direct it dorsally and laterally, still maintaining a subperiosteal plane. The key here is to pass below the tibialis anterior tendon.
- Advance: I'll continue advancing the elevator until it tents the skin just lateral to the tibialis anterior tendon on the dorsal aspect of the foot. This is where our third transverse incision will be made.
- Rationale: Passing below the tibialis anterior protects this crucial tendon and also helps create a plane that avoids the dorsalis pedis artery and deep peroneal nerve, which are typically deeper.
-
Incision 4: Dorsal Lateral (Dorsal to Cuboid)
- Action: From Incision 3, I'll extend the periosteal elevator further laterally, still subperiosteally, across the dorsum of the foot. This pass needs to be below the extensor tendons (EDL, EHL).
- Advance: I'll advance it until it exits at the level just dorsal to the cuboid and aligns with our first incision (plantar lateral). This is where the fourth transverse incision will be made, tenting the lateral skin.
- Rationale: This completes our circumferential subperiosteal tunnels, creating a safe passage for the Gigli saw around the midfoot bones.
Passing the Gigli Saw
Now for the delicate part – threading the Gigli saw.
-
First Suture Pass (Plantar):
- Action: I'll take a No. 2 Ethibond suture. Using a curved tonsil hemostat, I'll grasp the suture and pass it through our previously created plantar subperiosteal tunnel, from Incision 1 (lateral plantar) to Incision 2 (medial plantar).
- Retrieve: My assistant will retrieve the suture end from Incision 2.
-
Second Suture Pass (Dorsal Medial):
- Action: Now, from Incision 3 (dorsal medial, lateral to tibialis anterior), I'll pass the curved tonsil subperiosteally to Incision 2 (medial plantar).
- Clasp & Pull: We'll clasp the free end of the Ethibond suture from Incision 2 and pull it through Incision 3.
- Attach Gigli Saw: Here's the critical step. We'll now tie one end of the Gigli saw securely to the Ethibond suture.
- Pull Gigli Saw: Carefully, with gentle tension, we'll pull the Ethibond suture back through Incision 2 towards Incision 3. This will draw the Gigli saw from medial to lateral, subperiosteally, across the dorsum of the foot, exiting through Incision 3.
-
Third Suture Pass (Dorsal Lateral):
- Action: With the Gigli saw now partially through Incision 3, I'll take the curved tonsil again. This time, I'll pass it from Incision 4 (dorsal lateral) to Incision 3 (dorsal medial).
- Grasp & Pull: I'll grasp the free end of the Gigli saw (the end not yet tied to the suture) and pull it through Incision 4.
-
Final Saw Positioning:
- Confirmation: The Gigli saw is now circumferentially positioned around the bones of the midfoot, passing through all four incisions.
- Fluoroscopic Check: Before we proceed, let's get a fluoroscopic image. We must ensure the Gigli saw is perfectly aligned with our marked osteotomy level and that it hasn't migrated. This is a crucial check to prevent an oblique or misdirected cut.
Surgical Warning: Maintaining the correct level of the planned osteotomy during Gigli saw passage is paramount. Any deviation can lead to an incorrect cut, potentially compromising adjacent joints or neurovascular structures. Always re-check with fluoroscopy.
Performing the Osteotomy
- Attach Handles: We'll now attach the two Gigli saw handles to each end of the saw, ensuring a secure grip.
-
Initial Cut: Using a smooth, reciprocating motion, we'll begin cutting the midfoot bones from medial to lateral.
- Technique: Keep the saw taut. The motion should be controlled and steady.
- Protection: As we cut, the Gigli saw handles may need to be crossed to maintain the correct angle and prevent the saw from impinging on the lateral soft tissues. Pay close attention to the tension and direction.
-
Lateral Soft Tissue Protection:
- Action: As the saw approaches the lateral side of the foot, just before it completely exits the bone laterally, I'll take a periosteal elevator. I'll place it between Incision 4 (dorsal lateral) and Incision 1 (plantar lateral), crossing over the Gigli saw.
- Rationale: This elevator acts as a shield. It will block further progression of the saw, preventing it from cutting through the peroneal tendons and the lateral skin, which are directly in the path of the exiting saw. This is a critical step to avoid iatrogenic injury. We want to complete the osteotomy of the bone, but protect the surrounding soft tissues.
- Completion: Continue the reciprocating motion until the elevator blocks further progression, indicating the osseous cut is complete.
-
Post-Cut Check:
- Fluoroscopy: Let's get another fluoroscopic image. We need to confirm that the osteotomy is complete and extends fully across the midfoot bones at the planned level.
- Saw Removal: Once confirmed, I'll cut the Gigli saw and carefully withdraw it from the foot.
Closure
- Tourniquet Deflation: We'll deflate the tourniquet now. Observe for hemostasis.
- Incision Closure: The four small percutaneous incisions are typically closed with a single dissolvable suture or Steri-Strips, as they are very small and usually heal well.
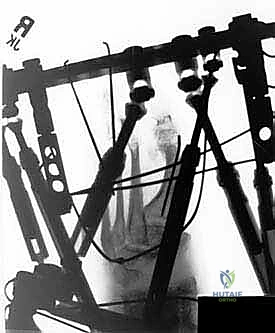
External Fixation Application
With the osteotomy complete, the next crucial step is applying the external fixator. This allows for precise, gradual correction of the deformity and, if needed, lengthening. We typically use either an Ilizarov external fixator or a Taylor Spatial Frame (TSF).
- Fixation Blocks: We'll start by building the frame according to our preoperative plan. This involves fixing the tibia, talus, calcaneus, and proximal midfoot with the proximal fixation block. The distal fixation block will secure the distal midfoot and forefoot.
- Stirrup Wires: This is a vital component for controlling the osteotomy site.
- Placement: We'll insert two stirrup wires, one just proximal and one just distal to the midfoot osteotomy. These are placed under fluoroscopic guidance, ensuring they are perfectly perpendicular to the bone and do not impinge on neurovascular structures.
- Olive Wires: We specifically use olive stirrup wires. The olive acts as a stopper, limiting osseous transverse plane deviation during gradual correction.
- Rationale: Remember, forces tend to take the path of least resistance. In the foot, this often means joints and growth plates. By placing these two stirrup wires adjacent to each side of the osteotomy, we effectively "capture" the osteotomy segments, directing the corrective forces precisely to the cut bone and preventing unwanted motion or subluxation at adjacent joints.
- Tensioning: Unlike other Ilizarov wires, these stirrup wires do not need to be tensioned. Their purpose is positional guidance, not compression or distraction.
- Frame Assembly: Finally, the stirrup wires are securely attached to the external frame distally and proximally, completing the construct.
Acute Correction Considerations
While gradual correction is the hallmark of external fixation, certain situations may warrant acute adjustments.
- Midfoot Derotation: If we're performing a significant midfoot derotation (supination or pronation) correction, we often need to release the tight soft tissues. This typically involves releasing the medial muscle and fascia, specifically the abductor hallucis muscle, from its osseous midfoot attachments. This can be done per
Additional Intraoperative Imaging & Surgical Steps

REFERENCES
-
Brunori A, Bruni P, Greco R, et al. Celebrating the centennial (1894–1994): Leonard Gigli and his wire saw. J Neurosurg 1995;82: 1086–1090.
-
Conti SF, Kirchner JS, Van Sickle D. Midfoot osteotomies. Foot Ankle Clin 2001;6.
-
Dehne R. Osteotomy of the pediatric foot. Foot Ankle Clin 2001;6.
-
Paley D. Principles of Deformity Correction. New York: Springer, 2005.
- Paley D. The correction of complex foot deformity using Ilizarov’s distraction osteotomies. Clin Orthop Relat Res 1993;293:97–111.
-
Perry J. Gait analysis: Normal and Pathological Function. Thorofare, NJ: Slack, 1992.
-
Statler TK, Tullis BL. Pes cavus. J Am Podiatr Med Assoc 2005;95: 42–52.
-
Wilcox PG, Weiner DS. Akron mid tarsal dome osteotomy in the treatment of rigid pes cavus: a preliminary review. J Pediatr Orthop 1985;5: 333–338.