Revision Total Knee Arthroplasty with Extensile Exposure: V-Y Quadricepsplasty Masterclass
Key Takeaway
This masterclass provides a granular, intraoperative guide to V-Y quadricepsplasty for revision total knee arthroplasty. We'll meticulously cover preoperative planning, patient positioning, and a graduated approach to extensile exposure, from initial incision to advanced quadriceps turndown. Critical surgical anatomy, instrument use, and real-time decision-making are emphasized, alongside comprehensive pearls, pitfalls, and postoperative management strategies to optimize patient outcomes.
Welcome, fellows, to the operating theater. Today, we're tackling a challenging case: a revision total knee arthroplasty (TKA) requiring extensile exposure, specifically employing the V-Y quadricepsplasty technique. Gaining adequate exposure in revision TKA, or even in primary TKA for an ankylosed knee, can be exceptionally demanding. While over 90% of revision TKAs can be managed through a standard approach, it is absolutely critical for every orthopaedic surgeon to be proficient in these extensile techniques to avoid catastrophic extensor mechanism disruption and ensure optimal component placement and postoperative function.
Preoperative Planning: Laying the Groundwork for Success
Before we even make an incision, meticulous preoperative planning is paramount.
- Patient Assessment: We've thoroughly reviewed this patient's history, focusing on previous surgeries, infection markers, and functional limitations. This patient presents with significant quadriceps contracture and a history of challenging exposure in their prior surgery, indicating a high likelihood of requiring an extensile approach today.
- Imaging Review:
- Plain Radiographs: We've studied the standing AP, lateral, and Merchant views to assess component loosening, bone loss, alignment, and patellar height. For this case, patella baja is a concern, which might influence our choice of extensile technique.
- CT Scans: If available, a CT scan provides invaluable information regarding bone stock, potential osteolysis, and the exact position of retained cement or hardware, guiding our extraction strategy.
- Templating: We've templated our revision components, considering potential stem lengths and diameters, and anticipated bone defects. This helps us visualize the procedure and prepare for various contingencies.
- Previous Incisions: We've carefully marked all previous skin incisions. Our goal is to utilize the most lateral usable incision to preserve the medial vascular supply to the skin, which is crucial for wound healing. If we must intersect a previous incision, we will do so at an angle of no less than 60 degrees to optimize flap viability.
- Patient Counseling: It's essential that the patient understands the complexity of this procedure, the potential for altered rehabilitation, and the specific risks associated with extensile exposures, such as extensor lag or wound healing issues.
Patient Positioning and Operating Room Setup
Let's get our patient positioned correctly.
- Supine Position: The patient is supine on the operating table.
- Leg Holder/Positioner: We're using a standard knee positioner to allow for controlled flexion and extension throughout the case. This is crucial for assessing soft tissue tension and component tracking.
- Tourniquet: A pneumatic tourniquet is applied high on the thigh. While we'll aim for a bloodless field, remember that prolonged tourniquet time can be a concern, especially in complex revisions.
- Fluoroscopy: Although not always required for the V-Y itself, for revision TKA, having a C-arm readily available and draped sterile is good practice, especially if we encounter difficult stem or cement extraction.
- Sterile Prep and Drape: The entire leg, from the iliac crest to the foot, is prepped and draped in a sterile fashion, allowing for full range of motion and access.
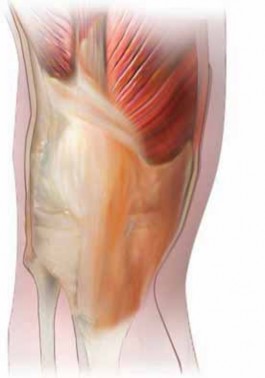
Comprehensive Surgical Anatomy: A Refresher
Before we make our incision, let's quickly review the critical anatomy we'll encounter:
- Extensor Mechanism: This includes the quadriceps femoris muscle (vastus medialis, intermedius, lateralis, and rectus femoris), the quadriceps tendon, the patella, and the patellar ligament (tendon). Understanding its intricate fibers and insertions is key.
- Neurovascular Structures:
- Superior Lateral Geniculate Artery: This is critical to preserve. It courses laterally, superior to the patella, and contributes significantly to the patellar blood supply. Injury to this vessel can lead to patellar osteonecrosis, a devastating complication. We will identify and protect it meticulously.
- Inferior Medial and Lateral Geniculate Arteries: Also important, but the superior lateral is particularly vulnerable during lateral releases and quadriceps turndown.
- Retinaculum: The medial and lateral retinacula stabilize the patella. Releasing these can aid in exposure.
- Collateral Ligaments: The superficial medial collateral ligament (MCL) and lateral collateral ligament (LCL) are important for stability. We may need to release the superficial MCL distally to gain exposure, but always be mindful of its role.
- Tibial Tubercle: The insertion point of the patellar ligament. This is the osteotomy site for a tibial tubercle osteotomy, another extensile technique.
- Semimembranosus Insertion: Located on the posteromedial aspect of the tibia, its release can provide additional posterior soft tissue release.
Step-by-Step Intraoperative Execution: The Extensile Approach
Alright, fellows, let's begin. Scalpel, please.
1. Initial Incision and Flap Development
"We'll start with our skin incision. As planned, we are utilizing the most lateral usable prior incision to optimize skin flap viability."
- Skin Incision: Make a precise, full-thickness skin incision along the predetermined line.
- Subcutaneous Dissection: "Now, let's develop thick, full-thickness skin and subcutaneous flaps. It's crucial to include the superficial fascia with our flaps to ensure adequate vascularity and prevent skin edge necrosis. Use your electrocautery judiciously to control bleeding, staying superficial to the deep fascia."
- Peripatellar Scar Tissue Excision: "Observe the extensive peripatellar scar tissue. This dense, avascular tissue must be meticulously excised. Use the cautery to carefully remove all peripatellar scar tissue, freeing up the patella and preparing for our arthrotomy."
2. Standard Medial Parapatellar Arthrotomy and Initial Release
"Now that we have our flaps developed, we'll proceed with a standard medial parapatellar arthrotomy, which is our first step in a graduated approach to exposure."
- Medial Parapatellar Arthrotomy: "Identify the quadriceps tendon. We'll make our arthrotomy at the junction of the medial and central thirds of the quadriceps tendon, extending distally along the medial border of the patella and patellar ligament. Use your scalpel to incise the capsule and synovium. Be precise, fellows, ensuring a clean incision."
- Adhesion Release and Synovectomy: "Once the joint is entered, we'll encounter significant adhesions. Use a combination of blunt and sharp dissection to meticulously reestablish the suprapatellar pouch, and the medial and lateral gutters. Release all adhesions, taking care not to damage underlying structures. Perform a thorough synovectomy, removing all inflamed and hypertrophic synovial tissue. This improves visibility and helps prevent future adhesions."
3. Graduated Soft Tissue Release for Exposure
"Now, let's attempt to gain adequate exposure. We'll gently flex the knee and try to evert the patella. If the extensor mechanism is still under too much tension, we'll proceed with further releases."
- Knee Flexion and Tibial Subluxation: "Gently flex the knee. Now, internally rotate the tibia slightly and sublux it anteriorly. This maneuver helps reduce tension on the extensor mechanism, allowing for better visualization of the joint. Observe how the patella begins to track."
- Distal Dissection and Superficial MCL Release: "If we still don't have enough exposure, we'll carry our dissection distally along the tibia. Identify the superficial medial collateral ligament. We'll perform a careful subperiosteal release of the superficial MCL from its tibial insertion. This provides additional medial release and allows for greater external rotation and anterior subluxation of the tibia."
- Lateral Retinacular Release: "Next, we'll perform a lateral retinacular release. This is crucial for patellar mobility and can significantly improve exposure. Use your electrocautery or scalpel to incise the lateral retinaculum.
> Surgical Warning: As you perform the lateral retinacular release, meticulously preserve the superior lateral geniculate artery. This artery is vital for the blood supply to the patella. Injury here can lead to devastating patellar osteonecrosis. Identify it, visualize it, and stay away from it. - Subperiosteal Dissection of Tibia: "To maximize exposure, extend your subperiosteal dissection of the tibia from the tibial tubercle posteriorly to the posteromedial corner, including the release of the semimembranosus insertion. Use a curved Cobb elevator, keeping it tightly against the bone to protect the neurovascular structures posteriorly."
"In most revision TKAs, these maneuvers provide adequate exposure. However, in this case, given the severe quadriceps contracture and ankylosis, we anticipate needing more extensile options."
4. Escalation to Extensile Techniques (If Standard Fails)
"Despite our best efforts with the standard approach and releases, the exposure remains inadequate. We cannot safely implant our components without excessive tension on the extensor mechanism. Therefore, we must escalate to a more extensile technique."
- Quadriceps Snip (Brief Mention): "The next step in a graduated approach, if the above releases are insufficient, would typically be a quadriceps snip (as described in Chapter AR-27). This involves a short, oblique incision into the quadriceps tendon proximally. However, for this patient's degree of contracture, we're moving directly to a more robust solution."
- Tibial Tubercle Osteotomy (Brief Mention): "Another powerful extensile option is a tibial tubercle osteotomy (see Chapter AR-26). This is often chosen in cases with difficult stem or cement extraction, or in patients with patella baja, as it allows for distalization of the patella. While it offers excellent exposure, it has its own set of complications, including nonunion and fracture."
5. Quadriceps Turndown: The Foundation for V-Y Quadricepsplasty
"For this patient, given the severe quadriceps contracture limiting flexion, we are proceeding with a quadriceps turndown, which will be converted to a V-Y quadricepsplasty. This technique provides excellent exposure and allows for subsequent lengthening of the extensor mechanism."
- Exposing the Quadriceps Tendon: "First, we need to expose the quadriceps tendon proximally. Extend your dissection to visualize the insertions of the vastus lateralis and vastus medialis muscles onto the quadriceps tendon. Ensure you have clear anatomical landmarks."
- Extending the Medial Parapatellar Arthrotomy: "Now, extend the medial parapatellar arthrotomy proximally, connecting it to the vastus medialis insertion. This creates a continuous medial incision."
-
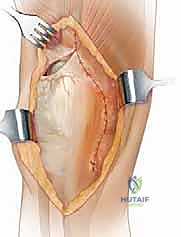
Quadriceps Incision for Turndown: "This is a critical step, fellows. We will now make our incision to create the distally based flap. The incision begins distally and laterally, at an angle of approximately 45 degrees, along the insertion of the vastus lateralis. This inverted V shape will create our distally based flap, incorporating the patella. Essentially, we are connecting our medial incision to the lateral release we performed earlier."
*TECH FIG 1 • Line of incision. (Based on drawing by Dr. Greg Hendricks, Assistant Professor, Department of Orthopaedics, Joan C. Edwards School of Medicine, Marshall University, Huntington, WV.)*

> **Surgical Warning:** Again, during this incision, be acutely aware of the superior lateral geniculate artery. Maintain a safe distance and protect it. Its preservation is paramount to patellar viability.
- Turning Down the Patella: "With this incision complete, the patella, along with the distally based quadriceps flap, can now be 'turned down' anterolaterally. Observe the excellent exposure this provides to the entire joint. We can now safely proceed with our revision arthroplasty, addressing component removal, bone preparation, and implant insertion."
(Proceed with the core revision TKA steps: component removal, cement extraction, bone preparation, trial reduction, and definitive component implantation.)
6. V-Y Quadricepsplasty: Repair and Lengthening
"Now that our revision components are securely in place, we need to address the quadriceps mechanism. Our goal is to achieve adequate range of motion while ensuring a stable repair."
-
Initial Repair and ROM Assessment: "First, we'll perform an initial repair of the quadriceps in situ. Use multiple interrupted no. 2 nonabsorbable sutures to reapproximate the V-shaped incision. Once a preliminary repair is achieved, gently assess the range of motion (ROM). If the passive ROM is acceptable, meaning we can achieve sufficient flexion without undue tension on the repair, we can proceed with closure, leaving the lateral retinacular release open to further decompress the patellofemoral joint."
-
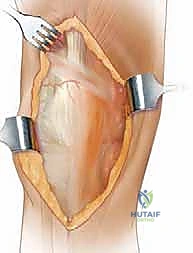
Converting V to Inverted Y for Increased ROM (Lengthening): "However, in many cases requiring a quadriceps turndown, increased passive ROM is desired. This is where the V-Y conversion comes into play. If we need to gain more flexion, we will convert our V-shaped repair into an inverted Y."
- Advancement: "This technique allows for 1% to 2% of advancement, effectively lengthening the quadriceps mechanism. We will flex the knee to the desired degree, which will open up the 'V' into a 'Y' shape."
- Suture Placement: "Place sutures or clamps along the apex of the 'Y' to hold the desired length. This is a crucial step to ensure appropriate lengthening without over-tensioning. We are looking for a balance between improved flexion and maintaining extensor mechanism integrity."
- Medial Limb Closure: "Once the appropriate lengthening is established, use no. 2 nonabsorbable sutures to meticulously close the medial side of the quadriceps mechanism. Ensure strong, secure stitches, as this repair will bear significant load during rehabilitation."
- Lateral Limb Closure: "The lateral retinacular release is intentionally left open. We will cover the lateral limb of the quadricepsplasty by carefully closing the quadriceps mechanism to the superficial fascia of the vastus lateralis. This provides soft tissue coverage and reinforces the repair."
*TECH FIG 2 • V-Y repair. (Based on drawing by Dr. Greg Hendricks, Assistant Professor, Department of Orthopaedics, Joan C. Edwards School of Medicine, Marshall University, Huntington, WV.)*
- Final ROM Check and Documentation: "Before routine skin closure, gently flex the knee to its maximum passive flexion without putting undue tension on the freshly repaired quadriceps mechanism. Record this exact angle. This measurement is critical for guiding our postoperative rehabilitation protocol, ensuring we do not exceed this limit in the early postoperative period."
7. Routine Closure
"With the quadriceps mechanism securely repaired, we'll proceed with routine closure of the subcutaneous tissues and skin layers. Ensure meticulous hemostasis and a tension-free skin closure to minimize wound complications."
💡 Pearls and Pitfalls
Graduated Approach: Always begin with the least invasive extensile technique. Start with a medial parapatellar approach, thorough release of adhesions, lateral retinacular release, and distal MCL release. Only escalate to a quadriceps snip, then tibial tubercle osteotomy or V-Y turndown as absolutely necessary. This minimizes morbidity.
Preserve the Superior Lateral Geniculate Artery: This is non-negotiable. Injury to this vessel can lead to patellar osteonecrosis. Identify it early, protect it diligently, especially during lateral retinacular release and the quadriceps turndown incision. Visualize it, or assume its presence and stay clear.
Do Not Be Aggressive with Postoperative Range of Motion (ROM): Particularly during the first 2 weeks, excessive or forced ROM can jeopardize the quadriceps repair, leading to dehiscence and a catastrophic extensor lag. Adhere strictly to the intraoperatively determined maximum flexion limit.
Wound Healing: Extensile exposures, especially in revision cases with compromised skin, carry a higher risk of wound complications. Ensure thick skin flaps, meticulous hemostasis, and tension-free closure. Consider vacuum-assisted closure (VAC) if wound tension is a concern.
Extensor Lag: While V-Y quadricepsplasty aims to improve flexion, it can inherently contribute to extensor lag if the repair is not robust or if early rehabilitation is too aggressive. Patient compliance and a structured rehab program are crucial.
Postoperative Care: A Modified Rehabilitation Protocol
Postoperative care for a V-Y quadricepsplasty is modified to protect the repair and optimize outcomes.
- Immediate Postoperative Immobilization: The patient is placed in an immobilizer immediately postoperatively. This provides crucial protection for the quadriceps repair during the initial healing phase.
- Hinged Brace Application: After the first dressing change, typically within a few days, a hinged knee brace is fitted.
- Flexion Stop: A flexion stop is used for the first 2 weeks. This is set to the maximum passive flexion angle determined intraoperatively, ensuring no undue tension is placed on the repair. This limit must not be exceeded.
- Rehabilitation Progression (First 6 Weeks):
- Passive Knee Extension: Encourage passive knee extension exercises. Gravity-assisted extension or gentle therapist-assisted extension helps prevent flexion contracture.
- Active Knee Flexion: Active knee flexion is initiated, but only within the prescribed limits and without resistance. The patient should actively engage the quadriceps to achieve flexion, but not push into pain or beyond the flexion stop.
- Weight-Bearing: Partial weight-bearing is required for 6 weeks. This reduces stress on the quadriceps repair and allows for initial soft tissue healing. Progress to full weight-bearing as tolerated after 6 weeks, provided the repair is stable and extensor lag is improving.
- Brace Locking: The brace is locked in extension at night and during ambulation until the extensor lag is less than 15 degrees. This prevents uncontrolled flexion and protects the repair, especially during transfers and ambulation.
- DVT Prophylaxis: Standard deep vein thrombosis (DVT) prophylaxis protocols are initiated and continued as per institutional guidelines. This typically involves mechanical prophylaxis (compression devices) and pharmacological agents (anticoagulants).
Complications and Outcomes
While V-Y quadricepsplasty is a powerful tool, it's not without potential complications.
- Patellar Osteonecrosis: As mentioned, this is a severe complication, observed in some studies (e.g., 8 of 29 patients in one study using quadriceps turndown). It underscores the critical importance of preserving the superior lateral geniculate artery.
- Wound Dehiscence: The extensive exposure increases the risk of wound complications. One case of minor wound dehiscence was reported in a hemophiliac patient during manipulation under anesthesia after TKA using V-Y quadricepsplasty. Careful patient selection, meticulous surgical technique, and appropriate postoperative wound care are essential.
- Extensor Lag: Despite the lengthening, some degree of extensor lag can persist, impacting functional outcomes. This is often a trade-off for achieving improved flexion in severely contracted knees.
- Infection: As with any revision TKA, the risk of periprosthetic joint infection remains a significant concern.
- Hardware Failure: While not directly related to the V-Y, revision TKA inherently carries risks of component loosening or failure, which must be managed appropriately.
Outcomes for patients requiring extensile exposures like V-Y quadricepsplasty often reflect the inherent difficulty of these cases. Studies comparing quadriceps turndown and tibial tubercle osteotomy to routine exposure revision TKAs have shown that while the extensile groups had significantly lower postoperative scores than the routine group, they achieved comparable scores to each other. Interestingly, the turndown group demonstrated a higher increase in arc of motion compared to the osteotomy group, though this came with a higher degree of extensor lag. Patients in the turndown group also reported a lower percentage of dissatisfaction regarding pain relief and return of function, and less difficulty with kneeling and stooping. This suggests that while challenging, V-Y quadricepsplasty can provide meaningful functional improvements for appropriately selected patients.
This concludes our discussion on the V-Y quadricepsplasty. It's a demanding technique, fellows, but one that, when executed meticulously, can salvage a difficult revision TKA and significantly improve a patient's quality of life. Remember the graduated approach, protect the critical anatomy, and adhere strictly to the modified rehabilitation protocol. Any questions?
REFERENCES
-
Aglietti P, Windsor RE, Buzzi R, et al. Arthoplasty for the stiff or ankylosed knee. J Arthroplasty 1989;4:1–5.
-
Barrack RL, Smith P, Munn B, et al. Comparison of surgical approaches in total knee arthroplasty. Clin Orthop Relat Res 1998;356:16–21.
-
Clarke HD, Scuderi GR. Revision total knee arthroplasty: planning, management, controversies, and surgical approaches. Instr Course Lect 2001;50:359.
-
Della Valle CJ, Berger RA, Rosenberg AG. Surgical exposures in revision total knee arthroplasty. Clin Orthop Relat Res 2006;446: 59–68.
-
Parker DA, Dunbar MJ, Rorabeck CH. Extensor mechanism failure associated with total knee arthroplasty: prevention and management. J Am Acad Orthop Surg 2003;11:238–247.
-
Scott RD, Siliski JM. The use of a modified V-Y quadricepsplasty during total knee replacement to gain exposure and improve flexion in the ankylosed knee. Orthopedics 1985;8:45.
-
Trousdale RT, Hanssen AD, Rand JA. V-Y quadricepsplasty in total knee arthroplasty. Clin Orthop Relat Res 1993;286:48–55.
-
In a mixed population of primary and revision TKA, Cybex testing revealed that the quadriceps was weaker on the VY quadricepsplasty side, but this did not reach statistical significance. Only 5 of 14 patients had extensor lag greater than 5 degrees, with active extension lag averaging 4 degrees (range 0 to 20 degrees). 7
You Might Also Like