Mastering Extra-Articular Phalangeal Fracture Fixation: An Intraoperative Masterclass
Key Takeaway
Join us in the OR for a masterclass on extra-articular phalangeal fracture management. We'll meticulously cover surgical anatomy, patient positioning, and step-by-step intraoperative execution of various fixation techniques, including K-wires, lag screws, and plating. Emphasizing early motion and avoiding complications like extensor tendon issues, this guide provides essential pearls and pitfalls for fellows to achieve stable fixation and superior functional outcomes.
Alright, fellows, gather around. Welcome to the operating theater. Today, we're tackling extra-articular phalangeal fractures – injuries that, while seemingly straightforward, demand meticulous attention to detail and a profound understanding of hand biomechanics to ensure optimal functional recovery. My goal today is not just to show you how we fix these, but why we choose specific techniques and what potential pitfalls we must navigate. This is a masterclass in precision, patience, and preserving the delicate balance of the digital extensor mechanism.
Understanding Extra-Articular Phalangeal Fractures: The Foundation
Extra-articular fractures of the phalanges encompass metaphyseal and diaphyseal injuries of the proximal, middle, and distal phalanges. These can range from isolated, relatively simple breaks to complex, multi-structure traumas that profoundly impact hand function. The challenge lies in restoring not just bony alignment, but also the intricate glide of tendons and the overall functional arc of motion.
The Critical Role of Early Motion
A fundamental principle we must always keep in mind when treating these injuries, whether operatively or non-operatively, is the absolute necessity of early motion. The extensor mechanism glides directly over the phalanges, separated by only a thin layer of periosteum and peritenon. Fractures, and the subsequent bleeding, swelling, and scarring, can severely inhibit this vital extensor function. Early, controlled motion helps minimize adhesions between the bone and tendon, which is paramount for preventing stiffness and achieving a good functional outcome.
Comprehensive Surgical Anatomy: Navigating the Digital Landscape
Before we make any incision, let's review the critical anatomy. The phalanges are the long, tubular bones that form the skeletal framework of the digits. Each phalanx, while similar, possesses unique anatomical features that contribute to the normal cascade and curvature of the fingers, allowing for seamless flexion and extension.
The Extensor Mechanism: A Delicate Overlay
The extensor mechanism is perhaps the most critical structure to understand and protect in phalangeal surgery.
* Extensor Digitorum Communis (EDC): This tendon, along with contributions from the intrinsic muscles, forms the complex extensor hood.
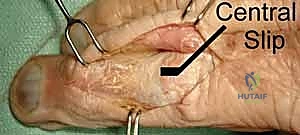
* Central Slip: The EDC inserts into the base of the middle phalanx via the central slip. Preserving this insertion is crucial.
* Lateral Bands: Formed by the confluence of the intrinsic tendons and the EDC, these bands converge distally to form the terminal tendon.
* Terminal Tendon: This inserts onto the dorsal base of the distal phalanx.
* Triangular Ligament: This structure keeps the lateral bands centered dorsally over the middle phalanx. Damage or disruption can lead to lateral band subluxation.
* Sagittal Bands: These stabilize the EDC tendon over the metacarpophalangeal (MCP) joint.
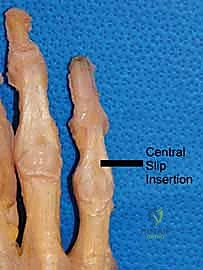
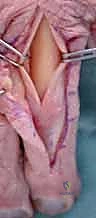
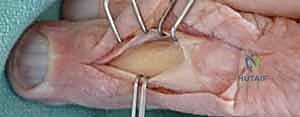
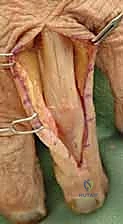
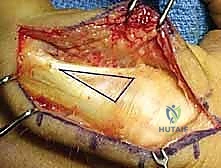
FIG 1 • A. Anatomic dissection of a digit showing the relationship and position of the lateral bands and extensor digitorum communis (EDC).
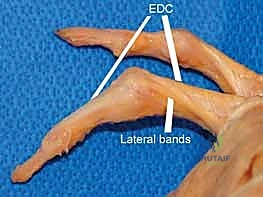
FIG 1 • B. Anatomic dissection showing the EDC with the important insertion of the central slip, which should not be detached if possible during the surgical approach.
Surgical Warning:
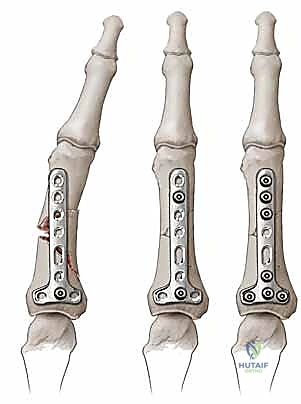
Dorsal implants, even low-profile ones, can lead to extensor imbalance, especially if the plate end is at the level of the proximal interphalangeal (PIP) joint. A plate on the proximal phalanx effectively shortens and tightens the central slip tendon, limiting PIP flexion. There is even less room to place a dorsal plate under the triangular ligament and terminal tendon over the middle phalanx. Hardware placed dorsally beneath the tendon risks tendon abrasion and interference with function. This is why we often prefer lateral plate placement or alternate fixation methods.
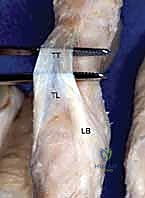
FIG 2 • The terminal tendon (TT) is formed by a confluence of the lateral bands (LB). The triangular ligament (TL) keeps the tendons on the dorsal aspect of the finger. The terminal tendon is intimately associated with the middle phalanx.
Flexor Tendons and Intrinsic Muscles
On the volar aspect, we have the flexor digitorum superficialis (FDS) and profundus (FDP). The FDS inserts onto the middle phalanx, while the FDP inserts onto the distal phalanx. The intrinsic muscles (lumbricals and interossei) insert on the proximal phalanx base and contribute significantly to digital motion and fracture displacement patterns.
Neurovascular Bundles: The Lifelines
The digital neurovascular bundles run along the lateral aspects of the phalanges. These consist of the digital nerves and arteries, and they are extremely vulnerable during any surgical approach. Meticulous dissection and retraction are paramount to prevent iatrogenic injury.
Pathogenesis and Fracture Patterns: Understanding the Forces at Play
The fracture pattern we observe is a direct consequence of the position of the digit at the time of injury and the direction and degree of force applied.
* Torsional forces typically result in long spiral fractures.
* Angular and three-point bending forces often lead to transverse fractures.
* Direct trauma (e.g., hammer blow, crush injury, gunshot) can cause a variety of patterns, often comminuted, especially in the distal phalanx where crush injuries are common and frequently associated with nail bed disruption.
Deformity Patterns: The Tendon Tug-of-War
Understanding the deforming forces of the surrounding tendons is crucial for reduction:
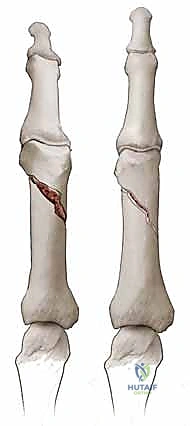
* Proximal Phalanx Fractures: These generally assume an apex volar angulation. The intrinsic muscle tendons, inserting on the proximal phalanx base, pull the proximal fragment into flexion (blue arrow). Simultaneously, the central slip, formed by the extensor tendon and intrinsic contribution, pulls the distal fragment into extension (yellow arrow). The sagittal bands (SB) also play a role.
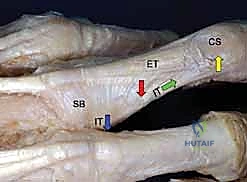
FIG 3 • Most proximal phalanx fractures assume an apex volar angulation (red arrow). This is due to a combination of tendon forces. The intrinsic tendon (IT) insertion at the base of the proximal phalanx pulls the proximal fragment into flexion (blue arrow). The central slip (CS) is formed from the extensor tendon (ET) and contribution from the intrinsic tendon (IT) as they cross dorsally (green arrow). The central slip pulls the distal fragment into extension (yellow arrow), resulting in an apex volar angulation (red arrow). SB, sagittal bond.
- Middle Phalanx Fractures: Deform less predictably but often also present with apex volar angulation. This is due to the strong pull of the flexor digitorum superficialis (FDS) tendon on the volar base of the proximal fragment, while the terminal extensor tendon exerts force on the distal fragment.
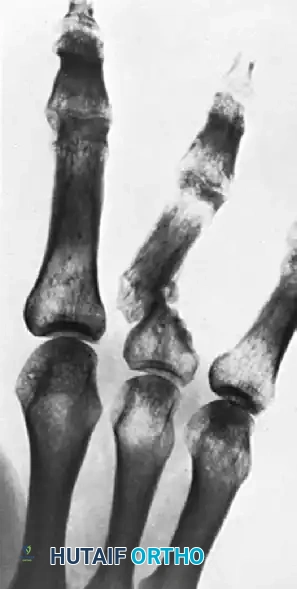
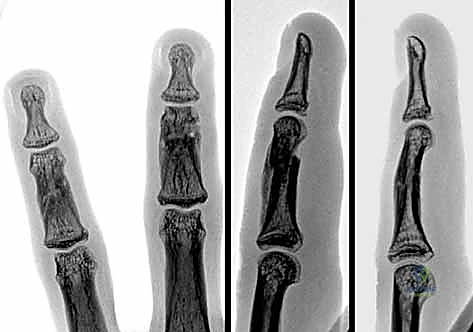
- Distal Phalanx Fractures: Both extensor and flexor tendons insert on the distal phalanx base. An extra-articular fracture between these two insertion sites, known as a Seymour fracture, typically angulates in a dorsal apex direction due to the strong pull of the FDP.
Patient History and Physical Findings: The Diagnostic Blueprint
A thorough history and physical exam are indispensable.
* History: Elicit the exact mechanism of injury, time from injury, any previous treatments, and critically, the impact on the patient's career, hobbies, and pre-injury functional limitations.
* Physical Examination:
* Digit Cascade and Attitude: Observe the resting position of the digits. Subtle changes can localize the injury.
* Palpation: Pinpoint tenderness helps localize the fracture and assess healing.
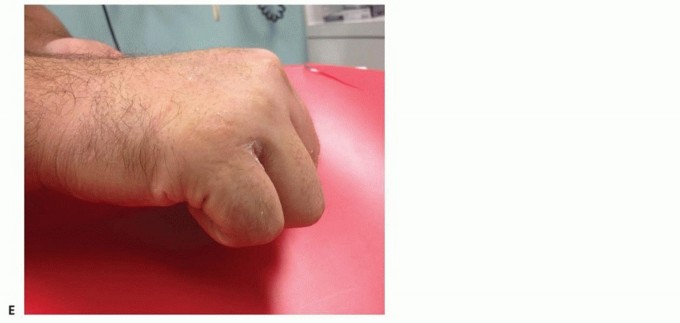
* Deformity Assessment: Look for displacement in AP or lateral planes, shortening, and especially rotational deformity. Rotational deformity affects ultimate function the greatest, often causing the fingers to scissor when flexed.
* Rotational Evaluation: Ask the patient to flex and extend the digits as a unit. Compare the injured digit's position to adjacent digits and the contralateral hand. A digital anesthetic block can facilitate this.
* Scissoring Test: During flexion, the digits should generally point towards the distal pole of the scaphoid. If they cross, rotation is present.
* Nail Bed Comparison: If pain prevents full flexion, compare the plane of the nail bed of the injured finger to adjacent nail beds and the uninjured hand. This provides a valuable clue to rotational malalignment.
* Neurocirculatory Status: Assess altered skin color, diminished turgor, and capillary refill for vascular compromise. Evaluate digital nerve integrity using two-point discrimination.
* Soft Tissue Envelope: Inspect for lacerations, degloving injuries, burns, or subungual hematomas (common with distal phalanx fractures). The condition of the soft tissues heavily influences treatment decisions.
* Unstable Fracture Patterns: Recognize patterns that are inherently unstable and likely require surgical intervention (e.g., spiral oblique, short transverse, comminuted).
Differential Diagnosis
While history and radiographs usually confirm a phalanx fracture, consider other causes of hand pain and deformity if a fracture isn't evident:
* Acute sprains (MCP/IP joints)
* Metacarpophalangeal (MP) and interphalangeal (IP) dislocations
* Mallet finger
* Phalangeal contusions
* Collateral ligament injury
* Boutonnière or swan-neck injuries
* Sagittal band ruptures
* Tendon ruptures
* Pulley ruptures
* Stenosing tenosynovitis or trigger finger
* Acute infection
* Benign and malignant lesions of the digits
* Osteoarthritis, congenital deformity
Imaging and Other Diagnostic Studies: Confirming the Diagnosis
Radiographs are the cornerstone of diagnosis.
* AP, Oblique, and True Lateral Views: These will provide sufficient imaging for the vast majority of extra-articular phalangeal fractures.
* Obliqued Lateral Views: Particularly useful for fractures at the base of the proximal phalanx, where overlap on a true lateral view can obscure details.
* Critical Evaluation: Look for subtle rotational malalignment. A true lateral view of the base or condyles of a phalanx should align perfectly across its corresponding joint. Any mismatch suggests rotation.
* Fluoroscopy: A mobile C-arm unit is invaluable. It allows for magnification to characterize subtle injuries and, crucially, dynamic evaluation to gauge fragment stability intraoperatively.
* Advanced Imaging: MRI, CT, or ultrasound are rarely needed to diagnose a phalangeal fracture or guide initial treatment, but may be useful for soft tissue injuries or complex nonunions.
Nonoperative Management: When to Stay Out of the OR
Many phalangeal fractures are stable and can be effectively treated nonoperatively. This decision is individualized, considering the soft tissue envelope, fracture characteristics, and patient's functional needs.
* Stable Fractures: Incomplete, complete but nondisplaced, or impacted fractures (e.g., at the proximal phalanx metaphysis) can be managed with a short period (1-2 weeks) of splinting, followed by buddy taping.
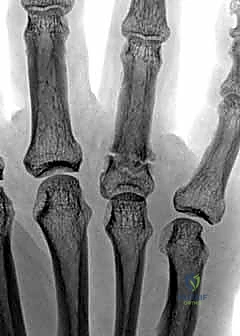
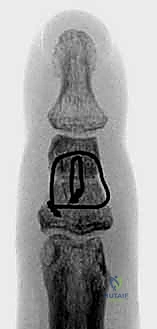
FIG 5 • This fracture is stable because it is well aligned (on the AP and lateral radiographs) and that alignment does not change with motion. This fracture was treated with splinting for 2 weeks and buddy taping for 2 more weeks.
* Unstable but Reducible Fractures: A fracture that can be adequately reduced under digital block but is relatively unstable can occasionally be held with a custom splint. This avoids surgery but requires close follow-up and serial radiographs to ensure reduction is maintained.
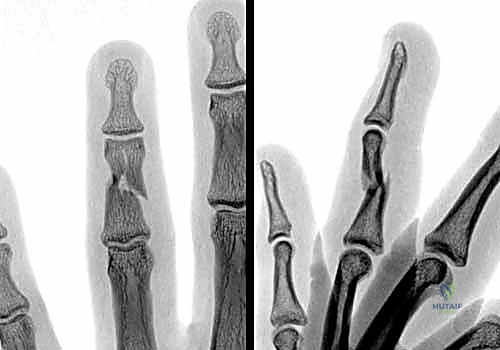
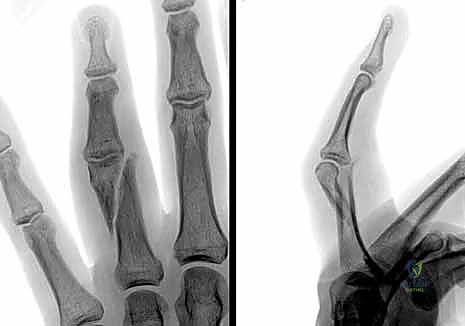
FIG 6 • A. This middle phalanx fracture shows apex volar angulation, which was easily reducible under digital block anesthesia, but the reduction was unstable and the deformity quickly recurred.
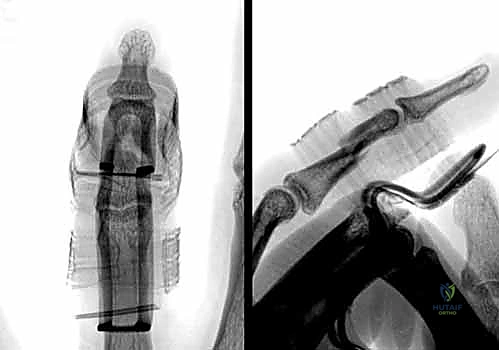
FIG 6 • B. A padded aluminum splint was fabricated to apply a three-point force to hold the fracture reduced.
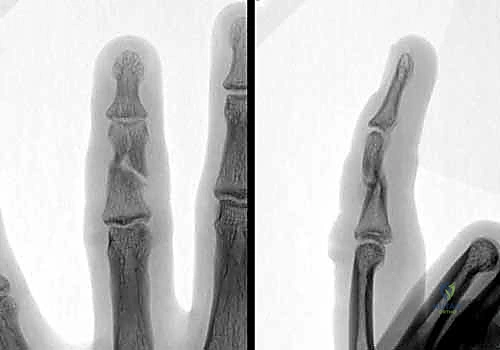
FIG 6 • C. After 4 weeks of splinting, the fracture had healed and the splint was removed. By 6 weeks, motion was full, with mild discomfort with gripping.
Key Considerations for Nonoperative Treatment:
* Less scarring to the extensor mechanism.
* Less ability to initiate early motion unless the fracture is inherently very stable.
* Minimal ability to hold a corrected deformity in unstable patterns.
* Immobilization beyond 3 weeks significantly increases stiffness and worsens outcomes.
Preoperative Planning & Patient Positioning: Setting the Stage for Success
For any operative intervention, meticulous planning is key.
1. Review Imaging: Carefully examine all radiographs. Mentally template potential fixation options – K-wires, lag screws, plates – considering the fracture pattern, bone quality, and patient activity level.
2. Anesthesia: Most hand procedures can be performed under regional anesthesia (axillary block, supraclavicular block) or general anesthesia. A digital block can be sufficient for simple K-wire fixations but is usually not adequate for open reductions requiring more extensive dissection.
3. Patient Positioning:
* Supine Position: Position the patient supine on the operating table.
* Hand Table: The injured arm is abducted and placed on a specialized hand table, allowing full access to the hand and wrist. Ensure the table is stable and well-padded.
* Tourniquet: A pneumatic tourniquet is applied to the upper arm. This provides a bloodless field, which is absolutely critical for visualizing the delicate structures of the hand. We'll inflate it to 250-280 mmHg once the patient is prepped and draped.
* Fluoroscopy Setup: The C-arm unit is brought into position on the contralateral side, ensuring it can easily be rotated for AP, lateral, and oblique views without contaminating the sterile field. Have sterile covers ready for the C-arm.
4. Sterile Prep and Drape: A standard sterile prep of the hand and forearm, extending to the elbow, is performed. The hand is then draped with sterile towels and a stockinette, leaving the digits exposed for manipulation.
Surgical Warning:
Never underestimate the importance of a bloodless field. Any bleeding obscures critical anatomical landmarks, increasing the risk of neurovascular injury and incomplete reduction.
Surgical Management: An Intraoperative Masterclass in Fixation Techniques
The goal of surgery is to restore alignment and stabilize the fracture sufficiently to permit early, controlled motion. This is where we balance the benefits of stable fixation against the potential for surgical complications like stiffness or extensor tendon issues. A significant injury to the soft tissue envelope worsens prognosis, making stable fixation and early motion even more critical. For open fractures, appropriate intravenous antibiotic therapy is initiated preoperatively.
The choice of fixation method is often made intraoperatively, based on the fracture's reducibility and stability after initial manipulation.
I. General Principles of Open Reduction and Approaches
When closed reduction fails or is deemed unsuitable, we proceed with an open approach.
1. Incision Choice:
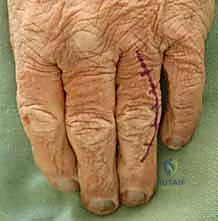
* Mid-axial Incision: This is often preferred for phalangeal fractures, especially for the proximal and middle phalanges, as it allows access to the bone while preserving the dorsal extensor mechanism and volar flexor sheath. The incision is placed just dorsal to the neurovascular bundle, typically on the radial side of the index and middle fingers, and the ulnar side of the ring and small fingers.
* Dorsal Incision: Can be used, but extreme care must be taken to avoid damaging the extensor mechanism. A longitudinal incision over the fracture site, carefully splitting the extensor mechanism or retracting it, can be used.
* Volar Incision: Rarely used for extra-articular fractures, reserved for specific flexor tendon or volar plate injuries.
2. Soft Tissue Dissection:
* Skin Incision: Use a #15 blade.
* Subcutaneous Dissection: Carefully identify and protect the dorsal sensory nerves and digital neurovascular bundles. Use fine-tipped scissors (e.g., tenotomy scissors) or a scalpel with meticulous technique.
* Extensor Mechanism Exposure (Dorsal Approach): If a dorsal approach is chosen, identify the extensor tendon. A longitudinal split in the extensor mechanism, carefully placed between the central slip and lateral band, or direct retraction, may be necessary. For proximal phalanx fractures, the sagittal bands may need to be carefully incised or elevated.
* Lateral Approach: Elevate the skin and subcutaneous tissues. Identify the digital neurovascular bundle and carefully retract it volarly. Incise the periosteum longitudinally along the lateral aspect of the phalanx to expose the fracture site.
3. Fracture Exposure and Reduction:
* Clear the hematoma and any interposed soft tissue from the fracture site.
* Use small, sharp Hohmann retractors or blunt-ended skin hooks to maintain exposure.
* Reduction: Apply gentle traction to the digit. Use small bone clamps (e.g., mini-fragment reduction forceps, pointed reduction forceps) or K-wires as joysticks to manipulate fragments into anatomical alignment.
* Confirm Reduction: Visually inspect the fracture site for anatomical reduction. Crucially, obtain intraoperative fluoroscopy in AP, lateral, and oblique views to confirm accurate reduction in all planes, especially checking for rotational alignment by observing the nail bed or comparing the condyles.
II. Percutaneous Wire Fixation (K-wires)
This is a versatile technique for many unstable fractures, offering minimal soft tissue disruption.
* Indications: Unstable spiral fractures, transverse metaphyseal fractures. Less suited for transverse diaphyseal fractures due to instability.
* Technique (Closed Reduction):
1. Anesthesia: Perform a digital block or use regional/general anesthesia.
2. Traction & Manipulation: Apply continuous traction to the digit. Use external manipulation to reduce the fracture, correcting angulation and rotation.
3. Confirm Reduction (Fluoroscopy): Obtain AP, lateral, and oblique views with the C-arm to confirm anatomical reduction. Check for scissoring by flexing the adjacent digits.
4. K-wire Insertion:
* Choice of Wires: Typically, 0.028" or 0.035" K-wires are used.
* Drill: Use a small, battery-powered K-wire driver.
* Trajectory: Insert K-wires percutaneously, away from neurovascular structures. Always aim for bicortical purchase.
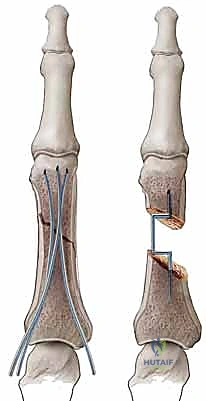
* Spiral Fractures: Often require two K-wires placed in an oblique fashion, crossing the fracture site. Avoid placing wires parallel to the fracture plane.
* Transverse Metaphyseal Fractures: Crossed K-wires are commonly used, entering from opposite sides of the phalanx, crossing at the fracture site, and engaging the opposite cortex.
* Fluoroscopic Guidance: Drill under constant fluoroscopic guidance. This is non-negotiable. Watch the wire tip as it crosses the fracture and engages the far cortex to prevent over-penetration, which can damage tendons or neurovascular structures.
* Stability Check: After placing the wires, gently stress the fracture under fluoroscopy to ensure stability. Flex and extend the digit to confirm no impingement of the wires on tendons or joints.
5. Cut & Bend Wires: Cut the K-wires just outside the skin and bend them to prevent migration and facilitate removal. Cover with a sterile dressing.
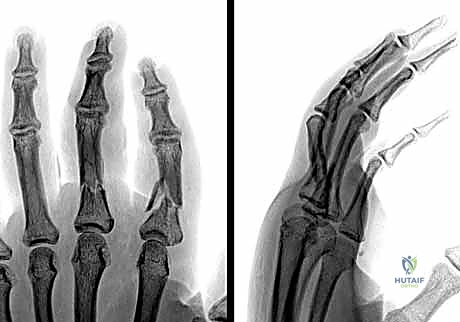
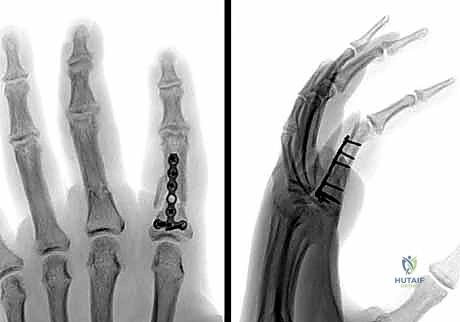
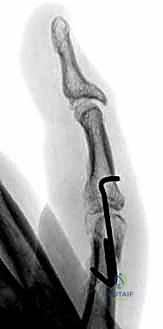
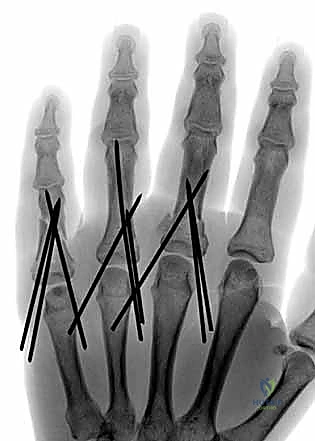
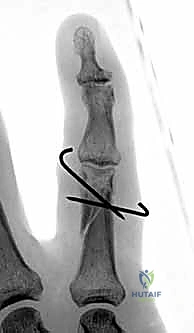
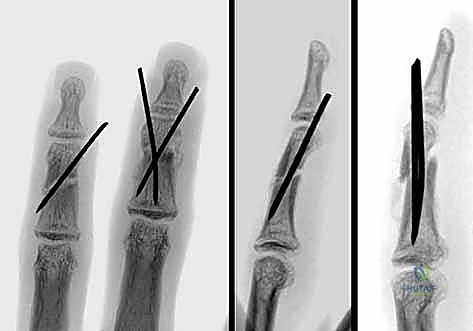
FIG 9 • A. A proximal phalanx spiral fracture of the little finger. B. Reduction was achieved with traction and manipulation and maintained with two 0.035-inch Kirschner wires (K-wires) placed percutaneously under fluoroscopic guidance. C. A lateral radiograph shows good alignment and placement of the K-wires. D. The fracture has healed and the K-wires have been removed.
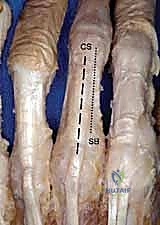
FIG 10 • A. This middle phalanx fracture was reduced and stabilized with two crossed K-wires. B. The K-wires are placed to avoid the flexor and extensor tendons.
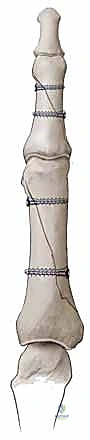
III. Interosseous Wire Fixation
This method offers rigid fixation but requires open reduction.
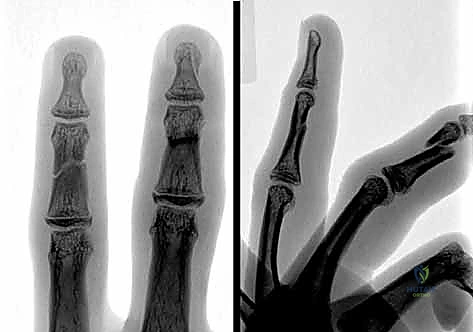
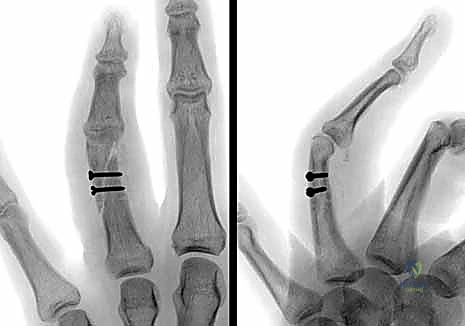
* Indications: Best suited for stable, transverse fractures, particularly of the middle phalanx, where percutaneous pinning might not provide enough stability or when a plate is too bulky. It is not suitable for comminuted fractures.
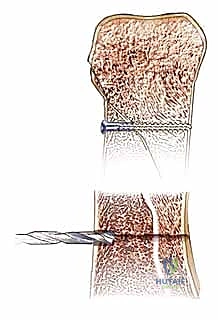
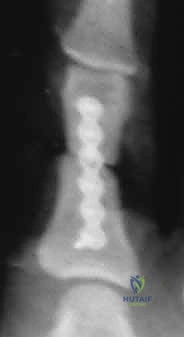
* Technique (Open Approach):
Additional Intraoperative Imaging & Surgical Steps


REFERENCES
thought to be adequate in the face of restricted motion may prove inadequate once full motion is regained.
-
Barton NJ. Fractures of the shafts of the phalanxes of the hand. Hand 1979;11:119–133.
-
Botte MJ, Davis JL, Rose BA, et al. Complications of smooth pin fixation of fractures and dislocations in the hand and wrist. Clin Orthop 1992;276:194–201.
-
Crofoot CD, Saing M, Raphael J. Intrafocal pinning for juxtaarticular phalanx fractures. Tech Hand Up Extrem Surg 2005;9:164–168.
-
Eaton RG, Hastings HH. Point/counterpoint: closed reduction and internal fixation versus open reduction and internal fixation for displaced oblique proximal phalangeal fractures. Orthopedics 1989;12: 911–916.
-
Ebinger T, Erhard N, Kinzl L, et al. Dynamic treatment of displaced proximal phalangeal fractures. J Hand Surg Am 1999;24:1254–1262.
-
Lins RE, Myers BS, Spinner RJ, et al. A comparative mechanical analysis of plate fixation in a proximal phalangeal fracture model. J Hand Surg Am 1996;21:1059–1064.
-
Maitra A, Burdett-Smith P. The conservative management of proximal phalanx fractures of the hand in an accident and emergency department. J Hand Surg Br 1992;17B:332–336.
-
Margic K. External fixation of closed metacarpal and phalangeal fractures of digits: a prospective study of one hundred consecutive patients. J Hand Surg Br 2006;31B:30–40.
-
Pa Pehlivan O, Kiral A, Solakoglu C, et al. Tension band wiring of unstable transverse fractures of the proximal and middle phalanges of the hand. J Hand Surg Br 2004;29:130–141.
-
Reyes FA, Latta LL. Conservative management of difficult phalangeal fractures. Clin Orthop Relat Res 1987;214:23–30.
-
Sloan JP, Dove AF, Maheson M, et al. Antibiotics in open fractures of the distal phalanx? J Hand Surg Br 1987;12B:123–124.
-
Strickland JW, Steichen JB, Kleinman WB, et al. Phalangeal fractures: factors influencing digital performance. Orthop Rev 1982;11: 39–50.
-
Vahey JW, Wegner DA, Hastings H III. Effect of proximal phalangeal fracture deformity on extensor tendon function. J Hand Surg Am 1998;23A:673–681.
-
If significant enough, osteotomy should be considered.
-
Neurovascular injury while pinning a fracture
-
By observing the cross-sectional anatomy of the digit, damage to the neurovascular bundle can usually be avoided when inserting the wires.
-
Care must be taken when the wire passes through the second cortex, as it will usually be heading directly toward the neurovascular bundle.
-
Inserting the wires initially by hand until bone contact is made and using small open incisions may decrease the chance of injury when inserting the wire close to the neurovascular bundle.
-
Complex regional pain syndrome
-
Early recognition and treatment are essential.
-
A high index of suspicion is needed to identify key symptoms:
-
Swelling despite elevation and other edema-control efforts
-
Stiffness, especially in adjacent digits, despite efforts toward early mobilization
-
Color changes in the hand
-
Mottling or shiny appearance of the skin
-
Abnormal hair growth
-
Burning pain in the hand
-
Tendon rupture
-
Nonunion
-
Infection
-
Pin loosening and migration
-
Implant failure
-
Pain and symptoms from retained hardware
You Might Also Like