DIP Joint Fracture-Dislocations: An Intraoperative Masterclass
Key Takeaway
Welcome, fellows, to an immersive intraoperative masterclass on distal interphalangeal (DIP) joint fracture-dislocations. We'll delve into the intricate anatomy, meticulous preoperative planning, and precise surgical techniques for conditions like mallet fractures, FDP avulsions, and complex dislocations. Expect a granular, step-by-step breakdown of each procedure, emphasizing critical pearls, potential pitfalls, and comprehensive postoperative management to ensure optimal patient outcomes.
Welcome, fellows, to the operating theater. Today, we're tackling a fascinating and often challenging set of injuries: distal interphalangeal (DIP) joint fracture-dislocations. While less common due to the inherent stability of this joint, when they do occur, they demand meticulous attention to detail and a profound understanding of the delicate anatomy. Our goal today is not just to fix a finger, but to restore precise function, prevent long-term disability, and avoid the dreaded cascade of secondary deformities.
Understanding the DIP Joint: A Deep Dive into Surgical Anatomy
Let's begin by reviewing the critical anatomical structures that provide stability to the DIP joint and are often compromised in these injuries. The DIP joint, a hinge joint, is inherently stable, a testament to its robust ligamentous and tendinous architecture.
Ligamentous and Capsular Structures
- Collateral Ligaments: These paired ligaments, radial and ulnar, are crucial stabilizers. They originate from the condyles of the middle phalanx and insert onto the base of the distal phalanx. Their tautness varies with joint position; they are typically taut in extension and slightly relaxed in flexion, although some studies suggest they remain relatively isometric. Injury to these ligaments can lead to significant instability.
- Volar Plate: This is a strong, fibrocartilaginous structure on the palmar aspect of the joint, firmly attached to the distal phalanx and loosely to the middle phalanx. It prevents hyperextension and provides a stable volar floor for the joint. In dislocations, it can be avulsed or become interposed, blocking reduction.
Tendinous Insertions
- Flexor Digitorum Profundus (FDP) Tendon: This is the sole flexor of the DIP joint. It originates from the ulna and interosseous membrane, traverses through the carpal tunnel, and inserts onto the volar base of the distal phalanx. Its firm insertion is a key stabilizer.
- Pulley System: The FDP tendon is secured by a series of annular (A) and cruciate (C) pulleys. At the level of the DIP joint, the A4 and A5 pulleys are particularly relevant, along with the C3 cruciate pulley. Preservation of these pulleys is paramount during any surgical approach to prevent bowstringing of the tendon.
- Vascular Supply (Vinculae): The FDP receives its blood supply via the vinculum longus profundus and vinculum brevis profundus, thin mesenteries that attach the tendon to the flexor sheath. These are critical for tendon viability, especially in avulsion injuries. Type I FDP avulsions, which retract into the palm, often disrupt these vinculae, leading to poor blood supply and demanding urgent intervention.
- Extensor Mechanism (Terminal Tendon): The extensor mechanism is a complex aponeurotic structure. At the DIP joint, the confluence of the lateral bands forms the terminal extensor tendon, which inserts onto the dorsal base of the distal phalanx. This insertion is robust, averaging 10.1 mm in length and 5.6 mm in width, and is typically 1.4 mm proximal to the germinal matrix of the fingernail. Disruption here leads to a "mallet finger" deformity. The volar surface of the terminal tendon is often adherent to the dorsal capsule of the DIP joint.
Neurovascular Structures
- Digital Nerves and Arteries: The proper digital nerves and arteries run along the radial and ulnar sides of each digit, volar to the collateral ligaments and dorsal to the flexor tendon sheath. They are susceptible to injury during dissection, especially with longitudinal incisions or aggressive retraction. Always identify and protect these vital structures.
Osteology
- The distal end of the middle phalanx presents two condyles that articulate with the base of the distal phalanx. The articular surface of the distal phalanx is concave. Mallet fractures involve an intra-articular bony avulsion from the dorsal base of the distal phalanx. FDP avulsions involve the volar base.
Preoperative Planning: Laying the Foundation for Success
Before we even consider making an incision, meticulous preoperative planning is non-negotiable. This is where we anticipate challenges and formulate our strategy.
Patient Assessment and History
- Hand Dominance and Occupational Requirements: Always ascertain the patient's dominant hand and their occupational demands. This profoundly influences our treatment goals and rehabilitation strategy. A concert pianist requires a different functional outcome than a desk worker.
- Mechanism of Injury:
- Mallet Finger: Often an axial blow to the fingertip, such as catching a ball, causing sudden flexion of an extended DIP joint. The patient will be unable to actively extend the DIP joint.
- Jersey Finger: A sudden extension force on a flexed DIP joint, like grabbing a jersey in football, resulting in FDP avulsion. The patient will be unable to actively flex the DIP joint.
- DIP Dislocations: Typically high-energy sporting injuries.
- Physical Examination:
- FDP Function: Test active DIP flexion. Inability suggests complete disruption. Weak or painful flexion may indicate a partial injury or intact vinculae/pseudotendon.
- Extensor Mechanism Function: Test active DIP extension. Inability implies terminal extensor tendon disruption. Loss of passive extension suggests a possible fracture or dislocation that is blocking movement.
- Joint Stability: Assess for collateral ligament integrity and subluxation.
- Neurovascular Status: Always check capillary refill and sensation.
Imaging and Diagnostic Studies
- Plain Radiographs: Standard PA, lateral, and oblique views of the affected hand and dedicated finger views are essential.
- Mallet Fracture: Lateral radiographs are most helpful for identifying the bony avulsion fragment, its size, and any associated joint subluxation. We need to estimate the percentage of articular surface involved.
- FDP Avulsion (Jersey Finger): A lateral radiograph can reveal a bony fragment caught at the A4 pulley, indicating the level of tendon retraction.
- Dislocations: Radiographs confirm the direction of dislocation (dorsal or volar) and rule out associated fractures.
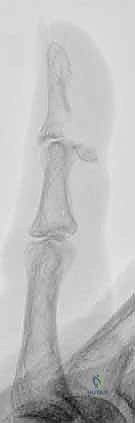
FIG 1 • Lateral radiographs usually are the most helpful in identifying a mallet fracture. Note that in this image, the avulsed fragment includes more than 50% of the articular surface. There is no significant volar subluxation in this case.
FIG 2 • A. Flexor digitorum profundus (FDP) avulsion in which a bony fragment has been caught up at the A4 pulley.
* Ultrasound: Can be helpful in determining flexor tendon continuity and the location of a retracted proximal tendon stump, especially in acute cases.
* MRI: Invaluable for assessing soft tissue injuries, determining flexor tendon continuity, and precisely locating the level of tendon retraction, particularly in subacute or chronic cases.
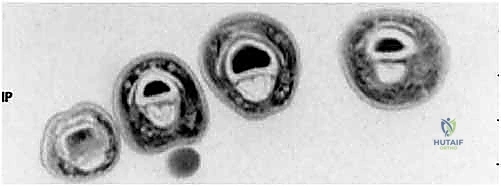
FIG 2 • C. Axial cut MRI at the level of the proximal phalanx shows both FDP and flexor digitorum superficialis (FDS) tendons are present. D. At the level of the middle phalanx, only the FDS tendon can be seen.
Classification of FDP Avulsion Injuries (Leddy and Packard)
This classification guides our urgency and approach:
* Type I: Tendon retracts into the palm. Vinculae are disrupted, leading to poor blood supply. Surgery within 7-10 days is critical.
* Type II: Tendon retracts to the PIP joint or distal A2 pulley. Proximal blood supply via long vincula is preserved. Can be treated successfully up to 6 weeks.
* Type III: Associated with a large bony avulsion, preventing retraction beyond the A4 pulley. Treated as bony injuries with ORIF. Can be treated late.
* Type IV: Bony avulsion where the tendon has also separated from the bony fragment. Time to treatment depends on the level of tendon retraction.
Surgical Indications
- Mallet Fractures: Reserved for fractures with joint subluxation or those involving greater than one-third of the articular surface (some say 50%), especially if volar subluxation is present.
- FDP Avulsions (Jersey Finger): Operative treatment is recommended for all acute avulsions. For subacute/chronic cases, consider functional necessity of DIP motion; nonoperative treatment or staged reconstruction may be an option.
- Isolated DIP Joint Dislocations: Surgical management indicated if closed reduction is unsuccessful due to interposed structures.
Patient Positioning
- The patient is placed supine on the operating room table.
- The affected arm is placed on a well-padded arm board, allowing full access to the hand and digits.
- For flexor tendon injuries, a flexible aluminum hand-holder can be extremely useful for positioning and stabilizing the hand during exploration and repair.
- A well-padded tourniquet is applied high on the arm (upper arm or forearm, depending on surgeon preference and expected case duration) to ensure a bloodless field, which is paramount for visualizing delicate structures.
- Anesthesia: Typically a regional block (axillary or supraclavicular) combined with local infiltration, or general anesthesia for longer, more complex cases. For simple closed reductions, a digital block suffices.
Fluoroscopy Setup
- The C-arm will be positioned for easy access to obtain true AP, lateral, and oblique views of the affected digit. Ensure the fluoroscopy unit is draped and ready for sterile use before incision.
Intraoperative Execution: A Step-by-Step Masterclass
Now, let's scrub in, fellows. We'll walk through the most common operative scenarios for DIP joint injuries.
I. Extension-Block Pinning for Mallet Fractures
This technique is elegant and effective for mallet fractures with dorsal subluxation or significant articular involvement. Our goal is to anatomically reduce the fracture and stabilize the joint, allowing the extensor mechanism to heal in a shortened position.
1. Anesthesia and Tourniquet:
* We've already administered our anesthesia and inflated the tourniquet. Ensure the arm is stable on the arm board.
2. Fluoroscopy Check:
* Before any manipulation, let's get our baseline AP and lateral fluoroscopic images to confirm our understanding of the fracture pattern and joint position.
TECH FIG 1 • C. PA fluoroscopic image confirms good bony purchase in both the dorsal and volar phalanx.
3. Initial Joint Flexion and Fragment Mobilization:
* Surgeon's Directive: "Fellows, observe closely. We begin by flexing the DIP joint initially to approximately 90 degrees. This maneuver is crucial. It relaxes the extensor mechanism, which is otherwise pulling the avulsed fragment dorsally, and it allows the fracture fragment to fall volarly, creating a small gap. This helps us visualize the fragment's true position and facilitates our reduction."
4. Insertion of the Dorsal Blocking Pin:
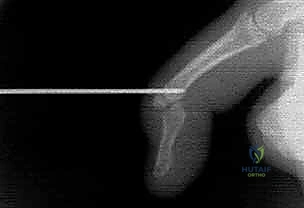
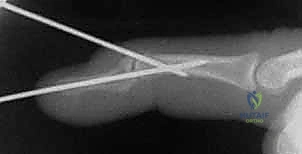
* Surgeon's Directive: "Now, with the DIP joint held in this flexed position, we'll insert our first K-wire. This is our dorsal blocking pin. I prefer a 0.045-inch smooth K-wire for most adult digits, though a 0.035-inch might be necessary for smaller fingers. The key here is precision."
* Technique: "I'm inserting this K-wire obliquely from distal to proximal, aiming to enter the dorsal edge of the articular surface of the middle phalanx. We want bicortical purchase in the middle phalanx. Watch the fluoroscopy screen carefully. We are aiming for the dorsal aspect of the middle phalanx, just proximal to the articular surface, but it's critical that this pin does not engage the fracture fragment itself. Engaging the fragment directly can lead to comminution, which would compromise our reduction and fixation."

TECH FIG 1 • A With the DIP joint flexed, a K-wire is inserted at the dorsal edge of the articular surface of the middle phalanx.
TECH FIG 1 • B. Bicortical purchase is obtained.
* Pearl: "The dorsal blocking pin serves as a buttress. When we extend the distal phalanx, this pin will prevent the distal phalanx from subluxing dorsally, thereby compressing and reducing our fracture fragment."
5. Reduction of the Fracture and Joint:
* Surgeon's Directive: "With the dorsal blocking pin securely in place, I will now gently extend the distal phalanx. As I extend, you should feel the fracture fragment reduce and compress against the distal phalanx. The DIP joint itself should also achieve anatomical reduction. Let's get another lateral fluoroscopic view to confirm our reduction. Look for perfect articular congruity and no residual subluxation."
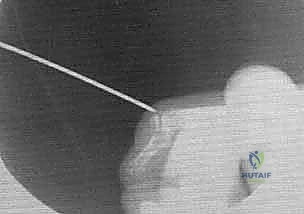
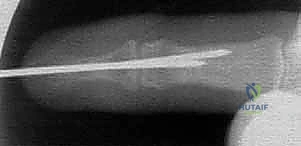
6. Insertion of the Retrograde Transarticular Pin:
* Surgeon's Directive: "Once we've achieved and confirmed our reduction, we'll insert our second K-wire. This is a retrograde transarticular pin. Again, a 0.045-inch or 0.035-inch smooth K-wire."
* Technique: "I'm inserting this K-wire directly through the distal tip of the distal phalanx. We'll advance it in a retrograde manner, across the DIP joint, and into the middle phalanx. While advancing, ensure you maintain the reduced position of the DIP joint and the fracture. The pin should gain good purchase in the middle phalanx, ideally bicortical, to provide stable fixation."
TECH FIG 1 • D. With the DIP joint extended, a retrograde K-wire is introduced through the tip of the distal phalanx.
TECH FIG 1 • E. Once reduction is confirmed, this retrograde pin is advanced into the middle phalanx.
TECH FIG 1 • F. A final P
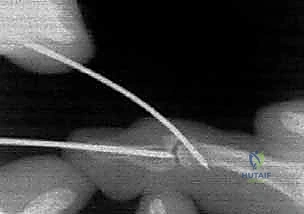
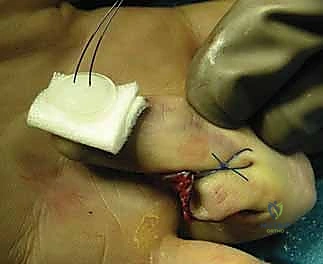
7. Final Fluoroscopy and Pin Management:
* Surgeon's Directive: "Let's get final AP and true lateral fluoroscopic images. We need to confirm excellent reduction, appropriate pin placement, and no penetration of the articular surface by either pin. Once satisfied, we will cut the K-wires just outside the skin and place protective plastic caps over the exposed ends to prevent snagging and minimize pin-site irritation. The tourniquet can now be deflated."
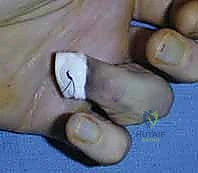
8. Dressing Application:
* Surgeon's Directive: "Finally, a protective dressing is applied. We want to keep the pins clean and the digit comfortable. Remember, the pins are temporary, but the healing is permanent."
Surgical Warning: Mallet Fracture Pinning
* Articular Penetration: Always confirm with fluoroscopy that K-wires do not penetrate the articular surface, which can lead to joint stiffness and arthrosis.
* Fragment Comminution: Avoid directly pinning the small avulsed fragment with the dorsal blocking pin. It's a buttress, not a direct fixation device for the fragment itself.
* Loss of Reduction: Re-check reduction after each pin insertion and before cutting the wires.
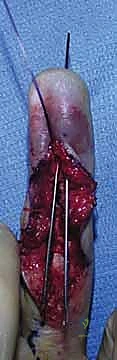
II. Open Reduction and Internal Fixation for FDP Avulsion (Jersey Finger)
This is a more involved procedure, often requiring precise soft tissue handling and careful tendon repair. We'll focus on a Type III injury, which often involves a bony fragment.
1. Anesthesia, Tourniquet, and Hand Positioning:
* General or regional anesthesia. Tourniquet inflated. Hand positioned on a flexible hand-holder for optimal exposure.
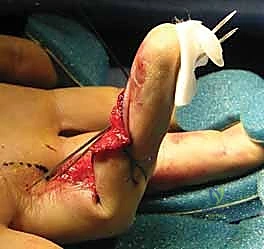
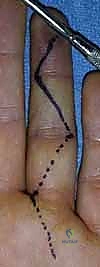
2. Surgical Approach: Volar Bruner Incision:
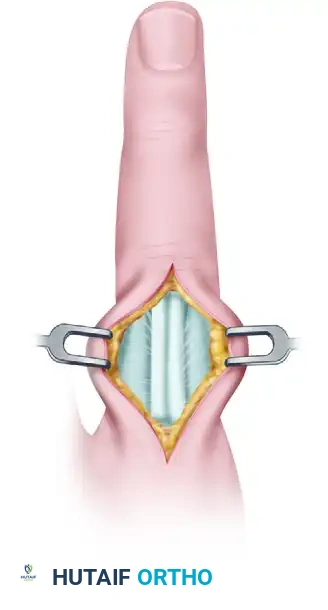
* Surgeon's Directive: "For FDP avulsions, we utilize a volar Bruner incision. This S-shaped incision provides excellent exposure while protecting the critical neurovascular bundles and minimizing scar contracture. I'm starting distally, just proximal to the DIP joint crease, and extending proximally into the mid-palm if necessary to retrieve a retracted tendon (especially for Type I injuries). Meticulous soft tissue handling is vital to minimize trauma to the skin, and great care must be taken to avoid injury to the germinal matrix proximal to the nail fold."
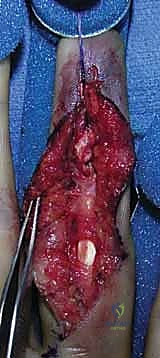
* Technique: "Incise the skin and subcutaneous tissue. Identify and carefully retract the digital neurovascular bundles, which run along the sides of the flexor sheath. Use fine-tipped forceps and blunt dissection."
3. Exposing the Flexor Tendon Sheath and Pulleys:
* Surgeon's Directive: "Now we expose the flexor tendon sheath. Remember our pulley system: A2, A3, A4, A5. We must preserve the A2 and A4 pulleys, as they are crucial for preventing FDP bowstringing and maintaining efficient finger flexion. I'm carefully incising the C1, A3, and C2 pulleys to gain access to the FDP tendon, but leaving A2 and A4 intact."
4. Identifying and Retrieving the Retracted FDP Tendon:
* Surgeon's Directive: "Now we're looking for our FDP tendon. In a Type III injury, the bony fragment often prevents significant retraction, so it's usually found near the A4 pulley. For Type I injuries, it can be deep in the palm. I'm using a tendon retriever (or a small right-angle clamp with a suture passer) to carefully fish out the proximal tendon stump. Be gentle; the tendon can be friable, especially if the vinculae are compromised."

FIG 2 • B. Lateral radiograph of a finger demonstrates chronic dorsal dislocation of the DIP joint, with associated arthrosis.
5. Preparing the Insertion Site:
* Surgeon's Directive: "Once the tendon is retrieved, we need to prepare the insertion site on the volar base of the distal phalanx. For a Type III bony avulsion, we'll reduce the bony fragment anatomically. If it's a pure tendinous avulsion, we'll debride the old insertion site to fresh, bleeding bone to promote healing."
6. Tendon Reattachment (Type III - Bony Avulsion):
* Surgeon's Directive: "For this Type III injury with a bony fragment, we'll perform open reduction and internal fixation. I'm carefully reducing the bony fragment to its anatomical position. This fragment often carries a portion of the articular surface, so precise reduction is paramount to restore joint congruity. We can use a small K-wire to temporarily hold the fragment, or sometimes a mini-screw if the fragment is large enough. For very small fragments, a pull-out suture technique or suture anchors might be more appropriate. Let's use a 0.028-inch K-wire for temporary fixation here, ensuring it doesn't penetrate the articular surface."
7. Tendon Reattachment (Pure Tendinous Avulsion):
* Surgeon's Directive: "If this were a pure tendinous avulsion, we would use a different approach. We'd prepare a bone tunnel or use suture anchors. For a bone tunnel, I'd drill two small tunnels from the dorsal aspect of the distal phalanx, exiting volarly at the FDP insertion site. We'd then pass sutures (e.g., modified Kessler or Bunnell) through the FDP tendon stump and then through these bone tunnels, tying them over a button on the dorsal aspect of the nail to create a secure pull-out repair. Alternatively, two small suture anchors can be placed directly into the volar base of the distal phalanx, and the FDP tendon is sutured to these anchors."
8. Repairing the Pulley System (if necessary):
* Surgeon's Directive: "If any of the critical pulleys (A2, A4) were inadvertently damaged or had to be partially released for access, we must repair them. Use fine non-absorbable sutures (e.g., 5-0 Prolene) to reconstruct the pulley integrity. This is crucial to prevent bowstringing and maintain mechanical advantage for the FDP."
9. Wound Closure:
* Surgeon's Directive: "After confirming stable repair and checking for any remaining foreign bodies, we'll irrigate the wound thoroughly. Close the flexor sheath loosely, if possible, to allow for some gliding. Then, meticulously close the skin with fine sutures (e.g., 5-0 or 6-0 nylon), ensuring no tension on the incision. Deflate the tourniquet and check for hemostasis."
Surgical Warning: FDP Avulsion Repair
* Neurovascular Injury: Always identify and protect the digital nerves and arteries during the volar approach.
* Pulley Damage: Avoid damage to the A2 and A4 pulleys. If damaged, repair them meticulously.
* Tendon Ischemia: Type I injuries have compromised blood supply; early repair is critical.
* Re-rupture: Ensure a robust, tension-free repair. Postoperative rehabilitation is key to preventing re-rupture.
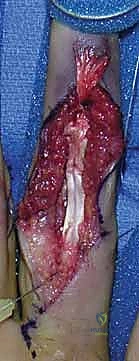
III. Open Reduction of Isolated DIP Joint Dislocations
While many DIP dislocations can be reduced closed, some are irreducible due to interposition of soft tissues. Open reduction is then necessary.
1. Anesthesia, Tourniquet, and Hand Positioning:
* Digital block or regional anesthesia. Tourniquet inflated. Hand positioned for optimal exposure.
2. Surgical Approach (Dictated by Dislocation Direction):
* Surgeon's Directive: "The approach is always dictated by the direction of the dislocation. For a dorsal dislocation, where the distal phalanx is dorsal to the middle phalanx, we approach volarly. This allows us to address the interposed structures, typically the FDP tendon or the volar plate. Conversely, for a volar dislocation, we approach dorsally to address the interposed extensor mechanism or collateral ligaments."
* Technique (Dorsal Dislocation, Volar Approach): "Using a small, modified Bruner or lazy-S incision volarly, carefully dissect through the subcutaneous tissue, identifying and protecting the neurovascular bundles. We'll open the flexor tendon sheath. Often, the head of the middle phalanx has 'buttonholed' through the interval between the FDP tendon and the collateral ligaments, with the volar plate potentially interposed. We need to gently retract the FDP tendon and carefully release the interposed volar plate or any other soft tissue blocking reduction."
* Technique (Volar Dislocation, Dorsal Approach): "For a volar dislocation, we'll use a dorsal longitudinal or lazy-S incision. Carefully dissect down to the extensor mechanism. Here, the head of the middle phalanx may have buttonholed through the interval between the terminal extensor tendon and the collateral ligament. We'll gently retract the extensor mechanism and carefully release any interposed structures."
3. Gentle Reduction Maneuver:
* Surgeon's Directive: "Once the interposed structures are identified and carefully released, we'll attempt a gentle reduction. For dorsal dislocations, gentle traction and slight extension through the DIP joint can assist. For volar dislocations, gentle traction while guiding the condyle of the middle phalanx back through the interval. Avoid excessive traction, as this can tighten the interposed structures, making reduction harder."
4. Assessing Stability and Stabilization (if needed):
* Surgeon's Directive: "After reduction, we must thoroughly assess the joint's stability through a full range of motion. If the collateral ligaments are significantly disrupted or the joint remains unstable, temporary K-wire stabilization may be required. A single transarticular K-wire (0.035-inch or 0.045-inch) can be inserted across the joint, maintaining reduction for 3-4 weeks. If stable, no surgical stabilization is required."
5. Wound Closure:
* Surgeon's Directive: "Thorough irrigation. Close the capsule or flexor sheath (if opened) if possible without tension. Meticulous skin closure with fine sutures. Deflate tourniquet, check hemostasis."
Surgical Warning: DIP Dislocation Reduction
* Incomplete Reduction: Always confirm complete anatomical reduction with fluoroscopy. Residual subluxation will lead to poor outcomes.
* Neurovascular Injury: Be extremely cautious during dissection and retraction, especially when dealing with buttonholed structures.
* Excessive Force: Avoid aggressive manipulation; if reduction is difficult, reconsider the interposed structures.
Pearls and Pitfalls: Navigating the Challenges
Even with meticulous technique, complications can arise. Anticipation and prompt management are key.
Mallet Finger Repair
- Pearl: Early diagnosis and treatment, especially for bony mallet fractures, yield the best results. Percutaneous pinning is often successful if performed within 3-5 days, though it can be attempted up to 6 weeks.
- Pitfall: Pin Tract Infection: Maintain sterile technique and meticulous pin site care. If infection occurs, oral antibiotics and potentially pin removal are necessary.
- Pitfall: Loss of Reduction/Hardware Failure: If the K-wires loosen or the reduction is lost, re-pinning may be required. Ensure adequate purchase and stable fixation.
- Pitfall: Persistent Deformity/Stiffness: Despite treatment, residual dorsal prominence or slight extensor lag can occur. Aggressive, but controlled, rehabilitation is crucial.
- Pitfall: Swan Neck Deformity: Untreated mallet fingers can lead to PIP joint hyperextension. Address the DIP deformity to prevent this cascade.
FDP Avulsion Repair
- Pearl: The urgency of repair is paramount for Type I injuries due to vascular compromise. Consider staged reconstruction for chronic cases with significant tendon retraction and scarring.
- Pitfall: Re-rupture: This is the most dreaded complication. Ensure a strong repair, protect it rigorously postoperatively, and educate the patient on strict adherence to rehabilitation protocols.
- Pitfall: Tendon Adherence/Stiffness: Aggressive scarring can tether the tendon, leading to poor gliding and limited motion. Early, controlled motion protocols are designed to prevent this
Additional Intraoperative Imaging & Surgical Steps
REFERENCES
-
Cannon NM, Strickland JW. Therapy following flexor tendon surgery. Hand Clin 1985;1:147–165.
-
Hofmeister EP, Mazurek MT, Shin AY, et al. Extension block pinning for large mallet fractures. J Hand Surg Am 2003;28:453–459.
-
Leddy JP, Packer JW. Avulsion of the profundus tendon insertion in athletes. J Hand Surg Am 1977;2:66–69.
-
Leversedge FJ, Ditsios K, Goldfard CA, et al. Vascular anatomy of the human flexor digitorum profundus tendon insertion. J Hand Surg Am 2002;27:806–812.
-
Lubahn JD, Hood JM. Fractures of the distal interphalangeal joint. Clin Orthop Relat Res 1996;327:12–20.
-
McCallister WV, Ambrose HC, Katolik LI, et al. Comparison of pullout button versus suture anchor for zone I flexor tendon repair. J Hand Surg Am 2006;31:246–251.
-
Morisawa Y, Ikegami H, Izumida R. Irreducible palmar dislocation of the distal interphalangeal joint. J Hand Surg Br 2006;31:296–297.
-
Pohl AL. Irreducible dislocation of a distal interphalangeal joint. Br J Plas Surg 1976;29:227–229.
-
Schweitzer TP, Rayan GM. The terminal tendon of the digital extensor mechanism: Part I, anatomic study. J Hand Surg Am 2004;29: 898–902.
-
Smith JH. Avulsion of the profundus tendon with simultaneous intraarticular fracture of the distal phalanx—case report. J Hand Surg Am 1981;6:600–601.
-
Wehbe MA, Schneider LH. Mallet fractures. J Bone Joint Surg Am 1984;66A:658–669.
-
In the compliant patient, place-and-hold exercises, initially in the splint and then with the wrist in slight extension, are started between postoperative days 5 and 7.
-
Further progression is based on the protocol described by Cannon and Strickland, 1 and typically includes tendon glides and wrist tenodesis activities at 5 weeks, and progressive strengthening at 7 to 8 weeks.
OUTCOMES
- For extension block pinning of mallet fractures, one study by the primary author reported average time to bony union of 35 days.
-
At an average follow-up time of 74 weeks, range of motion averaged 4 to 78 degrees. 2
-
For isolated dislocations of the DIP joint, case studies suggest that active range of motion at the DIP joint from 0 to 65 degrees is regained by 4 to 12 months postreduction. 7,8
-
Most patients with FDP avulsions treated acutely are able to work between 8 and 18 weeks after the surgery, with some
-
An 8to 10-degree flexion contracture and a similar lack of terminal flexion at the DIP joint often are encountered. 6
You Might Also Like