Staged Digital Flexor Tendon Reconstruction: An Intraoperative Masterclass
Key Takeaway
This masterclass guides fellows through staged flexor tendon reconstruction, a critical procedure for chronic Zone II injuries. We cover meticulous anatomical considerations, pre-operative planning, and granular, real-time surgical execution for both silicone rod placement and definitive tendon grafting. Emphasizing optimal tensioning, pulley reconstruction, and comprehensive postoperative care, this guide prepares you for successful outcomes in complex hand surgery.
Welcome, fellows, to a deep dive into one of the most challenging, yet immensely rewarding, procedures in hand surgery: Staged Digital Flexor Tendon Reconstruction. Today, we're going to meticulously dissect the nuances of this technique, focusing on the precision, anatomical understanding, and surgical artistry required to restore function in digits afflicted by chronic flexor tendon pathology. This isn't just about placing a graft; it's about re-engineering a complex biomechanical system.
Understanding the Foundation: Pathogenesis and Anatomy
Pathogenesis and Indications
We embark on staged flexor tendon reconstruction when dealing with either a delayed diagnosis of a flexor digitorum profundus (FDP) and flexor digitorum superficialis (FDS) disruption or, more commonly, a failed previous attempt at primary repair within zone II of the digital tendon sheath. Why zone II? Because, as Bunnell famously termed it, this is "no man’s land"—a region notorious for its highest probability of developing dense adhesions and, consequently, the poorest prognosis after primary repair.
The very nature of the trauma or subsequent infection can compromise the delicate synovial lining and blood supply within the sheath, leading to a proliferative scar response. This dense scar tissue obliterates the frictionless gliding surface essential for flexor tendon function. In such scenarios, a single-stage reconstruction with a tendon graft is often doomed to failure due to immediate adhesion formation. This is precisely why we opt for a two-stage approach: the first stage establishes a neo-sheath, a frictionless conduit, using a silicone rod, preparing the bed for the definitive tendon graft in the second stage.
Without reconstruction, these injuries lead to a stiff, often painful digit, severely compromising hand function. Furthermore, repeated extension stress on an unstable digit can lead to volar plate laxity and hyperextension deformities over time.
Our key indications for this two-stage approach include:
* Loss of both FDP and FDS function.
* Presence of protective sensation in the digit.
* Nearly full passive range of motion in the affected joints.
* Good quality, supple skin overlying zone II.
* A cooperative patient, fully committed to an intensive and prolonged rehabilitation program.
* Crucially, staged flexor tendon reconstruction is contraindicated in the setting of an active infection. Any identified infection must be aggressively treated with antibiotics and débridement to minimize further destruction of the flexor tendon sheath before we even consider reconstruction.
Essential Surgical Anatomy of the Flexor System
Before we make any incision, a robust understanding of the intricate anatomy is paramount.
Flexor Tendon Zones
Let's first orient ourselves to the flexor tendon zones.
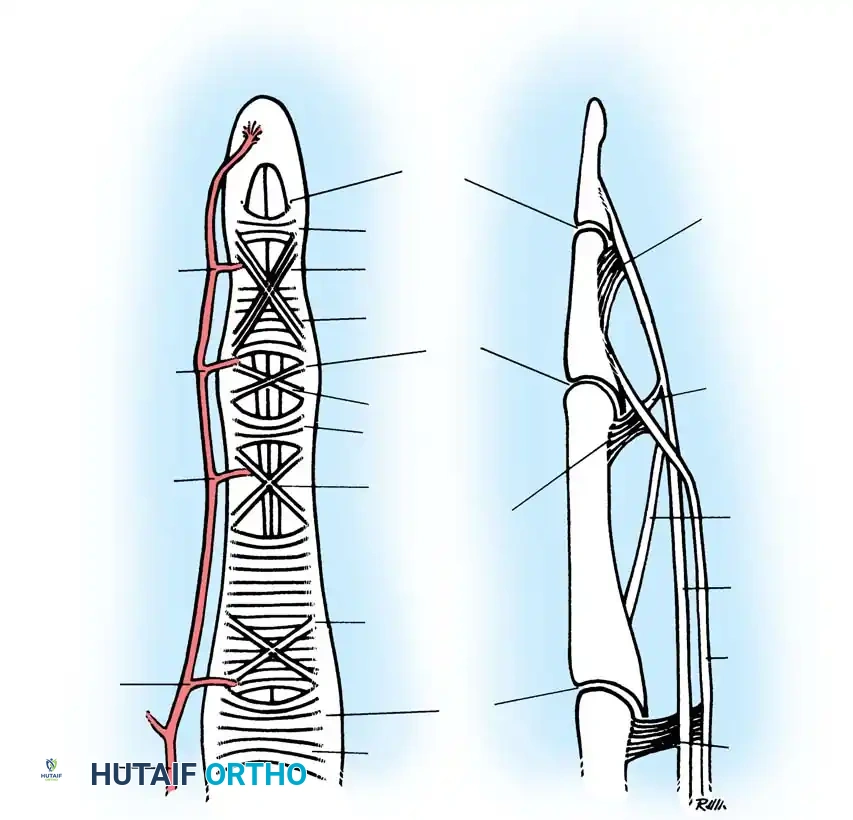
FIG 1 • A. The five flexor tendon zones of injury.
- Zone I: Distal to the FDS insertion, involving only the FDP.
- Zone II: The critical "no man's land" extending from the A1 pulley to the FDS insertion. This is where both FDP and FDS tendons traverse within the confined digital sheath, making it highly susceptible to adhesion formation.
- Zone III: From the distal edge of the carpal tunnel to the A1 pulley.
- Zone IV: The carpal tunnel itself.
- Zone V: Proximal to the carpal tunnel.
In zone II, the two flexor tendons, FDS and FDP, function synergistically, relying heavily on the digital sheath and its frictionless synovial interface for smooth gliding.
The Digital Sheath and Pulleys
The flexor tendon sheath is a fibro-osseous tunnel lined by synovium, crucial for directing tendon forces and preventing bowstringing. It comprises a series of annular (A) and cruciate (C) pulleys.
* Annular Pulleys (A1-A5): These are strong, fibrous bands. A2 and A4 are the most critical for preventing bowstringing and maintaining mechanical efficiency. A1 is at the MCP joint, A2 over the proximal phalanx, A3 at the PIP joint, A4 over the middle phalanx, and A5 at the DIP joint.
* Cruciate Pulleys (C1-C3): Thinner, more flexible structures located between the annular pulleys, allowing for greater mobility during flexion.
Loss of an A2 or A4 pulley, often due to trauma or previous surgery, leads to significant bowstringing of the flexor tendons, compromising excursion and grip strength.
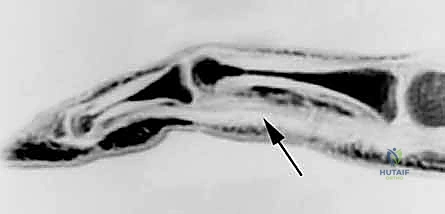
FIG 2 • Sagittal MRI showing bowstringing of a flexor tendon ( arrow ) over the proximal phalanx due to an incompetent A2 pulley.
Neurovascular Structures
The digital neurovascular bundles run along the sides of the digits, volar to the collateral ligaments. They are extremely vulnerable during incision and dissection, especially in revision cases where scar tissue can obscure normal planes. Preserving these structures is paramount for sensation and vascularity.
Camper's Chiasm and Vincula
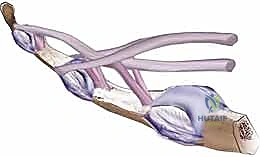
FIG 1 • B. The decussation of the flexor digitorum sublimus produces the chiasm of Camper. Both the flexor digitorum sublimus and flexor digitorum profundus receive their blood supply via the vinculum longus and brevis. A
A complicating anatomical characteristic of zone II is Camper’s chiasm, where the FDP passes through the decussating slips of the FDS. This intricate arrangement creates another potential region for adhesion formation. Both FDS and FDP receive their vital blood supply via the vincula longus and brevis, delicate vascular mesotendons. These must be handled with extreme care during any dissection to avoid ischemic damage to the remaining tendon stumps.
Preoperative Masterclass: Planning for Success
Patient History and Physical Examination
Our journey begins long before the OR doors open. A thorough patient history is crucial. Elicit details about the initial injury: when it occurred, the mechanism, and if there were associated injuries like fractures, digital nerve lacerations, or vascular compromise. For patients with previous repair attempts, ascertain when they first noticed a decrease in function.
On physical examination, we'll perform a battery of tests:
* Finger cascade: Observe the resting posture of the hand. A normal cascade shows progressively increasing flexion from the index to the small finger. Loss of this normal cascade suggests flexor tendon disruption.
* FDP examination: Isolate the FDP by holding the PIP and MCP joints in extension and asking the patient to flex the DIP joint. Loss of active DIP flexion indicates FDP disruption.
* FDS examination: Isolate the FDS by holding all other fingers in full extension (which blocks their FDPs) and asking the patient to flex the PIP joint of the digit being tested. Loss of active PIP flexion indicates FDS disruption.
* Tenodesis effect: Gently extend the wrist. The fingers should naturally flex. Then flex the wrist; the fingers should extend. Loss of this passive tenodesis effect suggests flexor tendon disruption.
* Passive Range of Motion (PROM): This is critical. We must achieve nearly full passive range of motion at the MCP, PIP, and DIP joints before proceeding with staged reconstruction. If contractures are present, intensive hand therapy must be initiated preoperatively to regain motion. Failure to do so will significantly compromise the final functional outcome.
* Vascular and Sensory Assessment: Always assess the vascular supply and digital sensation. Concomitant digital neurovascular injuries must be identified, as nerve repair is often performed during Stage 1.
Surgical Warning: Isolated chronic disruption of the FDP tendon with an intact FDS tendon is generally best treated nonoperatively. Attempts at FDP reconstruction in this scenario carry a significant risk of compromising the existing, functional FDS tendon, leading to a worse outcome.
Imaging and Diagnostic Studies
- Radiographs: Obtain plain radiographs of the hand and digits to rule out associated fractures, dislocations, or foreign bodies.
- Ultrasound or MRI: These can be invaluable for localizing the site of tendon rupture and the position of the proximal stump, especially when clinical examination is unclear due to extensive scarring.
Contraindications and Nonoperative Considerations
As mentioned, active infection is an absolute contraindication. In cases where staged reconstruction is not feasible (e.g., severe soft tissue loss, non-cooperative patient, poor skin quality), alternatives include arthrodesis of the affected joints or, in severe cases, amputation. There is no acceptable nonoperative management for combined FDS and FDP tendon lacerations if functional recovery is the goal.
Meticulous Preoperative Planning
For the second stage, we'll need a tendon graft. We must identify potential donor sites preoperatively.
* Palmaris Longus: Our primary choice if present. It's easily accessible and provides a good length.
* Long Toe Extensor (Extensor Hallucis Longus or Extensor Digitorum Longus): A reliable alternative if palmaris longus is absent.
* Plantaris Tendon: Often provides the longest segment of tendon, useful for extensive defects.
If a lower extremity donor site is anticipated, it must be prepped and draped into the surgical field.
Operating Room Setup and Patient Positioning
For both stages, the patient is positioned supine on the operating table. The arm is abducted and placed comfortably on a hand table. A non-sterile tourniquet is applied to the upper arm. This allows for a bloodless field, crucial for identifying delicate structures and minimizing bleeding. Ensure the arm is well-padded to prevent nerve compression. A C-arm fluoroscopy unit should be available and draped for potential intraoperative imaging, especially during distal fixation in Stage 2.
Stage 1: Re-establishing the Gliding Surface (Silicone Rod Placement)
Now, let's scrub in. We're ready for the first stage.
Incision and Exposure
"Alright, fellows, let's begin Stage 1. We're aiming to create a smooth, frictionless tunnel for our future tendon graft. Our initial incision will be a volar Brunner incision over the course of the flexor tendons. This zigzag pattern allows for excellent exposure while minimizing scar contracture.
Start distally, just proximal to the DIP joint, and extend it proximally into the palm, following the natural creases. For the proximal extent, we'll need a second, separate incision in the distal forearm. This ensures we can properly place the silicone rod through the carpal tunnel and allow its proximal end to glide freely with the native flexor tendons.
As we make our skin incision, be mindful of the digital neurovascular bundles running along the sides. Use a fine scalpel, maintaining skin tension, and then transition to Metzenbaum scissors for the subcutaneous dissection, carefully identifying and protecting these vital structures."
Meticulous Dissection and Adhesiolysis
"Once we're through the skin and subcutaneous tissue, we'll encounter the scarred flexor tendon sheath. Our goal here is to carefully incise this sheath, releasing all adhesions. Take your time. We need to preserve the critical A2 and A4 pulleys. These are non-negotiable for maintaining digital mechanics.
To aid in access and protect these pulleys, we can create L-shaped flaps within the flexor sheath. This involves making longitudinal incisions along the non-critical parts of the sheath and then making a transverse cut, creating a flap that can be retracted.
TECH FIG 1 • A. Creating a L-shaped flap can aid in accessing the underlying flexor sheath contents while preserving the important A2 and A4 pulleys.
Use a small scalpel or fine scissors, meticulously releasing any adhesions within the sheath. The goal is to free up the entire potential gliding space. This can be tedious, especially in severely scarred cases. Be patient. We're creating a clean, open tunnel."
Addressing Joint Contractures
"If, despite our preoperative therapy, we encounter any residual flexion contractures of the joints, this is the time to address them. We'll release the volar plate and the accessory collateral ligaments at the PIP and/or DIP joints as needed. Remember to preserve the proper collateral ligaments; these are essential for joint stability. A gentle, controlled release, often with a small scalpel or Freer elevator, is usually sufficient to restore full passive extension."
Tendon Stump Preparation
"Now, let's deal with the scarred tendon remnants. The fibrotic, non-functional tendon tissue must be excised. We'll meticulously debride all the scarred, non-viable tendon, but importantly, we want to leave a portion of the distal stump of the FDP intact at its insertion onto the distal phalanx. This stump will be our anchor point for the silicone rod, and later, for the definitive tendon graft. If there's not enough of a tendon remnant, we may need to secure the rod to surrounding periosteal tissue at the base of the distal phalanx or even use a small screw into the distal phalanx for certain rod designs."
Pulley Reconstruction: The Foundation of Function
"If the A2 or A4 pulleys are absent or have been excised during scar release, we absolutely must reconstruct them. This is a critical step to prevent bowstringing later. A small tendon graft, perhaps from a slip of the excised flexor tendon or a small portion of palmaris longus if we're harvesting it, can be used.
For A2 reconstruction, we'll pass the graft between the proximal phalanx and the extensor tendon.
For A4 reconstruction, the graft can be passed dorsal to the extensor tendon.
TECH FIG 1 • B. Tendon weaves for reconstruction of A2 and A4 pulleys.
We'll use a tendon weave technique, securing the graft to the periosteum or remaining pulley remnants to create a strong, stable loop. This reconstructed pulley will be essential for securing the silicone rod in this stage and guiding the definitive tendon graft in Stage 2."
Silicone Rod Insertion and Securing
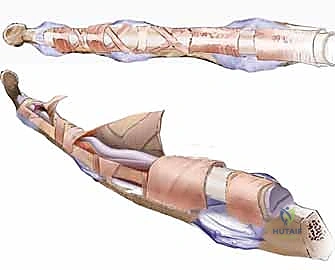
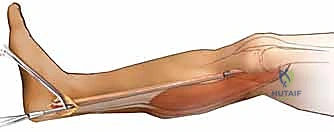
"With the sheath cleared and pulleys addressed, it's time for the star of Stage 1: the silicone Hunter rod. This rod is a passive implant, designed to create a smooth, synovial-lined pseudosheath.
We'll insert the silicone rod into the sheath. Distally, it is secured to the remnant of the FDP tendon using non-absorbable suture, typically a 3-0 or 4-0 braided polyester. We want a secure, non-tensioned attachment.
TECH FIG 1 • C. A “passive” silicone implant running under A2 and A4 pulleys is secured distally to the flexor digitorum profundus stump and extends proximally to the distal forearm.
Proximally, the silicone rod is passed through the carpal tunnel and allowed to glide freely with the native flexor tendons in the distal forearm. Ensure there's no kinking or impingement of the rod. It should move smoothly with passive digital motion. This free movement is crucial for the development of the pseudosheath."
Surgical Warning: Ensure the rod is not too tight within the reconstructed pulleys. It must glide freely. Excessive friction at this stage will hinder pseudosheath formation.
Wound Closure and Initial Postoperative Directives
"Once we're satisfied with the rod placement and hemostasis is achieved, we'll close all skin incisions with 4-0 nylon suture. A meticulous, tension-free closure is important to prevent wound complications.
The patient is then placed into a dorsal blocking splint, holding the fingers in an intrinsic plus posture (MCPs flexed, IPs extended or slightly flexed). Rehabilitation begins early, often within 1 week, focusing on regaining full passive range of motion. The goal is to ensure the scar tissue around the rod becomes soft and supple, and the pseudosheath matures. This typically takes an average of 3 months before we consider Stage 2."
Stage 2: The Definitive Reconstruction (Tendon Grafting)
Three months have passed, the pseudosheath is mature, and our patient has excellent passive range of motion. It's time for Stage 2.
Tendon Graft Harvest: Selecting Your Donor
"Fellows, for Stage 2, we need a robust tendon graft. We've already planned our donor site. Let's review the harvest techniques."
Palmaris Longus Harvest
"If the palmaris longus is present, it's our preferred choice. We'll make a small transverse incision, approximately 1-2 cm, over the distal forearm crease, just proximal to the wrist, where the palmaris longus tendon is usually palpable. Isolate the tendon. Then, make a second small incision, about 1 cm, proximally in the forearm, often just distal to the elbow crease. We'll pass a specialized tendon stripper proximally from the distal incision, around the palmaris longus muscle belly, and out through the proximal incision.
TECH FIG 2 • A. Technique for harvesting palmaris longus tendon graft.
With gentle traction on the distal end and counter-traction on the stripper, we'll avulse the tendon from its muscle belly. Close the small incisions. This provides a long, slender tendon, usually sufficient for a single-digit reconstruction."
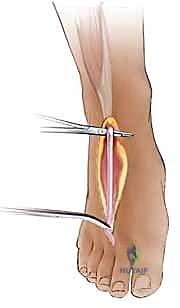
Long Toe Extensor Harvest
"If palmaris is absent, the long toe extensor (EHL or EDL) is an excellent alternative. We'll make a small transverse incision over the dorsum of the foot, typically at the level of the metatarsophalangeal joint of the second or third toe. Isolate one of the long extensor tendons. Distally, we'll detach it from its insertion. Proximally, we can use a tendon stripper, similar to the palmaris, or make a second small incision more proximally in the leg to free its muscle belly.
TECH FIG 2 • B. Technique for harvesting long toe extensor tendon graft.
Ensure adequate length, typically 15-20 cm."
Plantaris Tendon Harvest
"For situations requiring an exceptionally long graft, the plantaris tendon is ideal. This harvest is typically performed through a small incision in the posteromedial aspect of the calf, just proximal to the Achilles insertion. The plantaris tendon is usually found deep to the gastrocnemius muscle, running alongside the Achilles. It's often harvested with a tendon stripper after distal isolation. Plantaris often makes the best donor if a long segment of tendon is needed.
Once the graft is harvested, keep it moist in saline-soaked gauze. We'll be ready for placement."
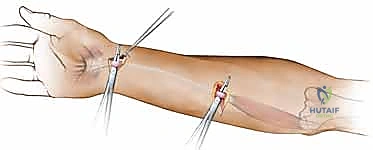
Re-exposing the Field: Distal and Proximal Access
"Now, back to the hand. We'll make a limited Brunner incision distally at the level of the DIP joint. This is crucial: do not extend this incision or dissection into zone II. We must respect the re-established tendon sheath created by the body's reaction to the silicone rod. Our goal here is simply to locate the distal FDP stump within the sheath and expose the sutures securing the silicone rod. Carefully release these sutures and free the distal end of the rod.
Next, a second incision is made in the distal forearm, often reusing the same incision from Stage 1 if the graft length permits. This allows us to localize the proximal portion of the silicone rod. If the tendon graft is shorter, our proximal junction might be in the palm, requiring a different incision there."
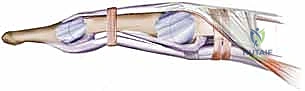
Graft Placement: The Critical Glide
"With the distal rod freed and the proximal end exposed, we're ready to pass our graft. We'll suture the distal end of our harvested tendon graft to the proximal end of the silicone rod, usually with a strong, absorbable suture like 2-0 Vicryl. This connection should be secure but not bulky.
Now, we'll gently retrieve the silicone rod from the distal wound, pulling the tendon graft smoothly into the newly formed tendon sheath.
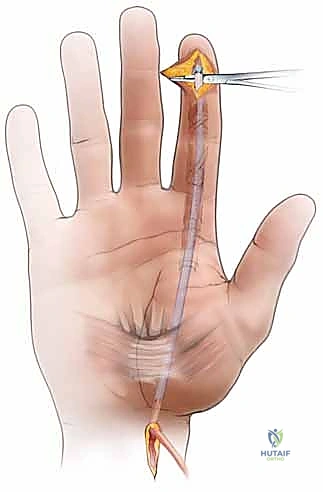
TECH FIG 3 • A. Technique for using the silicone rod to draw the tendon graft into the flexor tendon sheath and out through the distal incision.
This maneuver should be fluid and without resistance. If you encounter any hang-ups, stop and investigate. It typically means there's still some residual adhesion or impingement within the pseudosheath that needs to be addressed. Once the graft is through, detach the silicone rod and set it aside."
Distal Graft Fixation: Anchoring Success
"Now for distal fixation. We have a couple of options, but I prefer bone anchors for their reliability and reduced risk of nail complications.
The distal end of the tendon graft is secured to the distal phalanx with bone anchors. We'll choose anchors appropriate for the size of the phalanx, typically 1.5mm or 2.0mm. The anchors should be inserted precisely into the footprint of the FDP stump on the volar aspect of the distal phalanx. Angle the anchor slightly proximally to ensure it stays within the bone and does not penetrate the dorsal cortex, which could lead to complications.
TECH FIG 3 • C. A Pulvertaft weave is used for the proximal junction between the tendon graft and the flexor digitorum profundus or superficialis in the forearm. (Note: This image depicts the proximal junction, but I'm placing it here for the text flow about fixation options and will reiterate its correct context later.)
Surgical Warning: It is absolutely critical to ensure the anchor does not penetrate the DIP joint articular surface. Use fluoroscopy to confirm anchor placement if there's any doubt.
Alternatively, the tendon graft can be secured with a pullout suture tied over the nail. While historically used, this method has been associated with nail deformities after suture removal and has no proven biomechanical advantage over suture anchors. For these reasons, I generally avoid it.
For additional fixation, we can use the remaining FDP stump, if substantial enough, and secure it to the tendon graft with a non-absorbable suture in a figure-of-eight fashion. This provides a broad area of contact and enhances the strength of the repair.
Once the distal fixation is complete, we'll close the distal incision. It will become difficult to gain access to this incision after graft tension is set, so ensure meticulous closure now."
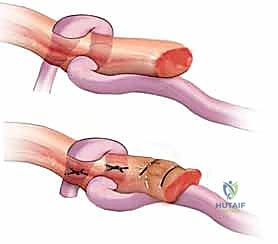
Proximal Graft Anastomosis: The Pulvertaft Weave
"Now, we move proximally. The proximal end of the tendon graft needs to be secured to the recipient tendon stump. This can be either the FDS or the FDP of the injured finger. If the initial injury is more than a few months old, the muscle belly of the injured FDP or FDS may be atrophic or scarred proximally in the forearm, limiting its postoperative excursion. In such a scenario, the recipient tendon can be a side-to-side anastomosis to the neighboring FDP, which will provide the appropriate excursion.
We'll typically use a Pulvertaft weave for this proximal junction. This is a strong, broad anastomosis that allows for good healing and force transmission.
TECH FIG 3 • C. A Pulvertaft weave is used for the proximal junction between the tendon graft and the flexor digitorum profundus or superficialis in the forearm.
Pass the graft through the recipient tendon, weave it back through itself, and secure it with multiple non-absorbable sutures (e.g., 3-0 or 4-0 braided polyester). Aim for at least three passes of the graft through the recipient tendon to maximize contact area and strength."
Setting the Tension: The Art of the Cascade
"This is arguably the most critical step in Stage 2: setting the correct tendon graft tension. This is determined from the proximal wound with the wrist in a neutral posture. We are evaluating the digital flexion cascade.
TECH FIG 3 • B. Re-creation of the normal finger cascade.
With the wrist in neutral, the fingers should naturally fall into a gentle cascade, with the small finger slightly more flexed than the ring, which is more flexed than the middle, and so on. We want to achieve this normal resting cascade.
It may be wise to exaggerate the cascade slightly at the time of surgery. Why? Because the graft will likely relax and lengthen as the patient goes through rehabilitation. A slight initial exaggeration often produces the normal cascade as the tendon graft settles.
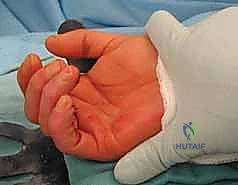
Surgical Warning: Gross exaggeration of the cascade, however, will produce a quadriga effect. This is a detrimental outcome where the uninjured digits are prevented from reaching full flexion when the reconstructed digit achieves full flexion. It's like having a single motor trying to pull four strings, and if one string is too tight, the others can't fully contract.
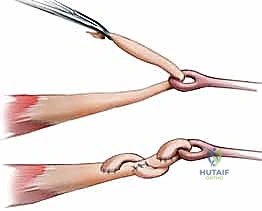
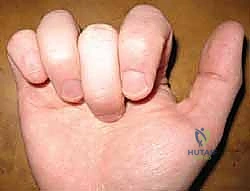
FIG 3 • Clinical photograph of the quadriga effect. The long finger, in which the flexor digitorum profundus was reconstructed, cannot achieve full flexion when the adjacent fingers are fully flexed.
Test the tension repeatedly with passive wrist and finger motion. Once you're satisfied with the cascade, complete the Pulvertaft weave and secure it meticulously."
Final Closure and Postoperative Immobilization
"With the graft tension set and all anastomoses secured, we ensure meticulous hemostasis. All skin incisions are then closed, typically with 4-0 nylon.
The patient is then placed into a dorsal blocking splint with the wrist slightly flexed (around 20-30 degrees) and the MCP and IP joints flexed (MCPs 70 degrees, IPs 30-45 degrees). This position protects the repair. Rehabilitation, under the guidance of a skilled hand therapist, will commence within a few days."
Additional Intraoperative Imaging & Surgical Steps
REFERENCES
-
Final total active motion is about 70% of the contralateral uninjured digit.
-
Amadio PC, Hunter JM, Jaeger SH, et al. The effect of vincular injury on the results of flexor tendon surgery in zone
-
J Hand Surg Am 1985;10A:626–632.
-
Beris AE, Darlis NA, Korompilias AV, et al. Two-stage flexor tendon reconstruction in zone II using a silicone rod and a pedicled intrasynovial graft. J Hand Surg Am 2003;28A:652–660.
-
Frakking TG, Depuydt KP, Kon M, et al. Retrospective outcome analysis of staged flexor tendon reconstruction. J Hand Surg Br 2000; 25B:168–174.
-
Hunter JM, Singer DI, Jaeger SH, et al. Active tendon implants in flexor tendon reconstruction. J Hand Surg Am 1988;13A:849–859.
-
Hunter JM. Staged flexor tendon reconstruction. J Hand Surg Am 1983;8A:789–793.
-
Trumble TE, Sailer SM. Flexor tendon injuries. In: Trumble TE, ed. Principles of Hand Surgery and Therapy. Philadelphia: WB Saunders, 2000:231–262.
-
Typically a significant discrepancy exists between ultimate total passive motion and total active motion. A flexion contracture of about 20 degrees at the DIP joint is common. 3
-
The most common reported complication, seen in 30% of patients, was the need for a tenolysis. 2–6
-
Other common complications that resulted in the need for further surgery included infection, tendon rupture, pulley rupture with bowstringing, and incorrect tendon tensioning. 2–6
COMPLICATIONS
- The most common complication is the development of adhesions that limit active motion. This can be assessed by a
You Might Also Like