Masterclass: Open Dorsal Approach Scaphoid Fracture Fixation with Corticocancellous Bone Grafting
Key Takeaway
This masterclass details dorsal scaphoid fracture fixation with bone grafting. Fellows will learn preoperative planning, precise anatomical dissection, K-wire guidance, and meticulous hardware placement. We cover neurovascular risks, pearls for successful union, and comprehensive postoperative care, ensuring optimal patient outcomes for challenging scaphoid nonunions or acute fractures.
Alright fellows, gather 'round. Welcome to the operating theater. Today, we're tackling a challenging case: a fractured scaphoid. Specifically, we have a Stage IIIB nonunion of the scaphoid waist in a young, active patient, necessitating open reduction, internal fixation, and corticocancellous bone graft harvest and placement. This procedure demands precision, a deep understanding of wrist anatomy, and meticulous technique. We'll be using a dorsal approach, which offers excellent visualization for waist and proximal pole fractures or nonunions, especially when dealing with kyphotic deformities.
Preoperative Planning & Patient Positioning
Before we even think about touching the skin, thorough preoperative planning is paramount.
Templating and Imaging Review
We've meticulously reviewed the patient's radiographs, CT scans, and MRI. Note the characteristic "humpback" deformity and sclerotic margins indicative of a nonunion. We've templated our screw size and length, aiming for a fully threaded, headless compression screw. Fluoroscopy is essential, and we've already confirmed the C-arm's optimal trajectory for both dorsal and lateral views of the scaphoid. We're looking for true lateral and true AP views to assess reduction and hardware placement accurately.
Patient Positioning and Setup
The patient is supine on the OR table. We'll utilize a standard hand table attachment, ensuring it's stable and allows for unrestricted C-arm access. The arm is abducted to 90 degrees, elbow flexed to 90 degrees, and the forearm pronated. This position provides optimal access to the dorsal wrist. We've applied a high-thigh tourniquet, which we'll inflate after draping to maintain a bloodless field, critical for visualizing fine anatomical structures and fracture fragments.
Fluoroscopy Setup
Our fluoroscopy unit is positioned to allow for both a true lateral and a true AP view of the wrist without repositioning the patient's arm excessively. We'll need to confirm these views frequently throughout the case. Remember, fellows, good fluoroscopy technique minimizes radiation exposure for everyone and is crucial for accurate K-wire placement.
Comprehensive Surgical Anatomy: Dorsal Wrist and Scaphoid
Let's quickly review the critical anatomy we'll encounter. The dorsal wrist is a complex region, housing numerous tendons, nerves, and vessels.
Dorsal Extensor Compartments
We'll primarily be working around Compartment 3 and Compartment 4.
* Compartment 1: Abductor pollicis longus (APL) and Extensor pollicis brevis (EPB). Located radially.
* Compartment 2: Extensor carpi radialis longus (ECRL) and brevis (ECRB).
* Compartment 3: Contains the Extensor pollicis longus (EPL) tendon. This tendon hooks around Lister’s tubercle on the dorsal aspect of the distal radius, changing its direction. We will need to transpose the EPL to access the scaphoid.
* Compartment 4: Contains the Extensor digitorum communis (EDC) and Extensor indicis proprius (EIP) tendons.
* Compartment 5: Extensor digiti minimi (EDM).
* Compartment 6: Extensor carpi ulnaris (ECU). Located ulnarly, near the ulna styloid process.
Neurovascular Structures
- Superficial branch of radial nerve: This nerve runs subcutaneously over the radial aspect of the wrist, providing sensation to the dorsum of the hand and thumb. It's highly susceptible to injury during skin incision and subcutaneous dissection. We must protect it.
- Dorsal cutaneous branch of the ulnar nerve: Less commonly encountered with a radial dorsal approach, but always in the back of our minds for ulnar-sided dissections.
- Posterior interosseous nerve: A terminal branch of the deep radial nerve, it typically innervates the dorsal wrist capsule. It's often ligated or cauterized during dorsal capsulotomy, as it's purely sensory to the joint capsule and its sacrifice generally has no functional deficit.
- Radial artery: While primarily volar, dorsal branches are present and must be protected.
Osteology and Ligamentous Anatomy
We're focusing on the scaphoid, which articulates with the radius proximally, the lunate medially, and the capitate distally. The dorsal radiocarpal ligament is a key stabilizer and will be encountered during capsulotomy. The radial column of the wrist, which includes the scaphoid, is crucial for load bearing. Our goal is to restore its length and alignment.
Step-by-Step Intraoperative Execution: The Operating Surgeon's Viewpoint
Alright, fellows, let's get scrubbed in.
1. Incision and Initial Dissection
"Scalpel, please. We'll make a longitudinal incision approximately 4-5 cm long, centered over Lister’s tubercle. This landmark is crucial for our dorsal approach. I'm extending it slightly proximally and distally to ensure adequate exposure."
"Now, careful subcutaneous dissection with the Bovie. Remember our neurovascular warning: protect the superficial branch of the radial nerve. It typically crosses our field radially. We're using skin hooks to maintain tension, and I'm looking for the glistening white fibers of the extensor retinaculum."
Surgical Warning: Always be mindful of the superficial branch of the radial nerve. Aggressive retraction or careless dissection can lead to paresthesias or painful neuromas. Identify it if possible and protect it with a vessel loop or careful retraction.
2. Retinacular Incision and Extensor Tendon Management
"Here's the extensor retinaculum. We'll make a longitudinal incision directly over Compartment 3, which houses the Extensor pollicis longus (EPL). I'm incising the retinaculum sharply, releasing the EPL from its tunnel. See how it springs free?"
"Now, we'll gently retract the EPL radially. This creates an empty third dorsal compartment, giving us direct access to the dorsal wrist capsule over the scaphoid. We'll also identify and protect the tendons of Compartment 4 (EDC) and Compartment 2 (ECRL/ECRB) as we proceed."
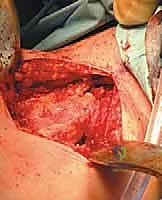
3. Capsulotomy and Scaphoid Exposure
"Next, we need to open the dorsal wrist capsule. I'm making a longitudinal capsulotomy directly over the scaphoid, extending from the distal radius to the midcarpal joint. Be precise here. We want to create a capsular flap that we can repair later. As we open the capsule, you might see some inflamed synovial tissue if this is a chronic nonunion, which we'll debride gently."
"Now, fellows, observe the fractured scaphoid. We can clearly see the proximal and distal poles, and the nonunion site. There's significant sclerosis and often a 'humpback' deformity, meaning the scaphoid is foreshortened and flexed. Our primary goal is to correct this deformity, restore the radial column length, and achieve stable fixation."
Surgical Warning: Ligation of the posterior division of the anterior interosseous artery may be necessary if it's encountered within the capsule or dorsal scaphoid pole. This vessel contributes to the dorsal blood supply of the scaphoid, but its sacrifice is generally well-tolerated given the dorsal approach and the need for clear visualization.
4. Fracture Debridement and Reduction
"Using a small osteotome or a curette, I'm meticulously debriding the nonunion site. We need to remove all sclerotic bone, fibrous tissue, and avascular fragments until we see healthy, bleeding bone on both fracture surfaces. This is critical for promoting bone healing. Use a small dental probe to ensure complete debridement."
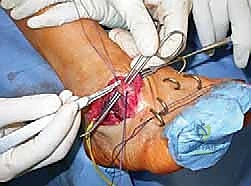
"Now for reduction. This is where the 'K-wire joystick' technique comes into play. I'm inserting a 0.062 K-wire into the proximal pole and another into the distal pole of the scaphoid. Gently, we'll use these K-wire joysticks to manipulate the fragments. Our aim is to restore anatomical alignment, correct the kyphosis, and achieve scaphoid length. We're looking for a good fit, like two puzzle pieces coming together."
"Once reduced, I'll temporarily fix the reduction with a third K-wire, driven across the fracture site from distal to proximal, ensuring it's not in the path of our planned screw. Fluoroscopy, please, AP and lateral views. Excellent, the reduction looks good."
5. Corticocancellous Bone Graft Harvest
"While I hold the reduction, Dr. Smith, please prepare for the corticocancellous bone graft harvest. We'll take this from the distal radius, just proximal to our incision, ensuring we stay clear of the joint. Make a small cortical window, and use a curved osteotome or curette to harvest cancellous bone. We need enough graft material to fill the defect at the nonunion site completely. The small cortical window can be used as a cap for the graft."
Surgical Pearl: Ensure the bone graft is packed tightly into the debrided nonunion site. A well-packed graft provides structural support and osteoinductive properties, significantly improving healing rates.
6. Guidewire Placement and Screw Insertion
"Now for the definitive fixation. We'll use a cannulated headless compression screw. The key is precise guidewire placement. We're aiming for the central axis of the scaphoid."
"I'm inserting the first 0.062 K-wire dorsally. This is our dorsal entry of guidewire. It needs to be central in the proximal fragment, traverse the fracture site, and exit volarly. We're drilling under constant fluoroscopic guidance. Check the AP and lateral views frequently. We want to avoid penetrating the articular cartilage of the radius or capitate."
"Once the guidewire is across, we'll confirm its position. If the fracture is stable and we're confident in the reduction, we can consider removing the temporary K-wires. I'm carefully advancing the guidewire until we see its volar exit of guidewire just beneath the skin on the volar aspect of the wrist. This ensures maximum purchase."
Surgical Warning: Misplacement of the guidewire is a common pitfall. It can lead to malreduction, articular penetration, or inadequate fixation. Take your time, use multiple fluoroscopic views, and don't hesitate to re-insert if you're not perfectly centered.
"Now, we'll measure the length of the guidewire to determine our screw length. Ream the bone over the guidewire according to the screw system's protocol, ensuring proper countersinking of the screw head below the cartilage surface. Finally, advance the cannulated screw over the guidewire. Feel that compression as the screw engages both fragments. Fluoroscopy, final AP and lateral views. Excellent. The screw is well-placed, and the reduction is maintained."
7. Wound Closure and Retinacular Repair
"With the fixation secure, we'll irrigate the wound thoroughly. Now, for closure. We'll repair the dorsal wrist capsule with absorbable sutures, using a 3-0 absorbable suture. This helps restore joint mechanics and prevent adhesion formation."
"Next, we'll repair the extensor retinaculum. I'll use a 2-0 absorbable suture. We can use a resected edge of retinaculum if needed for a lax repair, or simply reapproximate the incised edges. The goal is to restore the retinacular sling for the EPL, but not too tightly, to prevent impingement. We've successfully transposed the Extensor pollicis longus back into its anatomical position."
"Finally, subcutaneous layers and skin closure. I'll use 3-0 absorbable sutures for the subcutaneous tissue and a running 4-0 nylon for the skin. A sterile dressing and a sugar tong splint will be applied."
Pearls and Pitfalls
- Nonunion Debridement: The most common reason for nonunion failure is inadequate debridement of sclerotic bone. You must see healthy, punctate bleeding bone.
- Reduction Quality: Anatomic reduction is paramount. Any residual kyphosis or foreshortening will compromise healing and long-term function. Use those K-wire joysticks effectively.
- Guidewire Malposition: As discussed, this is critical. Constant fluoroscopic feedback is non-negotiable. If the guidewire is too dorsal, it can damage the dorsal cortex; too volar, it can enter the FCR tendon sheath or even the radial artery.
- Vascular Injury: While rare with this approach, the radial artery and its branches are always a concern, especially during volar guidewire exit or if a volar approach is considered. The posterior division of the anterior interosseous artery is often encountered and ligated dorsally.
- Nerve Injury: The superficial branch of the radial nerve is the most common iatrogenic injury. Careful dissection and retraction are key.
- Salvage for Intraoperative Disasters:
- Failed Reduction: If reduction cannot be achieved with K-wire joysticks, consider a mini-open volar approach to assist with manipulation or utilize a distractor.
- Guidewire Breakage: If a K-wire breaks, retrieve it carefully. If it's embedded and difficult to remove, it might necessitate a larger exposure or even leaving a small, inert fragment if it's not interfering with joint function or hardware.
- Screw Malposition: If the screw is clearly malpositioned (e.g., intra-articular, too short, or not achieving compression), remove it, re-insert the guidewire, and re-drill. Do not hesitate to start over. It's better to spend an extra 10 minutes than to have a failed fixation.
Postoperative Rehabilitation & Complication Management
Our work isn't done when the patient leaves the OR. Postoperative care is just as critical for a successful outcome.
Immobilization and Weight-Bearing
The patient will be placed in a sugar tong splint for approximately 6-8 weeks, followed by a short arm cast or removable brace. Strict non-weight-bearing is enforced for at least 10-12 weeks, or until radiographic signs of union are evident. Premature weight-bearing can lead to hardware failure or nonunion.
Range of Motion (ROM) Protocols
- Early: Finger and elbow ROM exercises are encouraged immediately to prevent stiffness.
- After Immobilization: Once radiographic union is confirmed, a gradual, supervised rehabilitation program will begin with a hand therapist. This will focus on regaining wrist ROM, grip strength, and fine motor control. We'll start with gentle active ROM, progressing to passive ROM and strengthening exercises.
DVT Prophylaxis
For any upper extremity surgery, especially with prolonged immobilization, we consider DVT prophylaxis, though it's less common than in lower extremity procedures. Patient ambulation and early finger/shoulder movement are usually sufficient.
Complication Management
- Wound Dehiscence/Infection: Meticulous wound care, appropriate antibiotics if infection is suspected, and potentially surgical debridement if severe.
- Hardware Failure: If the screw loosens or breaks, it typically indicates a persistent nonunion. This would necessitate revision surgery, potentially with a different approach (e.g., volar) or a more robust bone grafting technique.
- Persistent Nonunion: Despite our best efforts, scaphoid nonunions can be stubborn. If union is not achieved, further intervention, possibly with vascularized bone grafting, may be required.
- Stiffness: Aggressive hand therapy is crucial. If conservative measures fail, consider tenolysis or capsulolysis, but only after complete bone healing.
That concludes our masterclass on dorsal scaphoid fracture fixation. Remember, fellows, surgical excellence is not just about technique; it's about preparation, anatomical knowledge, critical thinking, and meticulous follow-through. Any questions?
You Might Also Like