Osteochondral Autograft Plug Transfer: A Masterclass in Articular Cartilage Restoration

Key Takeaway
Join us in the OR for a masterclass on osteochondral autograft plug transfer. We'll meticulously restore full-thickness articular cartilage lesions, detailing comprehensive anatomy, precise preoperative planning, and granular intraoperative execution. Learn critical techniques for graft harvest and delivery, navigate potential pitfalls, and ensure optimal patient outcomes through expert postoperative management.
Welcome, fellows, to the operating theater. Today, we're performing an osteochondral autograft "plug" transfer, a sophisticated technique for treating focal, full-thickness articular cartilage lesions, often with associated subchondral bone loss, in a nonarthritic joint. This procedure aims to restore the native bone contour and the articular surface by transplanting healthy cartilage and its underlying bone from a less critical donor site to the defect. We're essentially moving a cylinder, or "plug," of viable tissue, complete with its functional tidemark and subchondral bone, to precisely match a prepared recipient hole. Depending on the defect size, we may employ multiple plugs to achieve comprehensive coverage.
Foundational Surgical Anatomy: The Articular Cartilage and Knee Joint
Before we even consider making an incision, a profound understanding of articular cartilage and the surrounding knee anatomy is paramount.
The Intricate Structure of Articular Cartilage
Articular cartilage is a marvel of biological engineering. It's a smooth, viscoelastic, hypocellular structure, primarily composed of sparsely distributed chondrocytes within a vast extracellular matrix. This matrix is approximately 80% water and 20% collagen, predominantly Type II collagen, which accounts for 95% of its total collagen content. The collagen fibers provide tensile strength and form, while water imparts its substance, allowing it to withstand significant, recurring compressive loads with an incredibly low coefficient of friction—estimated to be 20% of ice on ice. This remarkable tissue transmits loads uniformly across the joint and provides that smooth, gliding surface essential for normal and athletic activity.
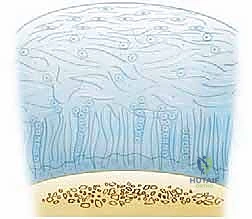
Let's break down its four distinct zones, as visualized in Figure 1, and understand their biomechanical roles:
-
Superficial (Tangential) Zone (10%-20% of thickness):
- This is the thinnest, outermost layer, often called the "gliding zone." Its collagen fibers are oriented parallel to the joint surface, providing resistance to both compressive and shear forces.
- The surface layer, the lamina splendens, is cell-free and consists of randomly oriented flat bundles of fine collagen fibrils. Underneath, more densely packed collagen fibers are interspersed with elongated, oval chondrocytes, also oriented parallel to the articular surface.
- Clinical Pearl: This zone acts as a crucial barrier, limiting the penetration of large molecules into the deeper layers and preventing the loss of vital molecules from the cartilage into the synovial fluid. Maintaining its integrity during harvest and implantation is critical for graft longevity.
-
Middle (Transitional) Zone (40%-60% of thickness):
- This is the thickest zone, where collagen fibers begin to orient parallel to the plane of joint motion, primarily resisting compressive forces.
- It boasts more proteoglycans and less water and collagen compared to the superficial zone. Chondrocytes here are more spherical and show more cellular structures, indicative of active matrix synthesis.
- The collagen bundles are arranged in the classic "arcades of Benninghoff" formation.
-
Deep (Radial) Zone (30% of thickness):
- Here, collagen fibers are oriented perpendicularly to the articular surface, making this zone crucial for resisting both compressive and shear forces.
- The round chondrocytes are arranged in columns perpendicular to the joint surface.
-
Calcified Zone:
- This is the deepest zone, a thin layer of calcified cartilage that forms a boundary with the underlying subchondral bone.
- The tidemark, located at the base of the deep zone, represents the transition from the deep zone to the calcified cartilage. It's a critical interface that resists shear stress and acts as an anchor between the articular cartilage and the subchondral bone.
- Surgical Significance: Harvesting a plug that includes the tidemark and a sufficient amount of subchondral bone is paramount. This ensures the graft has a stable anchor and maintains the structural integrity and biomechanical properties of the native tissue.
Relevant Osteology, Muscular Intervals, and Neurovascular Considerations of the Knee
For autograft transfer in the knee, we must be intimately familiar with the bony landmarks, muscle groups, and neurovascular structures, especially around potential donor and recipient sites.
-
Osteology:
- Femoral Condyles: The primary site for lesions and donor grafts. The lateral aspect of the medial femoral condyle is a common site for osteochondritis dissecans (OCD) lesions. Non-weight-bearing portions of the condyles (e.g., intercondylar notch, superior medial or lateral femoral condyles above the linea terminalis) are preferred donor sites.
- Tibial Plateau: Can be a recipient site, but less common for autograft harvest due to weight-bearing concerns.
- Patella and Trochlea: Also potential sites for lesions and, less commonly, donor grafts.
- Intercondylar Notch: A prime arthroscopic donor site, offering ready access and minimizing the need for an arthrotomy.
-
Muscular Intervals & Approaches:
- For an arthroscopic approach, we typically utilize standard portals (anteromedial, anterolateral) and accessory portals. These portals navigate between muscle groups and tendons, minimizing muscle damage.
- If an arthrotomy is required (e.g., for larger lesions or difficult access), a medial parapatellar approach is common, dissecting between the vastus medialis and the sartorius fascia, or a lateral parapatellar approach. We must be mindful of the quadriceps mechanism.
-
Neurovascular Risks:
- Popliteal Artery and Vein: These major vessels lie posterior to the knee joint. Deep dissection or posterior portal placement carries a risk of injury.
- Tibial Nerve: Runs with the popliteal vessels, posterior to the knee.
- Common Peroneal Nerve: Wraps around the fibular neck laterally. While less directly at risk during intra-articular work, care must be taken with retractors or external pressure, especially in the context of leg holders.
- Saphenous Nerve and Vein: Medial to the knee, superficial. Risk during medial portal placement or arthrotomy.
- Infrapatellar Branch of the Saphenous Nerve: Vulnerable during anteromedial portal placement, leading to numbness or neuroma formation.
- Surgical Warning: Always be cognizant of these structures. Careful portal placement, limited depth of dissection, and precise instrument manipulation are paramount.
Pathogenesis and Clinical Presentation
Chondral damage can arise from various mechanisms: a pivoting twisting fall, significant direct impacts to the knee, anterior cruciate ligament (ACL) tears, or patellar dislocation.
These injuries can lead to full-thickness chondral lesions that are often clinically silent initially, but should always be suspected in traumatic hemarthrosis, especially with ligament disruption. Patients commonly report localized pain, a persistent dull ache worsening after activity, or pain most noticeable when falling asleep. Activities like running, stair climbing, rising from a chair, squatting, or prolonged sitting can aggravate symptoms.
On physical examination, findings are often nonspecific but include:
* Joint line tenderness.
* Effusion, suggesting intra-articular pathology.
* Crepitus, grinding, or catching.
* Pain on direct palpation of the femoral condyles.
* Decreased range of motion.
* A positive Lachman test indicating ACL instability, a known precursor to cartilage injury.
* Malalignment of the tibia to the femur, leading to abnormal chondral wear.
* A positive patellar apprehension test signaling medial patellofemoral ligament damage.
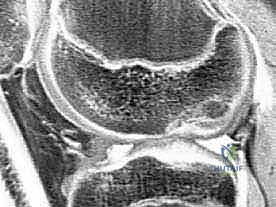
Osteochondritis dissecans (OCD) is a specific type of lesion involving separation of subchondral bone and cartilage from surrounding healthy tissues. It most commonly occurs in the lateral aspect of the medial femoral condyle.
Imaging and Diagnostic Studies
A thorough diagnostic workup is essential.
Radiographic Evaluation
A standard radiographic knee evaluation is our first step:
* Standing Anteroposterior (AP) views in full extension: To identify angular changes and compare joint space height.
* 45-degree Flexion Posteroanterior (PA) weight-bearing view: Crucial for identifying subtle joint space narrowing, which can be missed on full extension views.
* Non–weight-bearing Lateral view (45-degree flexion): With posterior femoral condyles overlapping, this view helps assess the posterior aspects of the condyles.
* Axial view of both patellae: Essential for evaluating patellar alignment and trochlear morphology.
* AP knee flexion view: Excellent for outlining the femoral intercondylar notch and best demonstrating osteochondritis dissecans lesions, particularly those in the lateral aspect of the medial femoral condyle.
* Long-leg hip-to-ankle films: Accurately determine varus or valgus alignment, which is critical for assessing overall limb mechanics and ruling out significant angular changes that contraindicate autografting.
Magnetic Resonance Imaging (MRI)
MRI is our gold standard for cartilage evaluation, boasting high sensitivity and specificity.
* Sequences: Clinically proven cartilage-sensitive sequences include T1-weighted gradient echo with fat suppression and fast spin-echo sequences with and without fat suppression. These protocols allow us to detect full- and partial-thickness lesions, as well as osteochondritis dissecans, even when clinically silent.
* Utility: MRI helps us characterize the lesion size, depth, and the integrity of the subchondral bone, which is vital for surgical planning. It can also detect associated pathologies like meniscal tears or ligament injuries.
Differential Diagnosis
When evaluating a patient with knee pain and suspected chondral damage, consider these:
* Partial or full-thickness cartilage lesion
* Osteonecrosis
* Osteochondritis dissecans
* Meniscal tear
* Ligament injuries
Natural History and Nonoperative Management
Articular cartilage has extremely limited regeneration potential. Full-thickness lesions have little spontaneous healing capacity, and further degeneration is likely. Experimental models suggest severe bone bruises and associated chondral necrosis can be precursors to degenerative changes. Instability from ACL loss is a known contributor to osteoarthritis onset.
Nonoperative treatment for discrete, full-thickness chondral lesions typically involves:
* Physical therapy to restore range of motion and strength.
* Anti-inflammatory medication.
* Activity modification to avoid high-impact or patella-destabilizing activities.
* Bracing: Patellar stabilizing braces for patellofemoral instability, or load-shifting braces to unload an injured compartment.
* Shoe inserts with appropriate heel and sole wedges for compartment unloading.
Clinical Reality: While these measures can provide symptomatic relief, they are generally more effective for medial femoral condyle lesions than lateral ones, and importantly, they do not address the underlying structural defect. Patients must understand that nonoperative management for full-thickness lesions often leads to progressive degeneration.
Preoperative Planning: The Blueprint for Success
Meticulous preoperative planning is the cornerstone of a successful osteochondral autograft transfer.
Patient Selection and Indications
- Indications: Discrete, isolated, full-thickness articular cartilage lesions between 1.0 and 2.5 cm in diameter. While acceptable results with larger defects have been reported, consistency is lacking.

* Contraindications:
* Opposing full-thickness articular cartilage damage ("kissing" lesions).
* Multiple-compartment full-thickness lesions.
* Significant angular changes (varus/valgus malalignment).
* History of joint infection.
* Intra-articular fracture.
* Rheumatoid arthritis or other inflammatory arthropathies.
* Lesion Location: Most commonly performed on the femoral condyle, but osteochondral autograft transplantation of the trochlea, patella, tibial plateau, humerus, and talus has also been reported.
Optimizing Graft Viability and Stability
The success of this procedure hinges on maintaining viable chondrocytes. Confocal microscopy studies have shown that excessive pressure on articular cartilage cells leads to cell death. Several technical issues contribute to transplanted cell death:
* High impact pressure during insertion: We must minimize this.
* Proud grafts: Grafts that are not advanced to the level of the adjacent native articular cartilage. These create areas of high stress and can shear off.
* Sunken grafts: Grafts depressed 2 mm or more compared to the adjacent articular cartilage. These create incongruity and can lead to early degeneration.
The ideal technique optimizes graft position and stability, provides for consistent graft length harvesting, and minimizes the forces required to insert the grafts.
Imaging Review and Surgical Approach
- All radiographs and MRI images must be meticulously reviewed to confirm the lesion's suitability and determine if an arthroscopic approach is feasible or if an arthrotomy is needed.
- Perpendicularity: Perpendicular placement of both the harvester at the donor site and the drill at the recipient site to the articular surface is absolutely required. Systems like the COR transfer system have a unique "perpendicularity" guide to enhance this.
- Depth Adjustment: If the depth of subchondral bone loss exceeds 6 mm, we must adjust the harvested graft accordingly to ensure adequate fill and restoration of the subchondral plate.
- Concomitant Procedures: Any ligament instability or malalignment (e.g., ACL tears) should be corrected at the time of autografting to avoid increased failure rates. Improved results are seen with concomitant ACL reconstruction. Meniscal repairs can also be performed.
- Material Availability: Ensure any necessary allograft or synthetic materials are available in the operating room, though for autograft, this is less common.
Patient Positioning and OR Setup
- Patient Positioning: The patient is positioned supine on the operating table. The operative knee is placed in an arthroscopic leg holder, with the knee flexed off the table.
- Crucial Check: Before operative preparation and draping, it is absolutely crucial to confirm that the knee can be flexed adequately to access both the lesion and the chosen donor site. If not, the leg holder may need to be removed, and the operative leg draped free to obtain enough knee flexion and mobility.
- Contralateral Leg: The contralateral leg must be well padded and positioned out of the operative field to prevent pressure injuries.
- OR Table Attachments: Standard leg holder, possibly a foot holder if free-draping, and appropriate padding.
- Fluoroscopy Setup: While not always mandatory for arthroscopic autografting, fluoroscopy may be helpful in cases of complex subchondral bone loss or when confirming the depth and perpendicularity of recipient holes, especially if an arthrotomy is performed. The C-arm should be readily available and draped.
- Tourniquet: A pneumatic tourniquet will be applied to the proximal thigh of the operative leg to ensure a bloodless field, which is essential for clear visualization of the articular cartilage.
Intraoperative Masterclass: Step-by-Step Execution
Alright, fellows, let's scrub in. We've got our patient positioned, prepped, and draped. Tourniquet is up.
Step 1: Diagnostic Arthroscopy and Portal Planning
Our first critical step is a thorough diagnostic arthroscopy. This is not just a quick peek; it's a systematic evaluation of the entire joint.
- Standard Portals: We'll start with our standard anterolateral and anteromedial portals.
- Surgical Directive: "Nurse, please hand me the 16-gauge spinal needle."
- Technique: I'm using this needle to precisely identify the optimal entry points for our portals. We want to ensure a perpendicular approach to both the defect and the potential donor sites. This is key for accurate harvesting and implantation.
- Visualization: I'm systematically examining all compartments: patellofemoral, medial, lateral, and the intercondylar notch. I'll sweep the scope into the posterior recesses and underneath the menisci, looking for any loose chondral pieces, meniscal tears, or other pathology.
- Synovectomy: "Suction, please. We need an adequate synovectomy, especially of the fat pad, to facilitate complete visualization of both the defect and our chosen harvest sites." Clear visualization is non-negotiable.
- Rule Out Contraindications: During this diagnostic phase, we must confirm that no contraindications to the procedure exist. This includes looking for kissing lesions, extensive multi-compartment disease, or signs of inflammatory arthropathy.
- Concomitant Pathology: "Fellows, notice the integrity of the ligaments. If we identify any significant ligament instability, particularly an ACL tear, we'll address that after the osteochondral transplantation. Correcting instability first is paramount to the long-term success of our graft."
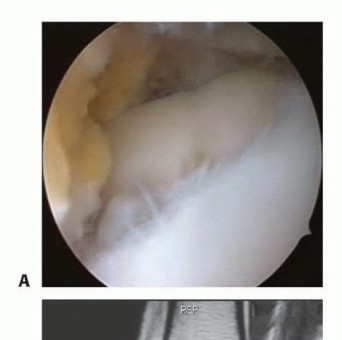
Step 2: Lesion Evaluation and Preparation
Now that we've confirmed the suitability of the lesion, let's focus on the defect itself.
- Defect Assessment:
- Surgical Directive: "Hand me the arthroscopic probe, please."
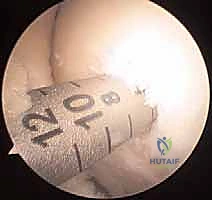
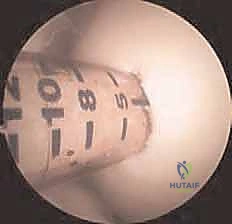
- Technique: I'm using the probe to meticulously assess the defect's size, shape, and depth. We're looking for the exact dimensions to plan our graft strategy. I'll use the 2-mm marks on the probe to estimate the depth of the lesion.
- Depth Consideration: "In most cases, the standard 10 to 12-mm harvester depth will be sufficient to fill the defect. However, if our preoperative imaging or intraoperative probing reveals subchondral bone loss exceeding 6 mm, we'll need to adjust our graft length accordingly to ensure proper fill and stability."
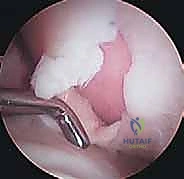
- Defect Preparation:
- Surgical Directive: "Now, let's prepare the defect. I need a curette and an arthroscopic knife."
- Technique: We're going to meticulously remove all loose debris and any residual articular cartilage within the lesion. The goal is to create perpendicular, healthy chondral walls around the defect. This provides a clean, stable bed for our graft.
- Surgical Warning:
> "Be precise here, fellows. We want to clear the subchondral bone of any residual cartilage, but avoid generalized bone bleeding. Excessive bleeding can impair graft integration and healing." - Visual Confirmation: "Look closely at these edges. They should be crisp and perpendicular, creating a well-defined recipient bed."
Step 3: Determining the Number and Size of Grafts
With the defect prepared, we plan our graft strategy.
- Defect Measurement:
- Surgical Directive: "Let's re-measure the defect using the probe to finalize our plan for graft placement."
- Technique: I'm using the probe to obtain a preliminary, yet precise, measurement of the defect’s shape and dimensions. This helps us visualize how many plugs will be needed and their optimal arrangement.
2. Graft Strategy:
* "Our plan is to place the grafts starting at the periphery of the defect. This allows the articular cartilage of the graft to match the adjacent native chondral edge after transplantation, creating a seamless transition."
* Optimal Plug Size: "For most defects, a series of 6 mm diameter grafts fills the defect best, minimizing the number of plugs while ensuring good coverage and maintaining structural integrity."
* Bone Bridge: "When using more than one graft, it is critical to maintain a 2–3-mm bone bridge between the recipient sites. This ensures a good press fit and prevents stress shielding or weakening of the subchondral bone."
* Harvester Selection: "Larger-plug harvesters are available, but they often require an arthrotomy for access and are more likely to encroach on weight-bearing areas at the donor sites, increasing donor site morbidity. We'll stick with 6mm plugs for this case."
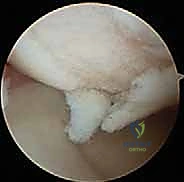
Step 4: Donor Site Selection and Graft Harvest
This is where the COR osteochondral repair system shines, allowing for precise harvesting.
- Donor Site Selection:
- Preference: "Our preferred donor site in the knee is typically the intercondylar notch or the superior medial or lateral femoral condyles, above the linea terminalis. These are non-weight-bearing areas, minimizing donor site morbidity. The intercondylar notch is particularly advantageous for arthroscopic access, avoiding the need for an arthrotomy."
- Perpendicularity Check: "Again, we'll use our 16-gauge needle to confirm the best portal placement for a perpendicular approach to our chosen donor site."
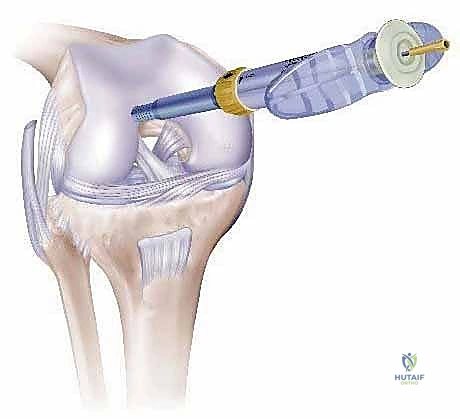
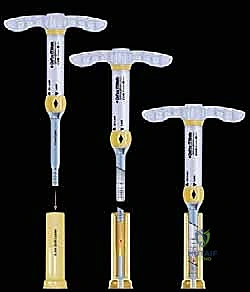
- Graft Harvesting (Using COR System):
- Surgical Directive: "Nurse, prepare the COR system harvester, 6mm diameter, set to 12mm depth."
- Technique:
- "We position the harvester precisely over the selected donor site. The COR system's 'perpendicularity' guide is invaluable here. We must ensure the harvester is perfectly perpendicular to the articular surface. Any angulation will result in an elliptical or beveled plug, leading to a poor fit and compromised integration."
- "Under direct arthroscopic visualization, I'm gently advancing the harvester. The goal is a smooth, controlled cut, capturing a full-thickness cylinder of healthy cartilage, the tidemark, and an adequate amount of subchondral bone."
- "Feel for the tactile feedback as the harvester engages the bone. Once the desired depth is reached, we carefully extract the plug."
- Surgical Warning:
> "Avoid any rotational forces during extraction that could shear the cartilage from the bone. The plug should be removed cleanly, preserving chondrocyte viability." - "Once harvested, the plug is immediately transferred to a sterile holding solution to maintain chondrocyte viability while we prepare the recipient site."
- Comparison to Other Systems:
- OATS System (Arthrex): In contrast to COR, the OATS system typically requires underdrilling of the recipient sites by 2 mm and a final "impaction" step to improve graft stability. While designed for stability, this impaction can place additional stress on the graft's articular cartilage. Also, with OATS, the donor plug is harvested first before creating the recipient hole to avoid donor-recipient site mismatch.
- MosaicPlasty System (Smith & Nephew): This system required overdrilling of the recipient site by 2 mm, creating space for debris and allowing the graft to "float" into place. Similar to OATS, the donor plug is harvested first.
- Clinical Pearl: The COR system aims for a precise, same-length plug and recipient hole, minimizing impact forces and optimizing cell survival, which is a key advantage.
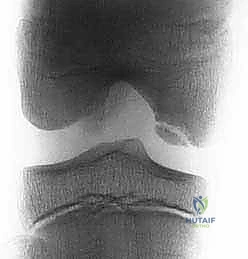
Step 5: Recipient Site Preparation
Now we move to the defect itself to prepare it for our precious graft.
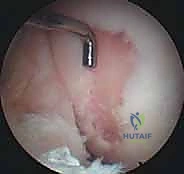
- Drilling the Recipient Hole:
- Surgical Directive: "I need the COR system drill, 6mm diameter, set to 12mm depth, and the perpendicularity guide."
- Technique:
- "Position the drill guide precisely over the prepared defect. Again, the perpendicularity guide is paramount. We must drill a recipient hole that is perfectly perpendicular to the articular surface and precisely matches the diameter and length of our harvested plug."
- "Drill slowly and under constant arthroscopic visualization. Irrigate frequently to clear debris and prevent thermal necrosis of the surrounding bone. We want a clean, cylindrical hole."
- Surgical Warning:
> "Drill under constant fluoroscopic guidance if there's any doubt about depth or trajectory, especially to prevent inadvertent penetration of the posterior cortex or neurovascular structures. Always confirm your trajectory and depth." - Matching Depth: "The depth of the recipient hole should precisely match the length of the harvested plug. This is crucial to prevent proud or sunken grafts."
2. Multiple Holes: "If we're using multiple plugs, we'll repeat this drilling process, maintaining that 2-3mm bone bridge between each hole to ensure good press fit and structural integrity."
Step 6: Graft Delivery and Impaction
This is the moment of truth – placing our autograft.
- Graft Placement:
- Surgical Directive: "Retrieve the first harvested plug from the holding solution. I'll need the graft inserter from the COR system."
- Technique:
- "Carefully load the
Additional Intraoperative Imaging & Surgical Steps
REFERENCES
-
Patellar or patellar and trochlear mosaicplasties have been reported to have good to excellent results in 79% of patients. 9,23
-
Ahmad CS, Cohen ZA, Levine WN, et al. Biomechanical and topographic considerations for autologous osteochondral grafting in the knee. Am J Sports Med 2001;29:201–206.
-
Barber FA, Chow JC. Arthroscopic chondral osseous autograft transplantation (COR procedure) for femoral defects. Arthroscopy 2006; 22:10–16.
-
Barber FA, Chow JC. Arthroscopic osteochondral transplantation: histologic results. Arthroscopy 2001;17:832–835.
-
Allograft has been shown to be an effective treatment for patellofemoral disease. 14,23
-
Comparisons of osteochondral transplantation with microfracture, Pridie drilling, and abrasion arthroplasty have shown better results with osteochondral transplantation. 6,10
-
Diduch DR, Chhabra A, Blessey P, et al. Osteochondral autograft plug transfer: achieving perpendicularity. J Knee Surg 2003;16:17–20.
-
Duchow J, Hess T, Kohn D. Primary stability of press-fit-implanted osteochondral grafts. Influence of graft size, repeated insertion, and harvesting technique. Am J Sports Med 2000;28:24–27.
-
Gudas R, Kalesinskas RJ, Kimtys V, et al. A prospective randomized clinical study of mosaic osteochondral autologous transplantation versus microfracture for the treatment of chteochondral defects in the knee joint in young athletes. Arthroscopy 2005; 21:1066–1075.
-
Guettler JH, Demetropoulos CK, Yang KH, Jurist KA. Dynamic evaluation of contact pressure and the effects of graft harvest with subsequent lateral release at osteochondral donor sites in the knee. Arthroscopy 2005;21:715–720.
-
Hangody L, Fules P. Autologous osteochondral mosaicplasty for the treatment of full-thickness defects of weight-bearing joints: ten years of experimental and clinical experience. J Bone Joint Surg Am 2003; 85(Suppl 2):25–32.
-
Hangody L, Rathonyi GK, Duska Z, et al. Autologous osteochondral mosaicplasty. Surgical technique. J Bone Joint Surg Am 2004; 86A(Suppl 1):65–72.
-
Hangody L, Kish G, Karpati Z, et al. Mosaicplasty for the treatment of articular cartilage defects: application in clinical practice. Orthopedics 1998;21:751–756.
-
Hangody L, Kish G, Kárpáti Z. Arthroscopic autogenous osteochondral mosaicplasty—a multicentric, comparative, prospective study. Index Traumat Sport 1998;5:3–9.
-
Horas U, Pelinkovic D, Herr G, et al. Autologous chondrocyte implantation and osteochondral cylinder transplantation in cartilage repair of the knee joint. A prospective, comparative trial. J Bone Joint Surg Am 2003;85A:185–192.
-
Jackson DW, Lalor PA, Aberman HM, et al. Spontaneous repair of full-thickness defects of articular cartilage in a goat model. A preliminary study. J Bone Joint Surg Am 2001;83A:53–64.
-
Jamali AA, Emmerson BC, Chung C, et al. Fresh osteochondral allografts. Clin Orthop Rel Res 2005;437:176–185.
-
Koh JL, Kowalski A, Lautenschlager E. The effect of angled osteochondral grafting on contact pressure: a biomechanical study. Am J Sports Med 2006;34:116–119.
-
Koh JL, Wirsing K, Lautenschlager E, et al. The effect of graft height mismatch on contact pressure following osteochondral grafting: a biomechanical study. Am J Sports Med 2004;32:317–320.
-
Malinin T, Temple T, Buck BE. Transplantation of osteochondral allografts after cold storage. J Bone Joint Surg Am 2006;88A: 762–770.
-
Marcacci M, Kon E, Zaffagnini S, et al. Multiple osteochondral arthroscopic (mosaicplasty) for cartilage defects of the knee: prospective study results at 2-year follow-up. Arthroscopy 2005;21: 462–470.
-
Matsusue Y, Kotake T, Nakagawa Y, et al. Arthroscopic osteochondral autograft transplantation for chondral lesion of the tibial plateau of the knee. Arthroscopy 2001;17:653–659.
-
Nakamae A, Engebretsen L, Bahr R, et al. Natural history of bone bruises after acute knee injury: clinical outcome and histopathological findings. Knee Surg Sports Traumatol Arthrosc 2006;14:1252–1258. Epub 2006 Jun 20.
-
Nelson F, Billinghurst RC, Pidoux I, et al. Early post-traumatic osteoarthritis-like changes in human articular cartilage following rupture of the anterior cruciate ligament. Osteoarthritis Cartilage 2006;14:114–119.
-
Potter HG, Foo LF. Magnetic resonance imaging of articular cartilage: trauma, degeneration and repair. Am J Sports Med 2006;34: 661–677.
-
Torga Spak R, Teitge RA. Fresh osteochondral allografts for patellofemoral arthritis: long term follow-up. Clin Orthop Rel Research 2006;444:193–200.
You Might Also Like