Anterior Tibial Osteotomy: Masterclass in Talus Osteochondral Lesion Repair
Key Takeaway
This masterclass guides fellows through anterior tibial osteotomy for osteochondral lesions of the talus. We cover meticulous patient positioning, exact anatomical dissection, precision osteotomy techniques, and graft harvesting. Fellows will learn to manage neurovascular structures, execute the "trap door" approach, and secure grafts for optimal talar dome repair. Comprehensive postoperative care and complication avoidance are emphasized for superior patient outcomes.
Anterior Tibial Osteotomy for Osteochondral Lesions of the Talus: An Intraoperative Masterclass
Alright, team, let's get scrubbed in. Today, we're tackling an osteochondral lesion of the talus, a challenging but incredibly rewarding procedure. Our goal is to gain direct access to the talar dome, allowing for precise treatment of the lesion while minimizing morbidity. We'll be utilizing an anterior tibial osteotomy, often referred to as a "trap door" osteotomy, for a medial lesion. This approach provides excellent visualization and access, crucial for successful graft placement.
Comprehensive Surgical Anatomy: A Refresher Before Incision
Before we even consider making a skin incision, let's quickly review the critical anatomy of the anteromedial ankle. Understanding these relationships is paramount to avoid complications.
- Osteology: We're operating around the distal tibia, specifically the tibial plafond, and the talus. The medial malleolus forms the medial wall of the ankle mortise. The angle of Hardy is a key anatomical landmark, representing the anterior-most extent of the medial malleolar facet, which guides our osteotomy. The talar dome, our target, articulates with the tibial plafond.
- Neurovascular Structures:
- The deep peroneal nerve and the anterior tibial artery and veins run directly anterior to the ankle joint, typically between the tibialis anterior and extensor hallucis longus tendons. Our incision and subsequent dissection must carefully protect this neurovascular bundle. It's often located slightly lateral to our anteromedial incision, but vigilance is key.
- The saphenous nerve and great saphenous vein are superficial structures that cross the anteromedial aspect of the ankle. The incision should be planned to avoid direct injury to these, especially the vein, to prevent hematoma and sensory deficits.
- Muscular Intervals & Tendons:
- The tibialis anterior tendon is a prominent landmark on the anteromedial aspect of the ankle. Our incision will be parallel to the medial talar facet, often just medial to this tendon.
- The extensor hallucis longus (EHL) and extensor digitorum longus (EDL) tendons lie more laterally.
- Joint Capsule: The anterior ankle capsule is relatively thin but provides stability. We'll perform a controlled capsulotomy to access the joint.
- Syndesmosis: For medial lesions, we are well clear of the distal tibiofibular syndesmosis. However, if approaching a lateral lesion, remember the caution: avoid violating the syndesmosis by keeping the most lateral saw cut at least 2 mm away.
Preoperative Planning & Patient Positioning
Successful surgery begins long before the first incision.
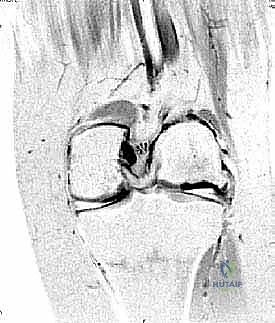
- Patient Selection & Lesion Assessment: This procedure is ideally suited for osteochondral lesions up to 10 mm in diameter and 10 mm deep, located in the anterior two-thirds of the medial or lateral talar dome margins. We've already reviewed our patient's MRI and CT scans, confirming the lesion's size, depth, and exact location. This helps us anticipate the required exposure and graft size.
- Fluoroscopy Setup: We'll need a C-arm positioned to allow for both anteroposterior (AP) and lateral views of the ankle without repositioning the patient or the limb. This is critical for confirming osteotomy cuts and graft placement. Ensure the C-arm can be brought into the field easily and then moved out of the way for instrument access.
- OR Table & Attachments:
- The patient is positioned supine on the operating table.
- A thigh tourniquet has been applied to the ipsilateral limb, ready for inflation. This provides a bloodless field, which is essential for precision work.
- A bolster is placed beneath the ipsilateral buttock. This maneuver internally rotates the leg slightly, bringing the medial aspect of the ankle into a more accessible position for the surgeon, especially for medial lesions.
- The leg, ankle, and foot are meticulously prepared and draped from below the knee distally, ensuring a sterile field that allows for full range of motion of the ankle during the procedure.
Step-by-Step Intraoperative Execution: The Operating Surgeon's Viewpoint
Alright, fellows, let's begin. Tourniquet is inflated. We have a bloodless field.
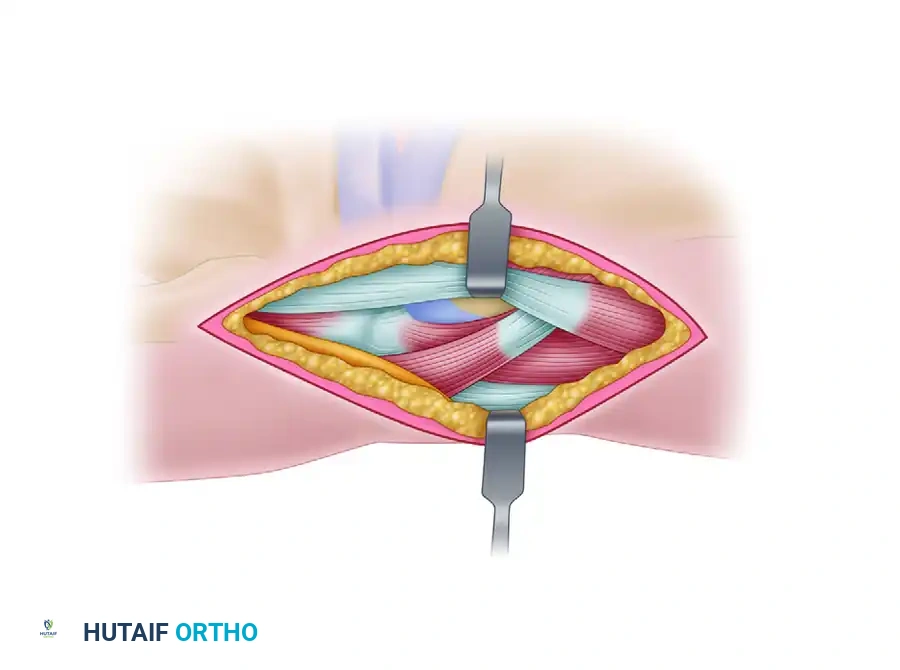
The Surgical Approach: Gaining Access
-
Incision:
- For this medial lesion, we'll make a 7-cm anteromedial longitudinal incision.
- Identify the medial talar facet and the tibialis anterior tendon. Our incision will run parallel to the medial talar facet, typically just medial to the tibialis anterior tendon. This minimizes injury to the tendon and provides a good interval.
- Make a clean incision through the skin and subcutaneous tissue.
Surgical Warning: Be mindful of the superficial great saphenous vein and saphenous nerve. Use careful blunt and sharp dissection to identify and protect these structures, ligating small venous branches as necessary.
-
Deep Dissection:
- Continue dissecting through the subcutaneous fat. We'll carefully retract the tibialis anterior tendon laterally.
- Identify the anterior ankle joint capsule.
- Perform a capsulotomy. Use a #15 blade to make a precise longitudinal incision in the anterior capsule, parallel to our skin incision. Extend this carefully proximally and distally to expose the underlying joint.
-
Capsular Stripping and Exposure:
- Using a small periosteal elevator or Freer elevator, meticulously strip enough of the anterior capsule from the distal tibia. Our goal is to expose the medial half of the ankle joint, providing clear visualization of the tibial plafond and the anterior talar dome. This is crucial for planning our osteotomy.
- Place small retractors, such as mini-Hohmanns or Senn retractors, to maintain exposure, ensuring they are not impinging on any neurovascular structures.
-
Synovectomy (If Indicated):
- Inspect the joint. If there's significant synovitis or hypertrophic synovial tissue obscuring our view, perform a limited synovectomy using a small rongeur or shaver. This ensures a pristine view of the lesion and surrounding cartilage.
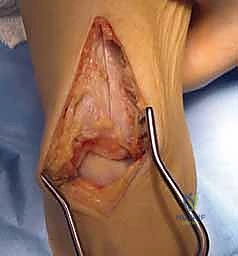
Tibial Osteotomy Using the Trap Door Technique
Now we move to the core of the exposure: creating the tibial trap door. This requires precision to ensure a stable osteotomy that will heal well.
-
Periosteal Stripping:
- Using a Cobb elevator or similar instrument, strip the periosteum proximally along the distal tibial metaphysis. Extend this stripping to the upper limit of our wound. This exposes the bone where our osteotomy cuts will be made and protects the periosteum, which is vital for healing.
-
Marking the Osteotomy Site:
- Identify the angle of Hardy, the anteromedial corner of the tibial plafond.
- Make a 1-cm mark on the medial tibial plafond, starting at the angle of Hardy. This will be the inferior-most extent of our medial vertical cut.
- Make a second mark 3 cm above the joint line on the anterior tibial metaphysis. This defines the superior extent of our osteotomy.
-
Predrilling for Fixation Pins:
- This is a critical step for later stabilization of the trap door.
- Identify the area where the tibial trap door will be removed.
- Using a 2.0 mm drill bit, drill two transverse parallel holes across the tibial metaphysis, just beneath the cortex, within the planned footprint of the trap door. These holes will later accommodate bioabsorbable pins to secure the bone block. Ensure they are parallel and adequately spaced for stability.
-
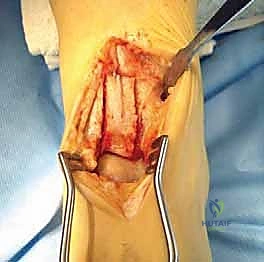
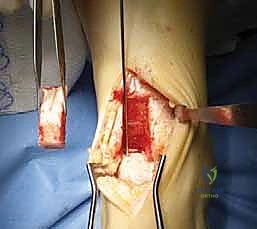
Making the Saw Cuts for the Trap Door:
- We'll use a Hall microoscillating saw with a no. 64 saw blade (Zimmer). This thin blade allows for precise, clean cuts.
- First, the two vertical parallel cuts:
- Starting from our 1-cm mark at the joint surface (angle of Hardy), make the first vertical saw cut. This cut should be 1 cm wide from the second parallel cut, and extend 3 cm in height proximally towards the anterior tibial metaphysis.
- Make the second vertical parallel saw cut, 1 cm lateral to the first, also extending 3 cm proximally.
- Ensure these cuts are 2 cm deep at the joint surface.
- These cuts should taper proximally and upward to the anterior tibial metaphysis 3 cm above the joint.
TECH FIG 2 • Saw cuts are made 1 cm wide, 3 cm high, and 2 cm deep (not seen), creating a trap door (arrow).
> **Surgical Warning:** Avoid making the vertical saw cuts more than 3 cm deep at the joint surface or 4 cm in height. Exceeding these dimensions significantly increases the risk of a medial malleolar stress fracture, which can be a debilitating complication.

*   **Second, the superior horizontal cut:**
    *   Make a **third horizontal saw cut** connecting the upper limits of these two vertical cuts. This completes the superior border of our trap door.
*   **Third, the angled inferior cut:**
    *   This is the critical cut that creates the "hinge" or "trap door" effect.
    *   Angle the saw **inferiorly and 22 degrees posteriorly** from the anterior metaphysis toward the joint surface. This creates a beveled cut, allowing the bone block to be mobilized and then replaced snugly.
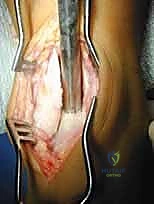
- Mobilizing and Removing the Trap Door:
- Once all cuts are complete, use a thin 10-mm osteotome. Carefully insert it into the saw cuts and gently mobilize the trap door. Use controlled, light taps with a mallet if necessary.
- Once mobile, carefully remove the trap door.
- Place the bone block aside in a sterile basin, keeping it moist with saline-soaked sponges. This bone will be replaced at the end of the procedure.
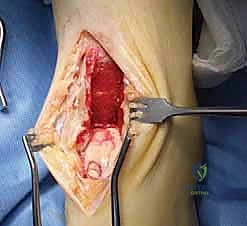
TECH FIG 3 • The trap door is removed and set aside to be replaced after the graft is inserted. A probe has been inserted into the lesion (arrow).
- Protecting the Talar Surface:
- Before proceeding, insert a Freer elevator or a small, thin retractor between the exposed distal tibia and the talus. This protects the talar cartilage from inadvertent injury during subsequent steps.
Coring Out the Lesion
With the trap door open, we now have excellent direct visualization of the talar dome.
-
Ankle Positioning:
- Gently plantarflex the ankle. This maneuver brings the osteochondral lesion into clear view, presenting it optimally for treatment.
-
Lesion Identification and Assessment:
- Use a small probe to meticulously determine the exact location, size, and depth of the lesion. Assess the quality of the surrounding cartilage and subchondral bone.
-
Coring Instrument Selection:
- Select the appropriate-size coring instrument (e.g., Arthrex system): 6, 8, or 10 mm, based on the lesion's dimensions. Always aim to remove the entire diseased area with a single, appropriately sized core.
-
Lesion Extraction:
- Place the coring instrument at a right angle to the talar dome, ensuring a perpendicular cut.
- Carefully rotate and advance the instrument to extract the entire osteochondral lesion.
- The removed bone and cartilage from the lesion should be preserved. This material will be used later to fill the donor site.
-
Addressing Sclerotic Bone (If Present):
- Inspect the base of the recipient site. If the subchondral bone is excessively sclerotic, it can impede vascular ingrowth and graft incorporation.
- In such cases, use a 0.045 Kirschner wire to drill multiple small holes ("microfracture") into the sclerotic base. This encourages bleeding and the formation of a fibrocartilaginous repair tissue, promoting vascularization for the graft.
Harvesting the Graft
Now that the recipient site is prepared, we need to harvest a healthy osteochondral graft.
-
Donor Site Exposure:
- Using a mini-Hohmann retractor, expose the medial facet of the talar body. Maintain the ankle in plantarflexion to optimize exposure.
-
Graft Harvesting Instrument Placement:
- Position the harvesting instrument on the medial facet, approximately 4 mm beneath the talar dome. This ensures we are harvesting from a non-weight-bearing or minimally weight-bearing area, minimizing donor site morbidity.
-
Graft Harvesting Technique:
- Harvest the graft in such a way that its orientation, when inserted into the recipient site, will approximate the shape of the normal talar weight-bearing surface.
- Specifically, the slightly elevated inferior margin of the graft from the medial facet should be oriented toward the medial border of the talar dome. This ensures a congruent articular surface.
Surgical Warning: In harvesting the osteochondral graft, avoid taking the graft too near the talar surface or too near the recipient site on the talar dome. This can create a stress riser and increase the risk of a stress fracture of the talar dome, compromising the overall talus.
Inserting the Graft
With the graft harvested, it's time for insertion.
-
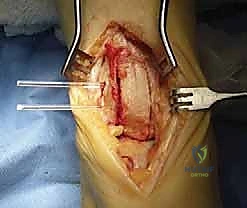
Recipient Site Débridement:
- Perform a final débridement of the talar recipient site to ensure a clean bed for the graft. Remove any loose fragments or debris.
-
Graft Insertion:
- Carefully orient the osteochondral graft. The inferior medial facet portion should be oriented toward the medial border of the talus, matching the contour of the talar dome.
- Gently tap the graft into place using a tamp and mallet. Ensure it is flush with the surrounding cartilage and stable. Avoid forceful impaction that could damage the graft.
TECH FIG 6 • The osteochondral graft has been inserted into the recipient site (upper arrow) and the bony material removed, including attached remaining cartilage from the defect that has been inserted into the donor site (lower arrow).
Filling the Donor Site
The donor site on the medial talar facet needs to be addressed.
- Material Insertion:
- Insert the material that was removed from the osteochondral lesion, including any attached remaining cartilage, into the donor site on the medial talar facet. This helps to fill the defect and promote healing.
- This can be augmented with additional cancellous bone taken from the distal tibia, if needed, to achieve a good fill.
Closing the Trap Door
Our primary goal now is to securely replace the tibial osteotomy.
-
Tibial Bone Block Replacement:
- Carefully reinsert the tibial bone block (trap door) back into its bed. Ensure it fits snugly and the saw cuts align perfectly.
-
Securing the Bone Block:
- Insert bioabsorbable pins (e.g., Biosorb, Johnson & Johnson) into the predrilled holes we created earlier.
- Advance the pins until they are flush with the cortical surface, securing the bone block firmly in place. This provides immediate stability and allows for biological healing of the osteotomy.
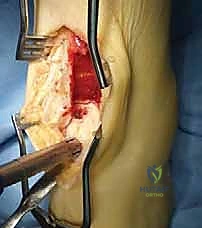
TECH FIG 7 • The trap door is replaced and secured with bioabsorbable pins (arrows) placed into predrilled holes.
Wound Closure and Dressing
With the osteotomy secured and the graft in place, we proceed with meticulous wound closure.
-
Deep Tissue Approximation:
- Release the tourniquet and achieve hemostasis.
- Approximate the deep tissues, including the joint capsule and periosteum, using 3-0 absorbable suture (e.g., Vicryl). Ensure dead space is eliminated to prevent hematoma formation.
-
Skin Closure:
- Close the skin with 3-0 monofilament nylon sutures (e.g., Ethilon) in an interrupted or running subcuticular fashion, depending on surgeon preference. Ensure good eversion of the skin edges for optimal cosmesis.
-
Dressing Application:
- Apply a sterile compression dressing to minimize swelling.
- Apply a posterior splint to the ankle, maintaining it in a neutral or slightly plantarflexed position. This provides immediate immobilization and protection for the osteotomy and graft.
💡 Pearls and Pitfalls
Let's discuss some critical points and potential issues with this procedure.
- Lesion Size and Location: Remember, this procedure is best suited for lesions up to 10 mm in diameter and up to 10 mm deep, located in the anterior two-thirds of the medial or lateral talar dome margins. Larger or more posterior lesions may require different approaches or more extensive osteotomies.
- Donor Site Selection: The graft is placed just beneath the subchondral bone of the medial or lateral facet. These surfaces bear minimal weight, making them ideal donor sites. To date, no significant complications have been noted in the medial or lateral gutters from graft harvest.
- Preventing Tibial Stress Fractures:
- Saw Cut Depth and Height: As we discussed, avoid making the vertical saw cuts more than 3 cm deep at the joint surface or 4 cm in height. Exceeding these limits significantly increases the risk of a medial malleolar stress fracture, which can lead to nonunion or persistent pain.
- Lateral Lesions & Syndesmosis: For lesions on the lateral talar dome, use the same technique, but ensure the most lateral vertical saw cut is at least 2 mm away from the distal tibiofibular syndesmosis to avoid violating this critical joint.
- Talar Dome Stress Fractures: When harvesting the osteochondral graft, avoid taking the graft too near the talar surface of the dome or too close to the recipient site. This can create a stress riser and compromise the structural integrity of the talar dome, leading to a stress fracture.
- Arthritis Progression: Patients with pre-existing or developing arthritis can experience progression of their condition even if the graft becomes incorporated and survives. It's crucial to counsel patients preoperatively about this possibility.
- Common Patient Complaints: The most common minor complaint postoperatively is occasional aching at the anteromedial joint line with activity. This is usually self-limiting and managed with activity modification and NSAIDs.
- Intraoperative Salvage:
- Fractured Trap Door: If the tibial trap door fractures during removal or replacement, assess the fragment size. If small, it can often be secured with additional bioabsorbable pins or a small plate. If it's a significant fracture compromising stability, consider a small non-absorbable plate and screws for rigid fixation.
- Inadequate Exposure: If visualization of the lesion is suboptimal, re-evaluate the osteotomy cuts. It may be necessary to carefully extend the superior or inferior cuts slightly, or to adjust the angle of the osteotomy. Do not force instruments into a tight space, as this can damage articular cartilage.
- Neurovascular Injury: If a neurovascular injury is suspected (e.g., bleeding from the anterior tibial artery, nerve paresthesias), immediately stop, identify the structure, and repair it if necessary. This might require consultation with a vascular surgeon. Prevention through meticulous dissection is key.
Postoperative Rehabilitation & Complication Management
Our work isn't done until the patient is fully recovered.
-
Immediate Postoperative Care:
- The compression dressing and posterior splint applied in the OR are maintained.
- Elevation of the limb is crucial to minimize swelling.
- Pain management is initiated.
-
First Follow-up (1-2 Weeks):
- The compression dressing and posterior splint are changed.
- Sutures are removed at approximately 2 weeks post-op.
- A non–weight-bearing short-leg cast is applied. This cast is maintained for 1 month to protect the healing osteotomy and the incorporated graft.
-
Intermediate Phase (After 1 Month):
- After 1 month in the non-weight-bearing cast, the cast is removed.
- A range-of-motion (ROM) boot is then prescribed.
- The patient begins 50% weight bearing for 3 weeks. This gradual progression allows for controlled loading and promotes healing.
- Formal physical therapy is instituted at this point. The focus will be on restoring ankle range of motion, strengthening surrounding musculature, and proprioceptive training.
-
Long-Term Rehabilitation:
- Progression to full weight-bearing is gradual, typically over 6-8 weeks, guided by clinical assessment and radiographic healing.
- Return to high-impact activities is usually delayed for 6-12 months, depending on graft incorporation and patient progress.
-
Complication Management:
- Wound Dehiscence/Infection: Manage with local wound care, antibiotics, and debridement if necessary. Early recognition is key.
- Hardware Failure (Bioabsorbable Pins): While rare, if pins migrate or cause irritation, they may require removal. Non-union of the osteotomy is typically managed with prolonged immobilization or revision surgery if symptomatic.
- Graft Non-incorporation or Collapse: This is a significant complication. It may manifest as persistent pain, swelling, or radiographic changes. Management can range from conservative measures to revision surgery with repeat grafting or alternative procedures.
- Deep Vein Thrombosis (DVT) Prophylaxis: Given the non-weight-bearing period, DVT prophylaxis (e.g., low-molecular-weight heparin or aspirin) should be considered based on patient risk factors, following institutional protocols.
This anterior tibial osteotomy provides excellent access for treating talar osteochondral lesions. Remember, meticulous technique, anatomical knowledge, and careful postoperative management are the cornerstones of a successful outcome. Any questions, fellows?
You Might Also Like