Thumb Carpometacarpal Arthrodesis: An Intraoperative Masterclass for Basal Joint Arthritis
Key Takeaway
This masterclass provides an exhaustive, real-time guide to thumb carpometacarpal (CMC) joint arthrodesis. Fellows will learn intricate surgical anatomy, precise intraoperative techniques, and critical pearls for managing advanced basal joint arthritis, ensuring optimal patient outcomes. We cover patient selection, detailed dissection, joint preparation, K-wire fixation, and postoperative rehabilitation, all from the operating surgeon's perspective.
Fellows, welcome to the operating theater. Today, we're tackling a challenging yet incredibly rewarding procedure: Thumb Carpometacarpal (CMC) Joint Arthrodesis. While arthroplasty procedures have gained popularity, arthrodesis remains a highly effective and valid treatment option for specific patients, particularly those with high demands on their thumb and stage II or III disease. Our goal today is to achieve a stable, pain-free thumb base, restoring robust pinch and grip strength.
Understanding the Pathology: A Clinical Perspective
Before we pick up a scalpel, let's briefly review the underlying pathology and patient presentation.
Definition and Natural History
Osteoarthritis, or more accurately, osteoarthrosis, of the trapeziometacarpal joint is a pervasive issue in the hand, second only to the distal interphalangeal joint in frequency, but far more debilitating due to its impact on grip and pinch. This degenerative process often initiates along the palmar aspect of the joint, driven by laxity of the anterior oblique ligament (AOL), leading to increased shear forces and abnormal wear. This eventually progresses to eburnation of the articular cartilage, osteophyte formation, and ultimately, involvement of the entire joint surface, including the entire trapezium and even the scaphotrapezoidal joint. Remember, any articular fracture, especially at the base of the thumb metacarpal, can accelerate this process. Paradoxically, a well-reduced Bennett fracture might even protect the joint by offloading the volar aspect.
Pathogenesis
The genesis of CMC joint arthrosis is multifactorial, encompassing both biochemical and biomechanical influences. Synovial fluid laden with inflammatory cytokines contributes to cartilage degradation. There's also a recognized increased incidence in postmenopausal women, suggesting a potential protective role for estrogen. The critical player here is often the anterior (palmar) oblique ligament, or "beak ligament." Its degeneration or functional incompetence leads to metacarpal laxity and abnormal translation on the trapezium, escalating the destructive forces.
Comprehensive Surgical Anatomy
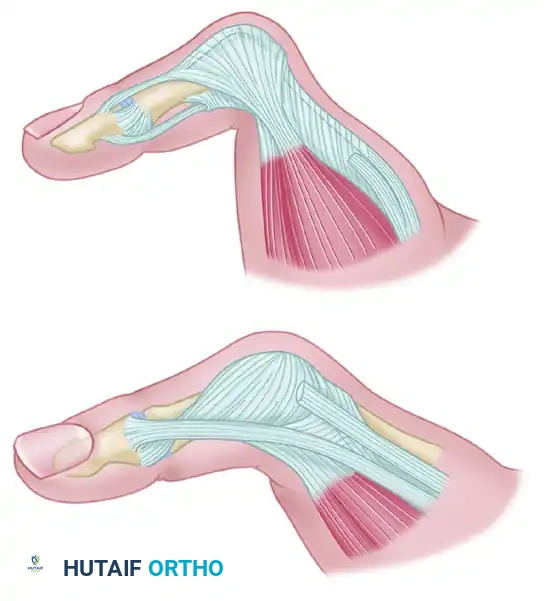
Let's quickly review the critical anatomy we'll encounter. The thumb CMC joint is a biconcave articulation, inherently unstable due to minimal osseous constraints, making its ligamentous structures paramount stabilizers.
-
Ligamentous Stabilizers: A total of 16 ligaments have been described, but seven are primary stabilizers of the thumb metacarpal:
- Superficial and deep anterior oblique ligaments (sAOL and dAOL)
- Dorsal radial ligament
- Posterior oblique ligament
- Ulnar collateral ligament
- Intermetacarpal ligament
- Dorsal intermetacarpal ligament
The remaining ligaments stabilize the trapezium itself, providing a stable foundation for the thumb.
-
Neurovascular Structures: This is where our meticulous dissection truly matters.
- Radial Sensory Nerve: This nerve, a branch of the radial nerve, courses superficially in the subcutaneous tissue over the dorsoradial aspect of the wrist and hand. Its branches are highly variable and extremely vulnerable during our incision and superficial dissection. Injury can lead to painful neuromas or persistent dysesthesia.
- Lateral Antebrachial Cutaneous Nerve: While less commonly encountered directly in this approach, its distal branches can contribute to sensation in the radial forearm and dorsoradial hand and should always be considered in the field of dissection.
- Dorsal Branch of the Radial Artery: This vessel runs deep to the abductor pollicis longus (APL) and extensor pollicis brevis (EPB) tendons, typically in a dorsal and ulnar direction. It is a critical structure that requires careful identification, mobilization, and protection throughout the procedure. Damage to this artery can compromise radial-sided hand circulation, especially if the ulnar artery compensation is inadequate (which we assess preoperatively with an Allen test).
-
Muscular Intervals & Tendons:
- First Dorsal Compartment: This compartment houses the APL and EPB tendons. We will need to identify and release the retinaculum along its ulnar aspect to facilitate exposure. These tendons will be retracted radially or volarly.
- Thenar Musculature: While not directly dissected for this dorsal approach, the thenar muscles (abductor pollicis brevis, flexor pollicis brevis, opponens pollicis) are crucial for thumb function, and their integrity must be preserved.
-
Osteology:
- Thumb Metacarpal Base: This is our primary target for shaping and fusion.
- Trapezium: The distal aspect of the trapezium will be prepared to receive the metacarpal. We must be mindful of its articulations with the scaphoid (scaphotrapezoidal joint) and the second metacarpal.
- Scaphoid: The proximal articulation of the trapezium. We'll inspect the scaphotrapezoidal joint meticulously for any signs of arthrosis.
Patient History and Physical Findings
Patients typically present with pain at the base of the thumb, exacerbated by activities requiring thumb loading – think turning a doorknob, twisting a jar lid, or turning a key. Pain at rest may or may not be present. Importantly, symptoms don't always correlate with radiographic findings; a patient with advanced disease might be minimally symptomatic, and vice-versa.
On examination, advanced disease often reveals a characteristic deformity: dorsal subluxation and adduction contracture of the thumb metacarpal, creating a prominence at the base and limiting abduction. The MCP joint frequently hyperextends in compensation, leading to the classic "zig-zag" deformity.
We'll perform specific tests:
* CMC Grind Test: Axial compression and rotation of the metacarpal on the trapezium. Reproduction of pain confirms CMC joint involvement.
* CMC Distraction Test: Distracting the metacarpal from the trapezium. Pain relief or reproduction can be diagnostic.
* Finkelstein Maneuver: For DeQuervain disease.
* Phalen's Test / Carpal Tunnel Compression Test: For carpal tunnel syndrome.
* Trigger Evaluation: For trigger thumb.
* Allen Test: Crucial preoperative assessment of radial and ulnar artery patency. We'll compress both, exsanguinate the hand, then release one at a time to check collateral circulation. This is vital given the proximity of the radial artery.
Differential Diagnosis
Always consider these conditions that can mimic CMC arthrosis:
* DeQuervain disease
* Trigger thumb or stenosing tenosynovitis
* Carpal tunnel syndrome
* Intramuscular (thenar) processes, such as vascular or tumor etiologies
Nonoperative Management
Most patients benefit from a trial of conservative therapy, including corticosteroid injections, thenar isometric strengthening, and splinting. Injections can also be diagnostic, helping to differentiate pain sources.
Imaging and Other Diagnostic Studies
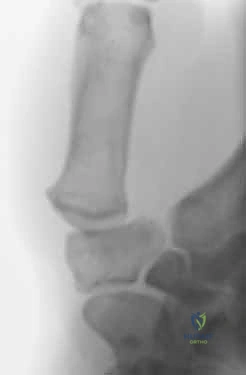
Plain radiographs are our imaging modality of choice. We'll obtain a pronated AP (Robert view), a true lateral, and a 30-degree posteroanterior stress view.
FIG 1 • AP radiograph of the thumb carpometacarpal joint.
We commonly use the Eaton and Littler radiographic staging system:
* Stage I: Normal-appearing or widened joint space due to synovitis.
* Stage II: Joint space narrowing and osteophyte formation smaller than 2 mm.
* Stage III: Joint space narrowing with osteophytes larger than 2 mm.
* Stage IV: Stage III appearance with additional narrowing or osteophytes in the scaphotrapezial joint.
Tomaino et al. emphasized the routine assessment of the scaphotrapezoidal joint, both radiographically and intraoperatively, to rule out "stage V disease," which is scaphotrapezoidal arthritis. This is a critical point, fellows, as pan-trapezial involvement is a contraindication for CMC arthrodesis.
Preoperative Planning: Setting the Stage for Success
Indications and Contraindications
The indications for surgical intervention are pain and weakness unresponsive to conservative treatments. For arthrodesis, the best candidates are young, active patients who require robust power grip and pinch, often manual laborers, with stage II or III disease.
Crucially, if the thumb MCP joint exhibits significant hyperextension and laxity, CMC arthrodesis is generally not appropriate. Fusing both joints would severely impair function. Similarly, as mentioned, pan-trapezial involvement is a contraindication due to the high risk of incomplete pain relief.
Patient Counseling
Before surgery, it is imperative that the patient fully understands the implications of arthrodesis. This includes:
* Decreased mobility: The joint will be fused, eliminating motion.
* Inability to flatten the palm: This can affect activities like placing the hand flat on a table or in tight spaces, or wearing certain gloves.
* Potential for nonunion: A recognized risk, requiring careful technique.
* Hardware complications: Prominence or irritation.
* Adjacent joint degeneration: Increased stress on neighboring joints over time.
Patient Positioning & Setup
Alright, fellows, let's get our patient ready.
* Anesthesia: This procedure can be performed under regional or general anesthesia. Today, we've opted for a regional block combined with light sedation for optimal pain control and patient comfort.
* Tourniquet: A pneumatic tourniquet will be applied to the upper arm. We'll inflate it to approximately 250 mmHg once the arm is prepped and draped to ensure a bloodless field, which is paramount for identifying delicate neurovascular structures.
* Positioning: The patient is in the supine position. The operative arm is extended and placed on a dedicated armboard, ensuring it's well-padded to prevent nerve compression. We want the hand positioned so that we have comfortable access to the radial aspect of the wrist and thumb base.
The Surgical Journey: Step-by-Step Intraoperative Masterclass
Now, let's begin the surgery. Maintain a meticulous, stepwise approach.
Incision and Dissection
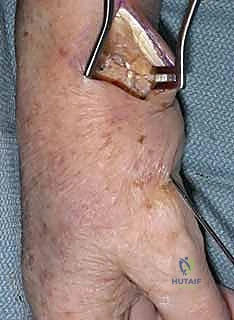
- Skin Incision: Fellows, our first critical step is the incision. We'll utilize a dorsal longitudinal approach, precisely placed along the radial aspect of the first dorsal compartment tendons. This specific trajectory allows us excellent access to the carpometacarpal joint while aiming to minimize soft tissue disruption. I'll make this incision approximately 3-4 cm in length, centered over the trapeziometacarpal joint. As I incise the skin, observe how I maintain a steady hand, ensuring a clean, precise cut through the dermis and subcutaneous tissue. We're aiming for adequate exposure without unnecessarily extending our dissection.
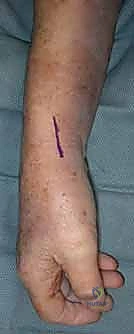
TECH FIG 1 • A. Surgical outline for the longitudinal incision along first dorsal compartment.
- Radial Sensory Nerve Identification and Protection: Immediately upon incising the skin and subcutaneous tissue, our primary focus shifts to identifying and protecting the sensory branches of the radial nerve and, if encountered, the lateral antebrachial cutaneous nerve. These nerve branches are highly variable and can be found coursing superficially. Use fine-tipped forceps and gentle blunt dissection with a small Metzenbaum scissors to carefully sweep the subcutaneous tissue. Identify these delicate white structures, and once visualized, use vessel loops or rubber stays to gently retract them away from our field, ensuring they are protected throughout the case. This is a critical step; nerve injury here can lead to debilitating neuromas or persistent dysesthesia.
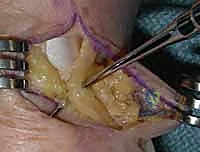
TECH FIG 1 • B. Surgical incision with identification of the radial sensory nerve.
> **Surgical Warning:** Always assume the radial sensory nerve branches are present and variable. Never make a blind incision or dissection in this area.
- First Dorsal Compartment Tendon Identification and Release: Next, we need to identify the first dorsal compartment tendons – the Abductor Pollicis Longus (APL) and Extensor Pollicis Brevis (EPB). You'll see their retinaculum, a tough fibrous sheath, overlying them. To gain adequate exposure to the CMC joint, we must release this compartment. I'll make a longitudinal incision along the ulnar aspect of the retinaculum, carefully dissecting it open. This allows us to mobilize and retract the APL and EPB tendons radially, providing a clear window to the underlying joint capsule. Use a small right-angle retractor or a Senn retractor to gently hold these tendons out of the way.

TECH FIG 1 • C. Release of the first dorsal compartment with exposure of the abductor pollicis longus and the extensor pollicis brevis tendons through an incision along dorsal ulnar aspect (retinaculum is held in forceps).
- Dorsal Branch of the Radial Artery Identification and Protection: Deep to the APL and EPB tendons, you'll find the dorsal branch of the radial artery. This vessel typically runs in a dorsal and ulnar direction. It's often nestled within the fatty tissue. Use careful blunt dissection, perhaps with a fine mosquito hemostat, to identify this pulsatile structure. Once identified, meticulously mobilize it from its surrounding tissues and protect it with a vessel loop. Retract it gently, typically in a volar direction, to keep it out of harm's way.

TECH FIG 1 • D. Identification of the radial artery deep to the first compartment tendons (tendons are retracted to volar).
> **Surgical Warning:** The radial artery is a vital structure. Inadvertent injury can lead to significant bleeding and, in cases of inadequate ulnar collateral circulation, potential hand ischemia. Always identify and protect it.
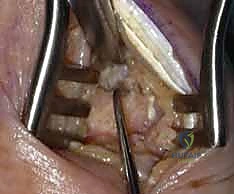
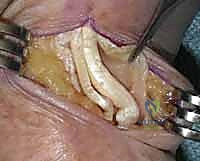
- Capsulotomy and Joint Exposure: With our neurovascular structures and tendons safely retracted, we now have a clear view of the joint capsule. I'll perform a longitudinal capsulotomy directly over the CMC joint. This incision should expose the base of the thumb metacarpal, the entire trapezium, and the distal aspect of the scaphoid. By carefully freeing the surrounding capsular attachments, we can gain better access to the joint surfaces, allowing us to flex the base of the metacarpal for improved visualization. If there's any doubt about the exact location, a quick fluoroscopy shot can confirm the joint space.
Preparation of the Joint: The "Cup and Cone" Technique
Now, fellows, we move to the heart of the arthrodesis – preparing the bony surfaces for fusion. We'll employ the "cup and cone" technique, which offers excellent surface area for fusion and allows for fine adjustments in position.
- Inspection of Adjacent Joints: Before we start resecting cartilage, it is absolutely critical to inspect the scaphotrapeziotrapezoid joints. This means looking at the articulation between the scaphoid and the trapezium, and the trapezium's articulation with the second metacarpal. Use a small osteotome or probe to feel the cartilage surfaces. If there is evidence of significant arthrosis in these adjacent joints, particularly the scaphotrapeziotrapezoid joint (Tomaino's "stage V disease"), then CMC arthrodesis is contraindicated, as it will likely lead to continued pain. In such cases, we would consider alternative procedures, such as a trapeziectomy or a four-corner fusion.
TECH FIG 2 • A. Inspection of the scaphotrapeziotrapezoid joints.
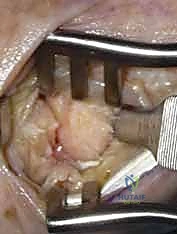
- Metacarpal Base Preparation (Cone): Now, let's turn our attention to the base of the thumb metacarpal. We need to create a "cone" shape here. I'll use a small rongeur, carefully removing any remaining articular cartilage, osteophytes, and a thin layer of subchondral bone. The goal is to expose healthy, bleeding cancellous bone. Shape the metacarpal base into a gentle cone, ensuring a broad, raw bony surface. This cone shape provides a larger surface area for fusion and offers greater freedom for obtaining the ideal position for arthrodesis later.
TECH FIG 2 • B. Inspection of the CMC joint.
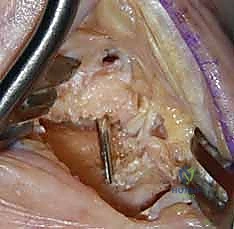
TECH FIG 2 • C. Removal of osteophytes.
TECH FIG 2 • D. Shaping the metacarpal base into a cone.
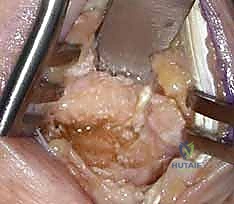
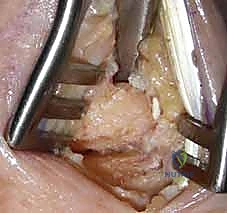
- Trapezium Preparation (Cup): Similarly, we will decorticate the distal aspect of the trapezium. Using the rongeur or a small curette, remove all remaining articular cartilage and a thin layer of subchondral bone, creating a complementary "cup" or concave depression. This cup should be sized to perfectly receive the prepared metacarpal base, maximizing bony apposition. Again, the goal is healthy, bleeding cancellous bone to promote fusion.
Achieving the Ideal Arthrodesis Position
This is perhaps the most critical step, fellows, as it dictates the functional outcome of the thumb. The position for arthrodesis must allow for optimal function.
- Functional Thumb Position: The general principle is that the tip of the thumb should comfortably rest against the radial aspect of the index middle phalanx when the hand is placed in a fisted position. This allows for effective pinch and grip.
- Specific Angles: While the exact angles are debated, in general, we aim for:
- Approximately 45 degrees of palmar abduction (the thumb projecting away from the palm).
- Adequate pronation to allow the thumb to oppose the fingers effectively.
We want the thumb to be able to grasp objects without strain and to perform fine motor tasks. Too much adduction will restrict grasp, while excessive abduction can make opposition difficult.
Fixation: Kirschner Wire Application
We'll use Kirschner wires (K-wires) for fixation, which are associated with fewer complications compared to plates and screws, particularly hardware prominence.
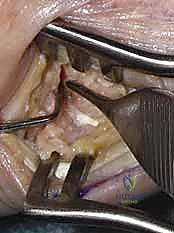
- Preliminary K-wire Placement (Antegrade): Take three 0.045-inch smooth Kirschner wires. We'll place these through the decorticated metacarpal base in an antegrade manner. This means drilling them from the prepared proximal surface, distally through the metacarpal shaft, until the tips of the wires just exit the dorsal aspect of the metacarpal, slightly beneath the prepared proximal metacarpal surface. Ensure they are divergent to maximize purchase.
TECH FIG 3 • A. Preliminary placement of Kirschner wire to check alignment before compression of the arthrodesis site.
- Joint Alignment and Compression: Now, carefully align the prepared metacarpal base (cone) with the trapezium (cup). Position the thumb in the desired functional position we just discussed. Once you're satisfied with the alignment, apply a gentle, axially directed force to compress the metacarpal onto the trapezium. This compression is vital for achieving good bony apposition, which is the cornerstone of successful arthrodesis.
TECH FIG 3 • B. Final inspection of the prepared surfaces before compression and advancement of the Kirschner wires across site of arthrodesis.
- Retrograde K-wire Advancement: With the joint compressed and perfectly aligned, advance the Kirschner wires retrograde across the joint. Slowly drive them into the trapezium, aiming for good purchase in the subchondral bone. Ensure the wires are divergent and do not cross the scaphotrapezoidal joint. The wires can be advanced further into the carpus if needed for additional stability.
TECH FIG 3 • C. Advancement of the Kirschner wires across the arthrodesis site.
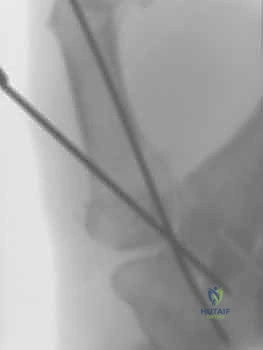
- Fluoroscopic Confirmation: At this juncture, fluoroscopy is essential. Obtain AP and lateral views to confirm:
- Optimal reduction and alignment of the joint.
- Correct placement and divergence of the Kirschner wires.
- Absence of K-wire penetration into adjacent joints or soft tissues.
- Adequate bony apposition.
TECH FIG 3 • D. Fluoroscopic confirmation of reduction and Kirschner wire placement.
-
Bone Grafting (If Necessary): If, after achieving optimal alignment and K-wire placement, you observe any voids or areas of inadequate bony apposition, this is the time to address it. A small amount of autogenous bone graft can be harvested, typically from the distal radius, and packed into these gaps. This helps to promote union and prevent nonunion.
-
Management of MCP Joint Laxity: Now, take a moment to assess the thumb MCP joint. If you notice mild hyperextension at this juncture, it's prudent to pin the MCP joint in approximately 20 degrees of flexion with a separate K-wire. If dynamic collapse accompanies pinch, a volar capsulodesis may be indicated to stabilize the MCP joint. This prevents compensatory hyperextension from becoming a new functional problem.
Closure
- Capsular Closure: Once satisfied with the fixation, close the joint capsule meticulously with a nonabsorbable suture, such as 2-0 or 3-0 braided polyester. This helps to reinforce the fusion site and exclude soft tissue interposition.
- Subcutaneous and Skin Closure: Close the subcutaneous layers with absorbable sutures. Finally, close the skin with buried absorbable sutures, or fine non-absorbable sutures if preferred, ensuring a tension-free closure.
- K-wire Management: Bend the external portions of the Kirschner wires at a sharp angle and cut them just external to the skin. Cover the exposed ends with sterile caps or dressings to prevent migration and infection.
- Splint Application: Apply a well-padded short-arm thumb spica splint. This provides immediate immobilization and protection for the fusion site.
Variations in Bony Preparation and Fixation
Fellows, while we used the "cup and cone" technique today, it's important to be aware of other approaches:
- Flat Surface Preparation: An oscillating saw can be used to create two flat, congruent surfaces for apposition. This technique provides a large contact area but is less forgiving than the cup and cone method. The cuts must be made in the exact desired plane, as there is less room for rotational adjustment of the metacarpal during positioning.
- Fixation Devices: While we opted for K-wires, various fixation devices have been used successfully:
- Single or multiple smooth Kirschner wires (our choice today, fewest complications).
- Tension band wiring.
- Cerclage wiring.
- Staples.
- Compression screws.
- Plates and screws.
While union rates are comparable, plates and screws often result in a higher rate of additional procedures, primarily due to hardware prominence or tendon irritation. K-wires offer simplicity and a lower complication profile.
Intraoperative Pearls and Pitfalls: Navigating Challenges
Fellows, the ability to anticipate and manage complications is a hallmark of a master surgeon.
💡 Pearls and Pitfalls
Neurovascular Protection: Always meticulously identify and protect the radial artery located deep to the abductor pollicis longus and extensor pollicis brevis tendons, and the radial sensory nerve branches superficially. Use vessel loops for clear demarcation and retraction.
Intraoperative Joint Inspection: Prior to any bone resection, carefully inspect the scaphotrapeziotrapezoid joints. Arthritic involvement at these adjacent joints, often termed "stage V disease," will preclude success with CMC arthrodesis and necessitate an alternative procedure. Do not proceed with arthrodesis if these joints are significantly involved.
Judicious Use of Bone Graft: Achieving excellent bony apposition is paramount for union. After joint preparation and preliminary fixation, ensure there is good contact between the raw bony surfaces. If any voids or gaps remain, harvest a small amount of autogenous bone graft, typically from the distal radius, and pack it into these areas to promote fusion and prevent nonunion.
Treatment of MCP Joint Laxity: If mild thumb MCP joint hyperextension is noted after CMC fusion, consider pinning the MCP joint in 20 degrees of flexion to prevent a compensatory "zig-zag" deformity. If dynamic collapse is observed during pinch, a volar capsulodesis may be indicated.
Radial Sensory Nerve Injury: If there is inadvertent injury to the radial sensory nerve and it is recognized intraoperatively, it should be repaired immediately with fine epineurial suture (e.g., 8-0 or 9-0 nylon) under magnification. If not recognized, a painful neuroma can develop, requiring further surgery.
Radial Artery Injury: Should the radial artery be inadvertently injured, temporarily clip it proximally and distally with temporary vascular clamps to control bleeding. After the arthrodesis is completed and the capsule is closed, the tourniquet is deflated. If there is good perfusion to the hand via the ulnar artery (confirmed by a preoperative Allen test), the clips can be removed, and the artery ligated if necessary. However, if the collateral circulation is inadequate, or if there is any doubt, a vascular surgeon should be consulted immediately for microvascular repair to prevent hand ischemia.
Postoperative Management and Rehabilitation
Our work doesn't end in the OR, fellows. Meticulous postoperative care is crucial for successful fusion and functional recovery.
Immediate Postoperative Care
- Immobilization: The short
Additional Intraoperative Imaging & Surgical Steps
REFERENCES
-
If fixation is secure and the Kirschner wires are not advanced through the trapezium, a well-molded short-arm thumb spica splint is applied and removed for hygiene purposes only. If the Kirschner wires are advanced into the carpus, the patient is placed in a thumb spica cast.
-
Berggren M, Joost-Davidsson A, Lindstrand J, et al. Reduction in the need for operation after conservative treatment of osteoarthritis of the first carpometacarpal joint: a seven year prospective study. Scand J Plastic Reconstr Surg Hand Surg 2001;35:415–417.
-
Bettinger P, Linscheid RL, Berger R, et al. An anatomical study of the stabilizing ligaments of the trapezium and trapeziometacarpal joint. J Hand Surg Am 1999;24A:786–798.
-
Eaton RG, Littler JW. Ligament reconstruction for the painful thumb carpometacarpal joint. J Bone Joint Surg Am 1973;55A:1655–1666.
-
Forseth MJ, Stern PJ. Complications of trapeziometacarpal arthrodesis using plate and screw fixation. J Hand Surg Am 2003;28A:342–345.
-
Hartigan BJ, Stern PJ, Kiefhaber TR. Thumb carpometacarpal osteoarthritis: arthrodesis compared with ligament reconstruction and tendon interposition. J Bone Joint Surg Am 2001;83A:1470–1478.
-
Muller GM. Arthrodesis of the trapeziometacarpal joint for osteoarthritis. J Bone Joint Surg Br 1949;31B:540–542.
-
Mureau M, Rademaker R, Verhaar J, et al. Tendon interposition arthroplasty versus arthrodesis for the treatment of trapeziometacarpal arthritis: a prospective comparative follow-up study. J Hand Surg Am 2001;26A:869–876.
-
North ER, Eaton RG. Degenerative arthritis of the trapezium: a comparative roentgenologic and anatomic study. J Hand Surg Am 1983;8A:160–166.
-
Pellegrini VD, Olccott CW, Hollenberg G. Contact patterns in the trapeziometacarpal joint: the role of the palmar oblique ligament. J Hand Surg Am 1993;18A:238–244.
-
Pellegrini VD, Smith RL, Ku CW. Pathobiology of articular cartilage in trapeziometacarpal osteoarthritis. I. Regional biochemical analysis. J Hand Surg Am 1994;19A:70–85.
-
Tomaino MM, Vogt M, Weiser R. Scaphotrapezoid arthritis: prevalence in thumbs undergoing trapezium excision arthroplasty and efficacy of proximal trapezoid excision. J Hand Surg 1999;24A: 1220–1224.
-
If there is any concern about fixation, a short-arm thumb spica cast is applied and the patient is seen at 2to 3-week intervals until clinical tenderness subsides and there is radiographic evidence of fusion ( FIG 2 ). This typically occurs by 6 to 8 weeks after surgery.
-
Once healing is documented, the pins are removed and range-of-motion exercises are begun under the direction of a hand therapist. The splint is continued for protection.
-
At 3 months, strengthening exercises are begun, the splint is discontinued, and the patient is allowed to return to unrestricted activities.
OUTCOMES
- The outcomes of trapeziometacarpal arthrodesis are generally good, with predictable pain relief and patient satisfaction.
- Hartigan et al 5 retrospectively reviewed patients who had arthrodesis and compared them to those having trapezial excision and ligament reconstruction. At 6 to 9 months there were no significant differences in pain, function, patient satisfaction, or grip strength. The arthrodesis group had greater key pinch and three-point pinch but more difficulty with opposition and the ability to flatten the hand, all of which were statistically significant. The arthrodesis group also had a higher complication rate, most of which was attributable to
You Might Also Like