Agility Total Ankle Arthroplasty: An Intraoperative Masterclass
Key Takeaway
This masterclass details the Agility Total Ankle Arthroplasty, a fixed-bearing device requiring syndesmosis fusion. Fellows will learn comprehensive anatomy, meticulous patient positioning, and step-by-step intraoperative execution. We cover neurovascular protection, precise osteophyte removal, syndesmosis preparation, and critical distractor application. Gain insights into managing deformities, avoiding pitfalls, and ensuring a stable, plantigrade foot for successful outcomes.
Welcome, fellows, to the operating theater. Today, we're performing an Agility Total Ankle Arthroplasty, a procedure that demands meticulous attention to detail, a deep understanding of ankle biomechanics, and precise surgical execution. This isn't just about replacing a joint; it's about restoring a stable, plantigrade foot and functional gait. Let's delve into the nuances of this unique fixed-bearing system, which, as you know, necessitates a fusion of the distal tibia and fibula – a critical design feature that offers a large surface area for bone ingrowth and mitigates the risk of tibial component subsidence.
Understanding the Agility System and Ankle Pathogenesis
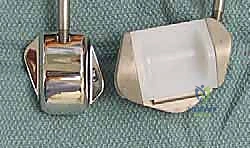
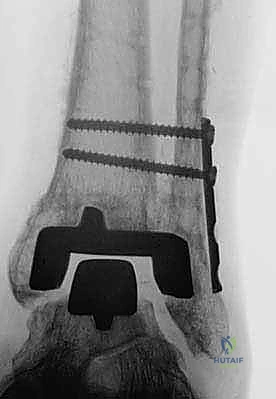
The Agility ankle replacement is a robust, fixed-bearing device. Its tibial base plate is a porous-coated titanium implant, designed for stable bone ingrowth, and uniquely requires a syndesmosis fusion between the distal tibia and fibula. This fusion is paramount, as it creates a stable mortise, a prerequisite for the long-term success of the implant. The tibial component is specifically designed to be positioned in 23 degrees of external rotation, a crucial detail for optimal biomechanics.
The talar component is a dome-shaped cobalt chrome alloy with a porous-coated undersurface, also engineered for robust bone ingrowth. The Agility LP talar base plate is designed to cover the entire resected talar surface, available in six sizes to match diverse patient anatomies. The ultra-high-molecular-weight polyethylene (UHMWPE) insert, available in various thicknesses, acts as the bearing surface. The Agility LP variant features a front-loading spacer, simplifying insertion and potential revision.
Most ankle arthritis, as you'll observe in your practice, is secondary to previous trauma. Intra-articular fractures, particularly high-energy pilon fractures, frequently lead to degenerative changes. Even seemingly minor injuries like syndesmosis disruptions can be devastating; remember, just one millimeter of talar translation within the mortise can increase articular cartilage forces by a staggering 40%. Similarly, chronic collateral ankle ligament instabilities, often stemming from inadequately treated sprains, significantly increase stress across the joint due to the ankle's inherently close-packed nature, ultimately leading to degenerative changes.
Comprehensive Surgical Anatomy: A Deeper Dive
The ankle joint is far more complex than a simple hinge; it's an intricate articulation involving four key structures: the distal tibia, the medial malleolus, the lateral malleolus of the fibula, and the trochlear surface of the talus. Think of it as a mortise-and-tenon joint, a carpentry term. For this mortise to be stable, the tibia and fibula must be rigidly bound together. This critical function is performed by the syndesmosis, comprising the:
- Anterior Inferior Tibiofibular Ligament (AITFL)
- Interosseous Ligament (a continuation of the interosseous membrane)
- Posterior Inferior Tibiofibular Ligament (PITFL)
Instability of this mortise is a direct pathway to degenerative joint disease. The ankle primarily functions as a hinge, facilitating plantarflexion and dorsiflexion. Its stability is reinforced medially by the robust deltoid ligament, a fan-shaped structure radiating from the medial malleolus to the sustentaculum tali of the calcaneus, the medial border of the plantar calcaneonavicular ("spring") ligament, the tuberosity of the navicular, and the neck of the talus.
Laterally, the lateral collateral ligament complex provides crucial stability, consisting of:
- Anterior Talofibular Ligament (ATFL)
- Posterior Talofibular Ligament (PTFL)
- Calcaneofibular Ligament (CFL)
FIG 3 • Anterior and lateral views of the ankle show the multiple ligamentous structures involved in keeping the ankle and mortise stable.
All these structures are indispensable for accurate joint function and stability. Lateral instability is the most common form of ankle instability, often exacerbated by a hindfoot varus deformity.
Neurovascular Considerations During an Anterior Approach
During our anterior approach, several critical neurovascular structures demand our utmost respect and protection:
- Superficial Peroneal Nerve (SPN): Specifically, its medial branch, frequently found within the subcutaneous tissues in the distal half of our incision. This nerve provides sensation to the dorsum of the foot. Injury can lead to a painful neuroma or sensory deficits.
- Deep Peroneal Nerve and Anterior Tibial Artery/Veins: This neurovascular bundle lies deep to the extensor hallucis longus tendon. The deep peroneal nerve innervates the anterior compartment muscles and provides sensation to the first web space. The anterior tibial artery is the primary blood supply to the anterior compartment and dorsum of the foot. Medial malleolar arterial branches, often encountered during deep dissection, may need coagulation or division to mobilize this bundle.
Preoperative Planning & Patient Positioning
Successful total ankle arthroplasty begins long before the first incision.
Preoperative Planning
- Imaging: We require a comprehensive set of imaging studies:
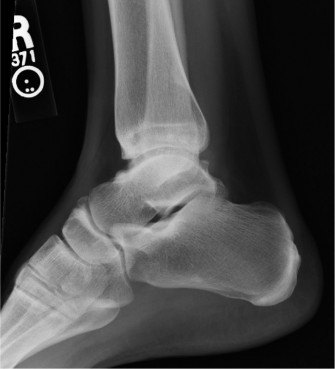
- Weight-bearing AP, lateral, and oblique radiographs of the ankle: These are fundamental to assess joint space narrowing, osteophyte formation, and overall alignment.
- Lateral radiograph including the entire foot: Crucial for evaluating potential midfoot and forefoot collapse, which can significantly impact post-arthroplasty gait.
- Weight-bearing maximum plantarflexion and dorsiflexion radiographs: The only reliable way to measure tibiotalar and midfoot motion, essential for assessing current range and predicting postoperative capabilities.
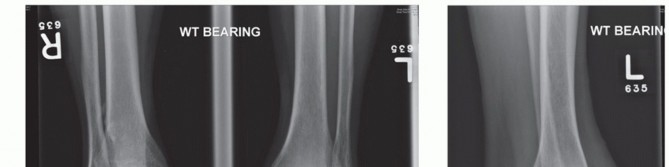
- Long-leg standing radiographs (knee to ankle): Absolutely vital for determining the mechanical axis of the entire leg and identifying any proximal alignment issues that might not be apparent on ankle views alone.
- CT scan and MRI: Indicated to evaluate for bone cysts, avascular necrosis of the talus, and the extent of degenerative changes, guiding our bone resection strategy.
- Deformity Assessment: Close attention must be paid to:
- Posterior Tibial Tendon Insufficiency (PTTI): If present, especially with secondary changes like hindfoot valgus, loss of the medial arch, or forefoot supination, it must be addressed before or concurrently with the ankle replacement. Untreated PTTI will lead to component malalignment and failure.
- Deltoid Attenuation: Indicates medial instability.
- Gastrocnemius Contracture: Limits dorsiflexion; a gastrocnemius lengthening may be required.
- Hindfoot Varus/Valgus and Forefoot Supination/Pronation: Any significant ligamentous instability (more than 20 degrees varus or valgus) is generally considered a contraindication for total ankle arthroplasty. Severe deformities are difficult to correct and predispose to prosthetic tilt.
- Patient Expectations: Counsel the patient that preoperative range of motion largely dictates postoperative range of motion. On average, we expect only about a 5-degree increase in motion. Realistic expectations are paramount.
Patient Positioning
Now, let's get our patient positioned correctly.
- Supine Position: The patient is placed supine on the operating table.
- Ipsilateral Hip Support: We'll place a sandbag under the ipsilateral hip. This maneuver internally rotates the limb slightly, turning the foot perpendicular to the bed. This is critical as it provides equal access for visualization and instrumentation to both the medial and lateral aspects of the joint.
- Leg Elevation: The operative extremity is placed on blankets or a specialized leg holder to elevate the leg above the adjacent nonoperative extremity. This elevation is crucial for facilitating sagittal plane fluoroscopy, allowing unobstructed C-arm access.
- Ankle Free Hanging: Crucially, the lower calf is supported (e.g., with a gel pad or bolster), allowing the ankle to hang freely off the end of the bed. This posteriorly translates the talus, opening up the anterior ankle joint space, and also relaxes the posterior soft tissue structures, aiding in distraction. Ensure the foot is close to the end of the bed for optimal surgeon ergonomics.
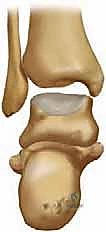
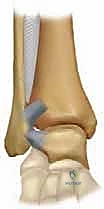
FIG 4 • The patient should be positioned with the foot close to the end of the bed. That makes it easier for the surgeon to visualize the joint without having to lean forward for an extended period. A sand bag is placed under the ipsilateral buttock to turn the foot perpendicular to the bed for equal access to the medial and lateral sides of the joint. The lower calf is supported to allow the ankle to hang free. That posteriorly translates the joint and also relaxes the posterior structures.
Step-by-Step Intraoperative Execution: The Operating Surgeon's Viewpoint
Alright, fellows, sterile field is ready, patient is positioned. Let's begin.
1. Incision and Initial Dissection
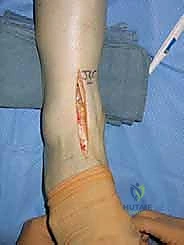
"Scalpel, please. We're making an anterior approach to the ankle. I'll make a longitudinal incision, approximately 10-12 cm in length, centered over the ankle joint, extending from just proximal to the tibiotalar joint line down to the talonavicular joint. Our interval, as you recall from anatomy, is between the tibialis anterior tendon medially and the extensor hallucis longus tendon laterally."
"Carefully incise the skin and subcutaneous tissue. We need to be vigilant here. The medial branch of the superficial peroneal nerve is often found right in this subcutaneous plane, especially in the distal half of our wound. Identify it, fellows."
"See it? Good. Now, gently mobilize it. We'll use fine blunt dissection to free it up and then retract it laterally using a vessel loop or a small Senn retractor. Protection of this nerve is paramount to prevent postoperative dysesthesia or painful neuroma formation."
"Next, we deepen our dissection. We'll leave the sheath of the tibialis anterior tendon intact and continue our dissection just lateral to it. This preserves the tendon's gliding mechanism. We're aiming for the deep fascia."
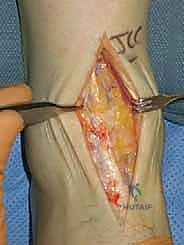
TECH FIG 1 • Anterior approach to the ankle between tibialis anterior and extensor hallucis longus.
"Once through the deep fascia, we'll encounter the extensor hallucis longus (EHL) tendon. Deep to this tendon lies our deep neurovascular bundle, containing the deep peroneal nerve and the anterior tibial artery and veins. We need to meticulously identify this bundle. Use blunt dissection, carefully sweeping structures laterally. You'll often see small medial malleolar arterial branches crossing our field; these can be carefully coagulated with bipolar cautery or ligated to free up the main neurovascular bundle, allowing us to retract it laterally with a broad, flat retractor, such as a Hohmann."
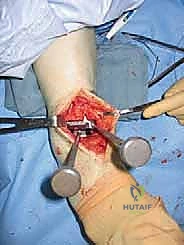
2. Joint Exposure and Osteophyte Removal
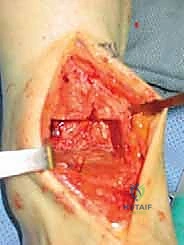
"Now that our neurovascular structures are safely retracted, we can incise the ankle capsule longitudinally, directly over the midpoint of the ankle. In some cases, particularly with significant capsular thickening or scarring, it may be necessary to excise a central portion of the capsule to achieve adequate exposure. Remember, extensile exposure is critical for this procedure. We need to visualize the entire medial malleolus, the syndesmosis, and the lateral malleolus. Take your time to achieve this."
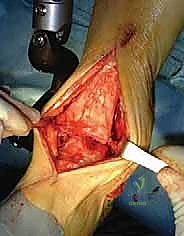
TECH FIG 2 • Adequate exposure is critical. This shows the medial malleolus, fibula, and syndesmosis. At this point the syndesmosis is already prepared for fusion by removing all the soft tissues and decorticating the apposing surfaces.
"Once the joint is open, we'll often find significant anterior osteophytes on both the distal tibia and the talar neck. These osteophytes limit dorsiflexion and obstruct proper placement of our cutting blocks. Use a straight or curved osteotome and a mallet to carefully remove these anterior osteophytes from the distal tibia, exposing the full extent of the tibial plafond depression. Then, address the osteophytes from the anterior aspect of the talus. This creates the necessary space for our instrumentation."

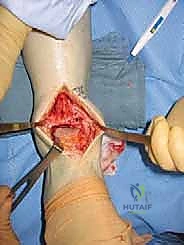
TECH FIG 3 • After adequate exposure of the ankle the anterior osteophytes are removed from the distal tibia and the talar neck. After the removal the entire joint should be visible. The neurovascular bundle is retracted laterally.
"With the osteophytes cleared, we can now clearly identify the medial and lateral sides of the talus. At this stage, we can also reassess the foot's alignment and determine if any additional soft tissue procedures are needed to correct severe deformity. Remember, a deformity exceeding 20 degrees is a relative contraindication for the Agility system due to the risk of postoperative prosthetic tilt and failure from incongruent contact."
3. Syndesmosis Preparation
"A unique and critical step for the Agility system is the syndesmosis fusion. Using the same anterior incision, we'll now turn our attention to the distal tibiofibular syndesmosis. We need to prepare this area thoroughly for fusion. This involves meticulously removing all soft tissues – ligaments, synovium, scar tissue – from between the opposing surfaces of the distal tibia and fibula. Then, we'll decorticate these surfaces, creating bleeding bone, over the distal 4 centimeters. Use a small osteotome, curette, or burr to achieve this. This preparation is essential for promoting a solid arthrodesis, which in turn provides the necessary stability for the tibial component."
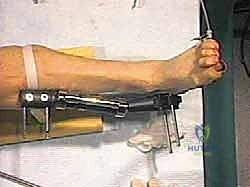
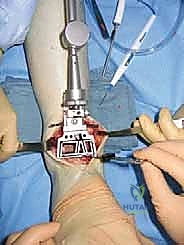
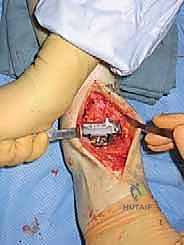
4. Application of the External Distractor
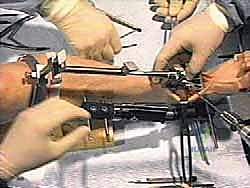
"Now, let's apply our external distractor. This device is invaluable for gaining exposure, correcting deformity, and guiding our resections. We'll use two pins in the foot and two in the tibia, all inserted from the medial side to keep them out of our anterior working corridor."
a. Talar Pin Placement (Critical Step):
"The first pin is placed into the talar neck. This pin is absolutely critical, fellows. It must be inserted parallel to the talar dome. If the ankle has a pre-existing valgus deformity, for instance, you would insert the pin perpendicular to the axis of that deformity. This allows the distractor to correct the deformity as tension is applied."
"The ideal placement for this talar pin is in the 'soft spot'—a palpable area defined by the medial malleolus proximally, the navicular distally, the tibialis anterior tendon anteriorly, and the tibialis posterior tendon posteriorly. With our current exposure, we can actually verify the placement of this talar pin under direct vision, ensuring absolute accuracy. This direct visualization minimizes the risk of malpositioning and potential damage to vital structures."

TECH FIG 4 • The talar pin placement is critical. It should be in the “soft spot” between the medial malleolus proximal, navicular distal, tibialis anterior tendon anterior, and tibialis posterior tendon posterior.
b. Calcaneal Pin Placement:
"Next, we'll use the distractor guide to place the second pin through the calcaneus. Because our first talar pin was accurately placed, this calcaneal pin will naturally be positioned posterior and superior to the deep neurovascular bundle, minimizing risk. We use cancellous pins for both the talus and calcaneus for better purchase in softer bone."
c. Tibial Pin Placement:
"Following the foot pins, we'll place two proximal pins through the distractor guide into the tibia. Ensure these are well-seated in cortical bone for maximum stability."
d. Distraction and Alignment Check:
"Once all four pins are in, we'll tighten all the distractor joints with the foot positioned at 90 degrees to the tibial axis. Then, slowly distract the joint. There isn't a fixed distance for distraction, but our goal is to achieve approximately 1 centimeter of distraction, reaching the 'deltoid endpoint' where the deltoid ligament is under tension. This opens up the joint space considerably, facilitating our resections."
"As we distract, we'll use fluoroscopy liberally to ensure several key parameters:
* The articular surfaces are becoming parallel.
* Joint space is adequately restored.
* The ankle is not being distracted into equinus.
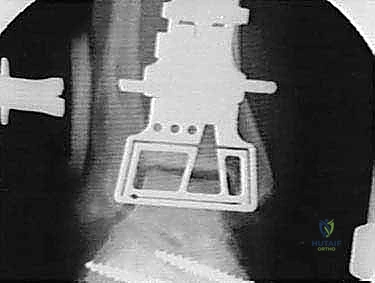
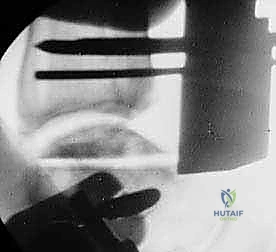
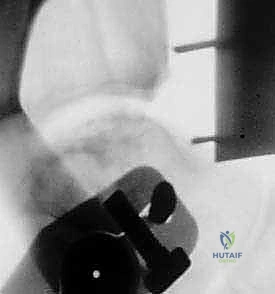

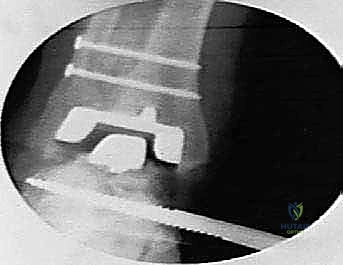
"This initial distraction and fluoroscopic assessment are crucial to confirm our alignment and ensure we are starting with a well-balanced joint before any bone cuts are made."
Pearls and Pitfalls
Surgical Warnings
Surgical Warning: Neurovascular Injury
During the anterior approach, the medial branch of the superficial peroneal nerve is highly vulnerable in the subcutaneous tissue. Always identify, mobilize, and retract it laterally. Similarly, the deep neurovascular bundle (deep peroneal nerve, anterior tibial artery/veins) must be meticulously protected and retracted laterally. Uncontrolled cautery or aggressive retraction can lead to permanent nerve damage or vascular compromise.Surgical Warning: Inadequate Exposure
Attempting to perform this complex procedure through a limited incision is a recipe for disaster. Extensile exposure of the medial malleolus, syndesmosis, and lateral malleolus is non-negotiable. Poor visualization leads to inaccurate cuts, malpositioned components, and increased risk of complications.Surgical Warning: Deformity Correction
Do not underestimate the impact of pre-existing deformities. A stable, plantigrade foot is the foundation of a successful ankle replacement. If a significant deformity (e.g., hindfoot varus/valgus > 20 degrees, uncorrected PTTI, severe gastrocnemius contracture) is present, it must be addressed either preoperatively or concurrently. Ignoring these issues will inevitably lead to component malalignment, abnormal stresses, and early prosthetic failure.Surgical Warning: Talar Pin Placement
The talar pin placement is one of the most critical steps in distractor application. An improperly placed talar pin can lead to inaccurate distraction, malalignment, and difficulty with subsequent bone cuts. Always aim for the "soft spot" and verify placement under direct vision and fluoroscopy. Ensure it's parallel to the talar dome, accounting for any existing deformity.
Intraoperative Salvage Strategies
- Nerve Laceration: If a nerve is inadvertently transected, immediate repair by a microvascular surgeon is indicated. For partial injuries or contusions, meticulous documentation and close postoperative monitoring are essential.
- **V
REFERENCES
-
Bono CM, Berberian WS. Orthotic devices: degenerative disorders of the foot and ankle. Foot Ankle Clin 2001;6:329–340.
-
Coetzee JC, Castro MD. Accurate measurement of ankle range of motion after total ankle arthroplasty. Clin Orthop Relat Res 2004;424:27–31.
-
Coetzee JC, Pomeroy GC, Watts JD, Barrow C. The use of autologous concentrated growth factors to promote syndesmosis fusion in the Agility total ankle replacement: a preliminary study. Foot Ankle Int 2005;26:840–846.
-
Gardner MJ, Demetrakopoulos D, Briggs SM, et al. Malreduction of the tibiofibular syndesmosis in ankle fractures. Foot Ankle Int 2006;27:788–792.
-
Johnson KA, Strom DE. Tibialis posterior tendon dysfunction. Clin Orthop Relat Res 1989;239:196–206.
-
Knecht SI, Estin M, Callaghan JJ, et al. The Agility total ankle arthroplasty: seven to sixteen-year follow-up. J Bone Joint Surg Am 2004;86A:1161–1171.
-
Kopp FJ, Patel MM, Deland JT, et al. Total ankle arthroplasty with the Agility prosthesis: clinical and radiographic evaluation. Foot Ankle Int 2006;27:97–103.
-
Myerson MS, Mroczek K. Perioperative complications of total ankle arthroplasty. Foot Ankle Int 2003;24:17–21.
-
Saltzman CL, Salamon ML, Blanchard GM, et al. Epidemiology of ankle arthritis: report of a consecutive series of 639 patients from a tertiary orthopaedic center. Iowa Orthop J 2005;25:44–46.
-
Spirt AA, Assal M, Hansen ST Jr. Complications and failure after total ankle arthroplasty. J Bone Joint Surg Am 2004;86A:1172–1178.
-
Wu WL, Rosenbaum D, Su FC. The effects of rocker sole and SACH heel on kinematics in gait. Med Engin Physics 2004;26:639–646.
OUTCOMES
- Alvine’s series 6 has the longest follow-up (7 to 16 years) on the Agility ankle replacement.
-
At a mean 9-year follow-up the revision rate was 11% (either a revision or a fusion).
-
More than 90% of patients reported that they had decreased pain and were satisfied with the outcome of the surgery.
-
Eighty-nine (76%) of the 117 ankles had some evidence of peri-implant radiolucency.
-
Syndesmosis nonunion had a negative impact on the clinical and radiologic outcome.
-
Deland et al 7 reported results at 3.5 years of follow-up on 38 patients. The American Orthopaedic Foot and Ankle Society (AOFAS) ankle–hindfoot scores increased from 33.6 preoperatively to 83.3 at final follow-up ( P 0.001).
-
Postoperative Medical Outcomes Study Short Form-36 (SF36) Physical Component Summary (PCS) and Mental Component Summary (MCS) scores averaged 49.5 and 56.1, respectively.
-
Migration or subsidence of components was noted in 18 ankles. Overall, 37 of 38 patients were satisfied with the outcome of their surgery and would have the same procedure under similar circumstances.
You Might Also Like