Hip Disarticulation: An Advanced Intraoperative Masterclass
Key Takeaway
Embark on an immersive journey through a hip disarticulation. This masterclass provides a granular, step-by-step guide from preoperative planning and intricate anatomical dissection to meticulous closure. Fellows will grasp neurovascular precautions, muscle interval navigation, and critical decision-making for complex limb salvage cases, ensuring optimal patient outcomes and functional recovery.
Welcome, fellows, to the operating theater. Today, we're tackling a challenging yet profoundly impactful procedure: a hip disarticulation. This is not merely an amputation; it's a meticulously planned, anatomically precise resection, often necessitated by aggressive oncological disease. Our goal is not just tumor extirpation, but also to provide the patient with the best possible foundation for future function and quality of life.
Understanding the Rationale: Indications and Background
A hip disarticulation involves the amputation of the entire lower extremity through the hip joint capsule. While limb-sparing techniques are our primary objective for most lower extremity tumors, certain cases demand this radical approach.
Key Indications for Hip Disarticulation:
* Extensive Soft Tissue Sarcomas: Particularly those of the thigh with direct extension into the proximal femur, the hip joint capsule, or involving critical neurovascular structures that preclude limb salvage.
* Unresectable Local Recurrences: Especially challenging after previous radiation therapy, where tissue planes are scarred, and tumor burden is high.
* Pathological Fractures: When a pathological fracture of the proximal femur is unresponsive to induction chemotherapy and immobilization, indicating aggressive disease progression.
* Palliation: For extensive, debilitating tumors causing intractable pain, fungating wounds, or severe functional impairment, where quality of life improvement is the primary goal.
It's crucial to understand that while a hip disarticulation requires a significant energy expenditure for ambulation with a prosthesis compared to more distal amputations, modern prosthetic design has made functional ambulation a reality for many patients. Even without a prosthesis, many individuals achieve remarkable independence in daily activities. Furthermore, in some scenarios, a hip disarticulation may offer a superior functional outcome compared to a very short above-knee amputation stump, which can present significant challenges for prosthetic fitting and control.
Preoperative Planning: The Blueprint for Success
Effective preoperative planning is paramount. It dictates our approach, anticipates challenges, and ensures we achieve clear surgical margins while preserving critical structures where possible.
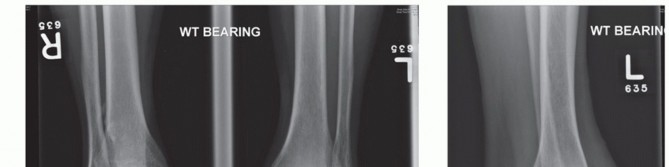
Comprehensive Imaging and Staging Studies
We rely heavily on advanced imaging to map the tumor's extent and plan our resection.
-
Computed Tomography (CT):
- Purpose: Provides exceptional detail on the tumor's effect on bone integrity, cortical involvement, and potential extension into the surrounding soft tissues, particularly within the complex anatomy of the ischiorectal fossa, hip joint, and groin.
- Clinical Pearl: CT helps us visualize the bony architecture of the pelvis and proximal femur, identifying any subtle cortical breach or intra-articular extension.
-
Magnetic Resonance Imaging (MRI):
- Purpose: The gold standard for soft tissue and marrow assessment. MRI clearly delineates intraosseous tumor spread within the marrow cavity, vital for determining the appropriate level of amputation and confirming the suitability of a hip disarticulation. It also provides superior visualization of neurovascular bundle involvement.
- Clinical Pearl: We scrutinize MRI for any evidence of tumor proximal to the lesser trochanter. Any suggestion of tumor involvement in this area significantly increases the risk of positive or close margins, potentially necessitating a more proximal resection or even a hemipelvectomy. Acetabular involvement, specifically, is a contraindication to hip disarticulation, as it would compromise our proximal margin and require a different surgical strategy.
-
Bone Scan:
- Purpose: A whole-body technetium bone scan is invaluable for evaluating multifocal bony involvement, not just of the femur, but also the pelvis and acetabulum.
- Clinical Pearl: As noted, acetabular involvement is a contraindication for hip disarticulation. The bone scan helps us rule out distant bony metastases, which would impact our overall treatment strategy.
-
Angiography:
- Purpose: When dealing with large, vascular tumors or complex recurrences, angiography can precisely map the external iliac, common femoral, and profundus arteries and their branches. This information is critical for anticipating major vascular control points and planning safe ligation.
Biopsy: The Definitive Diagnosis
Before any major amputation, especially one as functionally significant as a hip disarticulation, a definitive tissue diagnosis via biopsy is absolutely mandatory. This confirms the tumor type, grade, and guides our oncological management.
Preoperative Patient Optimization
- Nutritional Status: We emphasize optimizing the patient's overall health and nutritional status. Poor nutrition can severely impair wound healing and increase perioperative complications.
- Psychological Counseling: An amputation is a life-altering event. We ensure patients have access to psychological counseling to address the emotional and adjustment issues they will face.
- Prosthetist Consultation: Early consultation with a prosthetist and, ideally, a functional amputee, helps manage patient expectations, provides practical answers about daily activities, and facilitates early prosthetic planning.
- Deep Venous Thrombosis (DVT) Prophylaxis: Given the manipulation of proximal venous structures during this procedure, the risk of DVT and subsequent pulmonary emboli (PE) is elevated. We implement aggressive DVT prophylaxis protocols. For patients with a prior history of DVT or PE, we proactively consider placing a venous filter before surgery.
Flap Design and Surgical Margins
The development of robust, well-vascularized fasciocutaneous flaps is critical for optimal wound closure and healing. We carefully review all radiographic studies to assess tumor extension, especially into the ischiorectal fossa. This area, bounded medially by the sphincter ani externus, laterally by the ischial tuberosity, anteriorly by the transversus perinei superficialis fascia, and posteriorly by the gluteus maximus and sacrotuberous ligament, is a common site for tumor extension and dictates our posterior flap design. Previous scars, radiation fields, and the tumor mass itself will all influence the best skin to be used.
Surgical Anatomy: A Refresher
Before we make our incision, let's quickly review the critical anatomical landmarks and structures we'll encounter.
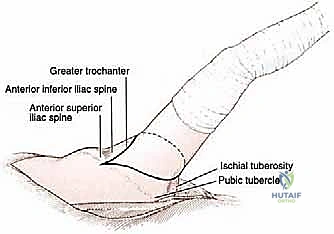
Osteology: Our Bony Compass
- Pubic Tubercle: A key anterior landmark, medial to the inguinal ligament.
- Anterior Superior Iliac Spine (ASIS): The most anterior projection of the ilium, origin of the sartorius.
- Anterior Inferior Iliac Spine (AIIS): Origin of the rectus femoris.
- Ischial Tuberosity: The bony prominence you sit on, origin of the hamstrings.
- Greater Trochanter: The large, lateral prominence of the proximal femur, insertion point for numerous gluteal and deep external rotator muscles.
- Lesser Trochanter: Medial prominence, insertion of the iliopsoas.
Neurovascular Structures: Proceed with Caution
- Femoral Triangle: Bordered superiorly by the inguinal ligament, laterally by the sartorius muscle, and medially by the adductor longus muscle. Its contents, from lateral to medial (NAVEL mnemonic): Nerve (femoral), Artery (femoral), Vein (femoral), Empty space (femoral canal), Lymphatics.
- Major Arteries:
- Common Femoral Artery: Main trunk in the femoral triangle.
- Profunda Femoris Artery: A major branch of the femoral artery, giving rise to medial and lateral circumflex femoral arteries, crucial for thigh perfusion.
- Medial and Lateral Circumflex Femoral Arteries: Supply the hip joint and surrounding musculature.
- Obturator Artery: Supplies the adductor compartment and hip joint, often encountered with the obturator nerve.
- Superior and Inferior Gluteal Arteries: Supply the gluteal region, originating from the internal iliac artery.
- Major Veins: Corresponding veins often accompany the arteries. The femoral vein is particularly large and prone to bleeding.
- Nerves:
- Femoral Nerve: Innervates the quadriceps femoris and provides sensory supply to the anterior thigh.
- Sciatic Nerve: The largest nerve in the body, supplying the posterior thigh and all muscles below the knee. Lies deep to the piriformis in the gluteal region.
- Obturator Nerve: Innervates the adductor muscles.
Muscular Intervals: Our Dissection Planes
- Outer Muscular Envelope: Tensor fascia lata, gluteus maximus, and iliotibial band. We'll often split at least one of these.
- Anterior Compartment: Sartorius, iliopsoas, rectus femoris, pectineus.
- Medial Compartment: Adductor longus, brevis, magnus, gracilis.
- Posterior Compartment: Hamstrings (semimembranosus, semitendinosus, biceps femoris long head), gluteus medius, minimus, piriformis, gemelli, obturator internus, quadratus femoris.
Hip Joint Capsule: The Final Hurdle
This strong fibrous layer covers the anterior hip to the intertrochanteric line, leaving much of the femoral neck exposed posteriorly.
Patient Positioning: Setting the Stage
For a hip disarticulation, which demands both extensive anterior and posterior dissection, a semilateral or true lateral position is often preferred.
Our Setup Today:
1. OR Table: We'll use a radiolucent table with appropriate attachments.
2. Patient Posture: The patient is positioned laterally, with the affected side facing up.
* Lower Extremity: The unaffected leg is flexed at the hip and knee and supported on pillows. The affected leg is draped free, allowing for full range of motion and manipulation during the procedure.
* Torso: The torso is secured with beanbags or appropriate supports to prevent rolling. We'll use axillary rolls to protect the brachial plexus and ensure adequate padding at all pressure points (e.g., contralateral hip, knee, ankle).
* Arm: The ipsilateral arm (on the affected side) is supported on an arm board, ensuring the elbow and wrist are padded. The contralateral arm is also padded and secured.
* Precaution: Ensure the patient is stable and securely positioned to allow for intraoperative tilting and manipulation without compromising airway or neurovascular status.
Intraoperative Execution: The Masterclass Begins
Now, let's scrub in.
Step 1: Incision and Initial Exposure
Before we make our first cut, let's identify our key bony landmarks. Palpate the pubic tubercle, the anterior superior iliac spine (ASIS), the ischial tuberosity, and the greater trochanter.
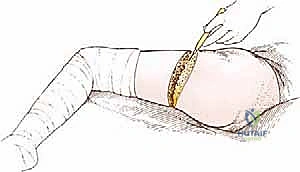
Incision Design:
* Anterior Incision: Starting approximately 1 cm medial to the ASIS, we'll curve distally towards the pubic tubercle, then sweep medially over the pubic bone to a point about 2 cm distal to the ischial tuberosity and the gluteal crease.
* Posterior Incision: This limb starts approximately 2 cm anterior to the greater trochanter and extends posteriorly, sweeping distally to meet the anterior incision limb behind the leg, distal to the gluteal crease. The exact distal extent beyond the gluteal crease is proportional to the patient's anteroposterior pelvic diameter, ensuring we have sufficient posterior flap length.
* Flap Thickness: If the buttock flap appears excessively thick, we may need to shift the anterior portion of the incision slightly more laterally to ensure adequate tissue for closure.
Initial Dissection:
* Using a #10 scalpel, we make our skin incision, meticulously carrying it through the skin, subcutaneous fat, and then through the fascia of Scarpa. As we incise, observe the superficial vessels.
* Now, we're exposing the aponeurosis of the external oblique muscle.
* Superficial Vessel Management: We'll encounter and manage several superficial vessels. Identify and ligate any branches of the saphenous vein. Look for a moderate-sized artery, the superficial epigastric artery, and multiple branches of the external pudendal vessels. These must be clamped, divided, and ligated securely to prevent troublesome bleeding.
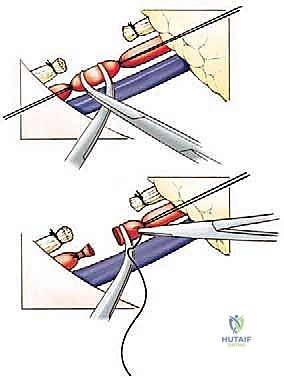
Step 2: Exposure and Ligation of the Femoral Neurovascular Bundle
Our next critical step is to gain control of the main neurovascular structures within the femoral triangle.
- Incision into Fossa Ovalis: Make a precise incision just below the inguinal ligament into the fossa ovalis. This exposes the contents of the femoral triangle.
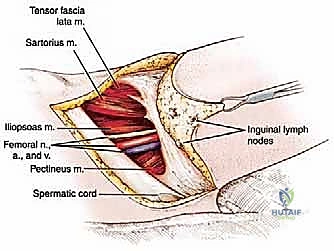
* Identification: Systematically identify the femoral vein, femoral artery, and femoral nerve. Remember the NAVEL mnemonic (Nerve, Artery, Vein, Empty space, Lymphatics) from lateral to medial.
* Spermatic Cord/Round Ligament: In men, identify the spermatic cord; in women, the round ligament. Take extreme care to avoid injuring these structures, gently retracting them as needed.
* Vessel Ligation:
* We'll begin with the femoral artery. Place two individual silk ties (e.g., 0-silk) around the artery in continuity. Use right-angle clamps to create a space between the ties, and then carefully sever the artery.
* Now, address the femoral vein. This is often larger and more fragile. Again, place two individual silk ties in continuity, clamp, and sever.
* Proximal Security: For both vessels, once severed, we'll place an additional silk suture ligature proximal to the initial ties and clamps. This provides a robust, fail-safe ligation to prevent proximal retraction and hemorrhage into the pelvis.
* Clinical Pearl: Always ligate the artery first, then the vein. This prevents distal engorgement and minimizes blood loss.
* Femoral Nerve Division: Gently place the femoral nerve on gentle traction. Using a sharp scalpel or electrocautery, divide it where it exits from beneath the inguinal ligament.
* Rationale: Once severed, the femoral nerve will retract proximally beneath the external oblique aponeurosis. This is a deliberate maneuver to ensure that if a neuroma forms, it will be located in a non-weight-bearing portion of the stump, minimizing future discomfort.
Step 3: Division of Anterior Hip and Groin Muscles
With vascular control established, we now proceed with the muscular dissection, systematically releasing the anterior and medial compartments.
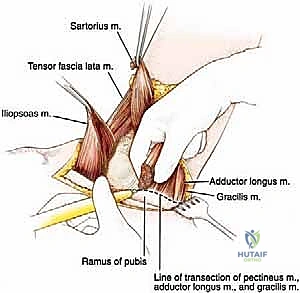
- Sartorius Muscle Division:
- Locate the sartorius muscle as it originates from the ASIS.
- Using careful sharp and blunt dissection, free the sartorius from its surrounding fascia.
- With electrocautery, transect the sartorius from its origin on the ASIS.
- Deep Dissection: Incise the femoral sheath and the fibroareolar tissue posterior to the ligated femoral vessels. This deeper dissection now exposes the anterior aspect of the hip joint capsule.
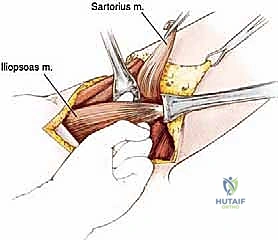
* Iliopsoas Muscle Division:
* Positioning: Slightly flex the extremity at the hip. This relaxes the iliopsoas muscle, making its identification and division easier.
* Isolation: Attempt to pass a finger beneath the iliopsoas muscle from a medial-to-lateral direction. Trying to go lateral-to-medial can be difficult due to the intimate attachments between the iliopsoas and the rectus femoris.
* Dissection: Through a combination of sharp and blunt dissection, meticulously dissect the entire iliopsoas muscle until its insertion onto the lesser trochanter is clearly defined.
* Vascular Control: Be vigilant for several prominent vessels that course on the anterior surface of this muscle. Secure these vessels with electrocautery or ligatures before their division to prevent retraction and bleeding.
* Transection: Sever the iliopsoas muscle precisely at its insertion onto the lesser trochanter.
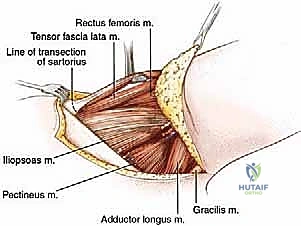
* Pectineus Muscle Division:
* Identification: To preserve the obturator externus muscle on the pelvis (which we'll use for coverage later), first locate the prominent tendon of the obturator externus arising from the lesser trochanter. This helps identify the plane between the pectineus muscle and the obturator externus; you'll also notice a distinct difference in the direction of their muscle fibers.
* Release: Pass a finger beneath the pectineus muscle, then release it from its origin on the pubis using electrocautery.
* Neurovascular Alert: Beneath the pectineus muscle, you will now visualize numerous branches of the obturator artery, vein, and nerve. Take note of their position.
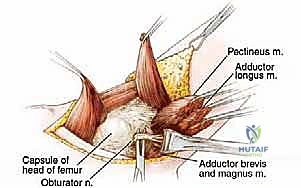
* Adductor Group Division:
* We now release the remaining adductor muscles from the pelvis in a lateral-to-medial progression.
* Transect the gracilis, adductor longus, adductor brevis, and adductor magnus muscles from their origins on the symphysis pubis.
* Obturator Neurovascular Structures: The obturator vessels and nerves typically bifurcate around the adductor brevis muscle. It is absolutely critical to identify and secure all branches of the obturator artery during this dissection.
> SURGICAL WARNING: Accidental rupture of the obturator artery can lead to significant hemorrhage and difficult-to-control bleeding as the proximal ends retract up into the pelvis. Meticulous electrocautery or ligation is essential here.
* Ischial Tuberosity Release (Hamstrings):
* Positioning: Hyperabduct the extremity. This maneuver helps to localize the ischial tuberosity and makes the retracted cut ends of the adductor muscles more visible.
* Vessel Precaution: Be aware of the circumflex femoral vessels in this region and avoid injuring them.
* Muscle Division: Transect the semimembranosus, semitendinosus, and the long head of the biceps femoris from their common origin on the ischial tuberosity.
* Critical Preservation: During this step, it is vital to preserve the quadratus femoris muscle and, most importantly, the sciatic nerve, which lies deep to the hamstrings. We will address the sciatic nerve later, but for now, ensure it is protected.
Step 4: Hip Joint Capsule Incision and Division of Posterior Muscles
We've now addressed the anterior and medial aspects. Let's shift our focus posteriorly.
- Torso Tilting and Posterior Incision:
- Carefully tilt the patient's torso from a posterolateral to an anterolateral position. This improves our access to the posterior gluteal region.
- Complete the posterior skin incision, carrying it through the gluteal fascia.
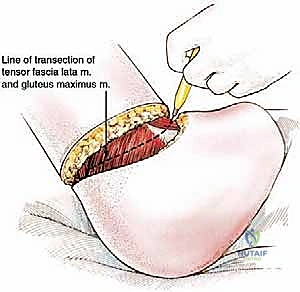
* Tensor Fascia Lata and Gluteus Maximus Division:
* In the depths of this posterior skin incision, we will encounter and divide the tensor fascia lata and the gluteus maximus muscles.
* Clinical Pearl: Note that these are the only major muscles in this procedure that are not divided at either their origin or insertion. They are simply transected along the line of our incision.
* Rectus Femoris Division:
* Directly beneath the tensor fascia lata and gluteus maximus (after some deeper dissection), you'll find the rectus femoris muscle.
* Transect the rectus femoris at its origin on the anterior inferior iliac spine (AIIS) using electrocautery.
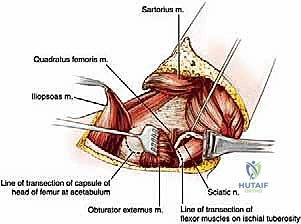
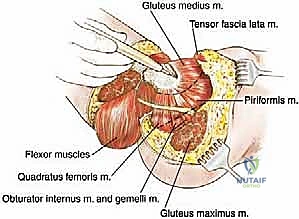
* Greater Trochanter Muscle Divisions:
* After dividing the gluteus maximus, we now expose the common tendon formed by the insertions of several muscles onto the greater trochanter.
* This includes contributions from the gluteus medius, gluteus minimus, piriformis, superior gemellus, obturator internus, inferior gemellus, and quadratus femoris muscles.
* Divide all these muscles as close as possible to their insertions on the greater trochanter. This helps to preserve as much muscle bulk as possible on the pelvis for later soft tissue coverage.
* Hip Joint Capsule Incision and Ligamentum Teres Transection:
* All anterior and posterior muscle groups have now been divided. The hip joint is largely exposed.
* Carefully incise the anterior portion of the hip joint capsule overlying the head of the femur.
* Dislocate the femoral head from the acetabulum.
* Under direct visualization, transect the ligamentum teres using electrocautery or a scalpel. This is the final intra-articular attachment.
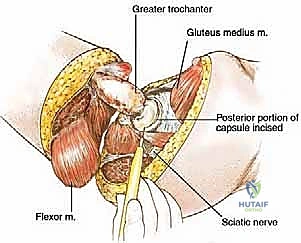
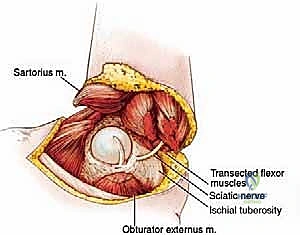
* Completion of Capsule and Sciatic Nerve Division:
* Complete the transection of the hip joint capsule by incising its posterior portion.
* Now, identify the sciatic nerve. Carefully dissect it free from any surrounding muscle or fascial attachments.
* Transect the sciatic nerve cleanly, allowing its proximal end to retract naturally beneath the piriformis muscle. Similar to the femoral nerve, this helps prevent a painful neuroma in a weight-bearing area.
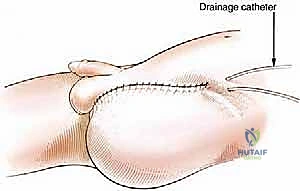
Step 5: Release of Specimen and Closure
The specimen is now free. We can carefully remove the entire lower extremity.
Soft Tissue Coverage and Closure: Our primary goal now is to provide robust soft tissue coverage over the exposed acetabulum and to close the dead space created by the amputation.
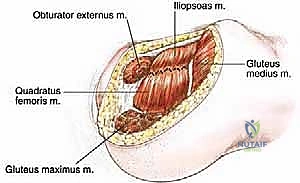
- Acetabular Coverage:
- Identify the remaining obturator externus and gluteus medius muscles on the pelvis.
- Suture these two muscles together over the exposed acetabulum and the remaining joint capsule. This provides a muscular cushion over the bony prominence, improving comfort and reducing potential pressure points.
* Clinical Pearl: Appro
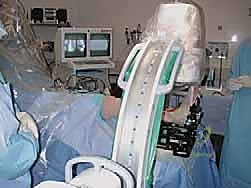
Additional Intraoperative Imaging & Surgical Steps
REFERENCES
-
Hip disarticulation has been shown to be very effective as a means of palliation for extensive tumors without other treatment options. It thus improves the quality of life of these patients.
-
Jain R, Grimer RJ, Carter SR, et al. Outcome after disarticulation of the hip for sarcomas. Eur J Surg Oncol 2005;31:1025–1028.
-
Lackman RD, Quartararo LG, Farrell ED, et al. Hip disarticulation using the lateral approach: a new technique. Clin Orthop Relat Res 2001;392:372–376.
-
Merimsky O, Kollender Y, Inbar M, et al. Palliative major amputation and quality of life in cancer patients. Acta Oncol 1997;36: 151–157.
-
Sugarbaker P, Malawer M. Hip disarticulation. In: Malawer MM, Sugarbaker PH. Musculoskeletal Cancer Surgery: Treatment of Sarcomas and Allied Diseases. Boston: Kluwer, 2001:337–349.
-
Prosthetic use in this population is usually lower than that seen in groups with more distal amputations. Use ranges from 5% to 60% of amputees. Problems with artificial limb use and reasons for the lack of limb use have included limb weight and inconvenience with toileting. Despite this, all patients should be offered an artificial limb.
You Might Also Like