Mastering First MTP Joint Arthrodesis with Bone-Block Distraction: A Comprehensive Intraoperative Guide
Key Takeaway
This masterclass details first MTP joint arthrodesis with bone-block distraction, a salvage procedure for severe great toe deformities and bone loss. Fellows will learn preoperative planning, precise surgical execution, comprehensive anatomical considerations, and critical pearls to restore first ray length and function. We cover patient positioning, meticulous dissection, graft harvesting, and optimal fixation techniques, emphasizing intraoperative decision-making for successful outcomes.
Welcome, fellows, to the operating theater. Today, we're tackling a challenging yet incredibly rewarding procedure: the First Metatarsophalangeal (MTP) Joint Arthrodesis with Bone-Block Distraction. This isn't your routine hallux valgus correction; this is a salvage procedure, often for patients who have endured multiple prior surgeries or significant bone loss, leading to debilitating forefoot dysfunction. Our goal is to restore the critical length and alignment of the first ray, thereby alleviating pain and improving overall gait mechanics.
Understanding the Indication: When and Why We Choose Distraction Arthrodesis
First MTP joint arthrodesis serves as a robust alternative to joint-sparing procedures in the salvage of various great toe deformities. While we always strive to preserve motion where possible, in cases of severe joint destruction or significant bone loss, fusion offers a predictable and durable solution.
Common Clinical Scenarios Requered Bone-Block Distraction
We primarily employ the ball-and-socket interpositional bone block distraction technique for substantial bone loss following:
- Failed Hallux Valgus Procedures: Particularly those leading to significant bone resection.
- Avascular Necrosis (AVN) of the Metatarsal Head: This can be a rare but devastating complication, often seen after procedures like a distal chevron osteotomy. The necrotic bone must be resected, creating a defect.
FIG 1 • (continued) C. Bone loss after avascular necrosis following a chevron osteotomy.
* Failed First MTP Joint Arthroplasty: Especially after the removal of silicone implants, which can cause osteolysis and significant bone destruction.
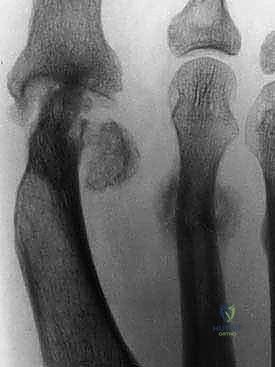
FIG 1 • (continued) C. Bone loss after avascular necrosis following a chevron osteotomy. D. Bone loss after failed silicon implant.
* Prior Infection: Leading to osteomyelitis and subsequent bone loss.
* Rheumatoid Arthritis: With severe joint destruction and deformity.
* Post-traumatic Conditions: Resulting in articular cartilage damage and bone loss.
* Severe Hallux Rigidus: Where conservative measures and cheilectomy have failed, and the joint is completely obliterated.
* Severe Hallux Valgus Deformities: Where the joint is severely incongruent and irreparable.
* Neuromuscular Disorders: Causing profound muscle imbalance and intractable deformity.
The Problem with Shortening: Why Distraction is Key
Historically, procedures like the Keller-Brandes or Mayo resectional arthroplasty were performed. While they addressed the immediate problem, they often led to significant shortening of the hallux and first ray.
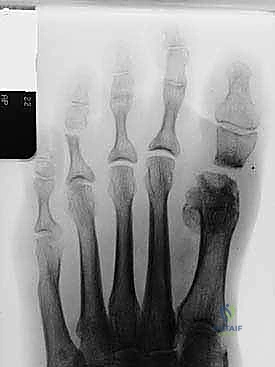
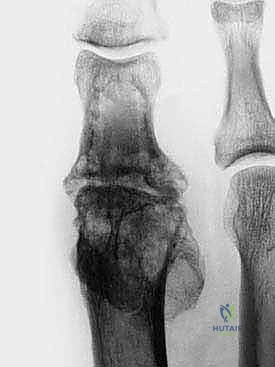
FIG 1 • A. Bone loss after Keller-Brandes procedure. B. Bone loss after Mayo resectional arthroplasty. (continued)
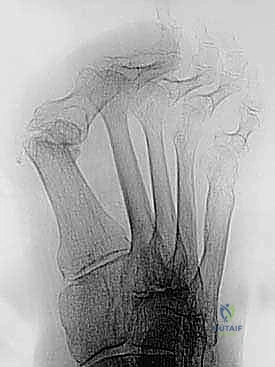
FIG 1 • A. Bone loss after Keller-Brandes procedure. B. Bone loss after Mayo resectional arthroplasty. (continued)
This shortening, fellows, creates a cascade of biomechanical issues:
* Transfer Metatarsalgia: The first ray, now too short, can no longer bear its physiological share of weight. This shifts excessive load to the lesser metatarsal heads, causing pain, callus formation, and even stress fractures or lesser toe deformities.
* Cosmetic Concerns: A significantly shortened great toe can be aesthetically displeasing to patients.
* Functional Imbalance: The natural history after failure of these procedures is a functional imbalance of the forefoot. The first ray fails to provide physiologic support, creating an overload phenomenon, or transfer metatarsalgia, to the lesser metatarsal heads.
While minimal to moderate bone loss might allow for an in-situ arthrodesis, accepting slight shortening, for marked shortening, we favor an interpositional structural bone graft to restore first ray length. This approach aims to improve the weight-bearing capacity of the first metatarsal and hallux, thereby alleviating secondary lesser metatarsalgia.
Graft Options: Autograft vs. Allograft
We have two primary sources for our structural interposition bone block:
1. Structural Allograft: Typically contoured from a donor femoral head or iliac crest. The risk of disease transmission or malignancy with processed allografts is practically zero.
2. Structural Autograft: Usually obtained from the patient’s ipsilateral anterior iliac crest. This site is readily accessible with the patient positioned supine, making it ideal for foot and ankle surgery. The primary concern here is donor-site morbidity, including local hematoma, infection, or nerve irritation.
The decision between allograft and autograft is made preoperatively, but we always discuss both options with the patient and maintain the flexibility to use either, based on intraoperative assessment.
Preoperative Planning: Setting the Stage for Success
Before we make a single incision, meticulous planning is paramount.
Patient History and Physical Examination
Our patients typically present with:
* Pain and deformity in the hallux MTP joint.
* Pressure and pain under the lateral forefoot, indicative of transfer metatarsalgia.
* A short hallux or first ray.
* A cock-up deformity of the hallux, where the toe is hyperextended at the MTP joint.
* Residual hallux valgus or, occasionally, a hallux varus deformity.
* Pain and crepitance with passive range of motion of the hallux.
* Pain, tenderness, and often plantar callus formation under the lesser metatarsal heads.
We also inspect the potential iliac crest harvest site to confirm no prior graft harvest has been performed and to assess for any soft tissue concerns.
Imaging and Diagnostic Studies
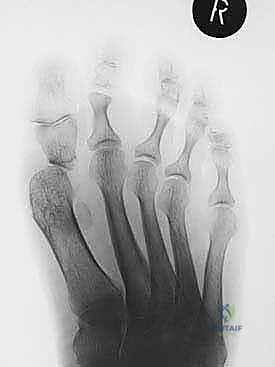
- Weight-bearing Foot Radiographs: We always obtain AP, lateral, and oblique views. These are crucial for assessing the extent of bone loss, existing deformities, and overall foot architecture.
- MRI of the Forefoot: In cases of avascular necrosis of the first metatarsal head, an MRI is invaluable. It helps estimate the extent of necrotic bone and allows us to predict the necessary size of our interpositional graft.
Templating the Graft
This is a critical step, fellows. We routinely draw a preoperative plan for the structural graft. Using templating software or even tracing the contralateral foot on radiographs, we determine the approximate amount of bone resection required and the precise length of graft needed to restore optimal first ray length. This guides our graft harvest and contouring.
Nonoperative Management (Briefly)
While generally unsuccessful for marked shortening and deformity, nonoperative measures like shoe modifications, accommodative orthotics, and metatarsal pads may offer temporary relief for symptoms related to transverse metatarsalgia by offloading the lesser metatarsal heads. However, they rarely provide a definitive solution for the underlying structural problem.
Patient Positioning and Surgical Approach
Let's get our patient positioned correctly.
Patient Positioning
The patient is positioned supine on the operating table. Crucially, we place a bump beneath the hip ipsilateral to the foot that will be operated on. This serves a dual purpose:
1. Optimal Foot Position: It subtly internally rotates the limb, presenting the foot in an ideal position for assessing proper hallux alignment throughout the procedure.
2. Iliac Crest Access: It makes the anterior iliac crest more accessible for autograft harvest, should we choose that option.
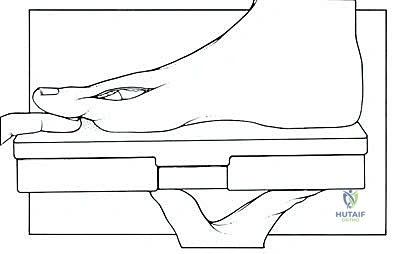
Ensure adequate padding for all pressure points, especially the heels, elbows, and ulnar nerves. The C-arm will be positioned to allow for easy AP and lateral fluoroscopic views of the foot.
Surgical Approaches
We'll be making two distinct incisions today.
1. First MTP Joint Approach
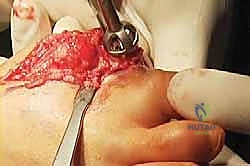
- Incision: A standard dorsal approach is recommended. We'll start our skin incision approximately 4 cm proximal to the MTP joint and extend it distally to the interphalangeal (IP) joint.
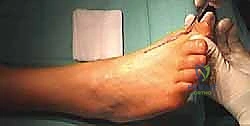
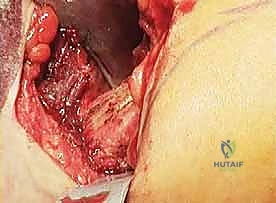
TECH FIG 1 • The joint capsule and the soft tissue coverage of the metatarsal and the phalanx are incised longitudinally straight down to the bone and then opened as an envelope. Subperiosteal preparation is mandatory to ensure sufficient release from the lateral soft tissue and scar adhesions.
* Incorporating Previous Incisions: If the patient has had prior surgery, we always strive to incorporate previous incisions into our approach. This helps avoid creating narrow, potentially ischemic skin bridges, which are at high risk for dehiscence, especially when the toe will be distracted and soft tissues placed under tension.
> **SURGICAL WARNING:** Always consider the vascularity of skin flaps. Multiple parallel incisions can compromise blood supply, leading to wound healing complications. Plan your incision thoughtfully.
2. Iliac Crest Approach (If Autograft is Chosen)
- Incision: This incision is made parallel and slightly inferior to the anterior iliac crest, approximately 3 cm posterior to the anterosuperior iliac spine (ASIS).
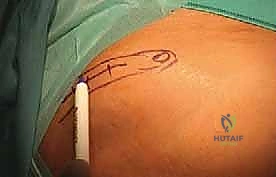
TECH FIG 9 • The incision for the tricortical iliac crest block is made 2 to 3 cm posterior to the anterior-superior iliac spine.
* Nerve Avoidance: The precise placement 3 cm posterior to the ASIS is critical to avoid injury to the lateral femoral cutaneous nerve (LFCN), which typically crosses the iliac crest more anteriorly. Injury to the LFCN can result in meralgia paresthetica, a troublesome sensory neuropathy.
> **SURGICAL WARNING:** The LFCN is highly variable in its course. While 3 cm posterior to the ASIS is a general guideline, always be mindful of its potential location. Dissect carefully through the subcutaneous tissue, and if encountered, gently retract it.
Step-by-Step Intraoperative Execution: The Masterclass Begins
Now, let's get scrubbed in.
A. Preparation of the MTP Joint
"Alright, fellows, scalpel please. Let's begin with our dorsal incision, starting about 4 cm proximal to the first MTP joint and extending distally to the interphalangeal joint. Remember to follow any existing surgical scars to maintain skin bridge viability."
-
Skin Incision and Deep Dissection:
- Make a precise skin incision, deepening it through the subcutaneous tissue. Use electrocautery for meticulous hemostasis.
- Identify the extensor hallucis longus (EHL) tendon. This is our key landmark.
- Incise the first MTP joint capsule, any existing scar tissue from prior surgeries, and the periosteum of both the proximal phalanx and the distal first metatarsal longitudinally, directly down to the bone.
- Using a small periosteal elevator, carefully reflect these soft tissues as an envelope. This subperiosteal preparation is absolutely mandatory to afford sufficient mobilization of the hallux and release it from any lateral soft tissue and scar adhesions.
- "See here, fellows, how we're carefully elevating the periosteum. This exposure is crucial for our upcoming reaming and graft insertion."
- Preserve Plantar Soft Tissues: It's vital to leave the plantar soft tissues intact. These contain the crucial blood vessels supplying the residual metatarsal head and proximal phalanx. Extensive plantar stripping can compromise bone viability and fusion rates.
-
EHL Tendon Management:
- Assess the length of the first ray. If there's minimal shortening and the toe can be easily brought into the desired alignment, the EHL tendon can simply be retracted laterally or medially.
- However, with moderate to severe shortening, particularly if there's an associated cock-up toe deformity, the EHL tendon will be taut and will prevent proper toe length restoration and lead to hyperextension at the IP joint post-fusion. In these cases, we must perform a Z-lengthening of the EHL tendon.
- "If we find the EHL is too tight, we'll perform a Z-lengthening. This involves making a longitudinal incision in the tendon, then transversely cutting half the tendon proximally and the other half distally, allowing us to lengthen it before repairing it with non-absorbable sutures."
-
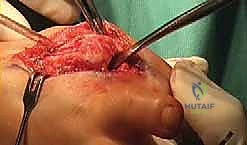
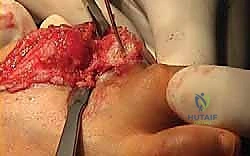
Debridement and Osteophyte Removal:
- Using a rongeur and curette, meticulously remove any remaining osteophytes, loose bodies, and additional soft tissue adhesions within the joint space. Ensure a clean, unobstructed surgical field.
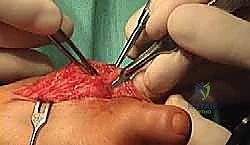
B. Reaming of the Metatarsal Head and Base of the Proximal Phalanx
"Now that we have excellent exposure, we'll prepare our host bone surfaces using our specialized reamer set. This ball-and-socket configuration provides maximum surface area for fusion and allows for precise rotational adjustment of the hallux."
- Metatarsal Head Preparation:
- Maximally plantarflex the hallux to expose the metatarsal head.
- "Nurse, please hand me the guidewire for the reamer set."
- Insert the guidewire precisely into the anatomical center of the metatarsal head. This ensures our reaming is concentric.
- Select the appropriately sized "female" reamer. Place it over the guidewire.
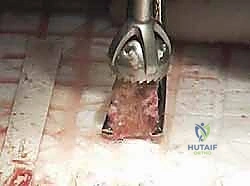
- Using the power drill at a controlled, low speed and with constant irrigation, ream the sclerotic bone surface of the metatarsal head. Continue reaming until you reach healthy, bleeding cancellous bone. This is critical for promoting vascularity and subsequent fusion.
TECH FIG 4 • The adequately sized female reamer is then used to remove the sclerotic bone surface of the metatarsal head down to the cancellous bleeding bone.
> **SURGICAL WARNING:** Avoid excessive reaming that removes too much healthy bone. Also, ensure constant irrigation to prevent thermal necrosis, which can impair fusion. The goal is to remove sclerotic bone, not healthy cancellous bone.
- Proximal Phalanx Preparation:
- Expose the base of the proximal phalanx. You may need to use a small Hohmann retractor for optimal visualization.
- Expose the base of the proximal phalanx. You may need to use a small Hohmann retractor for optimal visualization.
TECH FIG 5 • Exposure of the base of the proximal phalanx.
* In a similar manner, insert a guidewire into the anatomical center of the base of the proximal phalanx.
* Select the corresponding "male" reamer counterpart. Place it over the guidewire and prepare the proximal phalanx surface, again removing sclerotic bone down to bleeding cancellous bone with controlled reaming and irrigation.
- Measuring the Gap:
- Once both surfaces are prepared, gently distract the toe to the desired length, using your preoperative templating as a guide.
- "Now, fellows, let's use our depth gauge to precisely measure the exact extent of the gap created between the metatarsal head and the proximal phalanx. This measurement is crucial for sizing our bone graft."
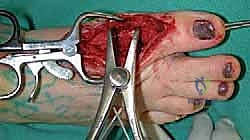
TECH FIG 8 • The toe can then be pulled into position of the desired length, and the exact extent of the gap in the joint is measured.
C. Harvest of the Iliac Crest Bone Block (If Autograft)
"While my assistant prepares the foot, let's turn our attention to the iliac crest for our graft harvest. Remember our incision planning to avoid the LFCN."
-
Incision and Dissection:
- Make the skin incision for the tricortical iliac crest block approximately 3 cm posterior to the ASIS, parallel and inferior to the crest.
- Carefully carry the dissection down to the intermuscular plane using electrocautery, ensuring meticulous hemostasis.
- Identify the superior aspect of the iliac crest. Using a Cobb elevator, reflect the periosteum from the superior crest, both medially and laterally.
- Insert Hohmann retractors on the inner and outer aspects of the iliac crest, deep to the periosteum, to provide excellent exposure and protect surrounding soft tissues and nerves.
-
Graft Marking and Osteotomy:
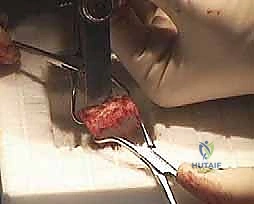
- Based on the desired length of the first ray and the gap measured in the MTP joint, precisely mark the segment of iliac crest to be harvested. We aim for a tricortical graft to maximize structural integrity.
- "Fellows, notice the precise marking. We're aiming for a graft that will perfectly fill that MTP gap, with a little extra for contouring."
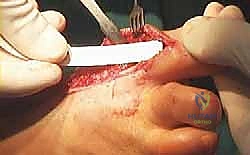
- Using a microsagittal saw with constant irrigation, carefully osteotomize the ends of the tricortical bone block. Make sure your cuts are perpendicular to the long axis of the crest.
TECH FIG 11 • A saw is used to osteotomize the ends of the tricortical bone block.
* Once the saw cuts are complete, use a straight osteotome and mallet to carefully complete the separation of the structural graft. Gently remove the harvested iliac crest structural graft.
> **SURGICAL WARNING:** When using the saw, protect surrounding soft tissues with retractors. Avoid plunging the saw blade too deeply, especially on the medial side, to prevent injury to intra-abdominal contents.
- Donor Site Closure:
- The defect in the iliac crest may be backfilled with allograft bone chips or bone substitute to reduce dead space and potentially minimize donor site pain.
- Close the periosteum meticulously with strong absorbable sutures.
- Place a small suction drain (e.g., a Blake drain) within the defect to manage any postoperative hematoma formation.
- Reapproximate the subcutaneous tissues and close the skin in layers.
D. Contouring of the Graft
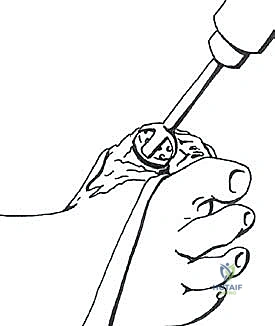
"Now, let's prepare our graft. Whether it's an autograft or a femoral head allograft, the principle is the same: create a perfect ball-and-socket interface."
- Graft Preparation:
- Secure the graft on the back table using a bone-holding forceps to ensure stability.
- Secure the graft on the back table using a bone-holding forceps to ensure stability.
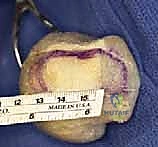
TECH FIG 13 • A. The graft is held on the table with a forceps and shaped into the desired length. B. The graft margins are marked on an allograft femoral head.
* Measure the graft and trim it to the desired length, matching the gap measured in the MTP joint.
* Insert a guidewire for the reamer set precisely into the center of the graft's long axis.
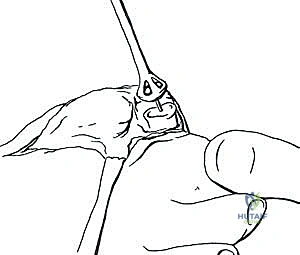
* Using the same reamers that were used to prepare the first MTP joint, contour the ends of the graft:
* One end will be prepared with the "female" reamer to articulate with the male reamed surface of the proximal phalanx.
* The other end will be prepared with the "male" reamer to articulate with the female reamed surface of the metatarsal head.
* This creates optimal, congruent contact to the host bone surfaces, maximizing the area for fusion.
> **SURGICAL PEARL:** Aim for a slightly oversized graft initially. You can always trim more, but you can't add bone back. The goal is a snug fit that requires gentle impaction.
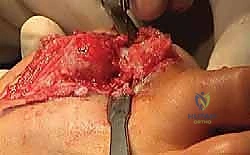
E. Insertion of the Graft and Fixation
"With our graft perfectly contoured, it's time to insert it and stabilize our construct. This is where we finalize our alignment."
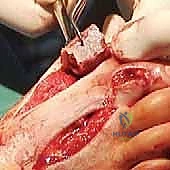
- Graft Insertion:
- Carefully insert the contoured bone graft into the prepared gap between the metatarsal head and the base of the proximal phalanx.

- Carefully insert the contoured bone graft into the prepared gap between the metatarsal head and the base of the proximal phalanx.


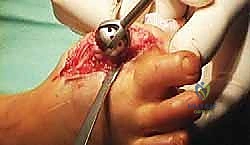
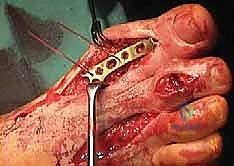
TECH FIG 15 • The molded graft is inserted into the gap between metatarsal and phalanx.
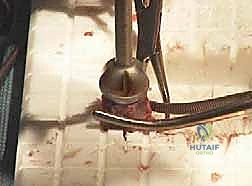
* "You'll notice that with the ball-and-socket shape on either end of the prepared gap, the alignment of the lengthened hallux may be seamlessly adjusted in any direction. This is a significant advantage of this technique."
- Temporary Fixation and Alignment Assessment:
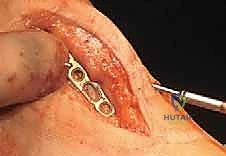
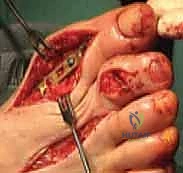
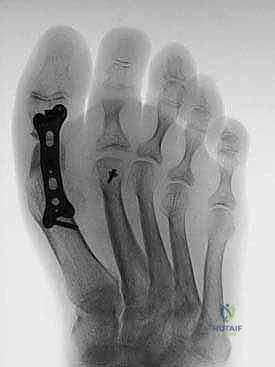
- Place a standard or, more commonly, a special revision plate dorsally over the construct, spanning the proximal phalanx, the bone graft, and the first metatarsal.
- Place a standard or, more commonly, a special revision plate dorsally over the construct, spanning the proximal phalanx, the bone graft, and the first metatarsal.
<a href="/media/huta
Additional Intraoperative Imaging & Surgical Steps


REFERENCES
-
Eight patients had a bony defect secondary to failed first MTP joint implant arthroplasties, two had avascular necrosis after failed bunion surgery, one had a nonunion of an attempted arthrodesis for failed bunion surgery, and one had been treated for osteomyelitis after cheilectomy.
-
Brodsky JW, Ptaszek AJ, Morris SG. Salvage first MTP arthrodesis utilizing ICBG: clinical evaluation and outcome. Foot Ankle Int 2000;21:290–296.
-
Machacek F Jr., Easley ME, Gruber F, et al. Salvage of a failed Keller resection arthroplasty. J Bone Joint Surg Am 2004;86A:1131–1138.
-
Machacek F Jr., Easley ME, Gruber F, et al. Salvage of the failed Keller resection arthroplasty: surgical technique. J Bone Joint Surg Am 2005;87A(Suppl 1):86–94.
-
Myerson MS, Schon LC, McGuigan FX, et al. Result of arthrodesis of the hallux metatarsophalangeal joint using bone graft for restoration of length. Foot Ankle Int 2000;21:297–306.
-
Myerson MS, Neufeld SK, Uribe J. Fresh frozen structural allografts in the foot and ankle. J Bone Joint Surg Am 2005;87A:113–120.
-
Trnka HJ. Arthrodesis procedures for salvage of the hallux metatarsophalangeal joint. Foot Ankle Clin 2000;5:673–686.
-
Eleven cases had a single dorsal plate secured by screws and one case had two plates, one dorsal and one medial.
-
A plate, crossed screw(s), or Kirschner wire combinations were used in four cases.
-
Clinical arthrodesis was achieved after an average of 12 weeks (range 4 to 20).
-
Radiographic arthrodesis was achieved in 11 of 12 feet at an average of 15 weeks (range 8 to 28), with one pseudarthrosis.
You Might Also Like


