Intramedullary Nailing of Intertrochanteric Femoral Fractures: A Master Surgical Technique Guide

Key Takeaway
Intramedullary nailing is a biomechanically superior fixation method for unstable intertrochanteric femoral fractures. By utilizing a modified medial trochanteric entry portal, surgeons can minimize abductor damage while achieving stable, center-center lag screw placement. This comprehensive guide details patient positioning, precise entry portal localization, sequential reaming, and implant insertion techniques to optimize fracture reduction, minimize postoperative shortening, and ensure excellent functional outcomes in orthopedic trauma patients.
INTRODUCTION AND BIOMECHANICAL RATIONALE
The surgical management of intertrochanteric femoral fractures (AO/OTA 31-A) has evolved significantly over the past two decades. While the sliding compression hip screw (CHS) remains a viable option for stable fracture patterns, intramedullary nailing has become the gold standard for unstable configurations, including reverse obliquity fractures, fractures with loss of the posteromedial calcar, and fractures with subtrochanteric extension.
Intramedullary devices offer distinct biomechanical advantages. By placing the implant closer to the mechanical axis of the lower extremity, the bending moment across the implant-bone interface is substantially reduced compared to extramedullary side-plates. Furthermore, intramedullary nails act as an internal buttress, preventing excessive medial translation of the femoral shaft and limiting the degree of varus collapse and limb shortening that frequently complicates the treatment of unstable fractures with a CHS.
PREOPERATIVE PLANNING AND PATIENT POSITIONING
Meticulous preoperative planning and precise patient positioning are the foundations of a successful intramedullary nailing procedure. Poor positioning inevitably leads to malreduction, prolonged fluoroscopy times, and suboptimal implant placement.
Patient Positioning on the Fracture Table
We generally prefer to place the patient in the supine position on a radiolucent fracture table equipped with a perineal post. While the lateral decubitus position may be beneficial for certain highly complex fracture patterns or morbidly obese patients, the supine position allows for easier airway management and more reliable, reproducible fluoroscopic imaging.
- Transfer and Padding: Carefully transfer the patient to the fracture table. Ensure all bony prominences are heavily padded to prevent pressure necrosis or neurapraxia.
- Contralateral Limb: Place the contralateral (unaffected) lower extremity in a boot and "scissor" the leg by extending the hip relative to the operative side. This removes the contralateral limb from the lateral fluoroscopic field of view.
- Operative Limb: Place the affected extremity into the traction boot after the initial gross reduction maneuver has been carried out. We typically position the affected extremity in 20 to 30 degrees of hip flexion. This slight flexion relaxes the deforming force of the iliopsoas muscle, aiding in the correction of anterior angulation of the proximal fragment.
- Torso Positioning: Adduct the patient’s torso toward the operative side to allow clear access to the greater trochanter. Secure the ipsilateral arm over the patient’s chest to keep it out of the proximal surgical field.
- Fluoroscopy Setup: Position the C-arm fluoroscopy unit on the contralateral side.
🚨 SURGICAL WARNING: Adequate, crystal-clear fluoroscopy in both the anteroposterior (AP) and lateral planes must be attainable before the patient is prepped and draped. Proceeding without perfect visualization guarantees technical errors.
Fracture Reduction
Closed reduction must be achieved prior to prepping. Apply longitudinal traction to restore length, followed by internal rotation (typically 10 to 15 degrees) to correct the external rotation deformity and profile the femoral neck accurately on the AP view. Evaluate the reduction fluoroscopically. If closed reduction is unacceptable, percutaneous adjuncts (e.g., a ball-spike pusher, collinear reduction clamps, or a Schanz pin in the proximal fragment) or a formal open reduction must be utilized.
SURGICAL TECHNIQUE: STEP-BY-STEP
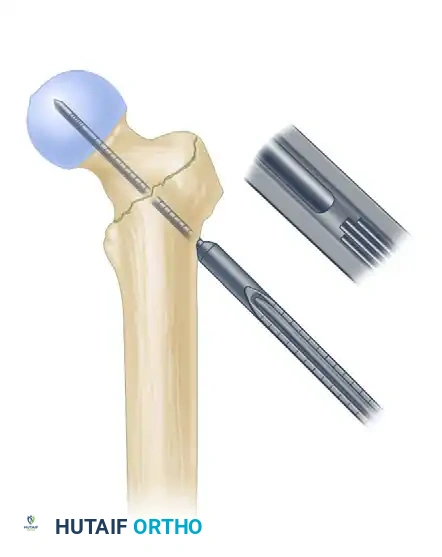
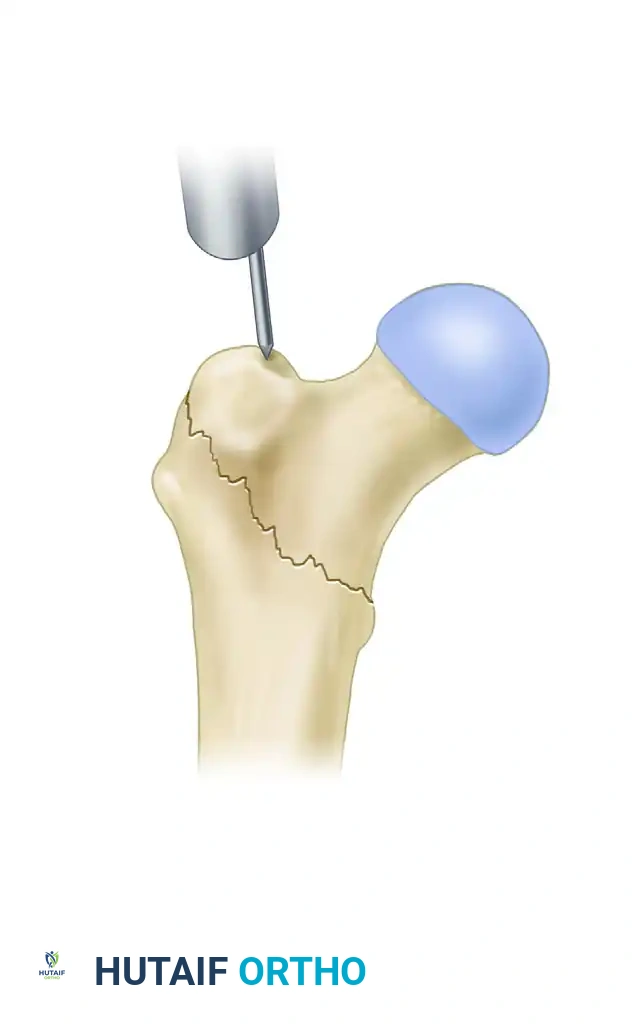
1. The Modified Medial Trochanteric Entry Portal
For the fixation of intertrochanteric femoral fractures, the selection of the entry portal is arguably the most critical step of the operation. We advocate for the modified medial trochanteric portal.
Anatomical Landmarks: The modified medial trochanteric portal is located on the medial aspect of the greater trochanter, directly along the trochanteric ridge on the AP view, and perfectly in line with the central axis of the femoral shaft on the lateral view.
💡 CLINICAL PEARL: In a landmark cadaveric study, Perez et al. demonstrated that utilizing this slightly medialized portal avoids damage to the gluteus medius tendon insertion. This significantly reduces postoperative abductor weakness and the incidence of a persistent Trendelenburg gait compared to the traditional tip-of-trochanter portal.
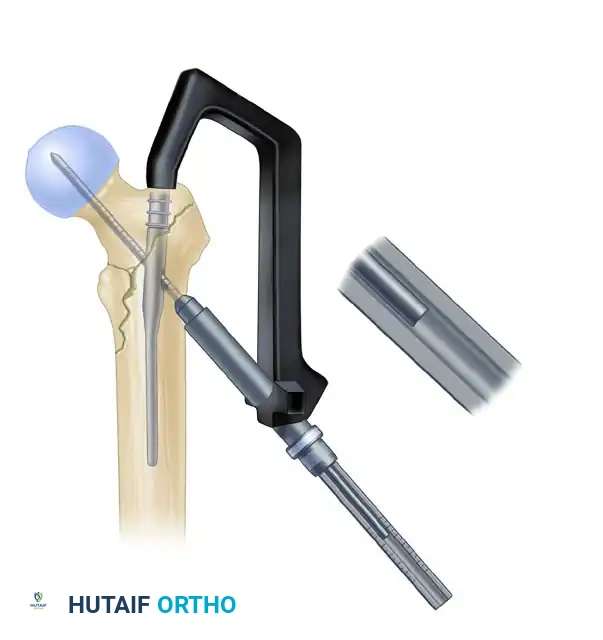
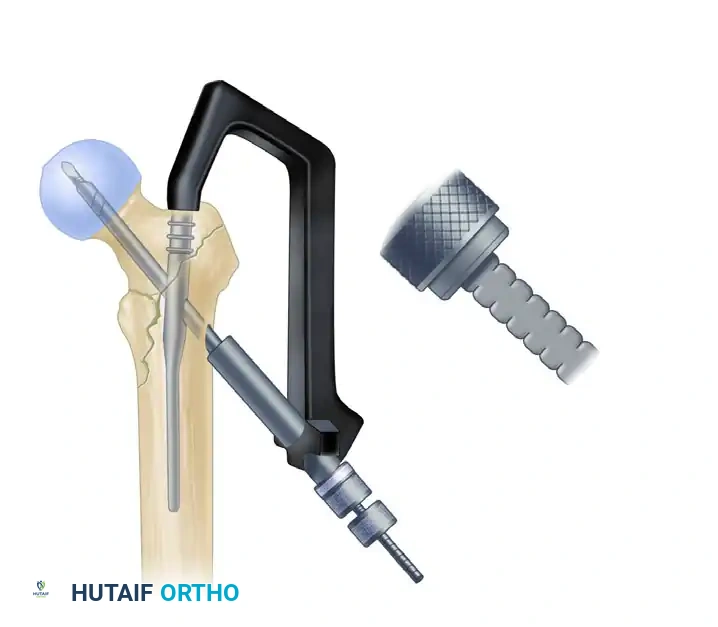
2. Incision and Guide Pin Placement
- Make an approximately 3-cm longitudinal incision, beginning 3 cm proximal to the tip of the greater trochanter and extending proximally. (Note: This incision may need to be extended in morbidly obese patients).
- Sharply incise the fascia lata and the aponeurosis of the gluteus maximus in line with the skin incision. Bluntly split the abductor muscle fibers to palpate the trochanteric tip.
- Localize the entry point with a guide pin on the medial aspect of the greater trochanter.
- Insert the guide pin 2 to 3 cm distally into the proximal fragment.
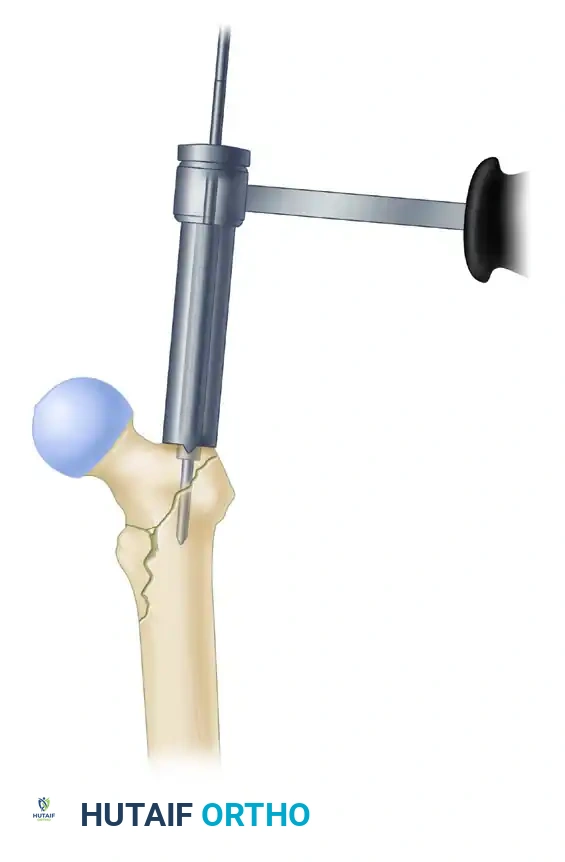
At this juncture, utilize fluoroscopy to rigorously assess the guide pin placement in both AP and lateral planes.
💡 CLINICAL PEARL: The Two-Pin Technique
If the initial guide pin trajectory is slightly malaligned, do not simply remove it and attempt to re-drill. The new pin will inevitably fall into the path of least resistance (the old hole). Instead, leave the first pin in place as a reference. Use a honeycomb-type multi-hole drill guide over the first pin to place a second, perfectly aligned pin. Once the second pin is confirmed, remove the first. This technique saves significant fluoroscopic time and prevents cortical blowout.
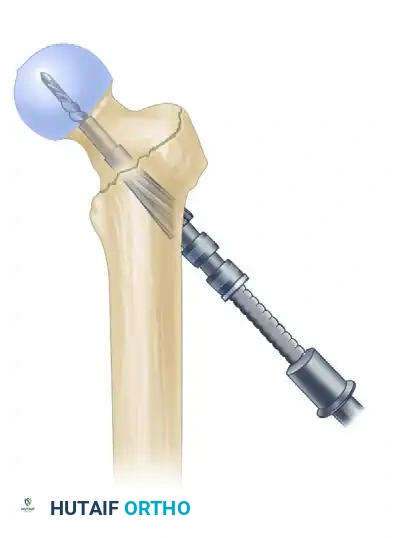
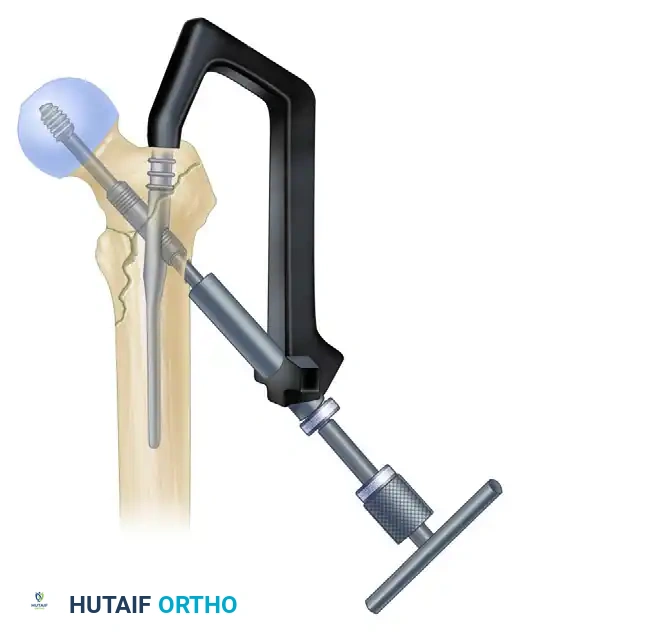
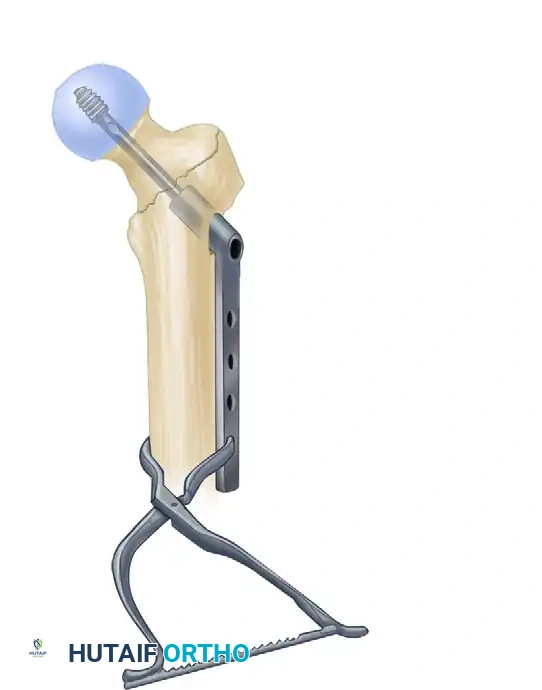
3. Proximal Reaming and Canal Preparation
- Once the guide pin is perfectly positioned, use the rigid proximal entry reamer to ream over the guide pin. Advance the reamer to a depth just below the level of the lesser trochanter.
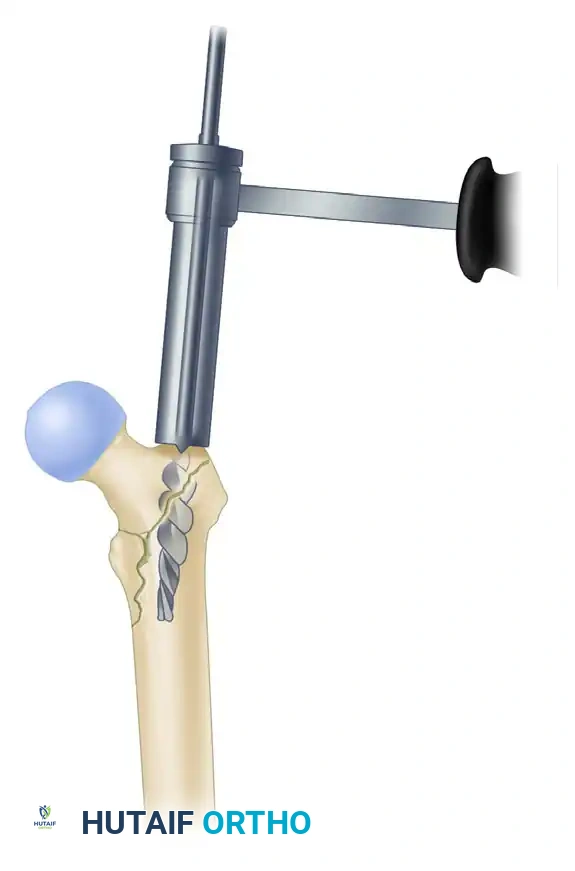
- Crucial Step: Correct any residual malreduction before passing the ball-tip guide wire down the diaphysis. Reaming a malreduced femur will lock the fracture in a deformed position.
- Place a ball-tip guide pin down the shaft of the femur, advancing it to the level of the physeal scar (or the desired distal extent of the nail).
- Measure the guide pin using the radiographic ruler to determine the appropriate length of the intramedullary nail.
- We typically utilize a 10-mm diameter nail for standard intertrochanteric fractures. There is rarely a biomechanical benefit to placing a larger diameter nail in the elderly osteoporotic population, and attempting to force a larger nail significantly increases the risk of iatrogenic anterior cortical perforation or hoop stress fractures.
- Ream the diaphyseal canal sequentially to a diameter 1.5 mm larger than the selected diameter of the intramedullary nail.
🚨 SURGICAL WARNING: The Anterior Bow
Pay careful attention to the anterior radius of curvature (bow) of the femur on the lateral fluoroscopic view. If the patient has a pronounced anterior bow, it may be necessary to over-ream by 2.0 mm larger than the nail diameter to prevent the distal tip of a straight nail from impinging on and perforating the anterior cortex.
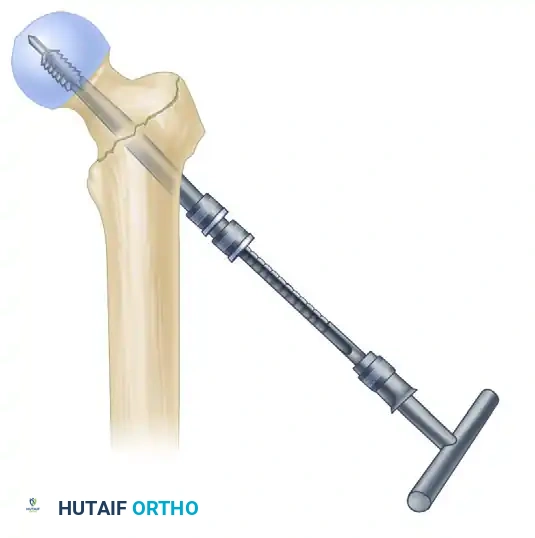
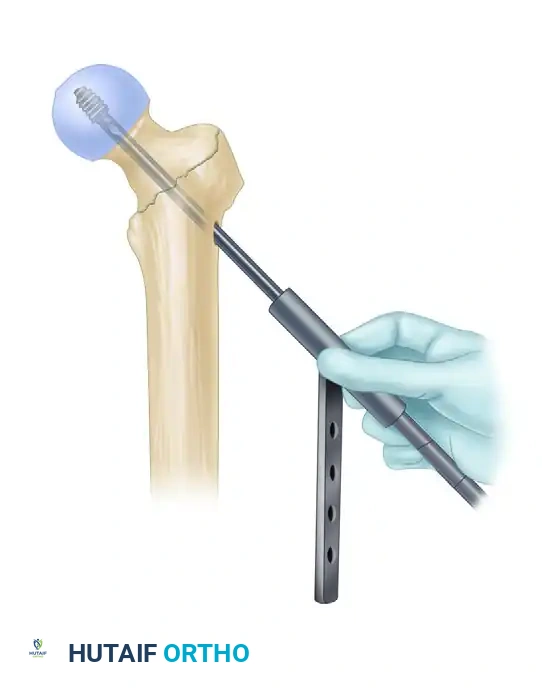
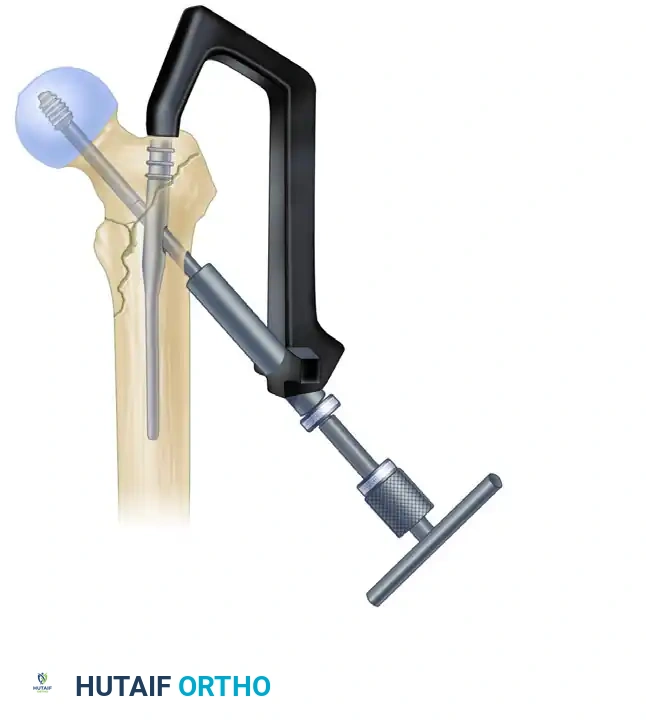
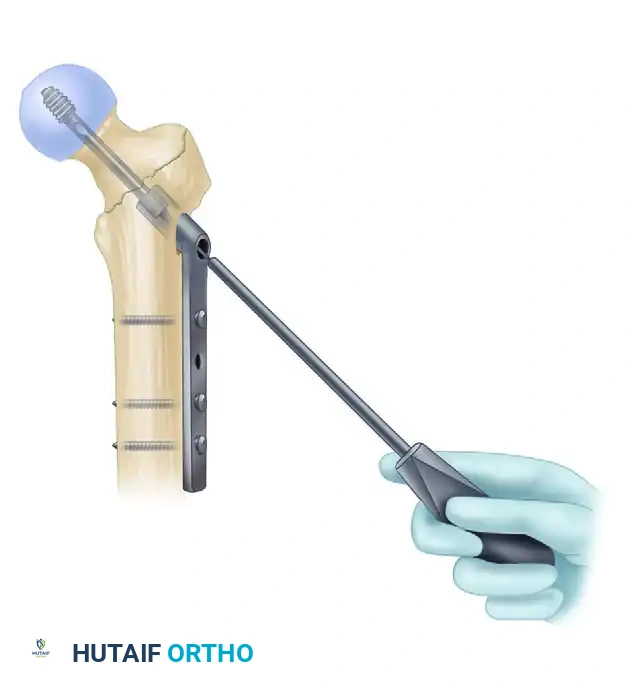
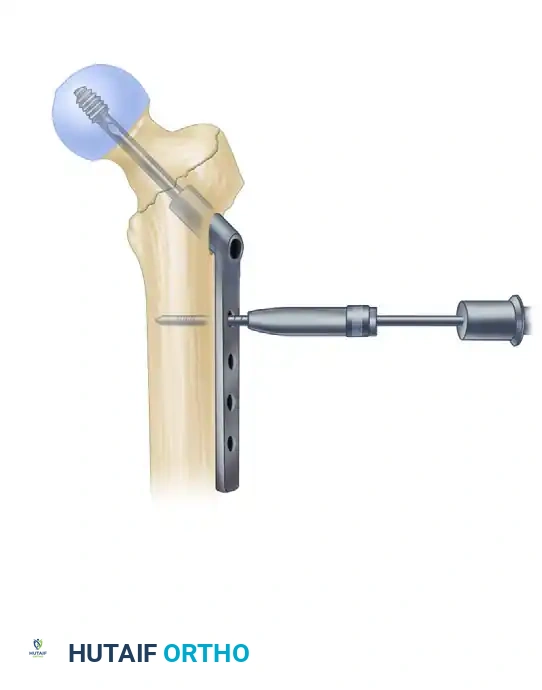
4. Intramedullary Nail Insertion
- After selecting the appropriate length and diameter, assemble the nail and the proximal drill guide securely. Ensure the targeting arm is tightly calibrated.
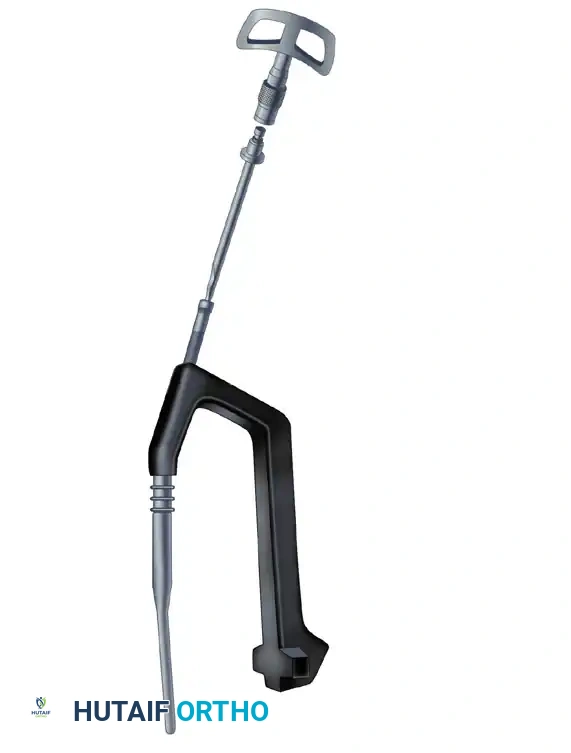
- Insert the nail manually. Do not use heavy mallet strikes. If the nail does not advance easily, remove it and ream an additional 0.5 mm.
- Insertion Technique: Insert the nail with the drill guide facing anteriorly (rotated 90 degrees). This utilizes the natural bow of the nail to navigate the proximal anatomy more easily. Once the nail has been inserted approximately halfway down the intramedullary canal, rotate the guide 90 degrees laterally into its final position.
- During nail advancement, continuously evaluate its trajectory with lateral fluoroscopy to avoid anterior cortical impingement.
- Insert the nail to a depth that allows for center-center positioning of the lag screw within the femoral head. Once the correct depth is achieved, remove the ball-tipped guide pin.
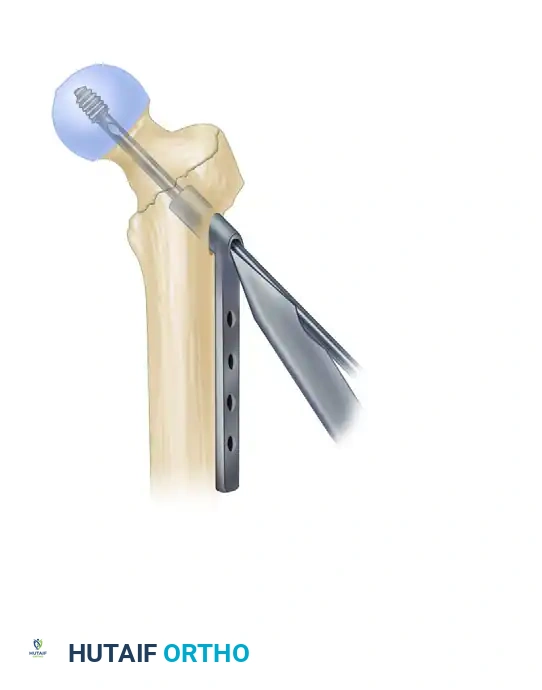
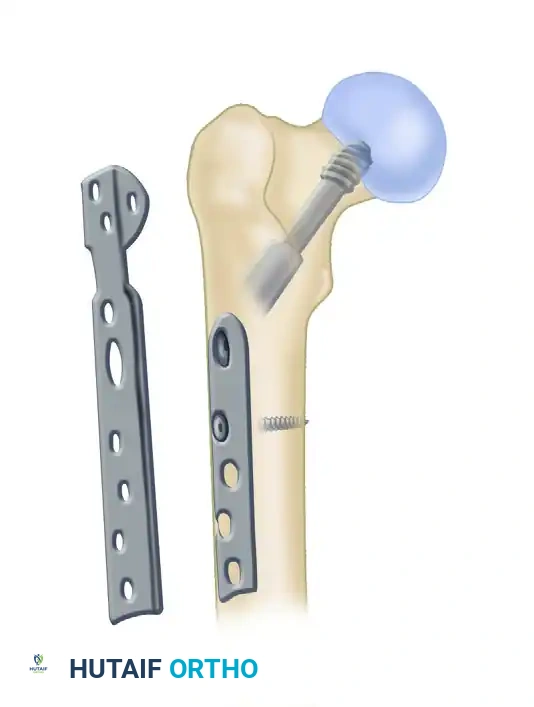
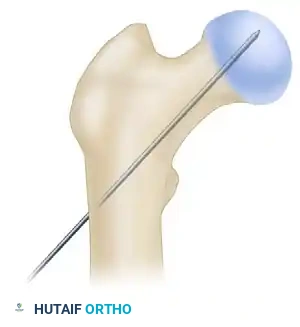
5. Lag Screw Placement and Compression
Achieving optimal lag screw placement is the most critical factor in preventing mechanical failure (cut-out). The goal is a Tip-Apex Distance (TAD) of less than 25 mm.
- Evaluate Version: Check the version of the nail on the lateral fluoroscopic view. The version is correct when the nail, the drill guide, the femoral neck, and the femoral head are all perfectly collinear.
- Make a small stab incision laterally through the skin and fascia lata corresponding to the targeting guide. Place the appropriate drill sleeve assembly down to the lateral cortex of the femur.
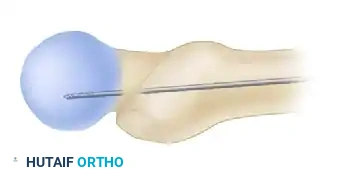
- Advance a threaded guide pin through the sleeve, up the femoral neck, and into the femoral head. Stop when the pin is within 5 mm of the subchondral bone.
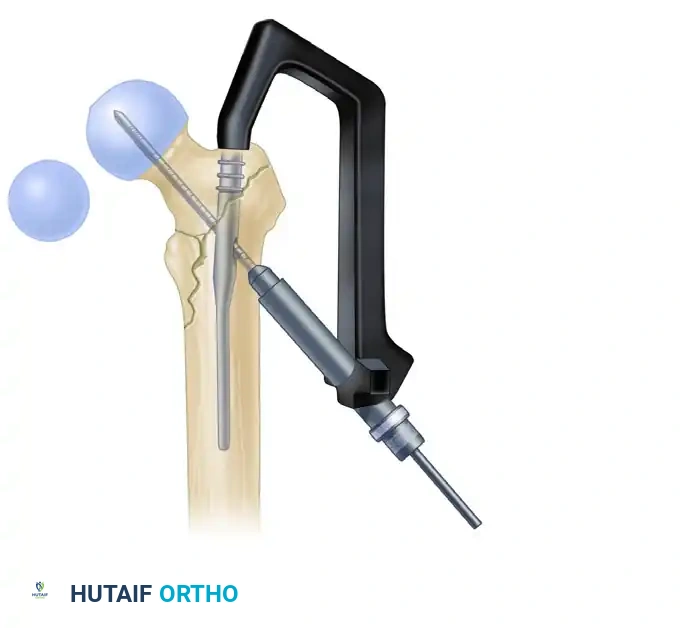
- Confirm appropriate center-center position in the femoral head on both AP and lateral views.
- Measure for the length of the lag screw using the calibrated measuring device over the guide pin.
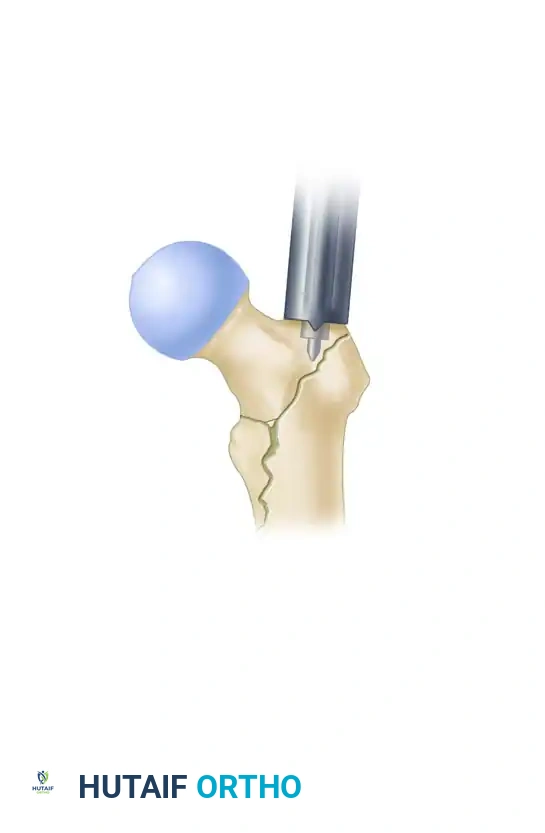
- Set the lag screw reamer to a depth 5 mm less than the measured length of the guide pin to prevent inadvertent joint penetration. Ream the lateral cortex and the lateral aspect of the femoral head.
- If the patient has dense, non-osteoporotic bone (e.g., a young patient with a high-energy mechanism), use a tap to prepare the thread path. In standard osteoporotic bone, tapping is generally unnecessary and may decrease screw purchase.
- Insert the lag screw over the guide pin until the threads are fully engaged in the subchondral bone of the femoral head.
- Use the centering sleeve insertion device to advance the centering sleeve over the lag screw shaft, locking it into the nail.
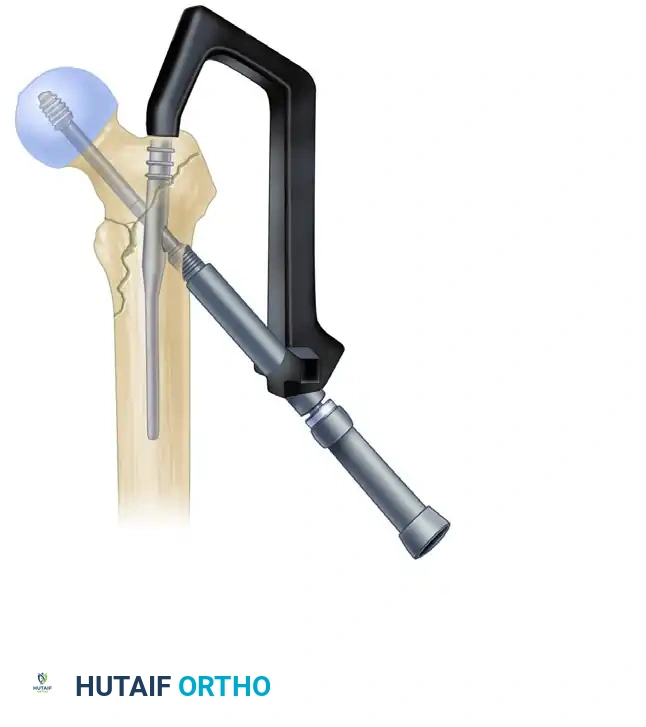
- Applying Compression: Before applying compression, release the traction on the fracture table. This allows the fracture fragments to settle. Insert the compression screw through the top of the nail and apply the desired amount of linear compression across the fracture site.
6. Distal Interlocking
Place distal interlocking screws as dictated by the fracture pattern and nail length. For standard short nails in stable patterns, a single static distal locking screw is usually sufficient to control rotation. For long nails or fractures with subtrochanteric extension, two distal screws (often utilizing a dynamic slot to allow for secondary settling) are recommended.

You Might Also Like