Operative Fixation of Medial Femoral Condyle Fractures
Key Takeaway
Isolated fractures of the medial femoral condyle require precise anatomical articular reduction to restore joint congruity and knee biomechanics. This guide details the anteromedial surgical approach, reduction techniques using joystick levers, and definitive fixation strategies—ranging from percutaneous lag screws to buttress plating. Early mobilization combined with rigid internal fixation ensures optimal functional recovery and minimizes post-traumatic osteoarthritis risk.
INTRODUCTION AND BIOMECHANICAL CONSIDERATIONS
Isolated fractures of the medial femoral condyle (AO/OTA Classification 33-B2) are relatively uncommon but present significant challenges to the orthopedic surgeon. Because the medial compartment of the knee bears approximately 60% of the load during the normal gait cycle, any disruption to the articular congruity of the medial femoral condyle can lead to rapid joint degeneration, varus instability, and severe post-traumatic osteoarthritis.
If only one condyle is fractured, the operative intervention is conceptually straightforward. Because the femoral diaphysis (shaft) is not involved, the primary goal is the restoration of the articular surface. When anatomical reduction is achieved, internal fixation is usually secure enough to allow for early range of motion (ROM) within a few days of surgery.
The fundamental principle of treating these intra-articular injuries is absolute stability. Whichever internal fixation construct is selected, the key principle remains anatomical articular reduction combined with rigid interfragmentary compression.
PREOPERATIVE PLANNING AND INDICATIONS
Indications for Surgery
Nonoperative management of medial condylar fractures is rarely indicated and is generally reserved for strictly nondisplaced fractures in non-ambulatory patients or those with prohibitive medical comorbidities.
Absolute indications for operative fixation include:
* Displaced intra-articular fractures (step-off > 2 mm).
* Fractures with associated varus/valgus instability.
* Open fractures.
* Irreducible condylar fractures.
Imaging and Templating
Standard anteroposterior (AP), lateral, and oblique radiographs of the knee are mandatory. However, plain radiographs often underestimate the degree of articular comminution and the exact plane of the fracture (e.g., coronal shear or Hoffa fractures).
Clinical Pearl: A preoperative computed tomography (CT) scan with 3D reconstructions is considered the gold standard. It allows for precise mapping of the fracture lines, identification of impacted articular segments, and accurate preoperative templating for screw trajectory and plate positioning.
PATIENT POSITIONING AND PREPARATION
Optimal positioning is critical for facilitating both the surgical approach and intraoperative fluoroscopy.
1. Table Setup: Place the patient supine on a completely radiolucent flat-topped table or a specialized fracture table.
2. Leg Positioning: A bump may be placed under the ipsilateral hip to correct natural external rotation, ensuring the patella faces directly toward the ceiling. A sterile tourniquet is applied to the proximal thigh.
3. Fluoroscopy: Position the C-arm on the contralateral side of the table. Ensure that perfect AP and lateral views of the distal femur can be obtained without obstruction before prepping and draping.
4. Provisional Reduction: Often, simple condylar fractures can be provisionally reduced with longitudinal traction and maintained with various periarticular reduction clamps applied percutaneously before formal incision.
SURGICAL APPROACH: THE ANTEROMEDIAL INCISION
Open reduction is strictly indicated for irreducible condylar fractures or when percutaneous methods fail to achieve an anatomical articular surface. The anteromedial approach provides excellent visualization of the medial condyle, the intercondylar notch, and the patellofemoral articulation.
Step-by-Step Dissection
- Skin Incision: Begin a longitudinal incision on the anteromedial aspect of the knee, starting approximately 10 cm proximal to the joint line. Extend the incision distally to just below the level of the joint line, curving slightly toward the medial tibial tubercle if necessary.
- Fascial Incision: Deepen the dissection through the subcutaneous tissues to expose the extensor mechanism.
- Arthrotomy: Incise the joint capsule and synovium at the joint level, perfectly in line with the skin incision.
- Proximal Extension: Extend this arthrotomy incision proximally along the lateral edge of the vastus medialis muscle, precisely at its junction with the quadriceps tendon (medial parapatellar arthrotomy).
- Exposure: Retract the patella laterally. Extend the proximal incision sufficiently to fully expose the medial femoral condyle, the patellofemoral groove, and the intercondylar area.
Surgical Warning: Take care not to aggressively strip the soft tissue attachments (especially the medial collateral ligament) from the medial epicondyle, as this can devascularize the fracture fragment and lead to nonunion or avascular necrosis.
FRACTURE REDUCTION TECHNIQUES
Achieving an anatomical reduction requires meticulous attention to detail and direct visualization of the articular cartilage.
Joint Debridement
Upon entering the joint, a hemarthrosis will be present. Clear the joint of all hematoma, debris, and loose bone chips using thorough pulsatile irrigation. Inspect the meniscus and cruciate ligaments for associated pathology.
The Joystick Technique
Expose the loose condylar fragments—whether it is the entire condyle or a smaller articular portion.
1. Insert a 3.2-mm or 4.0-mm Steinmann pin (or a partially threaded Schanz screw) directly into the large medial condylar fragment.
2. Use this pin as a "joystick" or lever to manipulate the fragment in multiple planes (rotation, translation, and angulation).
3. Reduce the fracture under direct vision, ensuring perfect congruity of the articular cartilage.
Provisional Fixation
Once anatomical reduction is achieved, maintain it by inserting multiple Kirschner wires (K-wires) across the fracture fragments. Drive these wires from the medial fragment directly into the intact lateral femoral condyle. Ensure these provisional wires are placed outside the planned trajectory of your definitive fixation screws.
DEFINITIVE FIXATION STRATEGIES
The choice of implant depends heavily on the fracture pattern, fragment size, and the patient's bone quality. Options include percutaneous lag screws, conical headless compression screws, or the placement of a buttress plate.
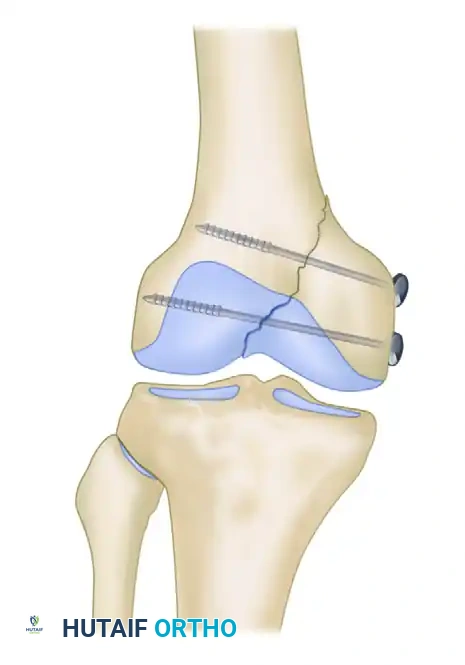
Cancellous Lag Screw Fixation
For large, uncomminuted medial condyle fractures, lag screw fixation provides excellent interfragmentary compression.
- Screw Trajectory: Plan the trajectory of the screws to be perfectly perpendicular to the fracture plane. This maximizes compression and prevents shear forces from displacing the reduction.
- Drilling and Measurement: Overdrill the near cortex (medial fragment) to create a gliding hole if using fully threaded screws, or use partially threaded cancellous screws.
- Screw Insertion: Place two cancellous screws to fix the medial femoral condylar fragment to the intact lateral femoral condyle. The size of the implant depends on the fragment size but typically ranges from 3.5-mm to 6.5-mm screws.
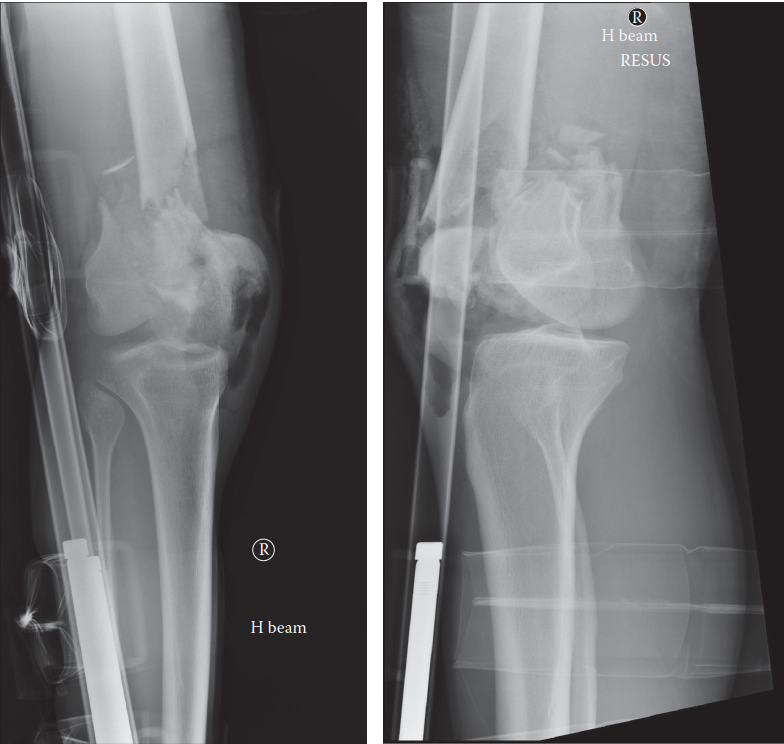
FIGURE 54-72: Fracture of the medial condyle fixed with 6.5-mm cancellous screws. Note the perpendicular trajectory to the fracture line to maximize interfragmentary compression.
Clinical Pearl - Osteoporotic Bone: If the bone is osteoporotic, place a washer under the head of the screw. This distributes the load and prevents the screw head from sinking through the thin medial cortex, which would result in a loss of compression.
- Bicortical Purchase: Ensure that the ends of the pins or cancellous screws penetrate the lateral femoral cortex. Osteoporotic cancellous bone within the condyle does not afford good purchase; engaging the dense lateral cortex is critical for construct stability. The lag screw effect of the pins or cancellous screws should produce robust fixation and visible interfragmentary compression at the articular surface.
- Verification: Remove the multiple K-wires used for temporary fixation. Confirm the reduction and hardware placement with fluoroscopic radiographs made in two orthogonal planes (AP and Lateral).
Buttress Plate Fixation
In some patients with severe osteoporotic bone, vertical shear fracture patterns, or metaphyseal comminution, fixation with screws alone may be biomechanically inadequate.
In these scenarios, a buttress plate must be applied to neutralize shear forces:
1. Contour a small fragment or distal femoral locking plate to fit the medial condyle perfectly.
2. An alternative to large cannulated screw fixation is the use of small fragment fixation. Interfragmentary compression can first be achieved with 3.5-mm interfragmentary lag screws.
3. The construct is then further stabilized with the addition of a small fragment buttress plate applied to the medial cortex, acting as an anti-glide plate to prevent proximal migration of the condyle.
CLOSURE AND POSTOPERATIVE CARE
Surgical Closure
Thoroughly irrigate the joint one final time to remove any drilling debris. A closed suction drain may be placed intra-articularly if significant bleeding is anticipated, though this is surgeon-dependent. Close the arthrotomy meticulously using heavy absorbable sutures (e.g., #1 or #2 Vicryl) in a watertight fashion. Close the subcutaneous tissues and skin according to standard protocols.
Postoperative Rehabilitation Protocol
The residual disability after isolated fractures of the medial femoral condyle is usually minor, and a good range of motion can be regained—provided that the reduction and fixation are satisfactory and joint motion is initiated early.
Phase 1: Immediate Postoperative (Days 0-3)
* Immobilization: The patient is placed in a removable long-leg splint or a bulky soft dressing with a light compression wrap and a knee immobilizer.
* Motion: Continuous passive motion (CPM) can be initiated immediately after surgery if desired, typically starting at 0 to 30 degrees and increasing daily.
* Weight Bearing: Ambulation with a walker or crutches is started on postoperative day 2 or 3, allowing strictly touch-down weight bearing (TDWB) to protect the articular reduction.
Phase 2: Early Rehabilitation (Weeks 1-6)
* Exercise: Gentle active and active-assisted exercises are begun as soon as the postoperative swelling subsides.
* Muscle Activation: Range-of-motion exercises, along with isometric quadriceps and hamstring exercises, are increased gradually to prevent arthrofibrosis and muscle atrophy.
* Weight Bearing: Maintain TDWB. The articular cartilage and subchondral bone require time to consolidate without the stress of axial loading.
Phase 3: Intermediate Rehabilitation (Weeks 8-10)
* Clinical Evaluation: Obtain follow-up radiographs to assess for callus formation and maintenance of articular reduction.
* Weight Bearing: If the fracture is healing satisfactorily on imaging and the patient is clinically pain-free at the fracture site, partial weight bearing (PWB) can be allowed, progressing from 25% to 50% of body weight.
Phase 4: Advanced Rehabilitation (Weeks 12-14)
* Weight Bearing: By 12 to 14 weeks, the patient usually has gradually progressed to full weight bearing (FWB) without assistive devices.
* Strengthening: Focus shifts to advanced closed-chain kinetic exercises, proprioception training, and return to baseline functional activities.
COMPLICATIONS AND PITFALLS
While outcomes are generally excellent following anatomical reduction, surgeons must be vigilant regarding potential complications:
* Loss of Fixation: Most commonly occurs due to failure to engage the lateral cortex in osteoporotic bone, or failure to utilize a buttress plate in vertical shear patterns.
* Arthrofibrosis (Knee Stiffness): Results from prolonged immobilization. Emphasize early, aggressive ROM protocols.
* Post-Traumatic Osteoarthritis: Directly correlated with the quality of the articular reduction. A residual step-off greater than 2 mm significantly increases the risk of early degenerative joint disease.
* Hardware Irritation: Medial-sided hardware, particularly bulky plates or prominent screw heads, can irritate the vastus medialis or medial collateral ligament, occasionally necessitating hardware removal after complete fracture union (typically after 12-18 months).
You Might Also Like