Leg Compartment Syndrome: Single and Double-Incision Fasciotomy Techniques
Key Takeaway
Acute compartment syndrome of the leg is a surgical emergency necessitating prompt decompression of all four fascial compartments. This guide details the single-incision (Davey, Rorabeck, and Fowler) and the gold-standard double-incision (Mubarak and Hargens) fasciotomy techniques. Mastery of the relevant cross-sectional anatomy, precise fascial release, and meticulous postoperative wound management—including delayed primary closure and negative pressure wound therapy—is essential to prevent irreversible ischemic necrosis and optimize functional outcomes.
INTRODUCTION TO ACUTE COMPARTMENT SYNDROME OF THE LEG
Acute compartment syndrome (ACS) of the lower extremity represents a catastrophic orthopedic emergency characterized by elevated interstitial pressure within a closed osteofascial space. This elevated pressure compromises microvascular perfusion, leading to tissue hypoxia, ischemic muscle necrosis, and irreversible nerve damage if left untreated. The leg is the most common anatomical site for ACS, frequently associated with high-energy tibial shaft fractures, crush injuries, ischemia-reperfusion injuries, and severe soft-tissue trauma.
The definitive treatment for ACS is emergent surgical decompression via fasciotomy. The primary objective is the complete release of the unyielding fascial envelopes surrounding all four compartments of the leg. Delay in surgical intervention beyond 6 to 8 hours of symptom onset exponentially increases the risk of permanent disability, ischemic contracture (Volkmann’s equivalent of the lower extremity), amputation, and systemic complications such as myoglobinuric renal failure.
This comprehensive academic guide details the two primary surgical approaches for leg decompression: the Single-Incision Fasciotomy (described by Davey, Rorabeck, and Fowler) and the gold-standard Double-Incision Fasciotomy (described by Mubarak and Hargens).
APPLIED ANATOMY AND BIOMECHANICS
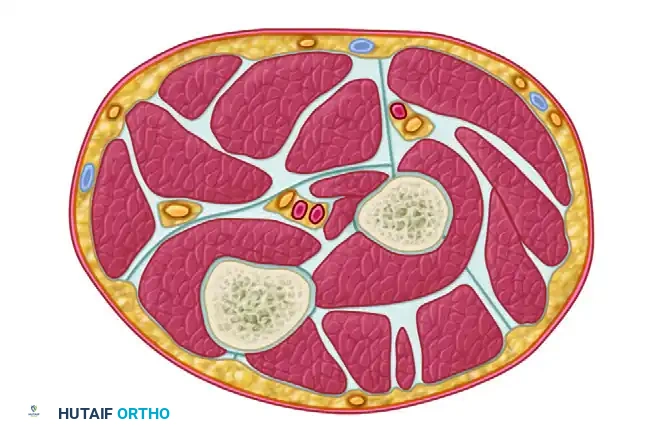
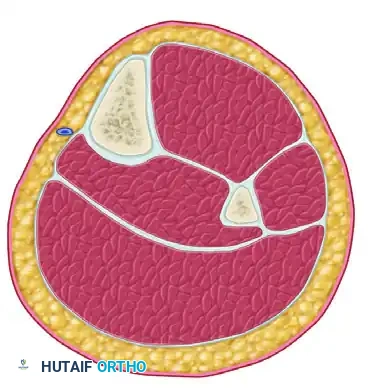
A profound understanding of the cross-sectional anatomy of the leg is mandatory for safe and effective fasciotomy. The leg is divided into four distinct fascial compartments by the tibia, fibula, interosseous membrane, and intermuscular septa.
1. Anterior Compartment
- Boundaries: Bounded medially by the lateral surface of the tibia, laterally by the anterior intermuscular septum, and posteriorly by the interosseous membrane.
- Contents: Tibialis anterior, extensor hallucis longus (EHL), extensor digitorum longus (EDL), and peroneus tertius muscles.
- Neurovascular Structures: Deep peroneal nerve and anterior tibial artery and vein.
- Clinical Relevance: Most frequently involved compartment in ACS. Paralysis results in foot drop.
2. Lateral Compartment
- Boundaries: Bounded anteriorly by the anterior intermuscular septum, posteriorly by the posterior intermuscular septum, and medially by the fibula.
- Contents: Peroneus longus and peroneus brevis muscles.
- Neurovascular Structures: Superficial peroneal nerve (SPN).
- Clinical Relevance: The SPN exits the fascia in the distal third of the leg; it is highly vulnerable to iatrogenic transection during the anterior fascial release.
3. Superficial Posterior Compartment
- Boundaries: Bounded anteriorly by the transverse intermuscular septum and posteriorly by the crural fascia.
- Contents: Gastrocnemius, soleus, and plantaris muscles.
- Neurovascular Structures: Sural nerve and lesser saphenous vein.
4. Deep Posterior Compartment
- Boundaries: Bounded anteriorly by the tibia, interosseous membrane, and fibula, and posteriorly by the transverse intermuscular septum.
- Contents: Tibialis posterior, flexor hallucis longus (FHL), and flexor digitorum longus (FDL) muscles.
- Neurovascular Structures: Tibial nerve, posterior tibial artery and vein, and peroneal artery and vein.
- Clinical Relevance: Often under-released due to its deep anatomical location. Failure to adequately decompress this compartment leads to claw toe deformities and severe plantar neuropathy.
💡 Clinical Pearl: Diagnostic Thresholds
The diagnosis of ACS is primarily clinical (pain out of proportion, pain with passive stretch, palpable tenseness). However, in obtunded or polytraumatized patients, intracompartmental pressure (ICP) monitoring is required. A Delta Pressure (ΔP) of less than 30 mm Hg (Diastolic Blood Pressure minus Intracompartmental Pressure) is the universally accepted threshold indicating the need for emergent fasciotomy.
PREOPERATIVE PREPARATION AND POSITIONING
- Anesthesia: General anesthesia is preferred. Regional anesthesia (neuraxial blocks) is generally contraindicated in patients at risk for ACS, as it masks the cardinal symptom of breakthrough pain.
- Positioning: The patient is placed supine on a radiolucent operating table. A bump is placed under the ipsilateral hip to internally rotate the leg to a neutral position, facilitating access to both the medial and lateral aspects of the limb.
- Tourniquet: A pneumatic tourniquet should be placed on the proximal thigh but must remain uninflated. Inflating the tourniquet exacerbates ischemia and prevents the surgeon from accurately assessing muscle viability and bleeding post-decompression. It is reserved strictly for catastrophic hemorrhage control.
SURGICAL TECHNIQUE 1: SINGLE-INCISION FASCIOTOMY (DAVEY, RORABECK, AND FOWLER)
The single-incision technique utilizes a single lateral approach to access all four compartments. While it offers the advantage of a single wound, it is technically demanding, requires extensive subcutaneous undermining, and carries a higher risk of incomplete deep posterior compartment release and iatrogenic injury to the superficial peroneal nerve.
Step 1: Incision and Superficial Dissection
- Make a single longitudinal, lateral incision directly in line with the fibular shaft.
- The incision should extend from just distal to the head of the fibula down to 3 to 4 cm proximal to the lateral malleolus.
Step 2: Anterior and Lateral Compartment Release
- Anterior Flap: Undermine the skin and subcutaneous tissues anteriorly to expose the crural fascia over the anterior and lateral compartments.
- Nerve Protection: Meticulously identify and protect the superficial peroneal nerve, which pierces the deep fascia in the distal third of the leg to become subcutaneous.
- Fasciotomy: Perform a longitudinal fasciotomy of the anterior compartment, extending the release proximally and distally. Repeat this longitudinal release for the lateral compartment, ensuring the intermuscular septum between the two is clearly identified.
Step 3: Superficial Posterior Compartment Release
- Posterior Flap: Undermine the skin and subcutaneous tissues posteriorly to expose the fascia overlying the gastrocnemius-soleus complex.
- Fasciotomy: Perform a longitudinal fasciotomy of the superficial posterior compartment along the entire length of the muscle belly.
Step 4: Deep Posterior Compartment Release (The Critical Step)
Accessing the deep posterior compartment from a lateral approach requires meticulous deep dissection.
- Identify the interval between the superficial posterior and lateral compartments distally.
- Develop this interval proximally by sharply detaching the soleus muscle from its origin on the posterior aspect of the fibula.
- Perform a subperiosteal dissection of the flexor hallucis longus (FHL) muscle off the posterior surface of the fibula.
- Carefully retract the FHL muscle belly and the peroneal vessels posteriorly.
- Identify the fascial attachment of the tibialis posterior muscle to the fibula. Incise this deep fascia longitudinally to fully decompress the deep posterior compartment.
⚠️ Surgical Warning: Single-Incision Pitfalls
The single-incision technique requires aggressive retraction of the skin flaps, which can lead to skin edge necrosis. Furthermore, the deep posterior compartment release is performed in a deep, narrow surgical corridor, increasing the risk of incomplete decompression and iatrogenic injury to the peroneal vessels.
SURGICAL TECHNIQUE 2: DOUBLE-INCISION FASCIOTOMY (MUBARAK AND HARGENS)
The double-incision technique is the universally recognized gold standard for leg fasciotomy. It provides direct, safe, and expansile access to all four compartments with minimal subcutaneous undermining, significantly reducing the risk of incomplete release and neurovascular injury.
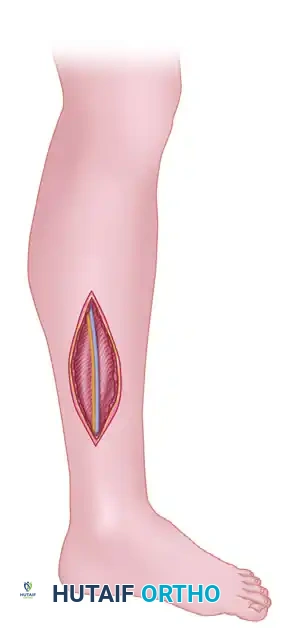
Step 1: The Anterolateral Incision (Anterior & Lateral Compartments)
- Make a 20 to 25-cm longitudinal incision in the anterolateral leg, centered exactly halfway between the anterior crest of the tibia and the shaft of the fibula.
- Use subcutaneous dissection to achieve wide exposure of the fascial compartments. Avoid excessive undermining to preserve the subdermal vascular plexus.
- Make a small transverse incision through the fascia to definitively identify the lateral intermuscular septum (the dividing line between the anterior and lateral compartments).
- Identify the Nerve: Locate the superficial peroneal nerve just posterior to the intermuscular septum within the lateral compartment.
- Anterior Release: Using long Metzenbaum scissors or a fasciotome, release the anterior compartment fascia proximally toward the tibial tubercle and distally toward the ankle, strictly in line with the tibialis anterior muscle belly.
- Lateral Release: Perform a longitudinal fasciotomy of the lateral compartment proximally and distally, in line with the fibular shaft, ensuring the superficial peroneal nerve is protected throughout the excursion.
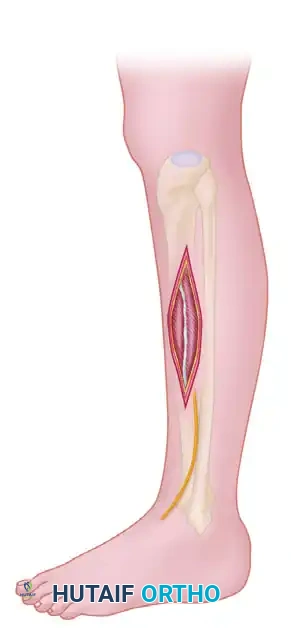
Step 2: The Posteromedial Incision (Superficial & Deep Posterior Compartments)
- Make a second 20 to 25-cm longitudinal incision on the posteromedial aspect of the leg.
- The incision must be placed at least 2 cm posterior to the posterior margin of the tibia to prevent exposure of the bare bone, which can lead to tibial desiccation and complicate future soft-tissue coverage.
- Use wide subcutaneous dissection to identify the fascial planes.
- Protect Superficial Structures: Identify and retract the greater saphenous vein and the saphenous nerve anteriorly.
- Superficial Posterior Release: Make a transverse fascial incision to identify the septum separating the deep and superficial posterior compartments. Release the fascia over the gastrocnemius-soleus complex for the entire length of the compartment.
Step 3: Deep Posterior Compartment Release
- Retract the superficial posterior compartment musculature posteriorly.
- Make another longitudinal fascial incision directly over the flexor digitorum longus (FDL) muscle to release the entire deep posterior compartment.
- The Soleus Bridge: As the dissection is carried proximally, inspect the soleus origin. If the soleus bridge extends more than halfway down the tibia, this extended origin must be surgically released to ensure complete decompression of the proximal deep compartment.
- Epimysiotomy: After the fascial release, carefully inspect the deep posterior muscle bellies (tibialis posterior, FHL, FDL). If increased tension is still evident within the epimysium of the individual muscles, perform a longitudinal epimysiotomy over the extent of the tense muscle belly to ensure absolute decompression.
💡 Clinical Pearl: The "Missed" Deep Posterior Compartment
The most common cause of failed fasciotomy and subsequent medicolegal action is an incomplete release of the deep posterior compartment. Always ensure the fascial release extends from the soleal arch proximally to the retromalleolar region distally.
POSTOPERATIVE CARE AND WOUND MANAGEMENT
The immediate postoperative management of fasciotomy wounds is as critical as the surgical decompression itself. The wounds must never be closed primarily at the index operation.
Immediate Postoperative Phase
- Pack the wounds open with sterile, moist saline dressings.
- Apply a bulky, well-padded posterior plaster splint with the foot held in a strictly plantigrade position (90 degrees) to prevent equinus contracture of the ankle, which can occur rapidly due to unopposed posterior muscle forces or ischemic fibrosis.
- Elevate the limb at the level of the heart. Elevation above the heart can decrease arterial perfusion pressure and exacerbate ischemia, while dependent positioning increases venous congestion and swelling.
The "Second Look" Procedure
- At 48 to 72 hours post-decompression, the patient must be returned to the operating room for a planned second-look procedure.
- Viability Assessment: The wounds are irrigated, and all muscle compartments are systematically inspected for viability using the "4 C's": Color, Consistency, Contractility, and Capacity to bleed.
- Adjuncts: Intravenous fluorescein angiography combined with a Wood's light examination can be highly beneficial in evaluating borderline muscle viability. Non-fluorescing, necrotic muscle must be aggressively and meticulously debrided to prevent systemic toxicity and infection.
- If there is no evidence of muscle necrosis and the swelling has subsided significantly, the skin may be loosely approximated.
- If closure cannot be accomplished without tension, or if further debridement is required, the wounds are repacked, and the debridement cycle is repeated at 48 to 72-hour intervals until the wound bed is clean and stable.
Wound Closure Techniques
Management of fasciotomy wounds requires a strategic approach, as primary closure is rarely possible due to massive tissue edema. Approximately 50% of patients will ultimately require a split-thickness skin graft (STSG).
1. Delayed Primary Closure (The Vessel Loop Shoelace Technique)
An excellent alternative to skin grafting is gradual delayed primary closure utilizing the vessel loop "shoelace" technique or commercial dynamic wound closure devices.
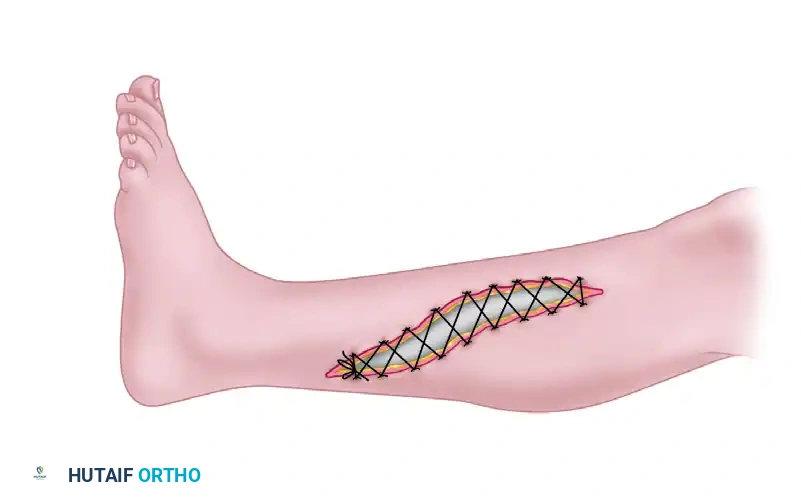
- Silastic vessel loops are interlaced through skin staples placed along the wound edges.
- Tension is applied to the vessel loops to provide continuous, dynamic creep of the skin edges.
- The tension is sequentially tightened every 48 hours in the operating room or at the bedside until the skin edges can be safely approximated without underlying compartment compression.
2. Negative Pressure Wound Therapy (NPWT / VAC)
* Vacuum-assisted wound closure (NPWT) is highly recommended in the interim between debridements.
* NPWT effectively manages copious wound exudate, reduces interstitial postoperative edema, promotes angiogenesis, and accelerates the formation of healthy granulation tissue.
* By reducing the physical volume of the limb, NPWT significantly improves the rates of successful delayed primary closure, minimizing the need for extensive skin grafting.
3. Split-Thickness Skin Grafting (STSG)
* If the skin edges cannot be approximated within 7 to 10 days despite dynamic closure techniques, a meshed split-thickness skin graft should be applied over the healthy granulation tissue.
* The anterolateral wound is more frequently amenable to delayed primary closure, whereas the posteromedial wound often requires STSG due to the larger volume of the posterior muscle bellies.
CONCLUSION
Emergent fasciotomy remains the sole definitive treatment for acute compartment syndrome of the leg. Whether utilizing the single-incision technique of Davey, Rorabeck, and Fowler, or the preferred double-incision technique of Mubarak and Hargens, the surgeon's paramount goal is the absolute and unhindered release of all four fascial compartments. Meticulous surgical technique, strict adherence to anatomical landmarks, and aggressive, staged postoperative wound management are essential to preserving limb viability and optimizing long-term functional outcomes.
You Might Also Like