Modular Proximal Femoral Replacement: Reconstructing an Above-Knee Stump After Hip Disarticulation
Key Takeaway
Join us in the OR for a masterclass on creating a functional above-knee stump after hip disarticulation using a custom modular prosthesis. This advanced technique significantly improves patient mobility and quality of life compared to traditional disarticulation. We'll meticulously cover preoperative planning, precise surgical steps, critical anatomical considerations, and post-operative management, emphasizing technique and rationale for optimal outcomes.
Introduction: The Rationale for Functional Stump Reconstruction
Alright fellows, gather around. Today, we're performing a challenging yet incredibly rewarding procedure: a hip disarticulation with reconstruction of a functional proximal thigh stump using a custom modular endoprosthesis. This isn't your standard hip disarticulation. This is about giving our patients a fighting chance at a more functional life, a chance to ambulate with significantly less energy expenditure and improved quality of life.
Historically, functional outcomes after a standard hip disarticulation have been, frankly, dismal. Patients are left without a leg, without a crucial lever arm to move an artificial limb. They often suffer profound losses in self-esteem, mobility, and are plagued by phantom pains. Imagine the energy expenditure required to ambulate without a fulcrum; studies report it can be 82% greater than a non-amputee. This often relegates patients to crutches or wheelchairs, hindering their independence.
Our goal today, building on the pioneering work of Marcove and colleagues, is to convert a hip disarticulation into something functionally akin to an above-knee amputation. We're providing that essential lever arm, dramatically lowering energy consumption for ambulation, and thereby increasing the likelihood of successful prosthetic use. This procedure, while rare, is a testament to the advances in orthopaedic oncology, offering a superior alternative when limb-sparing is not feasible due to aggressive tumor biology.
Indications for This Advanced Reconstruction
So, when do we consider this complex reconstruction? The indications are precise and critical:
- Proximal Transosseous Skip Metastases: When a primary tumor, often distal, has metastasized proximally within the femur, making a standard above-knee amputation oncologically unsafe.
- Pathologic Fractures with Proximal Contamination: A pathologic fracture of the distal femur, especially if treated with retrograde intramedullary fixation, can contaminate the proximal medullary canal, necessitating complete femoral resection.
- Extensive Diaphyseal Extension: Tumors with significant longitudinal extension along the diaphysis of the femur that cannot be safely resected with adequate margins via a typical wide resection or above-knee amputation.
- Large Adjacent Soft Tissue Masses: When a femoral tumor is associated with extensive soft tissue involvement that precludes a safe limb-sparing resection, particularly if combined with a poor response to adjuvant chemotherapy.
- Inability to Achieve Safe Osseous Margins: This is arguably the most common indication – when tumor extension simply dictates complete femoral removal to achieve clear margins.
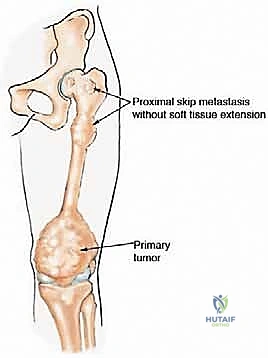
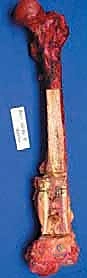
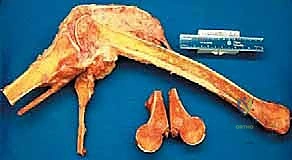
Figure 1: Illustrative examples of indications for hip disarticulation and reconstruction with a stump prosthesis. (A) Proximal skip metastasis without soft tissue extension. (B) Corresponding resected pathology gross specimen. (C) Distal femoral nonunion after a pathologic fracture treated with a long retrograde intramedullary nail, indicating proximal contamination. (D) Distal femoral synovial sarcoma with a proximal femoral head skip metastasis.
A crucial prerequisite for this operation is uncontaminated soft tissues around the hip, retrogluteal region, and proximal thigh. If we cannot achieve adequate soft tissue coverage free of tumor, this reconstruction is contraindicated, and a standard hip disarticulation may be the only option.
Preoperative Planning: The Blueprint for Success
Fellows, remember, the success of any complex oncologic procedure begins long before the first incision. Our preoperative planning is meticulous and multi-modal.
Imaging and Staging Studies
- Plain Radiography: We start with high-quality radiographs of the entire femur, including the hip and pelvis, to assess the bony architecture and rule out any pelvic involvement that might contraindicate the procedure. We're looking for skip metastases and the overall extent of the primary tumor.
- Computed Tomography (CT) Scan: Pelvic and hip CT scans are essential for precisely locating and defining the tumor margins, especially in relation to the acetabulum. We need to definitively rule out acetabular involvement, as this would necessitate a hemipelvectomy, a different beast altogether.
- Magnetic Resonance Imaging (MRI): MRI of the soft tissues of the pelvis and proximal femur is absolutely crucial. This dictates whether we can safely spare enough soft tissue to reconstruct a functional proximal thigh stump with adequate coverage. We're assessing tumor extension into muscle compartments, neurovascular bundles, and overall soft tissue envelope.
- Bone Scan: A technetium bone scan helps us determine the full extent of any potential skip metastases throughout the femur and proximal skeleton.
- Angiography (if indicated): In cases with very large or complex soft tissue masses, or proximity to major vessels, angiography can provide invaluable information regarding vascular anatomy and tumor involvement, guiding our vascular dissection.
Prosthetic Design and Customization
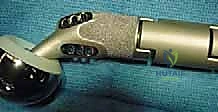
The modular prosthetic design is key to this reconstruction. It typically comprises:
* A proximal bipolar cup: This articulates with the native acetabulum.
* A modular body length: Chosen based on patient anatomy and the desired stump length. This segment often has a porous coating to encourage soft tissue ingrowth.
* A distal rounded, bullet-shaped tip: Designed specifically to prevent tissue penetration and features multiple fixation holes for reattaching the distal muscle ends.
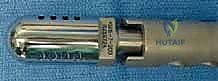
Figure 2: A modular stump prosthesis illustrating its key components: a proximal bipolar head, porous coating for soft tissue ingrowth, and distal holes for muscle reattachment. Note the rounded distal tip to prevent tissue penetration.
We'll have a custom bullet-tip prosthetic extension ordered based on our templating from the preoperative imaging. The goal is to achieve a stump length that allows for effective prosthetic fitting and leverage.
Unique Anatomic Considerations and Surgical Goals
Before we even begin, let's internalize the critical anatomical and surgical considerations:
- Arterial Blood Supply: We must preserve the arterial blood supply to the soft tissues that will form our stump. The superficial femoral artery, for instance, must be ligated as distally as oncologically possible within the sartorial canal, ensuring anterior flap viability.
- Muscle Group Balance: The muscle groups of the thigh – quadriceps, hamstrings, adductors, and abductors – must be meticulously reconnected to the prosthesis. Achieving proper tensioning and balance is paramount to avoid contractures and optimize function.
- Hip Capsule Reconstruction: The prosthesis must be securely integrated into the hip capsule to prevent dislocation, especially given the gravitational forces acting on the prosthetic stump. This requires robust capsular reconstruction and reinforcement.
- Soft Tissue Coverage: Sufficient, tension-free soft tissue coverage over the entire prosthesis, particularly its distal end, is absolutely critical to prevent skin breakdown, infection, and hardware exposure.
- Pain Management: Anticipate phantom limb pain and stump pain. We'll proactively address this intraoperatively with an epineural catheter placed in the transected sciatic nerve, combined with a comprehensive multimodal analgesia plan.
Patient Positioning and OR Setup
Let's get our patient positioned correctly.
Patient Positioning
The patient is placed supine on the operating table. This allows for excellent access to both the anterior and posterior aspects of the hip and thigh, which is essential for our extensive flap development and muscle dissection. We'll use a standard operating table, ensuring it's capable of Trendelenburg and reverse Trendelenburg as needed, though for this particular approach, supine with appropriate draping is key. The entire affected limb, up to the iliac crest, will be prepped and draped freely to allow for full range of motion assessment during the trial reduction.
Fluoroscopy Setup
While not constantly used, intraoperative fluoroscopy can be helpful during the trochanteric osteotomy if there are concerns about tumor proximity or during trial reductions to confirm prosthetic seating. We'll have a C-arm available and draped, ready for deployment.
Intraoperative Masterclass: Step-by-Step Execution
Alright, fellows, scalpel in hand. Let's begin.
1. Incision and Initial Exposure
"Let's start with our skin incision. We're aiming for a two-armed incision, designed to create large anterior or posterior myocutaneous flaps for optimal coverage. I'll begin on the medial side, extending distally along the medial aspect of the thigh. This medial limb will be positioned relatively posterior to allow us to access the sartorial canal and the superficial femoral artery from its posterior aspect. This strategy is crucial for preserving the anterior branches, which will supply our vital anterior flap and quadriceps muscle, much like in an anterior flap hemipelvectomy.
Now, let's make our lateral limb of the incision. This will be directed superiorly towards the greater trochanter and then extend distally along the lateral aspect of the femur, following the natural course of the fascia lata. This ensures we have ample soft tissue for our lateral flap.
"Scalpel, please. We'll carry this incision down through the skin and subcutaneous fat. You'll immediately notice the subcutaneous fat layer. Be mindful of the superficial veins here. We're encountering multiple branches of the saphenous vein in the medial aspect. Identify them, fellows. Clamp, divide, and ligate these meticulously with 3-0 Vicryl ties. Hemostasis is paramount from the get-go."
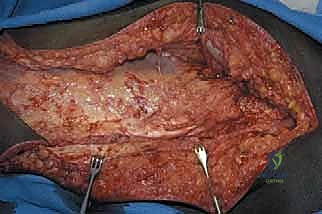
TECH FIG 1 • Initial exposure, showing the planned incision and the development of myocutaneous flaps.
"Now we're through the subcutaneous tissue. We'll incise the fascia lata along its entire length, exposing the underlying muscle groups. With the fascia lata exposed, we can now clearly visualize the hip girdle muscles. We'll internally rotate the hip slightly to bring these muscles into better view. Take a moment to appreciate the anatomy here, fellows. The tensor fasciae latae, the gluteal muscles, the sartorius, the rectus femoris – all are becoming apparent."
2. Neurovascular Dissection and Management
"Our next critical step is to identify and protect the major neurovascular structures. Let's locate the sciatic nerve. It's typically found deep to the gluteus maximus, running between the greater trochanter and the ischial tuberosity. Gently palpate for it. Once identified, carefully dissect around it and place a Penrose drain around the nerve for easy retraction and protection. Remember, we'll manage this nerve later for pain control, but for now, it's about safeguarding it during our dissection."
"Now, for the arterial supply. We need to identify the superficial femoral artery. This is a critical vessel. We'll trace it distally within the sartorial canal. The goal here is to clamp, divide, and ligate the superficial femoral artery as distally as oncologically possible. This preserves maximum blood supply to our anterior flap. Accompanying the artery, you'll find the superficial femoral vein and often a branch of the femoral nerve. These also need to be ligated. Use robust ties, fellows – 0-silk or 2-0 Ethibond are appropriate here."
Surgical Warning: Meticulous hemostasis is crucial. Any uncontrolled bleeding can obscure the field and compromise flap viability. Ensure secure ligation of all major vessels and their branches.
3. Muscle Division and Tagging
"With our neurovascular structures identified and managed, we'll now systematically divide the muscles. This is where we start shaping our future stump. We'll work distally, carefully dissecting the bone away from the musculature.
"Let's begin with the quadriceps muscles anteriorly, then the adductor muscles medially, and finally the hamstring muscles posteriorly. We'll sequentially clamp these muscle groups using large Kelly clamps and divide them at a predetermined anatomic level, simulating the length of a standard above-knee amputation stump. As we divide each muscle group, we will immediately tag them with Dacron tape (or heavy non-absorbable suture) for later identification and reattachment. This tagging is non-negotiable, fellows; it saves immense time and prevents confusion during reconstruction."
4. Hip Disarticulation
"Now we're ready for the disarticulation itself. We need to detach the entire femur from the acetabulum.
-
Sartorius and Iliopsoas: First, let's identify the sartorius muscle at its origin on the anterior superior iliac spine. Divide it cleanly from its origin. Next, flex the hip to relax the iliopsoas muscle. Identify it, and carefully dissect it from its origin on the lumbar vertebrae and iliac fossa. We'll tag these for later reattachment.
-
Trochanteric Osteotomy: If there's no tumor involvement of the greater trochanter or surrounding area, we will perform a trochanteric osteotomy. This is a key step, as it allows us to detach the abductor muscles (gluteus medius and minimus) along with a bone fragment. This osteotomy should be performed at an appropriate angle to ensure an adequate amount of bone remains attached to the abductor musculature, allowing for a strong reattachment later. Use an oscillating saw for a clean cut.
-
Short External Rotators: Next, we'll divide the short external rotators (piriformis, gemelli, obturators, quadratus femoris) at their bony insertions on the greater trochanter and intertrochanteric crest.
-
Hip Capsule Division: Identify the hip capsule. We'll make a standard T-type incision to divide it at the base of the femoral neck. The base of the 'T' runs along the anterior part of the neck, and the vertical limb extends circumferentially along the base of the neck. Tag the hip capsule meticulously for later reconstruction.
-
Anterior Flap Development: We've already incised the fascia lata along its length. Now, release the vastus lateralis from its origin. Continue to develop large anterior and posterior flaps, ensuring adequate mobilization for tension-free closure later.
-
Sciatic Nerve Transection: We previously isolated the sciatic nerve. Now, we'll carefully transect it about 2 cm proximal to where the hamstrings were cut. The rationale here is to maintain the proximal sciatic branches that innervate the remaining hamstring segments, preserving some hip extension function. This is a crucial detail for functional outcome.
"At this point, fellows, with all muscle attachments released and the capsule divided, the hip is disarticulated at the acetabular level. We can now remove the entire femur."
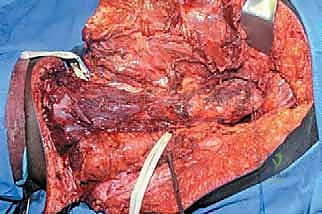
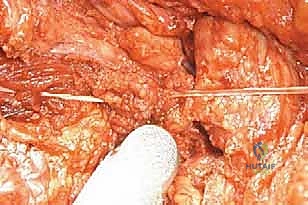
TECH FIG 2 • The entire femur has been exposed, disconnected from the hip capsule, and removed. Note the tagged muscle ends and hip capsule for later reconstruction.
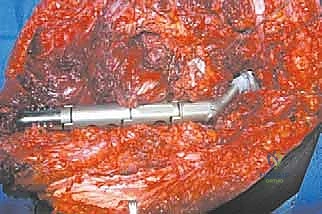
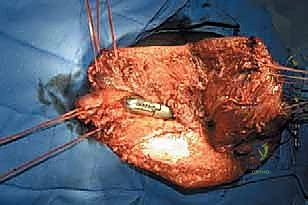
5. Creating a Femoral Stump with a Proximal Femoral Modular Prosthesis
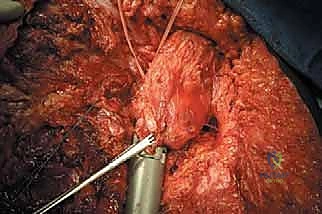
"Now, the core of our reconstruction: assembling and implanting the modular prosthesis. Remember the components: a proximal bipolar part, a body of variable length, and a distal rounded, bullet-shaped tip. The proximal bipolar part has holes and a porous coating for reattaching the hip capsule and the greater trochanter, preventing muscle sliding."
"First, we need to determine the correct prosthetic length. We'll measure the resected femoral head to approximate the required head cup size. We'll then assemble a trial proximal femoral prosthesis based on our preoperative templating and intraoperative measurements. It's critical to trial this. Place the trial prosthesis into the acetabulum. Now, carefully release the soft tissues from their retracted positions to simulate closure. This trial reduction allows us to assess whether the chosen prosthesis length permits adequate soft tissue closure without excessive tension."
Surgical Warning: Do not underestimate the importance of trial reduction. An improperly sized prosthesis will lead to either excessive tension on soft tissues, risking dehiscence, or laxity, increasing dislocation risk.
"Once we are satisfied with the trial, we'll assemble the definitive prosthesis. Ensure the Morse tapers are impacted securely. We'll use a large bipolar cup, ensuring smooth articulation within the acetabulum."
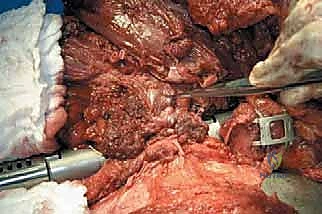
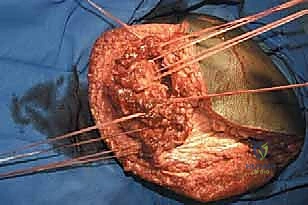
6. Reconstruction of the Hip Joint Capsule
"This is a critical step for stability. We need to reconstruct and reinforce the hip capsule around the prosthesis. We'll use a 3-mm Dacron tape as a noose around the femoral neck of the prosthesis. Take the Dacron tape, which we previously used to tag the cut capsule, and sew it circumferentially around the capsule. This creates a strong, reinforcing layer."
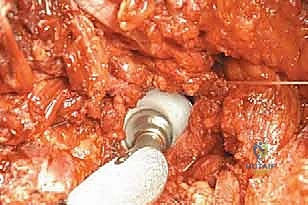
TECH FIG 4 • The hip capsule, previously tagged, is meticulously reconstructed and attached to the proximal part of the prosthesis, reinforcing stability.
"Now, carefully reduce the assembled prosthesis into the acetabulum. Once reduced, snuggly tighten and tie the Dacron tape around the femoral neck of the prosthesis. This acts as a robust noose, significantly helping to prevent dislocations. In our experience, this technique has proven highly effective."
"With the prosthesis reduced and the capsule reinforced, we need to assess the hip joint through a full functional range of motion. Flexion, extension, abduction, adduction, internal and external rotation. Ensure smooth movement and stability. Any impingement or instability at this stage must be addressed."
"Once satisfied with the prosthesis's seating and range of motion, we'll reattach the surrounding muscles to further strengthen the capsule. The previously detached iliopsoas muscle is pulled over the anterior hip capsule and meticulously sutured to it with robust Ethibond sutures. Similarly, the short external hip rotators are pulled anteriorly and sutured to the posterior capsule. This provides dynamic stability and reinforces the capsular repair."
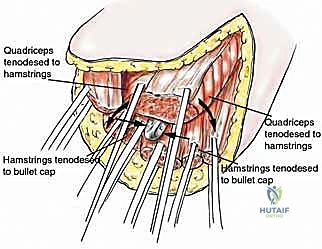
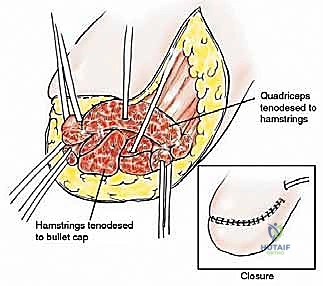
7. Reconstruction of the Adductor and Abductor Mechanism
"Now, let's reattach and balance the major muscle groups to our prosthetic stump. This is where we create the functional lever arm.
- Abductors and Greater Trochanter: The hip abductors, along with the osteotomized greater trochanter fragment, are repositioned. We'll reattach them securely using a cable system and a greater trochanter grip. Drill small pilot holes if necessary, then pass the cables through the bone fragment and the designated holes in the prosthesis, tensioning them appropriately. This ensures the abductor mechanism can exert its force on the prosthetic stump.
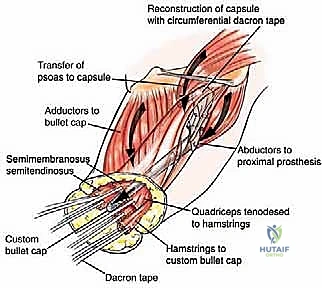
TECH FIG 5 • Reattachment of the abductors and greater trochanter with a cable system to the prosthesis. The adductors are also reconnected to the stump stem.
- Quadriceps, Hamstrings, Adductors: The remaining posterior muscle groups (hamstrings) are tenodesed to the distal portion of the stump prosthesis using the pre-formed holes. We'll do this with the hip in complete extension to ensure proper tensioning. Similarly, the quadriceps muscle is tenodesed to the anterior portion of the stump prosthesis, and the adductor group is connected in a similar fashion. The key is to set the prosthesis in a neutral position, then pull all three muscle groups (quadriceps, hamstrings, adductors) and tenodese them simultaneously. This helps achieve balanced muscle tension and prevents contractures. Use heavy non-absorbable sutures like #2 Ethibond or FiberWire for these reattachments.
Surgical Warning: Appropriate muscle tensioning and balancing are absolutely imperative. Over-tensioning can lead to contractures (e.g., flexion or abduction contractures), while under-tensioning results in a flaccid stump with poor function. The reconstructed stump should lie naturally in a neutral position.
- Vastus Lateralis Reattachment: The origin of the vastus lateralis is reattached to the greater trochanter or the prosthetic body if the trochanter is absent.
"Finally, the ends of the reattached muscles are sutured to each other, forming a continuous fascial border covering the distal aspect of the stump prosthesis. This provides critical soft tissue coverage and a smooth, well-padded stump for prosthetic fitting."
8. Sciatic Nerve Pain Management
"Now, let's address the sciatic nerve we previously transected. Phantom limb pain and stump pain can be debilitating. We'll proactively manage this by placing an epineural catheter.
"Identify the remaining proximal portion of the sciatic nerve. Carefully open its epineural sheath using a fine right-angle clamp. Now, gently thread a standard epidural catheter proximally for at least 5 to 10 cm within the sheath. Once positioned, secure the catheter to nearby adipose or muscular tissue using a 4-0 chromic suture to prevent dislodgement.
"Next, we'll create an exit point for the catheter. Insert a 14-gauge angiocatheter at the desired skin exit point, ensuring the needle passes beneath the subcutaneous and muscular layers. Thread the epineural catheter through the angiocatheter to the skin level, then carefully remove the angiocatheter, leaving the epineural catheter in place. We'll infuse 4 to 8 cc of 0.25% bupivacaine without epinephrine through this catheter to provide excellent postoperative pain control."
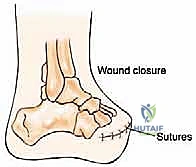
9. Wound Closure
"With all reconstruction complete, we'll proceed with meticulous layered wound closure. Ensure all deep layers are closed without tension. Irrigate the wound thoroughly with copious amounts of sterile saline. We'll place suction drains (e.g., a large Blake drain or Jackson-Pratt drain) deep to the flaps to prevent hematoma and seroma formation, which can compromise healing. Close the subcutaneous tissue with interrupted absorbable sutures (e.g., 2-0 or 3-0 Vicryl). Finally, close the skin with staples or a running subcuticular suture, depending on surgeon preference."
Pearls and Pitfalls: Navigating the Challenges
Fellows, this procedure is complex, and we must be prepared for potential issues.
Pearls:
- Preoperative Templating is Gold: Spend significant time with imaging to template prosthesis length and predict soft tissue coverage.
- Meticulous Flap Design: Ensure your incisions allow for robust, well-vascularized flaps. The posterior approach to the superficial femoral artery is key for anterior flap viability.
- Aggressive Hemostasis: Bleeding obscures anatomy and compromises flap survival. Ligate every vessel meticulously.
- Tagging is Non-Negotiable: Label every muscle and capsular structure with distinct tags. This will save you hours during reconstruction.
- Trial, Trial, Trial: Never skip the trial prosthesis. It's your only chance to assess length, tension, and range of motion before committing to the definitive implant.
- Balanced Tensioning: When reattaching muscles, ensure balanced tension. The goal is a neutral, mobile stump, not one prone to contracture.
- Epineural Catheter: Proactive pain management for phantom limb and stump pain is a game-changer for patient comfort and early rehab.
Pitfalls and Salvage Strategies:
-
Inadequate Soft Tissue Coverage/Flap Necrosis:
- Pitfall: This is a major concern. If your flaps are too thin, devascularized, or under excessive tension, necrosis can occur, leading to hardware exposure and infection.
- Salvage: If recognized intraoperatively, adjust your incision or consider a different flap design (e.g., rotational flap from the gluteus maximus if viable). Postoperatively, small areas of superficial necrosis may be managed with local wound care. Extensive necrosis often requires debridement and potentially a plastic surgery consultation for complex flap reconstruction (e.g., free flap) or even revision amputation to a higher level.
-
Prosthetic Dislocation:
- Pitfall: Despite our best efforts with capsular reconstruction, dislocation can occur, especially with poor muscle balance or patient non-compliance.
- Salvage: Closed reduction under anesthesia is the first line. If recurrent, consider open reduction, revision of capsular repair, or assessment of muscle balance. In rare, intractable cases, a constrained liner or even revision to a standard hip disarticulation may be necessary.
-
Infection:
- Pitfall: As with any large implant, infection is a devastating complication.
- Salvage: Early, aggressive debridement and irrigation, with retention of hardware if stable and infection is superficial. If deep or persistent, a two-stage exchange arthroplasty (explant, antibiotic spacer, reimplantation) is the standard. In severe, uncontrolled cases, explantation without reimplantation or conversion to a standard hip disarticulation may be required.
-
Persistent Phantom Limb Pain/Stump Pain:
- Pitfall: Despite the epineural catheter, some patients will experience severe or persistent pain.
- Salvage: Optimize multimodal analgesia (NSAIDs, gabapentinoids, antidepressants). Consider nerve blocks, TENS units, or referral to a pain management specialist. Surgical revision for neuroma excision or targeted muscle reinnervation (TMR) may be options in refractory cases.
-
Muscle Imbalance/Contractures:
- Pitfall: Poor tensioning during reattachment can lead to flexion, abduction, or adduction contractures, hindering prosthetic fitting and function.
- Salvage: Early physical therapy is key. If severe and established, serial casting or dynamic splinting may help. Surgical release or revision of muscle reattachments might be necessary in recalcitrant cases.
Postoperative Rehabilitation and Complication Management
Our job isn't done when the patient leaves the OR. Postoperative care is paramount for achieving the functional goals of this procedure.
Immediate Postoperative Period (Days 0-7)
- Pain Management: Continue with the epineural catheter infusion for the first 3-5 days, supplemented with oral multimodal analgesia (NSAIDs, acetaminophen, gabapentinoids, short-acting opioids as needed).
- DVT Prophylaxis: Standard DVT prophylaxis protocols are initiated immediately, typically with low-molecular-weight heparin or fondaparinux. Mechanical prophylaxis (SCDs) should also be used.
- Wound Care: Daily wound checks. Monitor drains; remove when output is consistently low (<30-50 mL/24 hours). Watch for signs of infection (erythema, warmth, purulent discharge) or flap compromise.
- Positioning: Maintain the hip in a neutral position. Avoid prolonged hip flexion or adduction, which can stress the repair and increase dislocation risk. A hip abduction pillow may be used.
- Early Mobilization: As soon as pain is controlled, encourage upper body exercises and bed mobility. Occupational therapy will assist with ADLs.
Early Rehabilitation (Weeks 1-6)
- Weight-Bearing Status: Non-weight-bearing on the affected side initially. We will typically progress to touch-down weight-bearing at 4-6 weeks, followed by progressive weight-bearing as soft tissue healing and muscle reattachment strength allow, usually guided by clinical assessment and potentially radiographs.
- Range of Motion (ROM): Gentle, protected active and passive ROM exercises for the hip joint are initiated, carefully avoiding extremes of motion, especially flexion and adduction. Emphasis on maintaining extension and abduction.
- Stump Care: Begin gentle stump desensitization and shaping with elastic bandages or stump shrinkers once wounds are healed.
- Prosthetic Referral: Referral to a prosthetist for evaluation and preliminary fitting of a temporary prosthesis.
Long-Term Rehabilitation (Months 2+)
- Progressive Strengthening: Intensive physical therapy focusing on core stability, hip abductor and extensor strengthening, and balance training.
- Gait Training: Once a definitive prosthesis is fitted, intensive gait training with the prosthetist and physical therapist is crucial. This focuses on proper weight transfer, balance, and efficient ambulation.
- Monitoring for Complications: Continue to monitor for late complications such as chronic pain, heterotopic ossification, muscle contractures, or prosthetic loosening/failure.
Complication Management Specifics:
- Wound Dehiscence/Infection: If superficial, local wound care, antibiotics. If deep or involving hardware, aggressive surgical debridement, IV antibiotics, and potentially hardware removal/revision as discussed earlier.
- Hardware Failure: Prosthetic loosening or fracture is rare but can occur. Requires surgical revision, potentially with a different implant design or cement augmentation.
- Neuroma Formation: Can contribute to stump pain. Managed with local injections, pain medication, or surgical excision if refractory.
Fellows, this procedure is a journey for the patient, and our role extends far beyond the operating room. By meticulously executing each step, understanding the underlying anatomy, anticipating pitfalls, and
Additional Intraoperative Imaging & Surgical Steps
References
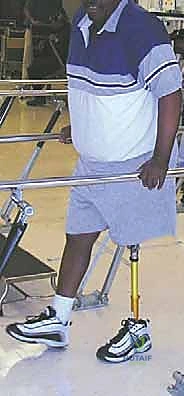
FIG 3 • Patient after hip disarticulation and proximal thigh stump reconstruction after being fitted with an above-knee prosthesis.
POSTOPERATIVE CARE
- Drains may be removed about 3 days after surgery. Compressive dressings are used for the first few weeks after surgery. A prosthesis may be fitted as soon as the wound has healed. Full weight bearing is permitted.
- Physiotherapy may begin promptly after surgery and should focus on achieving range of motion.
OUTCOMES
- We have used this procedure in six patients over a 30-year period for osteosarcoma (n 2), malignant fibrous histiocytoma of bone (n 2), and synovial sarcoma (n 2), with very good results. Five of the six patients ambulated with an above-knee prosthesis ( FIG 3 ). The only patient who did not ambulate with
-
Abudu A, Sferopoulos NK, Tillman RM, et al. The surgical treatment and outcome of pathological fractures in localised osteosarcoma. J Bone Joint Surg Br 1996;78B:694–698.
-
Dillingham TR, Pezzin LE, MacKenzie EJ. Limb amputation and limb deficiency: epidemiology and recent trends in the United States. South Med J 2002;95:875–883.
-
Jain R, Grimer RJ, Carter SR, et al. Outcome after disarticulation of the hip for sarcomas. Eur J Surg Oncol 2005;31:1025–1028.
-
Marcove RC, McMillian RD, Nasr E. Preservation of the functional above-knee stump following hip disarticulation by means of an AustinMoore prosthesis. Clin Orthop Relat Res 1979;141:217–222.
-
Nowroozi F, Salvanelli ML, Gerber LH. Energy expenditure in hip disarticulation and hemipelvectomy amputees. Arch Phys Med Rehabil 1983;64:300–303.
-
Rougraff BT, Simon MA, Kneisl JS, et al. Limb salvage compared with amputation for osteosarcoma of the distal end of the femur: a long-term oncological, functional, and quality-of-life study. J Bone Joint Surg Am 1994;76A:649–656.
-
Van der Windt DA, Pieterson I, van der Eijken JW, et al. Energy expenditure during walking in subjects with tibial rotationplasty, above-knee amputation, or hip disarticulation. Arch Phys Med Rehabil 1992; 73:1174–1180.
-
Westbury G. Hindquarter and hip amputation. Ann R Coll Surg Engl 1967;40:226–234.
You Might Also Like