Talar Reconstruction and Advanced Foot & Ankle Surgical Techniques: An OR Masterclass
Key Takeaway
This masterclass guides fellows through complex talar reconstruction for bone loss, avascular necrosis, and infection, utilizing circular tensioned wire fixators. We meticulously cover preoperative planning, precise surgical execution, critical anatomical considerations, and essential postoperative management to optimize patient outcomes in challenging foot and ankle cases.
Introduction to Complex Foot and Ankle Reconstruction
Alright, team, gather around. Welcome to the operating theater. Today, we're tackling a challenging case: a patient presenting with significant bone loss, avascular necrosis (AVN), and chronic infection of the talus. This isn't just a simple debridement; it's a comprehensive reconstruction that will demand meticulous planning, precise surgical execution, and a deep understanding of complex foot and ankle biomechanics. Our goal is to achieve a stable, pain-free foot, often through a tibiocalcaneal arthrodesis or a talar body replacement, utilizing circular tensioned wire fixators for robust stabilization. We'll also touch upon other common foot and ankle pathologies as we navigate the anatomy.
Preoperative Planning: The Blueprint for Success
Before we even consider making an incision, our strategy is meticulously crafted. For a case like this, with avascular necrosis and infection of the talus, advanced imaging is paramount. We've reviewed the patient’s weight-bearing radiographs, CT scans, and MRI, which clearly delineate the extent of bone destruction, the presence of sequestra, and the involvement of surrounding soft tissues.
- Imaging Review: We're looking for the exact dimensions of the talar defect, the integrity of the surrounding joints (tibiotalar, talonavicular, subtalar), and any associated deformities.
- Templating: We've used digital templating to pre-plan our circular fixator construct. This includes selecting appropriate ring sizes, identifying optimal pin and wire insertion sites, and determining the desired tarsal/first metatarsal axis alignment to ensure a functional foot post-fusion.
- Microbiology: Given the chronic infection, we have pre-operative cultures guiding our antibiotic selection, which will be continued long into the postoperative period.
- Bone Grafting Strategy: We've identified potential donor sites for our interposition of corticocancellous bone graft, critical for achieving fusion and filling defects. Our primary sites will be the ipsilateral calcaneal tuberosity and sustentaculum, or potentially the iliac crest if a larger volume is required.
Patient Positioning and Operating Room Setup
Patient positioning is critical for optimal exposure and fluoroscopic access. For this complex talar reconstruction, we'll position the patient supine on the operating table.
- Leg Preparation: The entire lower extremity, from the knee down, will be prepped and draped to allow full range of motion of the ankle and foot, and to facilitate access for potential bone graft harvest from the calcaneus or tibia.
- Fluoroscopy: The C-arm will be positioned to allow both lateral and anterior-posterior views of the ankle and hindfoot without repositioning the patient. This is non-negotiable for accurate pin and wire placement in circular fixation.
- Tourniquet: A high thigh tourniquet will be applied to ensure a bloodless field, crucial for meticulous dissection and bone work.
- Operating Table Attachments: We'll use a foot roll or bolster under the ankle to allow for slight plantarflexion and dorsiflexion, aiding in exposure and alignment.
Intraoperative Execution: A Step-by-Step Masterclass
Now, let's get scrubbed in. The skin is prepped, draped, and the tourniquet is inflated.
Surgical Approaches and Meticulous Dissection
For a comprehensive talar debridement and reconstruction, we'll often employ a combined approach, typically starting with a medial incision, but prepared for lateral and even anterior extensions as needed. This allows us to address the talus circumferentially.
Medial Approach: Incision 1 and 2
"1st incision" and "2nd incision" often refer to the primary medial approach and a potential secondary, more anterior or posterior incision for specific access.
- Initial Medial Incision (1st Incision): We make a curvilinear incision, approximately 8-10 cm long, just posterior to the tibialis anterior tendon, extending from the distal tibia to the navicular. This gives us access to the medial ankle and hindfoot structures.
-
Deep Dissection - Medial Neurovascular Bundle:
- Identify and Protect: As we deepen the incision, we meticulously identify and protect the critical neurovascular structures within the tarsal tunnel. This involves careful dissection through the subcutaneous tissue.
- Flexor Retinaculum (cut): We carefully incise the flexor retinaculum to decompress the structures and gain access.
- Posterior Tibial Nerve: This is our primary concern. Fellows, observe how we gently retract it posteriorly.
- Calcaneal Branches: Be mindful of the calcaneal branches of the posterior tibial nerve, which can be quite superficial and are highly susceptible to injury during medial approaches. Damage here can lead to painful neuromas.
- Medial Plantar Nerve, Lateral Plantar Nerve: Within the tarsal tunnel, we'll identify the bifurcation of the posterior tibial nerve into the medial plantar nerve and lateral plantar nerve.
- Muscular Intervals: We'll expose the tendons of the flexor digitorum longus and flexor hallucis longus (FHL). The FHL (protected) is crucial to retract and protect, especially if we are working near the sustentaculum tali or planning a posterior approach. The flexor digitorum brevis m. and the nerve to abductor digiti quinti m. along with the abductor digiti quinti m. will be deeper, and we usually don't need to directly dissect them unless the pathology extends very plantarward.
SURGICAL WARNING: Always prioritize neurovascular protection. Use blunt dissection where possible, and sharp dissection only under direct vision. The posterior tibial nerve and its branches are extremely sensitive.
Lateral Approach: Incision 3 and 4
"3rd incision" and "4th incision" could refer to a lateral approach, often used for debridement of the lateral talus, fibular access, or subtalar joint visualization.
- Lateral Incision (3rd Incision): A curvilinear incision, 6-8 cm, centered over the distal fibula, extending distally towards the calcaneus.
-
Deep Dissection - Lateral Neurovascular Structures:
- Superficial Peroneal Nerve: As we dissect, we must identify and protect the branches of the superficial peroneal nerve. These nerves are highly variable in their course and can be easily injured, leading to numbness or dysesthesia over the dorsum of the foot.
- Sural Nerve: Posteriorly, we'll encounter the sural nerve and the lesser saphenous vein. These run along the posterior aspect of the fibula and are important to retract safely.
SURGICAL WARNING: The superficial peroneal nerve is notorious for its anatomical variability. Always assume it's in your field and meticulously dissect to avoid injury.
Debridement of Infected and Avascular Talus
With adequate exposure, we proceed with the core of the procedure: debridement.
- Excision of Necrotic Bone: Using osteotomes, rongeurs, and high-speed burrs, we meticulously resect all devitalized, infected, and avascular bone from the talus. This often means excising the entire body of the talus, leaving the articular cartilage of the tibia and calcaneus.
- We are aiming for healthy, bleeding bone margins. All granulation tissue, pus, and necrotic debris must be removed.
- Pulsatile Lavage: Copious irrigation with antibiotic-laden saline is performed to thoroughly clean the surgical field.
- Specimen Collection: Multiple tissue samples are sent for both aerobic and anaerobic cultures, as well as histopathology, to confirm complete debridement and guide post-operative antibiotic therapy.
Bone Graft Harvest and Interposition
Now that the diseased bone is removed, we prepare for reconstruction.
- Calcaneal Bone Graft Harvest: We'll often harvest a corticocancellous bone graft from the ipsilateral calcaneus.
- Access: Through the same lateral incision, or a separate small incision over the lateral calcaneal wall.
- Target Areas: We aim for the sustentacular segment and the tuberosity segment of the calcaneus, as these areas provide excellent quality cancellous bone.
- Technique: Using an osteotome or a small trephine, we carefully harvest a block or chips of bone. Ensure not to compromise the structural integrity of the calcaneus.
- Iliac Crest Graft (if needed): If a larger volume of graft is required, we would make a separate incision over the posterior iliac crest.
- Graft Preparation: The harvested graft is shaped to fit the defect created by the talar resection. This interposition of corticocancellous bone graft will bridge the gap, promoting a solid fusion between the tibia and calcaneus.
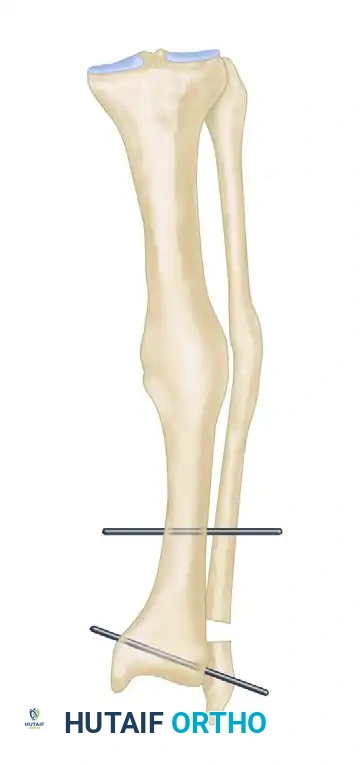
Tibiocalcaneal Arthrodesis and Circular Fixator Application
Our primary goal is to achieve a solid tibiocalcaneal arthrodesis, providing a stable platform for the foot. This is where the circular tensioned wire fixators come into play, offering unparalleled stability and adjustability.
- Joint Preparation: The articular surfaces of the distal tibia and the superior calcaneus are decorticated to promote fusion. Any remaining cartilage is removed.
- Lateral aspect of medial malleolus trimmed, if necessary: In some cases, to achieve optimal alignment or to prevent impingement, we might need to trim the lateral aspect of the medial malleolus. This ensures a flat, broad surface for fusion.
- Graft Placement: The prepared bone graft is impacted into the resected talar space, ensuring good contact with the tibia and calcaneus.
- Frame Assembly - The "AO Tension Device" Principle:
- Ring Placement: We begin by applying the proximal ring to the tibia, approximately 2 cm from the joint line. Then, the distal ring is applied to the calcaneus. Intermediate rings are added as needed.
- Wire and Pin Insertion:
- Tensioned Wires: We insert smooth wires (e.g., 1.8mm or 2.0mm) through the bone, engaging at least two cortices. These wires are then attached to the rings.
- Half-Pins: Half-pins are typically used for additional stability, particularly in the tibia and calcaneus.
- Fluoroscopic Guidance: Every single pin and wire insertion is performed under constant fluoroscopic guidance to prevent neurovascular injury and ensure optimal bone purchase.
-
SURGICAL WARNING: When drilling or inserting wires, always palpate the skin on the opposite side to ensure you are not tenting or exiting near a neurovascular structure. Drill under constant fluoroscopic guidance to prevent nerve or vessel damage.
-
- Connecting Rods: The rings are connected with threaded rods, allowing for compression, distraction, and angular correction.
- Tensioning Wires: This is where the "tensioned wire" aspect is critical. We use an AO tension device (or similar wire tensioner) to apply appropriate tension (typically 90-130 kg) to each wire. Proper tensioning provides axial stiffness and stability to the construct, crucial for compression and stability at the fusion site.
- Alignment: We carefully adjust the frame to achieve the desired foot alignment, ensuring the tarsal/first metatarsal axis is in a neutral or slightly dorsiflexed position, which is optimal for ambulation. The foot should be in slight valgus (5-7 degrees) and neutral rotation.
Concurrent Procedures: Forefoot and Ankle
While our primary focus is the talar reconstruction, a comprehensive foot and ankle surgeon must address any concomitant pathologies.
Forefoot Considerations: Cheilectomy and Metatarsal Osteotomy
Let's imagine this patient also presented with severe hallux rigidus and a splayfoot deformity.
- Cheilectomy for Hallux Rigidus:
- Incision: A dorsal longitudinal incision over the first metatarsophalangeal (MTP) joint.
- Exposure: We carefully dissect through the subcutaneous tissue, protecting the dorsal cutaneous nerves. The extensor digitorum longus and extensor digitorum brevis tendons are retracted.
- Area of cheilectomy: We identify and resect the dorsal osteophytes from the metatarsal head and proximal phalanx. This increases dorsiflexion of the MTP joint.
- Proximal phalanx: We ensure adequate bone removal from the base of the proximal phalanx to prevent impingement.
- Metatarsal Osteotomy (e.g., Weil Osteotomy):
- Planned osteotomy: For metatarsalgia or splayfoot, we might perform a shortening osteotomy of the lesser metatarsals.
- Transverse metatarsal ligament: We ensure careful dissection around the transverse metatarsal ligament to avoid injury.
- Closed osteotomy: The osteotomy is performed, and the fragment is translated proximally.
- Wire Closed osteotomy: Fixation is often achieved with a small screw, but for simpler cases, a wire can be used to hold the fragments in reduction.
- Stay sutures: In both cheilectomy and osteotomy, careful soft tissue handling with stay sutures minimizes trauma and aids in exposure.
Fibula and Medial Malleolus Management
- Fibula: If there's an associated fibular fracture or need for fibular shortening to accommodate a tibiocalcaneal fusion, we might use a small plate.
- 95° condylar plate: While more commonly used in the knee, specific anatomical plates or even a small 95° condylar plate could potentially be adapted for complex ankle or calcaneal fractures requiring rigid fixation, though less common in this specific talar reconstruction. More often, standard locking plates are used.
- AO tension device: Beyond circular fixators, the principles of the AO tension device are fundamental to plate fixation as well, ensuring compression across fracture sites.
Achilles Tendon Assessment
- Area of Achilles degeneration: During our posterior assessment, we always palpate and visually inspect the Achilles tendon. If there's an area of Achilles degeneration, we might consider debridement or augmentation, as a healthy Achilles is vital for future ambulation.
Wound Closure
Once the fixator is applied, aligned, and all ancillary procedures are complete, we proceed with closure.
- Hemostasis: Ensure meticulous hemostasis.
- Drain Placement: Often, a small drain is placed to manage post-operative bleeding, especially in infected cases.
- Layered Closure: The deep fascia is closed, followed by subcutaneous tissue and then skin, using absorbable sutures for deeper layers and non-absorbable sutures or staples for the skin.
Pearls and Pitfalls: Navigating the Surgical Minefield
This is where experience truly shines, fellows. Anticipating problems and knowing how to react is paramount.
Intraoperative Disasters and Salvage Techniques
- Neurovascular Injury:
- Pitfall: Accidental transection or stretch injury to the posterior tibial nerve, sural nerve, or superficial peroneal nerve.
- Pearl: Immediate identification is key. If a nerve is transected, primary repair with microsurgical technique is the goal. If a major vessel is injured, direct repair or grafting is necessary. Always have vascular surgery on standby for complex cases. Prevention through meticulous dissection and fluoroscopic guidance is your best defense.
- Malreduction/Malalignment:
- Pitfall: Failure to achieve optimal tarsal/first metatarsal axis alignment, leading to gait abnormalities or persistent pain.
- Pearl: Constant fluoroscopic checks in multiple planes are crucial. Use reference points, and don't hesitate to adjust the fixator frame until ideal alignment is achieved. A malaligned fusion is worse than a non-union.
- Inadequate Debridement:
- Pitfall: Leaving behind infected or avascular bone, leading to persistent infection or non-union.
- Pearl: Be aggressive with debridement. When in doubt, take more. Send multiple cultures and frozen sections if available.
- Hardware Failure:
- Pitfall: Pin loosening, wire breakage, or frame instability.
- Pearl: Ensure optimal bone purchase for all pins and wires. Proper AO tension device technique for wire tensioning is critical. If a pin loosens, exchange it for a new one in a different trajectory.
Postoperative Rehabilitation and Complication Management
Our work isn't done when the patient leaves the OR. Postoperative care is just as critical for a successful outcome.
Immediate Postoperative Period
- Pain Management: Aggressive multimodal pain management is essential.
- Antibiotics: IV antibiotics are continued, tailored to intraoperative culture results, typically for 6-8 weeks, followed by oral antibiotics for several months.
- Pin Site Care: Meticulous pin site care is crucial to prevent pin tract infections, which are the most common complication of external fixation. Daily cleaning with chlorhexidine or saline is instructed.
- Weight-Bearing Status: The patient will be strictly non-weight-bearing on the operative extremity for the initial 8-12 weeks, or until radiographic signs of early fusion are evident. The circular fixator provides stability, but bone healing takes time.
- DVT Prophylaxis: Given the prolonged immobilization, DVT prophylaxis with anticoagulants is initiated immediately.
Rehabilitation Progression
- Range of Motion (ROM) Protocols: While the ankle is fused, we encourage early ROM exercises for the knee, hip, and toes to prevent stiffness.
- Frame Adjustments: The circular fixator allows for gradual adjustments. In some cases, we might perform gradual compression across the fusion site or make minor alignment corrections in the outpatient setting.
- Radiographic Monitoring: Serial radiographs are obtained to monitor fusion progression. Once solid fusion is confirmed (typically 3-6 months), the external fixator is removed.
- Transition to Weight-Bearing: After fixator removal, the patient will gradually transition to protected weight-bearing in a CAM walker or brace, followed by physical therapy to regain strength and proprioception.
Managing Postoperative Complications
- Pin Tract Infection: The most common complication. Managed with local wound care, oral antibiotics, and occasionally pin removal or exchange.
- Non-Union: If fusion fails, revision surgery with further debridement, bone grafting, and restabilization may be required.
- Wound Dehiscence: Managed with local wound care, debridement, and sometimes plastic surgery consultation for flap coverage.
- Hardware Failure: Breakage of wires, pins, or rods requires immediate attention and replacement.
- Recurrent Infection: A devastating complication that may require further debridement, prolonged antibiotic therapy, or even amputation in severe cases.
This comprehensive approach, from meticulous planning to detailed execution and dedicated postoperative care, is how we achieve the best possible outcomes in these complex foot and ankle reconstructions. Remember, every step matters, and your attention to detail is paramount. Let's proceed with the case.
You Might Also Like