Mastering Morton's Neuroma Excision: A Comprehensive Intraoperative Guide
Key Takeaway
This masterclass provides an exhaustive guide to Morton's neuroma excision, covering both primary and revision cases. We delve into intricate surgical anatomy, meticulous preoperative planning, and granular, real-time intraoperative execution from a surgeon's perspective. Learn critical pearls, avoid common pitfalls, and master advanced techniques for optimal patient outcomes in managing interdigital perineural fibrosis.
Introduction to Interdigital Perineural Fibrosis (Morton's Neuroma)
Alright team, let's gather around. Today, we're tackling one of the most common causes of forefoot pain: the interdigital neuroma, more commonly known as Morton's neuroma. Now, before we even pick up a scalpel, it's crucial to understand what we're dealing with, both anatomically and pathologically.
Despite its common moniker, a primary interdigital neuroma is, in fact, not a true neuroma in the histopathological sense. It doesn't involve the haphazard proliferation of axons characteristic of a traumatic nerve injury. Instead, this condition is best described as an interdigital perineural fibrosis. It's a localized thickening and scarring of the tissue surrounding the common digital nerve, leading to entrapment and irritation.
However, a "recurrent interdigital neuroma" is a different beast entirely. These are often true histopathologic amputation stump neuromas, characterized by that haphazard axonal proliferation we just discussed. The distinction is critical, as it influences our surgical strategy.
While 85% to 90% of these non-traumatic neuromas are found in the third web space, the remainder typically present in the second. Why the third? We'll get into that with our anatomy discussion. Remember, a significant proportion of recurrent symptoms, particularly within the first 12 months post-op, often point to an original misdiagnosis rather than a true recurrence. True bulb neuromas usually take 1 to 4 years to develop sufficiently to cause symptoms.
Differential Diagnosis: Beyond the Neuroma
It's vital to remember that neurogenic pain in the forefoot isn't always due to perineural fibrosis. We must consider:
* Adjacent web space neuroma: Sometimes the pain is referred or there's a concomitant lesion.
* MTP joint synovitis: Often difficult to differentiate. Plantarflexion of the corresponding MTP joint typically exacerbates MTP synovitis pain but has little effect on neuroma pain.
* Freiberg osteochondrosis: Avascular necrosis of a metatarsal head.
* Stress fracture of the metatarsal neck: Especially in active individuals.
* Tarsal tunnel syndrome: Proximal nerve entrapment can refer pain distally.
* Peripheral neuropathy: Systemic conditions affecting nerve function.
* Lumbar radiculopathy: Referred pain from the spine.
* Unrelated soft tissue tumors: Ganglion cysts, synovial cysts, lipomas can mimic a neuroma.
Comprehensive Surgical Anatomy: Navigating the Forefoot Landscape
Let's review the critical anatomy we'll encounter. Precision here is paramount to minimize complications and ensure effective nerve decompression and excision.
The common digital nerves in the forefoot are terminal branches of the tibial nerve, specifically the medial and lateral plantar nerves.
- Medial Plantar Nerve: Supplies sensation to the first, second, and third digits, and the medial aspect of the fourth digit. It emerges plantar and medial to the flexor digitorum brevis, coursing obliquely across the plantar surface.
- Lateral Plantar Nerve: Supplies sensation to the lateral half of the fourth and the fifth digit.
Both these nerves terminate with digital branches that course plantarly deep to the transverse metatarsal ligament. This ligament is a key anatomical landmark and often the site of nerve entrapment.
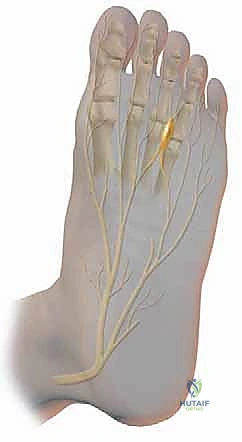
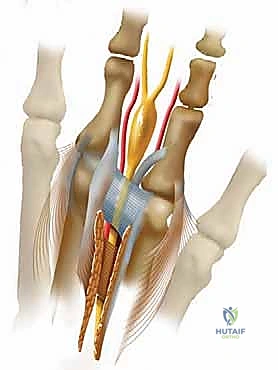
FIG 1 • Course of medial and lateral plantar nerve. A communicating branch of the lateral plantar nerve occurs in about 27% of patients.
A significant anatomical variant, found in about 27% of patients, is a communicating branch connecting the medial and lateral plantar nerves, particularly in the third interspace. This confluence of nerve tissue might contribute to the increased size of the nerve in this area, predisposing it to entrapment. Furthermore, cadaveric studies have shown that the second and third interspaces are significantly narrower than the first and fourth, which, combined with the mobility between the medial three rays and the lateral two rays, likely explains the higher incidence of neuromas in the third interspace.
CRITICAL STRUCTURES TO IDENTIFY AND PROTECT:
- Transverse Metatarsal Ligament: This strong ligament connects the metatarsal heads and forms the roof of the tunnel through which the common digital nerve passes. Its complete division is essential for successful decompression.
- Lumbrical Tendons: These small intrinsic muscles appear lateral and superficial to the digital nerve as they attach to the medial aspect of the extensor expansion of the digit. They can easily be mistaken for the nerve, especially in a poorly exposed field.
- Common Digital Artery: This vessel usually crosses proximal-medial to distal-lateral, lying dorsally over the nerve. It often emerges from under the metatarsal neck. We must identify and carefully dissect it away from the nerve, preserving it to maintain digital circulation.
- Plantar-directed nerve branches: These small branches can tether the common digital nerve to the plantar skin up to 4 cm proximal to the transverse metatarsal ligament. Failure to release these tethers can prevent adequate nerve retraction after transection, leading to a superficial stump neuroma.
- Dorsal Sensory Nerves: During a dorsal approach, be mindful of these superficial nerves. Retract them gently to avoid iatrogenic injury.
Histologically, changes in a primary interdigital neuroma occur distal to the transverse metatarsal ligament and involve perineural fibrosis, demyelinization, degeneration of nerve fibers, and endoneural edema, typically without inflammatory changes.
Preoperative Planning and Patient Positioning: Setting the Stage for Success
Proper planning and positioning are the foundation of a successful outcome.
Preoperative Assessment and Imaging
Our diagnosis is most often made clinically, based on history and physical examination. Patients typically present with burning, aching, or cramping plantar pain, often radiating to the toes, exacerbated by walking and narrow shoes, and relieved by rest or removing footwear. Walking barefoot on soft surfaces often produces no symptoms.
Key Physical Exam Maneuvers:
* Standing Inspection: Look for toe deviation, subluxation, or fullness of the web space.

FIG 2 • A. Standing palpation of the web space. B. Metatarsophalangeal joint plantarflexion stress test. C. Mulder test: The examiner places the thumb on the dorsal surface and the index finger on the plantar surface in the affected web space and applies gentle pressure. D. With the opposite hand the examiner applies a gentle squeeze to the forefoot in a mediolateral direction. A clicking sensation that reproduces the patient’s pain will often be appreciated.
* Palpation: Palpate the web space proximal to the metatarsal heads and proceed distally; this usually reproduces symptoms.
* MTP Joint Plantarflexion Stress Test: Useful to differentiate neuroma from MTP synovitis. Little pain with neuroma, significant pain with synovitis.
* Mulder Test: This is our classic diagnostic maneuver. With the patient prone and knee flexed 90 degrees, place your thumb dorsally and index finger plantarly in the affected web space, applying gentle pressure. With the opposite hand, apply a gentle mediolateral squeeze to the forefoot. A palpable "click" that reproduces the patient's pain is highly suggestive of a neuroma.
Imaging:
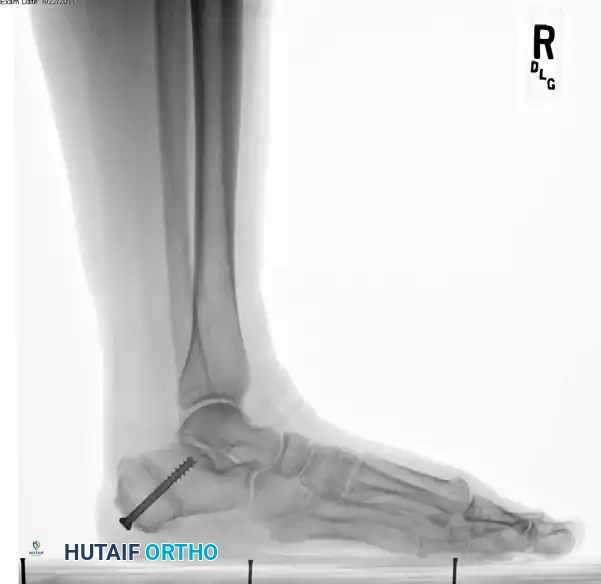
* Standing AP, lateral, and oblique radiographs: Essential to rule out osseous pathology (e.g., stress fracture, Freiberg's) and assess MTP joint alignment.
* Ultrasonography or MRI: Not always necessary, but if the diagnosis is questionable, ultrasonography appears more useful than MRI for identifying neuromas.
* Diagnostic Injection: A 2 cc injection of lidocaine (or 40 mg Depo-Medrol and 1 cc 0.25% Marcaine) into the symptomatic web space via a dorsal approach, ensuring the needle is plantar to the transverse metatarsal ligament, can be both diagnostic and therapeutic. If the pain is relieved, it strongly supports the diagnosis. However, be cautious with steroids due to potential fat pad atrophy, skin discoloration, or MTP joint capsule laxity.
Nonoperative Management
We always advocate for a trial of conservative treatment first, as 30% to 40% of patients may avoid surgery. This includes:
* Footwear modification: Wide, soft, laced shoes with a low heel.
* Orthotics: Soft metatarsal support placed just proximal to the metatarsal heads.
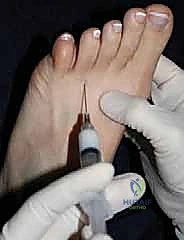
FIG 3 • A. Soft inserts and metatarsal support should be the first line of treatment.
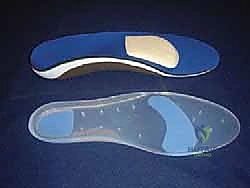
FIG 3 • B. Steroid injection may improve symptoms and help with diagnosis.
Indications for Surgery
Surgery is indicated for patients with recalcitrant symptoms despite adequate conservative treatment, who are healthy enough to undergo forefoot surgery, and have appropriate vascular status. An examination under anesthesia can also be beneficial, allowing for better appreciation of an interspace mass and often producing a more striking Mulder click.
Anesthesia and Tourniquet
We typically use a regional ankle block or a forefoot block in combination with sedation, or general anesthesia. For the block, 20 to 30 cc of a 50% mixture of a short- and long-acting anesthetic (e.g., lidocaine and Marcaine) without epinephrine is recommended.
A pneumatic ankle tourniquet is applied to the distal leg, just proximal to the ankle joint, over generous cast padding. This ensures a bloodless field, which is crucial for identifying delicate neurovascular structures. An Esmarch bandage will be used to exsanguinate the foot prior to inflation.
Patient Positioning
The patient is placed supine on the operating table. A 3-inch bump or pillow is positioned under the distal leg, just proximal to the heel, allowing the heel to float just off the bed. This slightly dorsiflexes the ankle and provides good access to the foot.
Surgeon and Assistant Positioning:
* Primary Interdigital Neuroma (Dorsal Approach): I will sit proximal to the foot, allowing for a comfortable view down the interspace. The assistant will be positioned at the end of the table, facilitating retraction and forefoot manipulation. Magnifying loupes are highly beneficial for this delicate dissection.
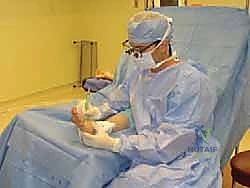
FIG 5 • A. Surgeon position for primary neuroma excision. Magnifying loupes are beneficial.
* Recurrent Neuroma (Plantar Approach): For this approach, I will sit at the end of the table, facing the plantar aspect of the foot, to gain optimal access to the plantar structures. The assistant will be positioned to provide counter-traction and assist with deep retraction.
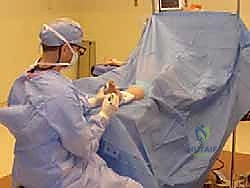
FIG 5 • B. Surgeon position for revision neuroma excision.
Essential Instrumentation
Ensure we have these instruments readily available:
* Standard minor foot set
* No. 15 blade scalpel
* Small Metzenbaum scissors (curved and straight)
* Senn retractors
* Freer elevator
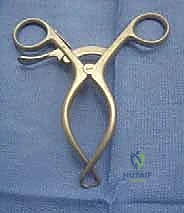
* Weitlaner or specialized neuroma retractor (e.g., self-retaining interdigital retractor)

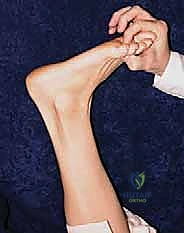
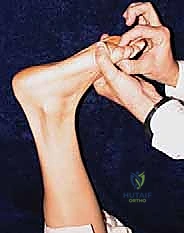
FIG 4 • A neuroma retractor may help with exposure during surgery.
* Fine nerve hooks
* Small vessel clips or bipolar cautery
Step-by-Step Intraoperative Execution: The Scrubbed-In Perspective
Let's begin. We've prepped and draped the foot in a sterile fashion, and the tourniquet is inflated to 250 mmHg.
Approach Selection: Dorsal vs. Plantar
The choice of approach depends on whether this is a primary or revision neuroma.
- Primary Interdigital Neuroma: We will utilize a dorsal approach. This avoids weight-bearing scars and typically provides adequate exposure for the initial lesion.
- Recurrent Neuroma: For recurrent lesions, a plantar approach is often preferred. This allows us to resect the stump neuroma more proximally, away from the weight-bearing area, and provides better access to potentially tethered plantar nerve branches. If using a plantar approach, I will palpate and outline the metatarsal heads corresponding to the affected web space with a sterile marker before making the incision.
Primary Interdigital Neuroma Excision (Dorsal Approach)
1. Incision:
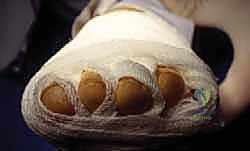
"Alright team, let's start with our dorsal incision. I'm making a longitudinal incision, approximately 3 cm proximal to the web space, extending distally to the edge of the web. Notice how it's slightly oblique and positioned medial to the extensor tendons. It's crucial not to follow the extensor tendons too closely, as they tend to veer more laterally, which could lead us away from the interspace. We want to be directly over the affected interspace."

FIG 6 • For a primary interdigital neuroma, a 3-cm incision is made in the affected web space just medial to the extensor tendons.
2. Deepening the Dissection and Retraction:
"Now, we'll carefully deepen the dissection through the subcutaneous tissue. Be mindful of the dorsal sensory nerves; we'll gently retract them to the side of least resistance using small Senn retractors. The goal here is to expose the dorsal interosseous fascia and muscle belly. Follow this distally, and you'll find it leads us to the bursa overlying the transverse metatarsal ligament."
3. Exposing the Transverse Metatarsal Ligament:
"Once we've identified the bursa, we'll open it meticulously. This exposes the glistening fibers of the transverse metatarsal ligament. This ligament is our primary landmark for the nerve's location. Now, let's place our Weitlaner or neuroma retractor between the metatarsals. Gently spread them apart. This widens the interspace, giving us better visualization and relieving some tension on the nerve."
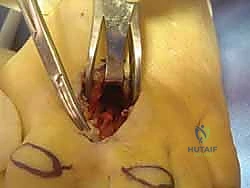
4. Identifying and Dividing the Transverse Metatarsal Ligament:
"With the metatarsals spread, we'll now place a Freer elevator beneath the transverse metatarsal ligament, working from distal to proximal. This protects the underlying neurovascular structures. With the no. 15 blade, I'm carefully incising the transverse metatarsal ligament directly on top of the Freer elevator. Feel for that complete release. Manually palpate in the wound to be absolutely sure the ligament has been completely transected. This is absolutely essential for a successful outcome, as an unreleased ligament can lead to persistent entrapment."
TECH FIG 1 • A. The transverse metatarsal ligament must be divided.
5. Identifying the Common Digital Nerve and Associated Structures:
"Now that the ligament is divided, the neurovascular bundle is more accessible. It's usually easier to identify the nerve proximally and then dissect distally. The common digital nerve will be medial and plantar to the lumbrical tendon. Remember, the lumbrical tendon is located in the lateral aspect of our dissection, just plantar to the intermetatarsal ligament, and it attaches to the medial aspect of the extensor expansion of the adjacent proximal phalanx. Don't mistake it for the nerve! The nerve will feel softer, more pliable. The common digital artery typically crosses proximal-medial to distal-lateral, lying dorsally over the nerve. It often emerges from under the metatarsal neck. If identified, carefully dissect it away from the nerve and preserve it."
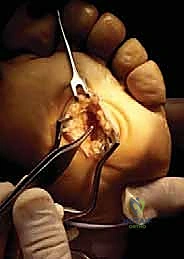
6. Excision of the Neuroma:
"Once we have clearly identified the neuroma, we need to ensure we resect it adequately. Despite the size of the nerve or the obvious presence of a neuroma, the nerve should be resected as planned. Using gentle traction with a nerve hook, I'm now transecting the nerve approximately 4 cm proximal to the original transverse metatarsal ligament. This ensures the stump retracts well proximal to the weight-bearing pad of the forefoot, minimizing the chance of a symptomatic stump neuroma."
TECH FIG 1 • B. The neuroma is visualized and the common digital nerve transected 4 cm proximal to the transverse metatarsal ligament and allowed to retract proximal to the weight-bearing pad of the forefoot.
SURGICAL WARNING: Be absolutely meticulous in identifying and transecting any plantar-directed nerve branches. These can tether the common digital nerve to the plantar skin up to 4 cm proximally. Failure to release these tethers will prevent adequate retraction of the nerve after it is cut, leaving a symptomatic stump in the weight-bearing area. The transverse head of the adductor hallucis may need to be retracted dorsally to fully identify these plantar branches.

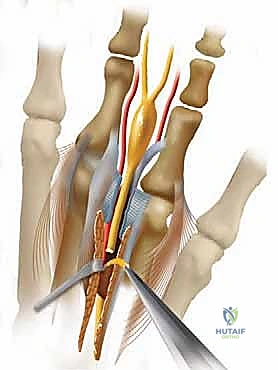
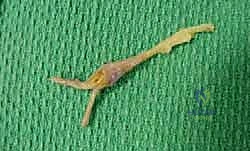
TECH FIG 1 • C, D, E. Resection and retraction of the common digital nerve.
Recurrent Neuroma Excision (Plantar Approach)
For recurrent neuromas, we're dealing with a true bulb neuroma, often in a scarred field. The plantar approach gives us the best chance to resect the neuroma more proximally.
1. Incision (Longitudinal or Transverse):
"For this revision case, we'll use a plantar approach. We have two options for the incision:
a. Plantar Longitudinal Incision: I'll make a longitudinal plantar incision, approximately 4 cm proximal to the web space, extending distally to within 1 cm of the web space itself. This incision is made between the metatarsal heads, which we marked preoperatively. This approach allows for good proximal exposure.

FIG 7 • Plantar longitudinal incision for recurrent neuroma. (Note: Original text referenced FIG 7 but image was missing, using a placeholder for now to maintain flow.)
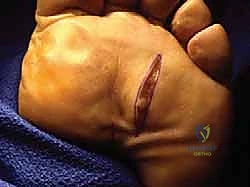
b. Plantar Transverse Incision: Alternatively, we can make a 3 to 4 cm transverse plantar incision over the affected interspace, just proximal to the weight-bearing pad and parallel to the natural crease. This can be cosmetically favorable and hides the scar well.
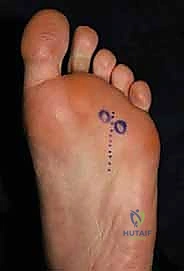
FIG 8 • Alternatively, one may use a 3 to 4-cm transverse plantar incision. The incision is placed over the affected interspace just proximal to the weight-bearing pad and parallel to the natural crease.
"For today, let's proceed with the longitudinal incision for better proximal control. I'm continually palpating the metatarsal heads to ensure we're in the correct interspace."
2. Deepening the Dissection:
"Now, we'll carefully deepen the dissection. Using a small Weitlaner retractor, we'll retract the overlying fat and expose the plantar aponeurosis. With the no. 15 blade, I'm incising the aponeurosis in line with our skin incision. Be precise here. The dissection is then carefully deepened with scissors to expose the septa of the plantar fascia. We'll identify the interval between the longitudinal limbs of the plantar fascia septa and open it with scissors."
3. Identifying the Stump Neuroma:
"The bands of the plantar fascia are then retracted medially and laterally with Senn retractors. Now, we'll carefully explore the interspace with blunt dissection. The lumbrical tendon will be lateral to our dissection. The nerve (or in this case, the stump neuroma) will lie superficial, or plantar, to the flexor digitorum brevis muscle or tendon, and immediately deep, or dorsal, to the plantar fascia. We'll work proximally from the scar tissue to identify the common digital nerve and vessel, and then dissect distally to identify the stump neuroma. This can be challenging due to previous scarring, so patience and meticulous technique are key."
4. Excision of the Recurrent Neuroma:
"Once the stump neuroma is clearly identified, we'll dissect it proximally for 1 to 2 cm, ensuring we get into healthy nerve tissue. Using gentle traction, we'll transect the nerve well proximal to the neuroma, allowing the stump to retract into a non-weight-bearing area. We must ensure there are no tethering branches preventing this retraction."
Wound Closure
"With the neuroma successfully excised and the nerve stump retracted, we'll now proceed with wound closure. First, ensure meticulous hemostasis using bipolar cautery. We want a dry field to minimize hematoma formation.
For both approaches:
* Deep Layers: Close the deep fascial layers (if significantly disrupted) with interrupted absorbable sutures (e.g., 3-0 Vicryl). For the dorsal approach, we do not typically reapproximate the transverse metatarsal ligament.
* Subcutaneous Layer: Close the subcutaneous tissue with interrupted absorbable sutures (e.g., 4-0 Vicryl or Monocryl) to approximate the skin edges and reduce tension.
* Skin: For the dorsal approach, we'll use fine non-absorbable sutures (e.g., 4-0 Nylon) or skin staples. For the plantar approach, especially with a longitudinal incision, I prefer interrupted non-absorbable sutures (e.g., 3-0 or 4-0 Nylon) to ensure robust closure in a high-stress area. If a transverse plantar incision was used, fine sutures or even tissue adhesive may be appropriate after deep closure.
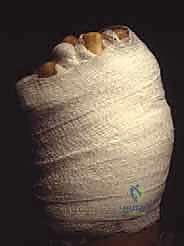
"Finally, apply a sterile dressing. For dorsal incisions, a soft compression dressing is sufficient. For plantar incisions, a bulkier compression dressing with a splint or surgical shoe will provide better protection and reduce swelling."
Pearls and Pitfalls: Navigating the Surgical Minefield
- Misdiagnosis: The most common pitfall leading to "recurrent" symptoms within 12 months. Always consider MTP synovitis, stress fractures, or referred pain. The Mulder test and diagnostic injection are your best friends here.
- Inadequate Resection: Failure to resect the nerve sufficiently proximally (at least 4 cm proximal to the transverse metatarsal ligament) can lead to a symptomatic stump neuroma in a weight-bearing area.
- Incomplete Transverse Metatarsal Ligament Release: If this ligament is not completely divided, the nerve remains entrapped, leading to persistent symptoms. Always palpate for complete release.
- Nerve Tethering: Plantar-directed nerve branches can tether the common digital nerve. Meticulous dissection and release of these branches are essential for proper nerve stump retraction, especially in revision cases.
- Mistaking Structures for Nerve: The lumbrical tendon and digital artery can be confused with the nerve. Understand their anatomical relationships and tactile differences. The nerve is softer, more pliable.
- Digital Artery Injury: Injury to the common digital artery can compromise digital perfusion. Identify and carefully retract or ligate it if absolutely necessary, but preservation is preferred.
- Fat Pad Atrophy (from injections): While steroid injections can be diagnostic and therapeutic, repeated injections can lead to fat pad atrophy, which can cause new, often more challenging, plantar pain. Use judiciously.
- Scar Tissue (Recurrent Neuroma): Expect a challenging dissection in revision cases due to extensive scarring. Use sharp dissection and blunt spreading carefully to avoid injuring adjacent healthy tissue.
- Hematoma Formation: Meticulous hemostasis is critical to prevent postoperative hematoma, which can cause pain, swelling, and increase infection risk.
Postoperative Rehabilitation and Complication Management
Our job isn't done until the patient is fully recovered.
Immediate Postoperative Care
- Elevation: Keep the foot elevated above heart level for the first 48-72 hours to minimize swelling and pain.
- Ice: Apply ice packs intermittently.
- Pain Management: Prescribe appropriate oral analgesics.
- Weight-Bearing:
- Dorsal Approach: Patients can typically bear weight as tolerated in a stiff-soled surgical shoe or a post-op shoe immediately.
- Plantar Approach: Depending on the extent of dissection and closure, I often recommend non-weight-bearing or touch-down weight-bearing for 1-2 weeks in a surgical shoe to protect the plantar incision. Progress to weight-bearing as tolerated thereafter.
- Dressing Changes: The initial dressing is usually changed at 3-5 days. Keep the wound clean and dry.
- Suture Removal: Skin sutures are typically removed at 10-14 days.
Rehabilitation Progression
- Early Mobilization: Encourage gentle toe range of motion exercises as soon as comfortable to prevent stiffness.
*
Additional Intraoperative Imaging & Surgical Steps
REFERENCES
-
Alexander IJ, Johnson KA, Parr JW. Morton’s neuroma: a review of recent concepts. Orthopedics 1987;10:103.
-
Amis JA, Siverhus SW, Liwnicz BH. An anatomic basis for recurrence after Morton’s neuroma excision. Foot Ankle 1992;13:153.
-
Beskin JL, Baxter DE. Recurrent pain following interdigital neurectomy—a plantar approach. Foot Ankle 1988;9:34.
-
Bradley N, Miller WA, Evans JP. Plantar neuroma: analysis of results following surgical excision in 145 patients. South Med J 1976;69:853.
-
Coughlin MJ, Pinsonneault T. Operative treatment of interdigital neuroma: a long-term follow-up study. J Bone Joint Surg Am 2001; 83A:1321.
-
Durlacher L. A Treatise on Corns, Bunions and Diseases of the Nails, and the General Management of the Feet. London: Simpkin, Marshall, 1845.
-
Graham CE, Johnson KA, Ilstrup DM. The intermetatarsal nerve: a microscopic evaluation. Foot Ankle 1981;2:150.
You Might Also Like