Operative Management of Acromioclavicular Joint Dislocations
Key Takeaway
Acromioclavicular joint dislocations require a nuanced surgical approach based on the chronicity and grade of injury. While distal clavicle resection serves well for degenerative type II injuries, high-grade type III, IV, and V dislocations necessitate robust coracoclavicular ligament reconstruction. This guide details the biomechanical principles, indications, and step-by-step surgical techniques—including the Mumford, Neviaser, Dewar-Barrington, and Rockwood procedures—to achieve optimal functional restoration and joint stability.
ACROMIOCLAVICULAR JOINT: BIOMECHANICS AND SURGICAL INDICATIONS
The acromioclavicular (AC) joint is a complex diarthrodial articulation that serves as the sole skeletal link between the axial skeleton and the upper extremity. Its stability is governed by a delicate interplay of static and dynamic restraints. The static restraints include the acromioclavicular ligaments (providing primary resistance to anteroposterior translation) and the robust coracoclavicular (CC) ligaments—comprising the conoid and trapezoid fascicles—which provide primary resistance to superior-inferior translation. The dynamic restraints consist of the deltotrapezial fascial envelope.
The Rockwood classification system remains the gold standard for categorizing both acute and chronic unreduced dislocations of the AC joint. Surgical decision-making is heavily dictated by this classification.
Resection of the distal end of the clavicle (the Mumford procedure) is strictly indicated for symptomatic type II unreduced dislocations or chronic type I injuries that have progressed to post-traumatic osteoarthritis. In these specific scenarios, the coracoclavicular ligaments remain anatomically intact. Extensive clinical outcome studies, including those by Cook and Tibone, have concluded that the Mumford procedure produces excellent subjective and objective results in athletes suffering from degenerative changes following grade I or grade II injuries.
Surgical Warning: The Mumford procedure is contraindicated in the acute setting for grade I or grade II injuries. It is reserved exclusively for patients with chronic, refractory symptoms resulting from degenerative changes. Furthermore, performing an isolated distal clavicle resection in patients with type III, IV, or V injuries—where the CC ligaments are structurally compromised—will result in a hypermobile clavicle that continuously irritates the surrounding soft tissues, leading to catastrophic functional failure.
Therefore, in type III, IV, and V chronic dislocations, a formal reconstruction of the coracoclavicular ligaments is mandatory to restore the static and dynamic stability of the shoulder girdle.
SURGICAL TECHNIQUES FOR ACROMIOCLAVICULAR JOINT PATHOLOGY
Resection of the Lateral End of the Clavicle (Mumford; Gurd Technique)
The open Mumford procedure aims to eliminate painful bone-on-bone crepitus at the AC joint while preserving the stabilizing function of the intact CC ligaments.
Indications: Chronic, symptomatic Rockwood Type I or II AC joint injuries with radiographic evidence of osteoarthritis and failure of conservative management (e.g., corticosteroid injections, physical therapy).
Patient Positioning: The patient is placed in the beach-chair position with the operative arm draped free to allow full manipulation of the shoulder.
Surgical Steps:
* Incision and Exposure: Expose the lateral end of the clavicle through a short, 3 to 4 cm curved incision centered directly over the AC joint, following Langer’s lines.
* Fascial Dissection: Incise the deltotrapezial fascia in line with the clavicle. By dissecting strictly subperiosteally, free the lateral 2.5 cm of the clavicle of all soft-tissue attachments.
* Bone Resection: Utilize an oscillating saw or heavy bone-cutting rongeurs to resect approximately 1.5 to 2.5 cm of the distal clavicle. Care must be taken not to resect medial to the trapezoid ligament insertion, which typically lies 2.5 to 3 cm medial to the distal articular surface.
* Contouring: Smooth the superior and posterior borders of the remaining lateral end of the bone with a rasp or file to eliminate any sharp bony ridges beneath the skin. It is unnecessary and often detrimental to disturb the cartilaginous surface of the acromion.
* Closure: Meticulously plicate and suture the periosteum and the deltotrapezial fascia over the raw end of the clavicle using heavy absorbable sutures (e.g., #1 Vicryl). This step is critical to prevent postoperative dead space and dynamic instability.
Postoperative Protocol:
The shoulder is immobilized in a Velpeau dressing or standard shoulder sling for 1 week to allow soft tissue resting. Following this, active use and progressive range of motion (ROM) exercises are encouraged. Full return to activities is typically permitted by 6 to 8 weeks.
Reconstruction of the Superior Acromioclavicular Ligament (Neviaser Technique)
In types III, IV, and V chronic unreduced acromioclavicular dislocations, the coracoclavicular ligaments must be addressed. Neviaser described a historical but foundational operation in which the coracoacromial (CA) ligament is mobilized to reconstruct the superior acromioclavicular ligament.
Clinical Pearl: While the Neviaser technique effectively reconstructs the superior AC capsule, it does not anatomically reconstruct the coracoclavicular ligaments. Consequently, it relies heavily on the healing of the deltotrapezial fascia and can be followed by redislocation if the CC interval is not adequately stabilized.
Surgical Steps:
* Incision: Make a slightly curved incision that begins medially over the lateral half of the clavicle and ends laterally at the lateral border of the acromion.
* Exposure: Strip the deltoid muscle subperiosteally from the lateral third of the clavicle. Expose the coracoacromial ligament and the dislocated acromioclavicular joint. Do not disturb the ruptured acromioclavicular and coracoclavicular ligaments or the intra-articular disc remnants.
* Joint Reduction and Fixation: Reduce the acromioclavicular joint anatomically. Fix it by inserting a 1.6 mm Kirschner wire through the skin and acromion into the medullary canal of the clavicle. This maneuver may be simplified by retrograde insertion of the wire: first through the center of the acromial articular surface, out through the skin, and then driven antegrade into the reduced clavicle.
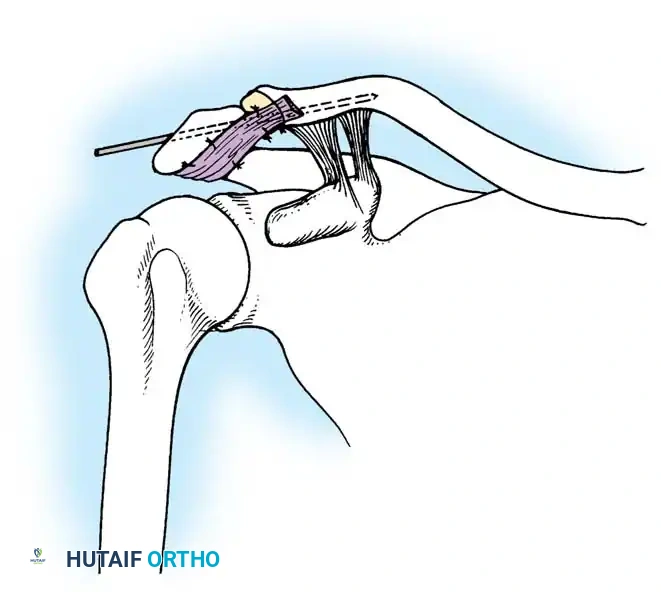
To prevent the wire from working loose, embed its medial tip firmly in the dense cortex of the clavicle near the apex of its lateral curve.
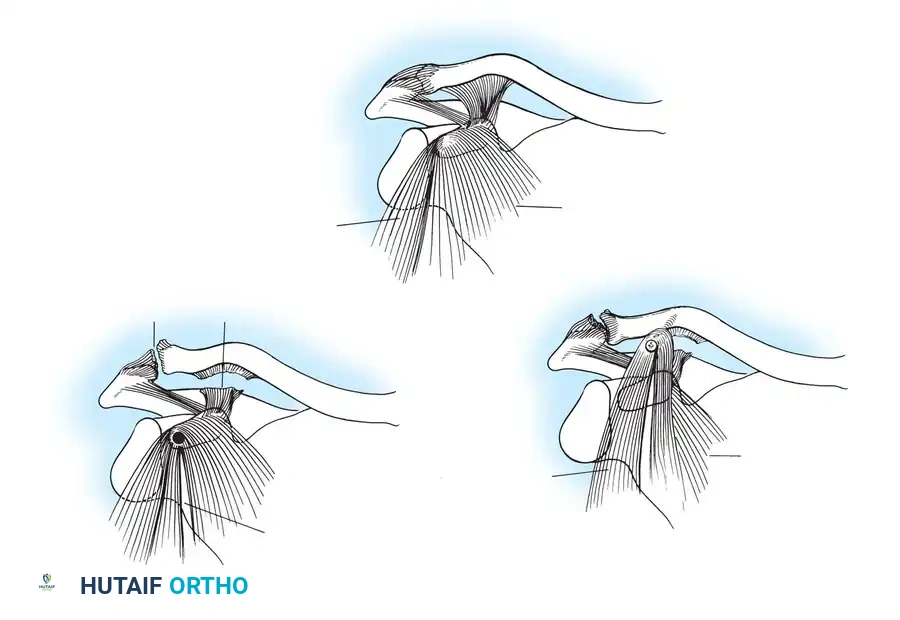
- Ligament Harvest: Free the medial end of the coracoacromial ligament by resecting a small piece of bone from the lateral border of the coracoid that includes its attachment.
- Ligament Transfer: Turn the coracoacromial ligament over the superior surface of the acromion and fix it there with three absorbable sutures passed through the soft tissues. Bring the transferred ligament over the AC joint to the superior surface of the clavicle.
- Bony Anchoring: Anchor the ligament by roughening an area on the superior clavicle. Fix the ligament with heavy absorbable sutures passed through two holes drilled vertically into the bone. Pass a supplementary suture around the ligament and the clavicle to secure the small bone fragment and the new ligament in place.
- Closure: Suture the deltoid firmly back to the clavicle. Cut off the Kirschner wire just beneath the skin and bend the end to prevent catastrophic medial migration. Apply a modified Velpeau bandage.
Postoperative Protocol:
The wound is dressed, and the K-wire is inspected weekly. Gentle passive motions of the shoulder are carried out weekly. At 5 weeks, the Kirschner wire is removed in the clinic, and normal activities are gradually resumed. Competitive sports should be strictly avoided for a minimum of 8 weeks.
Transfer of the Coracoid to the Clavicle (Dewar and Barrington Technique)
Dewar and Barrington described a dynamic reconstruction technique for chronic injuries. In this procedure, the tip of the coracoid process, along with its attached conjoint tendon (short head of the biceps and coracobrachialis), is transferred to the undersurface of the clavicle.
Biomechanics Note: This technique provides a dynamic reduction force on the distal clavicle (pulling it inferiorly during arm use) but lacks a static restraint. It is often combined with distal clavicle resection.
Surgical Steps:
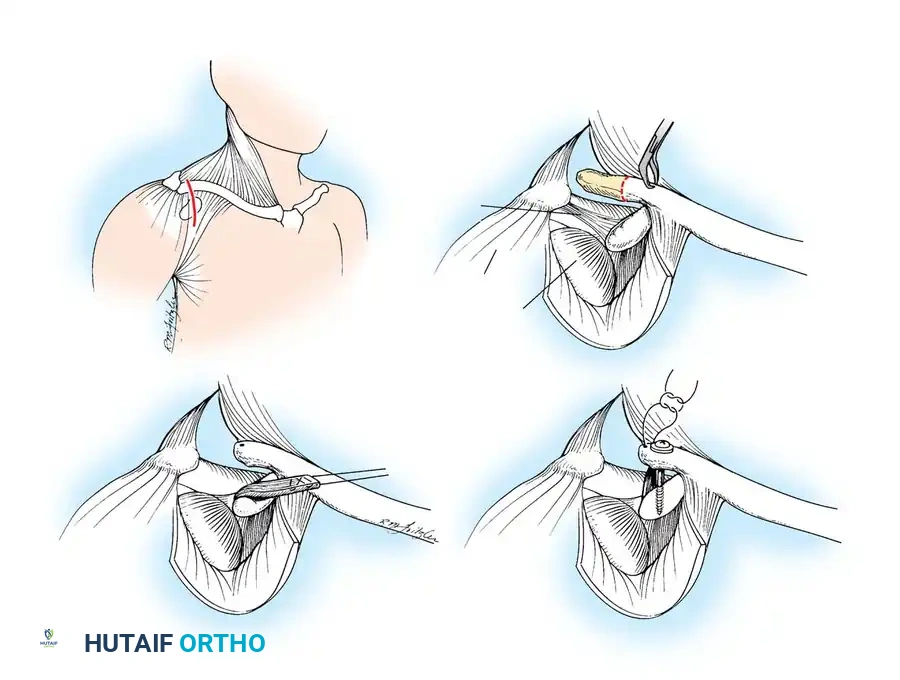
* Incision: Beginning laterally at the AC joint, make a curved incision extending medially to the anterior border of the deltoid muscle, curving distally along this border to midway between the origin and insertion of the muscle.
* Exposure: Strip the deltoid subperiosteally from the clavicle to expose the subcutaneous surface of the clavicle and the AC joint. If indicated by degenerative changes, resect the lateral end of the clavicle (Mumford).
* Coracoid Preparation: Identify the coracoid process along with its attached muscles. Drill a hole in its end, in line with its longitudinal axis, sized to accept a standard cortical or cancellous screw.
* Muscle Division: Divide the pectoralis minor muscle in line with its fibers at the junction of its medial two-thirds and lateral one-third.
* Osteotomy: Use a sharp osteotome to divide the coracoid at the junction of these parts of the pectoralis minor.
- Clavicular Preparation: Roughen the inferior surface of the clavicle exactly at the anatomical attachment site of the torn coracoclavicular ligaments (and slightly medial to this, but never lateral, to maintain appropriate biomechanical vectors).
- Transfer and Fixation: Drill a hole into the prepared clavicle. Using a screw and washer, fix the osteotomized end of the coracoid—with its attached short head of the biceps, coracobrachialis, and part of the pectoralis minor—to the undersurface of the clavicle.
- Closure: Close the wound in layers and apply a Velpeau dressing.
Postoperative Protocol:
At 4 weeks, the Velpeau dressing is removed, and the shoulder is gradually mobilized by supervised physical therapy. Strenuous activities and heavy lifting are avoided for at least 8 weeks to allow for bony union at the transfer site.
Transfer of the Coracoacromial Ligament (Rockwood / Weaver-Dunn Modification)
Weaver and Dunn originally described detaching the coracoacromial (CA) ligament from the acromion and reattaching it to the distal clavicle to reproduce a static CC ligament. However, this alone does not provide internal fixation while the ligament heals. Pavlik et al. reported satisfactory results, but noted partial loss of reduction in some cases.
To address this, Rockwood popularized the transfer of the CA ligament combined with rigid, temporary internal fixation using a Bosworth lag screw. This provides both a biological reconstruction and a rigid static restraint during the critical healing phase.
Surgical Steps:
* Incision: Make a skin incision over the distal clavicle along Langer’s lines around the shoulder.
* Distal Clavicle Resection: Expose the distal clavicle subperiosteally and resect approximately 2.5 cm of bone to prevent future AC joint impingement.
* Medullary Preparation: Drill and curet the medullary canal of the remaining distal clavicle to receive the transferred CA ligament.
- Ligament Harvest (Copeland and Kessel Modification): Use a knife to remove the acromial attachment of the CA ligament. For superior healing, remove a sliver of bone from the undersurface of the acromion along with the CA ligament, as described by Copeland and Kessel.
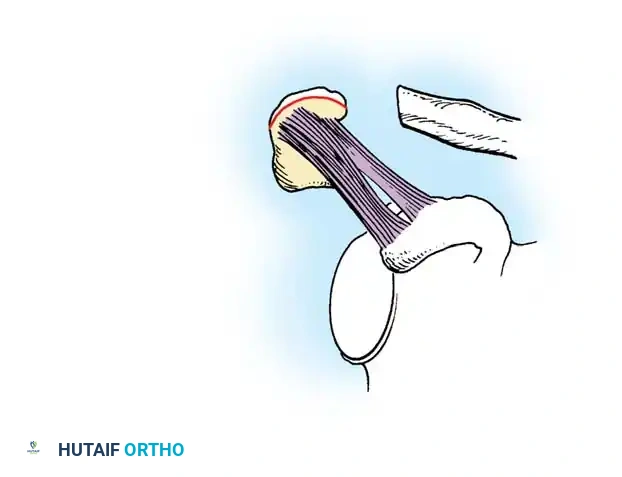
Surgical Pearl: Utilizing the Copeland and Kessel modification provides bone-to-bone fixation at the distal clavicle rather than ligament-to-bone fixation, significantly accelerating integration and reducing the risk of pull-out. Furthermore, Rockwood and Cadenat described lengthening the CA ligament, if necessary, by detaching its anterior fasciculus off the waist of the coracoid process.
- Suture Passage: Pass a heavy, nonabsorbable suture (e.g., #2 FiberWire or Ethibond) back and forth through the ligament using a Krackow or whipstitch technique so that the ends exit through the acromial end of the ligament.
- Drilling for Fixation: Drill two small holes into the superior cortex of the distal end of the clavicle, entering the medullary canal. Next, drill another hole through the distal clavicle directly above the base of the coracoid process.
- Screw Placement: With the clavicle held manually in the anatomically reduced position, insert a drill bit through the clavicular hole and drill through both cortices of the coracoid process.
- Ligament Inset: Pass the two ends of the suture in the CA ligament into the medullary canal of the clavicle and out through the holes in the superior cortex before inserting the lag screw.
- Rigid Fixation: Pass a lag screw (Bosworth screw) through the clavicle and into the coracoid. Tighten it to hold the clavicle securely just above the coracoid, restoring the native CC distance.
- Final Securing: Tighten and tie the two ends of the suture over the superior bony bridge of the clavicle as the CA ligament (and its bone block) is fed deeply into the medullary canal.
Postoperative Protocol:
Postoperatively, the patient is placed in a sling but is allowed to use the arm for light, everyday activities of daily living (ADLs) below chest level. Heavy lifting, pushing, or pulling is strictly prohibited. At 12 weeks postoperatively, the lag screw must be removed under local or light general anesthesia to prevent hardware breakage, as the normal rotational biomechanics of the clavicle will eventually fatigue the rigid screw. Following screw removal, progressive strengthening is initiated.
You Might Also Like
