Arthroscopic CA Ligament Transfer for AC Joint Dislocation
Key Takeaway
The arthroscopic transfer of the coracoacromial (CA) ligament, popularized by Boileau, is a robust surgical technique for managing chronic, unreduced acromioclavicular (AC) joint dislocations. This modified Weaver-Dunn procedure utilizes a bone-block harvest of the CA ligament combined with double-button suspensory fixation. It restores vertical and horizontal stability, promoting biologic healing while minimizing open surgical morbidity in patients with symptomatic chronic AC instability.
Introduction to Chronic Acromioclavicular Joint Instability
The management of chronic, unreduced acromioclavicular (AC) joint dislocations remains a complex challenge in orthopedic surgery. While acute injuries (less than 3 to 4 weeks old) often possess the biological potential for primary ligamentous healing when anatomically reduced and stabilized, chronic dislocations lack this intrinsic healing capacity. The native coracoclavicular (CC) ligaments—the conoid and trapezoid—retract, scar, and become biologically inert.
Historically, the open Weaver-Dunn procedure was the gold standard for chronic AC joint instability. This technique involved resecting the distal clavicle and transferring the coracoacromial (CA) ligament to the distal clavicle to substitute for the ruptured CC ligaments. However, biomechanical studies have demonstrated that the native CA ligament possesses only 25% to 30% of the tensile strength of the intact CC ligament complex. Consequently, the classic Weaver-Dunn procedure was plagued by high rates of recurrent subluxation and loss of reduction.
To address these biomechanical shortcomings and minimize the morbidity of open surgery, Boileau et al. pioneered the All-Arthroscopic Transfer of the Coracoacromial Ligament augmented with double-button suspensory fixation. This modern evolution of the Weaver-Dunn-Chuinard procedure achieves three critical objectives:
1. Biologic Fixation: Harvesting the CA ligament with an acromial bone block promotes robust bone-to-bone healing within the medullary canal of the clavicle.
2. Mechanical Augmentation: A double-button suspensory device acts as an internal brace, maintaining anatomic reduction and protecting the ligament transfer during the critical phases of biological incorporation.
3. Minimally Invasive Approach: The all-arthroscopic technique preserves the deltotrapezial fascia, minimizes postoperative pain, and accelerates rehabilitation.
Surgical Anatomy and Biomechanics
A profound understanding of the AC joint and coracoid anatomy is paramount for safe arthroscopic navigation and successful reconstruction.
The Coracoclavicular (CC) Ligaments
The primary suspensory stabilizers of the shoulder girdle are the CC ligaments:
* Conoid Ligament: Located posteromedially, it is cone-shaped and primarily resists superior translation of the distal clavicle. Its clavicular insertion is approximately 4.5 cm medial to the AC joint.
* Trapezoid Ligament: Located anterolaterally, it is broader and primarily resists axial compression and posterior translation of the distal clavicle. Its insertion is approximately 3 cm medial to the AC joint.
The Coracoacromial (CA) Ligament
The CA ligament forms the structural roof of the subacromial space, extending from the lateral border of the coracoid process to the undersurface of the anterior acromion. In this reconstructive procedure, its acromial attachment is harvested with a bone wafer, while its robust coracoid origin is left intact, allowing it to be pivoted and transposed into the distal clavicle.
Biomechanical Pearl: The double-button suspensory fixation is not a permanent substitute for the CC ligaments; rather, it is a temporary mechanical load-sharing device. It absorbs vertical shear forces, allowing the transferred CA ligament bone block to heal rigidly within the clavicular socket. Once bone-to-bone healing occurs (typically at 8 to 12 weeks), the biological transfer assumes the primary stabilizing role.
Indications and Contraindications
Indications
- Chronic AC Joint Dislocation: Type III, IV, or V AC joint dislocations (Rockwood classification) present for greater than 4 to 6 weeks.
- Symptomatic Instability: Patients experiencing persistent pain, weakness, scapular dyskinesia, or neurological symptoms (e.g., thoracic outlet-like symptoms due to a drooping shoulder girdle).
- Failed Conservative Management: Inability to return to pre-injury levels of work or sport after a dedicated trial of physical therapy.
Contraindications
- Absolute: Active infection, severe medical comorbidities precluding surgery, or lack of functional deltoid/trapezius musculature.
- Relative: Previous distal clavicle resection (Mumford procedure) that leaves insufficient bone stock for socket creation and button fixation; severe osteoporosis increasing the risk of coracoid or clavicle fracture.
Preoperative Planning and Imaging
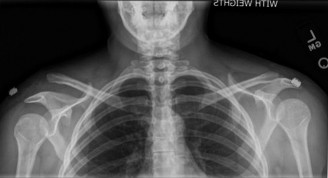
Standard radiographic evaluation must include:
* Zanca View: A 10- to 15-degree cephalad tilt view to accurately assess the AC joint without superimposition of the scapular spine.
* Axillary Lateral View: Essential for evaluating anterior or posterior displacement (Type IV dislocations).
* Cross-Body Adduction View: Useful for assessing dynamic instability.
* Magnetic Resonance Imaging (MRI): While not strictly necessary for the diagnosis of AC dislocation, MRI is highly recommended to evaluate for concomitant intra-articular pathology (e.g., SLAP tears, rotator cuff tears), which are present in up to 15-20% of high-energy AC joint injuries.
Patient Positioning and Anesthesia
The procedure is typically performed under general anesthesia supplemented with an interscalene regional nerve block for optimal postoperative pain control.
The patient can be positioned in either the beach-chair or lateral decubitus position, depending on the surgeon's preference.
* Beach-Chair Position: Highly preferred for AC joint reconstruction. It allows excellent superior access to the clavicle, facilitates anatomical orientation of the shoulder girdle, and makes intraoperative fluoroscopy easier to position. The arm is draped free and placed in an articulated arm holder.
* Lateral Decubitus Position: Provides excellent visualization of the subacromial space and glenohumeral joint due to longitudinal traction, but superior access to the clavicle for drilling can be ergonomically challenging.
Arthroscopic Portal Placement
Precise portal placement is the foundation of a successful all-arthroscopic AC joint reconstruction. Five distinct portals are utilized to achieve optimal viewing angles and working trajectories.
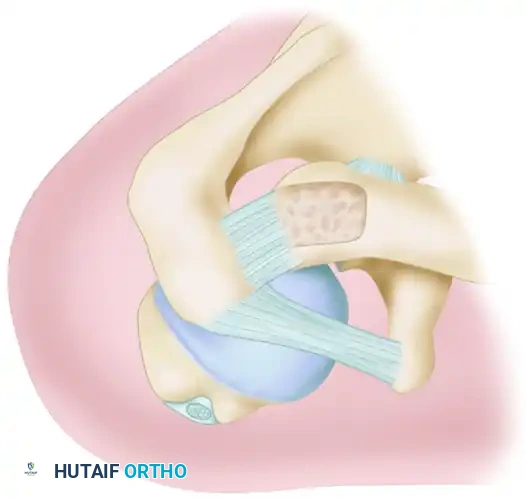
FIGURE 61-9: Five portals used for acromioclavicular joint reconstruction (P, posterior; L, lateral; AL, anterolateral; AM, anteromedial; S, superior).
- Posterior Portal (P): The standard viewing portal, established 2 cm inferior and 1 cm medial to the posterolateral corner of the acromion.
- Lateral Portal (L): Created 2 to 3 cm lateral to the acromion. Used primarily for subacromial decompression and visualization during CA ligament harvest.
- Anterolateral Portal (AL): Positioned at the anterolateral corner of the acromion. This is a critical viewing portal for assessing the CA ligament and the coracoid process.
- Anteromedial Portal (AM): Established just lateral to the coracoid process, passing through the rotator interval. This is the primary working portal for coracoid preparation and inferior button deployment.
- Superior Portal (S): A trans-clavicular or peri-clavicular portal used for drilling the clavicle and passing the suspensory fixation device.
Step-by-Step Surgical Technique (Boileau Modification)
Step 1: Diagnostic Arthroscopy and Coracoid Exposure
Begin with a standard diagnostic glenohumeral arthroscopy through the posterior portal to address any concomitant intra-articular pathology.

Arthroscopic visualization of the glenohumeral joint and the base of the coracoid process following rotator interval clearance.
Transition the arthroscope to the subacromial space. Perform a thorough bursectomy to expose the undersurface of the acromion, the distal clavicle, and the entire length of the CA ligament. Using a radiofrequency wand through the anteromedial portal, clear the soft tissue around the base of the coracoid process. It is imperative to visualize the medial and lateral borders, as well as the "knee" (the angle between the vertical and horizontal parts) of the coracoid to ensure central drill placement later.
Surgical Warning: Meticulous hemostasis is critical when clearing the coracoid base. The musculocutaneous nerve and brachial plexus lie medially, while the axillary artery is situated inferiorly. Always keep the radiofrequency wand and shaver strictly on bone.
Step 2: Distal Clavicle Resection and Socket Preparation
To prevent postoperative AC joint arthrosis and to create space for the reduction, resect approximately 8 to 10 mm of the distal clavicle using a high-speed burr. This is essentially an arthroscopic Mumford procedure.
Next, prepare the medullary canal of the resected distal clavicle to receive the CA ligament bone block. Using a burr or a specialized reamer, drill a socket into the medullary canal of the clavicle, aiming medially. The socket should be approximately 10 to 15 mm deep and wide enough to accommodate the harvested bone block.
Step 3: Harvest of the Coracoacromial Ligament
This is the most technically demanding step of the procedure. The goal is to detach the CA ligament from its acromial insertion while retaining a small wafer of bone.
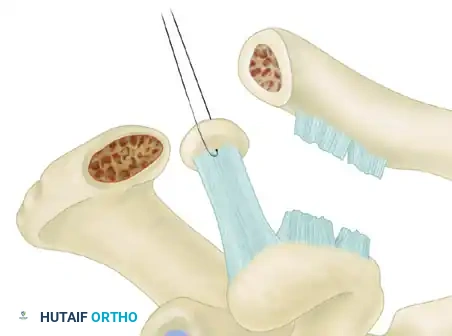
FIGURE 61-8A: The Coracoacromial ligament is harvested with a bone block from the tip of the acromion. The arthritic distal clavicle has been resected, and a socket is drilled in its medullary canal.
- View from the lateral or anterolateral portal.
- Introduce a high-speed burr through the anterior portal.
- Carefully outline a bone block at the anterior undersurface of the acromion, corresponding to the CA ligament footprint. The block should measure approximately 10 mm wide, 15 mm long, and 3 to 4 mm thick.
- Gently detach the bone block from the acromion.
- Once free, pass a heavy non-absorbable traction suture (e.g., #2 FiberWire) through the bone block and the distal end of the ligament using a suture passing device. This suture will be used to shuttle the graft into the clavicle.
Pitfall: Harvesting a bone block that is too thick will make it impossible to shuttle into the clavicular socket. Conversely, a block that is too thin may fracture during suture passage or tensioning, compromising the bone-to-bone healing interface.
Step 4: Coracoid and Clavicle Drilling
A specialized drill guide is introduced. The inferior arm of the guide is placed under the base of the coracoid via the anteromedial portal. The superior arm rests on the superior aspect of the distal clavicle (via a small superior incision).
Ensure the drill trajectory is perfectly central within the coracoid base to avoid medial or lateral cortical blowout. Drill a 4.0 mm or 4.5 mm tunnel (depending on the specific button system used) through the clavicle and the coracoid.
Step 5: Double-Button Fixation and Ligament Transfer
Pass a shuttling suture through the drilled tunnels from superior to inferior. Use this shuttle to pull the double-button suspensory device (e.g., TightRope, DogBone) through the coracoid and clavicle.
- Deploy the inferior button beneath the base of the coracoid and confirm its seating arthroscopically.
- Before tensioning the suspensory device, use the previously placed traction sutures to shuttle the CA ligament bone block into the prepared medullary socket of the distal clavicle.
- Reduce the AC joint by applying a superiorly directed force on the elbow while pushing down on the distal clavicle.
- With the joint anatomically reduced and the bone block seated within the socket, tension and tie the sutures of the superior button over the clavicle.
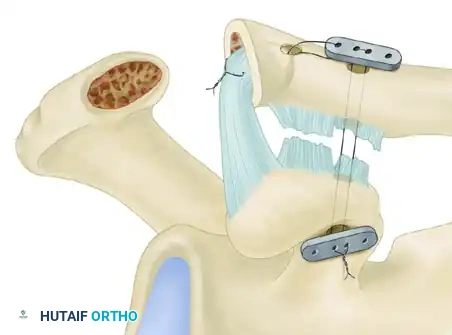
FIGURE 61-8B: The bone-ligament transfer is protected during the period of bone healing by maintaining the reduction with the help of a double-button suspensory fixation system (two titanium buttons connecting the clavicle and the coracoid with high-strength suture).
Step 6: Final Assessment and Closure
Assess the reduction both arthroscopically and via intraoperative fluoroscopy. The distal clavicle should be perfectly aligned with the acromion. Ensure the CA ligament is under appropriate tension and securely docked within the clavicle. Thoroughly irrigate the joint and close the portal sites in a standard fashion.
Postoperative Rehabilitation Protocol
Successful outcomes rely heavily on strict adherence to a phased rehabilitation protocol to protect the biological transfer while it heals.
- Phase I (Weeks 0 to 4): Maximum Protection. The patient is immobilized in a sling with an abduction pillow to offload the weight of the arm from the AC joint reconstruction. Only passive range of motion (PROM) for the elbow, wrist, and hand is permitted. Pendulum exercises are strictly avoided as they create inferior traction on the repair.
- Phase II (Weeks 4 to 8): Progressive Passive and Active-Assisted ROM. The sling is gradually weaned. Begin supine passive forward elevation and external rotation. Avoid active shoulder flexion or abduction, and strictly avoid cross-body adduction, which stresses the AC joint.
- Phase III (Weeks 8 to 12): Active ROM and Early Strengthening. Initiate active range of motion in all planes. Begin gentle isometric strengthening of the deltoid and rotator cuff. Scapular stabilization exercises are critical during this phase.
- Phase IV (Months 3 to 6): Advanced Strengthening and Return to Sport. Progress to isotonic strengthening. Heavy lifting and contact sports are restricted until at least 5 to 6 months postoperatively, contingent upon radiographic evidence of bone block incorporation and clinical restoration of strength.
Complications and Management
While the arthroscopic Boileau technique offers excellent clinical outcomes, surgeons must be vigilant regarding potential complications:
- Coracoid Fracture: The most devastating intraoperative complication. It is usually caused by eccentric drill placement or using a drill bit that is too large for the patient's anatomy. Prevention: Meticulous exposure of the coracoid base and precise, central guide wire placement verified by arthroscopy and fluoroscopy.
- Button Pull-Through: The superior button can migrate through the clavicle, or the inferior button through the coracoid, leading to loss of reduction. This is more common in osteoporotic bone or if the clavicular drill hole is placed too close to the resected distal edge. Prevention: Ensure at least 15 mm of intact bone bridge remains between the drill hole and the distal end of the clavicle.
- Loss of Reduction: Mild radiographic loss of reduction (subluxation) is occasionally noted over time due to suture creep or minor button subsidence. However, if the CA ligament bone block has healed, this rarely translates to clinical failure or recurrent symptoms.
- Adhesive Capsulitis: Postoperative stiffness can occur due to prolonged immobilization. Early, controlled passive motion and meticulous surgical technique to minimize bleeding and inflammation are key preventative measures.
Conclusion
The arthroscopic transfer of the coracoacromial ligament with double-button fixation represents a sophisticated, biologically sound solution for chronic AC joint dislocations. By combining the mechanical security of suspensory fixation with the biological permanence of a bone-to-bone ligament transfer, this technique effectively restores the complex biomechanics of the shoulder girdle. Mastery of the regional anatomy, precise portal placement, and meticulous graft handling are essential for orthopedic surgeons aiming to achieve optimal, reproducible outcomes in this challenging patient population.
You Might Also Like