Arthroscopic AC Joint Reduction and Coracoclavicular Stabilization: A TightRope Masterclass
Key Takeaway
This masterclass guides fellows through arthroscopic AC joint reduction with TightRope fixation. We cover precise patient positioning, detailed anatomy, and meticulous intraoperative execution, from portal placement to hardware application. Learn critical pearls, potential pitfalls, and comprehensive postoperative care for optimal patient outcomes in acute, high-grade AC separations. Focus is on Rockwood Type III and VI injuries in active patients seeking functional restoration.
Alright team, let's gather around. Today, we're tackling an acute, high-grade acromioclavicular (AC) joint separation, specifically a Rockwood Type III, which we've elected to treat surgically given our patient's high activity level and unwillingness to accept the cosmetic and functional deficit. This procedure, arthroscopic AC joint reduction with coracoclavicular stabilization using the TightRope system, demands precision, a thorough understanding of anatomy, and meticulous technique. It's a fantastic example of how minimally invasive approaches can yield excellent results in complex shoulder trauma.
Understanding the Injury: AC Joint Separations
First, let's review the pathology. Acromioclavicular separations, while relatively rare, are significant injuries resulting from direct trauma to the lateral aspect of the shoulder, often with the arm adducted – think a fall onto the point of the shoulder during sports. The degree of force transmitted through the acromion to the distal clavicle and the surrounding deltotrapezial fascia dictates the severity, leading to varying degrees of disruption of the AC joint and the critical coracoclavicular (CC) ligaments.
Low-grade injuries, Rockwood Types I and II, involve only partial tears of the AC ligaments, with minimal or no subluxation. These are typically self-limited and managed nonoperatively. However, as the force increases, we see complete disruption of the AC ligaments and tearing of the CC ligaments, leading to the higher-grade injuries we address surgically. Severe arm abduction during the injury can even lead to subacromial or subcoracoid displacement of the distal clavicle, characteristic of Rockwood Type VI injuries.
Patient History and Physical Examination
Before we even consider the OR, a comprehensive evaluation is paramount. Our patient presented with significant pain and a visible deformity at the AC joint. We always perform a complete physical examination of both upper extremities with the patient appropriately attired and in an upright position.
On palpation, you'll find exquisite tenderness directly over the AC joint. Look for increased deformity as the injury grade increases, though acutely, swelling can sometimes mask the true extent of displacement.
Specific provocative tests are key:
* AC Joint Compression (Shear) Test: Stabilize the scapula with one hand and compress the clavicle towards the acromion. Isolated pain at the AC joint with a history of direct trauma points to AC pathology.
* Cross-Arm Adduction Test: Actively or passively adduct the arm across the chest. Pain specifically at the AC joint is positive. Be careful to differentiate this from posterior or lateral shoulder pain, which might indicate other issues.
* Paxino Test: While stabilizing the posterior aspect of the clavicle, apply pressure to the anterior aspect of the acromion. This can sometimes elicit AC joint pain.
* O’Brien Test: Although primarily for labral or biceps pathology, if symptoms are at the top of the joint, confirm by palpating the AC joint. Anterior glenohumeral joint pain suggests other pathology.
Crucially, always evaluate the neck and perform a complete neurologic examination. Higher-grade injuries, particularly those with significant displacement, can manifest with brachial plexus compromise, which we must rule out preoperatively.
Comprehensive Surgical Anatomy
Alright, let's talk anatomy. This is our roadmap, and understanding every detail is non-negotiable for safe and effective surgery.
The Acromioclavicular Joint
The AC joint is a diarthrodial joint formed by the medial margin of the acromion and the distal clavicle. It’s a relatively small joint, but critical for shoulder function. A fibrocartilaginous intra-articular disc often resides between the two bony ends, helping to decrease contact stresses.
Static Stability:
* AC Ligaments: These are capsular thickenings, with the superior ligament providing the greatest restraint to anterior translation of the distal clavicle. The anterior, posterior, and inferior ligaments contribute to horizontal stability. In a Rockwood Type III, these are completely torn.
Dynamic Stability:
* Trapezial Fascia and Anterior Deltoid: These muscles, specifically their fascial attachments, provide dynamic stability. In higher-grade injuries (Type V), the deltotrapezial fascia is significantly injured, contributing to the severe superior displacement.
The Coracoclavicular Ligaments
These are the primary static stabilizers preventing superior displacement of the clavicle relative to the coracoid. Their integrity is paramount.
* Conoid Ligament: This robust ligament arises from the posteromedial aspect of the coracoid process and inserts onto the conoid tubercle on the posteromedial aspect of the clavicle. It measures approximately 2.5 cm long and 1 cm wide and provides primary resistance against anterior and superior loading of the clavicle.
* Trapezoid Ligament: Arising from the anterolateral coracoid, just posterior to the pectoralis minor attachment, it attaches to the trapezoid line on the lateral or central clavicle. It's broader, about 2.5 cm long and 2.5 cm wide, and provides resistance against posterior loading of the clavicle.
In a Rockwood Type III injury, both the conoid and trapezoid ligaments are completely disrupted.
Relevant Osteology
- Distal Clavicle: Identify the conoid tubercle (posteromedial) and trapezoid line (anterolateral) on the inferior surface. These are the attachment sites for the CC ligaments and our target for tunnel placement.
- Acromion: The medial facet forms the AC joint.
- Coracoid Process: This anterior projection of the scapula is crucial. We'll be drilling through its base. Understand its three muscle attachments: pectoralis minor, coracobrachialis, and short head of the biceps. Our target for the drill guide is the base, posterior to these muscle origins.
Neurovascular Risks: A Critical Discussion
This is where attention to detail is paramount.
* Suprascapular Nerve: This nerve, originating from the upper trunk of the brachial plexus, passes through the suprascapular notch (inferior to the suprascapular ligament) and then the spinoglenoid notch. It supplies the supraspinatus and infraspinatus muscles. Its proximity to the base of the coracoid, particularly medially, means we must be extremely careful when placing instruments or drilling in this region.
* Brachial Plexus and Axillary Artery/Vein: These vital structures lie medial and inferior to the coracoid process. Any instrument plunging or errant drilling medial to the coracoid base risks catastrophic injury. The scapular notch, which houses the suprascapular nerve, is also in close proximity to the medial aspect of the coracoid base.
SURGICAL WARNING: Always visualize the coracoid base clearly and maintain a central, posterior trajectory for your drill guide to avoid neurovascular structures medial to the coracoid and the suprascapular nerve superiorly.
Preoperative Planning
Our planning starts long before the patient enters the OR.
Imaging and Diagnostic Studies
Standard shoulder radiographs are useful, but often overpenetrated, obscuring the AC joint.
* Axillary View: Essential to rule out glenohumeral dislocation and assess anteroposterior translation of the clavicle.
* Zanca View: This is a game-changer. A 10- to 15-degree cephalic tilt view avoids superposition of the scapular spine, significantly improving visualization of the AC joint. It also helps identify any small fractures or loose bodies that might be missed on standard views.
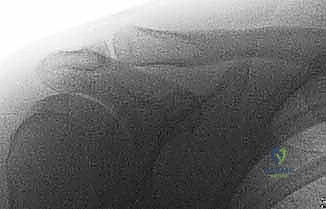
FIG 1 • Zanca view of the acromioclavicular joint.
* Stress Radiographs: While some authors recommend standing views with 10-15 pounds of traction to distinguish injury grades, recent literature does not support their routine use as they often don't alter operative decision-making. However, a single AP view with both AC joints visible is invaluable for comparing to the contralateral side and assessing the degree of displacement, accounting for normal variants.
* CT Scan: For complex fractures, occult injuries, or if there's any suspicion of intra-articular pathology or significant coracoid involvement, a CT scan provides invaluable bony detail.
* MRI: While not always necessary for acute AC separations, an MRI can provide detailed soft tissue assessment, confirming ligamentous integrity and ruling out concomitant rotator cuff or labral pathology.
Templating and Fluoroscopy Setup
Preoperative templating involves measuring the coracoclavicular distance on the uninjured side, if possible, and estimating the required TightRope construct length. We'll also plan our fluoroscopy setup. The C-arm will be positioned for easy access to obtain true AP and lateral views of the shoulder, as well as a Zanca-equivalent view, throughout the procedure. We'll drape it in a sterile fashion to allow intraoperative use without compromising our field.
Equipment Check
Ensure all components of the Arthrex TightRope system are present and accounted for: the drill guide, coracoid drill stop, 2.4mm guide pin, 4mm cannulated reamer, Nitinol wire loop, and the TightRope device itself. Our arthroscopy tower, camera, light source, and fluid management system must be fully functional.
Patient Positioning and Preparation
Our patient is positioned in the standard beach-chair position. This provides excellent access to the shoulder for both arthroscopic and open components of the procedure.
Exact Patient Posture and Padding
- The patient's torso is elevated to about 60-70 degrees, with the head supported in a neutral position to prevent neck strain.
- All bony and soft tissue prominences are meticulously padded. This includes the sacrum, heels, and especially the ulnar nerve at the elbow and the peroneal nerve at the fibular head.
- The operative arm is prepped free, allowing full range of motion. We will use an arm positioner (such as a McConnell or Tenet arm holder) to provide controlled traction and assist with reduction during the procedure. This frees up an assistant and maintains a stable position.
- The non-operative arm is tucked and padded.
Sterile Field
Standard shoulder preparation and draping are performed. We use an arthroscopy drape that allows for both arthroscopic portals and the small open incision over the clavicle. Ensure the entire shoulder, including the clavicle, acromion, and coracoid region, is exposed within the sterile field.
Intraoperative Masterclass: Step-by-Step Execution
Alright fellows, let's scrub in. The patient is prepped and draped, anesthesia is stable. We're ready to begin.
1. Establishing Anatomy and Portals
Our first step is always to re-establish our anatomical landmarks by palpation and marking them on the skin. We'll mark the acromion, the distal clavicle, the AC joint, and the coracoid process.
-
Posterior Portal (Viewing): We'll start with our posterior viewing portal. Palpate the posterolateral corner of the acromion. Our portal will be approximately 2 cm inferior and 2 cm medial to this point, in the "soft spot" just lateral to the posterior deltoid.
- Make a small skin incision with a #11 blade.
- Bluntly dissect through the subcutaneous tissue and posterior deltoid fibers with a hemostat or trocar, aiming towards the glenohumeral joint. You should feel a "pop" as you enter the joint capsule.
- Insert a 30-degree arthroscope.
-
Diagnostic Arthroscopy of the Glenohumeral Joint: With the scope in the posterior portal, perform a thorough diagnostic arthroscopy of the entire intra-articular space. Systematically inspect the rotator cuff, biceps tendon, labrum, articular cartilage of the humeral head and glenoid, and the glenohumeral ligaments. We're looking for any concomitant injuries that might influence our approach or postoperative care. Introduce a 5-7 mm cannula to assist with fluid pressure control and allow instrument passage.
-
Entering the Subacromial Space: From this posterior portal, we'll then enter the subacromial space using standard technique, typically by releasing the posterior capsule if needed and directing the scope superiorly. We'll perform a bursectomy to improve visualization.
-
Anterolateral Portal (Working): This will be our primary working portal for subacromial access. It's created using an "outside-in technique" in line with the lateral edge of the acromion, aiming towards the coracoid.
- Identify the lateral acromial border. Make a small skin incision.
- Bluntly dissect to enter the subacromial space. Insert an arthroscopic shaver or radiofrequency ablator.
-
Anteroinferior Portal (Coracoid Access): This portal is crucial for coracoid preparation and guide pin passage.
- Under direct arthroscopic visualization from the posterior portal, use an 18-gauge spinal needle to localize the anteroinferior portal. Position it just lateral and slightly inferior to the coracoid tip. This trajectory will allow us to access the base of the coracoid.
- Once the needle position is confirmed arthroscopically, make a small skin incision.
- Bluntly dissect and insert an 8.25 mm cannula. This larger cannula is necessary to accommodate the drill guide.
SURGICAL PEARL: If you find visualization challenging, a 70-degree scope can sometimes be helpful, especially if you elect to use a trans-interval technique, though we don't routinely find it necessary to move through the rotator interval to identify the coracoid base.
2. Coracoacromial Ligament and Coracoid Preparation
Now, with our portals established, let's focus on the coracoid.
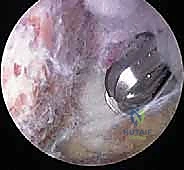
- CA Ligament Identification and Preservation: With the scope in the posterior portal, identify the anterolateral acromion and the coracoacromial (CA) ligament. This ligament forms the superior border of the subacromial space. We must preserve the CA ligament as it plays a role in subacromial stability and preventing superior migration of the humeral head (as seen in TECH FIG 1A in the original text's reference).
- Subcoracoid Bursa Resection: Through the anterolateral portal, use an arthroscopic ablator or a chondrotome to meticulously resect the subcoracoid bursa. This will significantly improve your visualization of the inferior aspect of the coracoid and its base.
- Following the CA Ligament to Coracoid: Follow the CA ligament distally to its attachment site on the coracoid process (TECH FIG 1B). This helps confirm your anatomical orientation.
- Coracoid Base Visualization: There is no need to remove soft tissue from the superior aspect of the coracoid (TECH FIG 1C). Our focus is on the inferior and posterior aspects of the coracoid base, where the CC ligaments would normally attach.
- Clavicular Incision: Make a 1 to 2 cm skin incision over the clavicle, centered approximately 4-5 cm medial to the AC joint, directly in line with where your drill guide will pass to the coracoid. Bluntly dissect down to the superior surface of the clavicle, carefully preserving the deltotrapezial fascia as much as possible, though it will be disrupted in high-grade injuries.
SURGICAL WARNING: Always be mindful of the neurovascular bundle medial to the coracoid. When placing instruments or the drill guide, stay as far posterior, near the coracoid base, as possible, and central from a mediolateral standpoint. Avoid straying too far medially, as the scapular notch and its neurovascular contents lie in close proximity.
- Adapteur Drill Guide Placement: Now, through the anteroinferior portal, insert the Arthrex Adapteur Drill Guide C-Ring and Coracoid Drill Stop. Advance it carefully under the base of the coracoid (TECH FIG 1D). Ensure the drill stop is firmly seated against the inferior cortex of the coracoid. This is critical to prevent plunging and protect the neurovascular structures. Confirm its position arthroscopically.
3. Guide Pin Passage and Reaming
This is a critical step requiring precise alignment and control.
- Clavicle Reduction: With the clavicle now exposed superiorly, an assistant will manually reduce the clavicle, pushing it inferiorly and posteriorly to restore its anatomical relationship with the coracoid. This can be aided by the arm positioner if traction is applied. Confirm reduction with fluoroscopy if desired, though arthroscopic visualization will be primary.
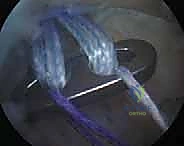
- Guide Pin Advancement: Under direct arthroscopic visualization of the coracoid drill stop, advance a 2.4 mm guide pin through the center of the clavicle, through the superior cortex, and then precisely through the coracoid base, aiming for the center of the drill stop (TECH FIG 2A).
> SURGICAL PEARL: The guide pin must be perfectly centered in the clavicle to ensure adequate bone stock and prevent cortical breach. Use gentle, controlled pressure. Fluoroscopy can be used here to confirm the trajectory and prevent plunging. - Overreaming: Once the guide pin is securely captured by the drill stop, remove the drill guide. Overream the guide pin with a 4 mm cannulated reamer (TECH FIG 2B). The drill stop remains in place to prevent the reamer from plunging too deep and damaging the neurovascular structures inferior to the coracoid. Ream slowly, with constant irrigation, to prevent thermal necrosis of the bone. You will feel the reamer pass through the clavicle and then the coracoid. Confirm full passage arthroscopically.
- **Nitinol Wire Loop Passage
REFERENCES
COMPLICATIONS 1. Allman FL Jr. Fractures and ligamentous injuries of the clavicle and its articulation. J Bone Joint Surg Am 1967;49A:774–784.
-
Bannister GC, Wallace WA, Stableforth PG, et al. The management of acute acromioclavicular dislocation: a randomized prospective controlled trial. J Bone Joint Surg Br 1989;71B:848–850.
-
Chernchujit B, Tischer T, Imhoff AB. Arthroscopic reconstruction of the acromioclavicular joint disruption: surgical technique and preliminary results. Arch Orthop Trauma Surg 2006;126: 575–581.
-
Costic RS, Vangura A Jr, Fenwick JA, et al. Viscoelastic behavior and structural properties of the coracoclavicular ligaments. Scand J Med Sci Sports 2003;13:305–310.
-
Infection
-
Loss of reduction
-
Coracoid fracture 11
-
Clavicle fracture
-
Suprascapular neurovascular bundle injury
OUTCOMES
- The TightRope Fixation System is a relatively new system for treatment of acute AC separations. It is not intended for chronic injuries.
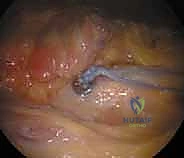
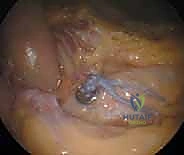
TECH FIG 3 • (continued) C. Button is flipped by pulling the trailing, uncolored suture. D. Reduced button on base of coracoid.
-
Costic RS, Labriola JE, Rodosky MW, et al. Biomechanical rationale for development of anatomical reconstructions of coracoclavicular ligaments after complete acromioclavicular joint dislocations. Am J Sports Med 2004;32:1929–1936.
-
Dimakopoulos P, Panagopoulos A, Syggelos SA, et al. Double-loop suture repair for acute acromioclavicular joint disruption. Am J Sports Med 2006;34:1112–1119.
-
Jari R, Costic RS, Rodosky MW, et al. Biomechanical function of surgical procedures for acromioclavicular joint dislocations. Arthroscopy 2004;20:237–245.
-
Lancaster S, Horowitz M, Alonso J. Complete acromioclavicular separations: a comparison of operative methods. Clin Orthop Relat Res 1987;216:80–88.
-
Lee SJ, Nicholas SJ, Akizuki KH, et al. Reconstruction of the coracoclavicular ligaments with tendon grafts: a comparative biomechanical study. Am J Sports Med 2003;31:648–655.
-
Moneim MS, Balduini FC. Coracoid fracture as a complication of surgical treatment by coracoclavicular tape fixation: a case report. Clin Orthop Relat Res 1982;168:133–135.
-
Pearsall AW IV, Hollis JM, Russell GV Jr, et al. Biomechanical comparison of reconstruction techniques for disruption of the acromioclavicular and coracoclavicular ligaments. J South Orthop Assoc 2002;11:11–17.
-
Rockwood CA Jr, Williams GR Jr, Young DC. Disorders of the acromioclavicular joint. In Rockwood CA Jr, Matsen FA III, eds. The Shoulder. Philadelphia: WB Saunders, 1998:483–553.
-
Salter EG Jr, Nasca RJ, Shelley BS. Anatomical observations on the acromioclavicular joint and supporting ligaments. Am J Sports Med 1987;15:199–206.
-
Schlegel TF, Burks RT, Marcus RL, et al. A prospective evaluation of untreated acute grade III acromioclavicular separations. Am J Sports Med 2001;29:699–703.
-
Taft TN, Wilson FC, Oglesby JW. Dislocation of the acromioclavicular joint: an end-result study. J Bone Joint Surg Am 1987;69A: 1045–1051.
-
Tienen TG, Oyen JF, Eggen PJ. A modified technique of reconstruction for complete acromioclavicular dislocation: a prospective study. Am J Sports Med 2003;31:655–659.
-
Thornes B, Walsh A, Hislop M, et al. Suture-endobutton fixation of ankle tibio-fibular diastasis: a cadaver study. Foot Ankle Int 2003;24:142–146.
-
Thornes B, Shannon F, Guiney AM, et al. Suture-button syndesmosis fixation: accelerated rehabilitation and improved outcomes. Clin Orthop Relat Res 2005;431:207–212.
-
Tossy JD, Mead NC, Sigmond HM. Acromioclavicular separations: useful and practical classification for treatment. Clin Orthop Relat Res 1963;28:111–119.
-
Wolf EM, Pennington WT. Arthroscopic reconstruction for acromioclavicular joint dislocation. Arthroscopy 2001;17:558–563.
-
Yap JJ, Curl LA, Kvitne RS, et al. The value of weighted views of the acromioclavicular joint: results of a survey. Am J Sports Med 1999; 27:806–809.
You Might Also Like