Ulnar Shortening Osteotomy: Comprehensive Surgical Technique and Biomechanical Principles
Key Takeaway
Ulnar shortening osteotomy is a highly effective surgical intervention for ulnar impaction syndrome and symptomatic ulnar-positive variance. By precisely resecting a measured diaphyseal segment and applying rigid dynamic compression plating, surgeons can decompress the ulnocarpal joint while preserving the distal radioulnar joint (DRUJ) kinematics. This guide details the Chun and Palmer technique, emphasizing preoperative templating, meticulous soft-tissue handling, oblique osteotomy execution, and robust internal fixation to ensure optimal biomechanical restoration and union.
Introduction and Biomechanical Rationale
The Ulnar Shortening Osteotomy (USO), popularized by Chun and Palmer, is a cornerstone joint-leveling procedure in operative hand and wrist surgery. It is primarily designed to address ulnar impaction syndrome (ulnocarpal abutment), a degenerative condition caused by excessive load transmission across the ulnar aspect of the wrist.
In a normal wrist with neutral ulnar variance, the radius absorbs approximately 80% of the axial load, while the ulna absorbs 20%. However, biomechanical studies have demonstrated that an increase in ulnar variance of just 2.5 mm (ulnar-positive variance) shifts the load distribution dramatically, increasing the ulnar axial load transmission to nearly 42%. Conversely, shortening the ulna by 2.5 mm decreases the load at the ulnocarpal joint to approximately 4.3%.
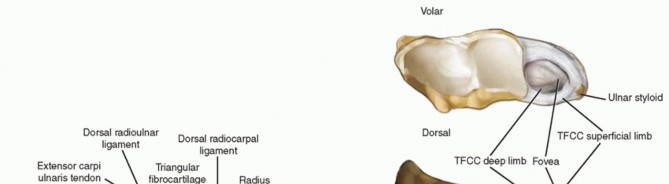
Beyond simple decompression of the ulnar head against the lunate and triquetrum, an ulnar shortening osteotomy effectively tightens the ulnocarpal ligaments and the Triangular Fibrocartilage Complex (TFCC). This "ligamentotaxis" effect stabilizes the ulnar carpus and the distal radioulnar joint (DRUJ), making the procedure highly versatile for treating both impaction and mild ligamentous instability.
Clinical Pearl: The primary advantage of a diaphyseal ulnar shortening osteotomy over a wafer resection (partial ulnar head excision) is the preservation of the articular cartilage of the ulnar dome and the maintenance of the DRUJ kinematics, provided the DRUJ is free of advanced arthrosis.
Indications and Contraindications
Indications
- Ulnar Impaction Syndrome: Symptomatic ulnar-positive variance with associated ulnar-sided wrist pain, exacerbated by pronation and ulnar deviation.
- TFCC Tears: Palmer Class 2 (degenerative) tears, or Class 1 tears associated with ulnar-positive variance where ligamentous repair alone is insufficient.
- Early Lunotriquetral (LT) Instability: Shortening tightens the ulnocarpal ligaments, providing secondary stability to the LT interval.
- Previous Distal Radius Fracture: Malunion resulting in relative ulnar lengthening.
Contraindications
- Advanced DRUJ Osteoarthritis: Shortening the ulna alters the contact area within the sigmoid notch, increasing joint reactive forces. In the presence of established DRUJ arthritis, a salvage procedure (e.g., Darrach, Sauvé-Kapandji) is preferred.
- Fixed DRUJ Subluxation/Dislocation: Severe incongruity that cannot be reduced.
- Active Infection: Local or systemic.
Preoperative Planning and Templating
Meticulous preoperative planning is mandatory to determine the exact amount of bone to be resected.
- Standardized Radiographs: Obtain strict posteroanterior (PA) radiographs of the wrist with the shoulder abducted 90 degrees, the elbow flexed 90 degrees, and the forearm in neutral rotation. Pronation artificially increases ulnar variance, while supination decreases it.
- Variance Measurement: Measure the distance between a line drawn perpendicular to the long axis of the radius at the sclerotic line of the lunate fossa, and a parallel line drawn at the distal articular surface of the ulnar head.
- Target Resection: Plan the osteotomy to achieve a final ulnar variance of 0 to −1 mm.
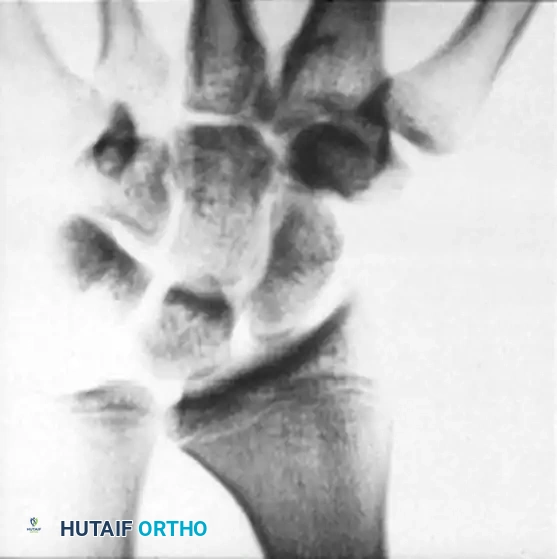
Figure 1: Preoperative PA radiograph of a patient with symptomatic ulnar-positive variance, demonstrating the need for ulnar shortening.
Surgical Anatomy and Positioning
Patient Setup
- After the induction of satisfactory regional or general anesthesia, place the patient supine with the operative extremity extended onto a radiolucent hand table.
- Apply a well-padded pneumatic tourniquet to the proximal arm.
- Prepare and drape the limb in a standard sterile fashion. Exsanguinate the limb with an Esmarch bandage and inflate the tourniquet (typically 250 mm Hg).
- Ensure intraoperative C-arm fluoroscopy is positioned to allow unobstructed orthogonal views of the forearm and wrist.
Anatomical Considerations
The approach utilizes the internervous and intermuscular plane between the Flexor Carpi Ulnaris (FCU) (ulnar nerve) and the Extensor Carpi Ulnaris (ECU) (posterior interosseous nerve).
Surgical Warning: The Dorsal Sensory Branch of the Ulnar Nerve (DSBUN) emerges from beneath the FCU approximately 5 to 8 cm proximal to the ulnar styloid and crosses dorsally over the distal ulna. It is highly susceptible to iatrogenic injury during the distal extent of the exposure. Retract it gently and avoid vigorous compression.
Step-by-Step Surgical Technique (Chun and Palmer)
1. Approach and Exposure
Beginning at the level of the ulnar neck, make a longitudinal incision on the ulnar (medial) aspect of the distal forearm. Center the incision over the subcutaneous border of the ulna. The incision must be of adequate length (typically 8–10 cm) to allow for the completion of the osteotomy, manipulation of the bone fragments, and the application of a six-hole plate.
Carefully dissect through the subcutaneous tissues, identifying and protecting the DSBUN. Incise the deep antebrachial fascia between the FCU and the ECU.
Expose the dorsum of the ulna subperiosteally.
Pitfall: Avoid wide, circumferential stripping of the periosteum, particularly distally. Excessive stripping compromises the periosteal blood supply, significantly increasing the risk of delayed union or nonunion.
2. Plate Preparation and Rotational Alignment
Select a six-hole, 3.5-mm dynamic compression plate (DCP) or a specialized ulnar osteotomy plate. Align the plate on the dorsum of the distal ulna. The distal end of the plate should rest at approximately the ulnar neck, just proximal to the proximal border of the sigmoid notch.
Contour the plate slightly if necessary to match the natural dorsal bow of the distal ulna. Secure the plate to the bone using a reduction clamp. Drill, measure, tap, and insert the two most distal screws to fix the plate to the distal fragment.
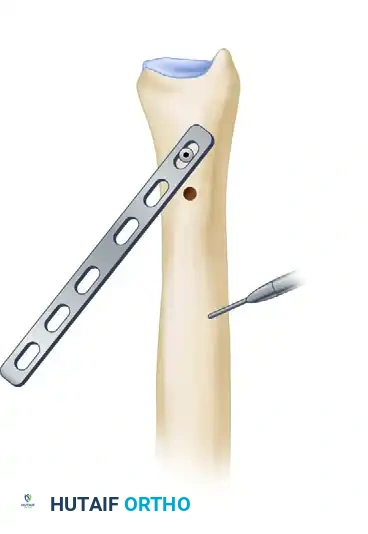
Figure 2: A six-hole 3.5-mm plate is placed on the dorsal surface of the ulna, and the two most distal screws are inserted. A longitudinal mark is made with electrocautery for rotational orientation.
To ensure rotational alignment is perfectly maintained after the osteotomy, use an electrocautery or a surgical marker to score a longitudinal line across the planned osteotomy site on the exposed ulnar shaft.
Once marked, loosen the most distal screw slightly and completely remove the second distal screw. Hinging on the loosened distal screw, swing the plate out of the surgical field to expose the osteotomy site.
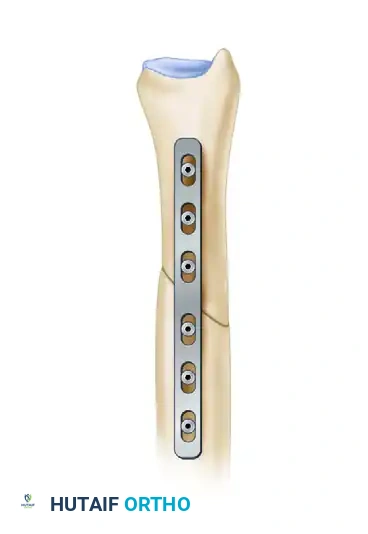
Figure 3: The plate is swung out of the way, hinging on the distal-most screw, to allow unobstructed access for the osteotomy.
3. The Oblique Osteotomy
Locate the planned osteotomy site at the center of the plate's footprint. Using a fine-toothed oscillating saw under continuous saline irrigation (to prevent thermal necrosis), initiate an oblique osteotomy.
The cut should be made from proximal-medial to distal-lateral, passing through approximately 70% of the ulnar diameter. The obliquity of the cut is critical: it must be sufficiently angled (typically 45 degrees) to allow an interfragmentary lag screw to be placed perpendicular to the osteotomy plane later in the procedure.
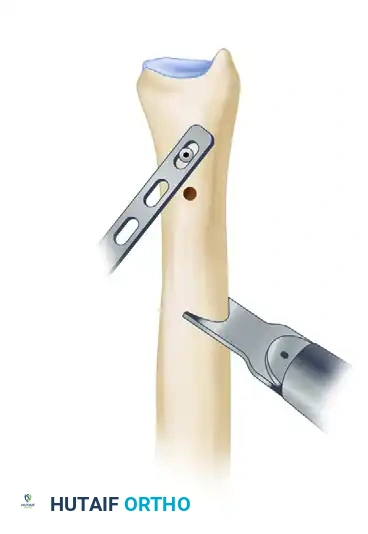
Figure 4: An oscillating saw is used to make the initial oblique osteotomy through 70% of the ulna.
Measure the exact thickness of the bone to be removed based on your preoperative templating (e.g., 2.5 mm). To ensure perfectly parallel cuts, place a free, unattached saw blade into the first cut to act as a physical guide. Make the second osteotomy cut parallel to the first, separated by the exact measured distance.
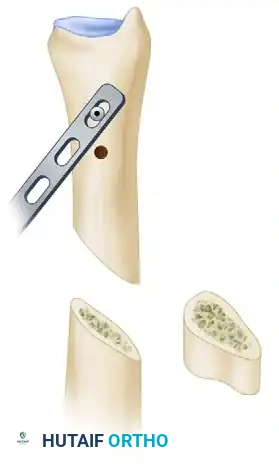
Figure 5: A second cut is made parallel to the first, utilizing a free saw blade as a guide to ensure precision.
Complete both cuts through the remaining cortex and carefully remove the resected diaphyseal bone wafer.
Figure 6: The precisely measured oblique bone segment is removed.
4. Reduction and Rigid Internal Fixation
Reduce the osteotomy by bringing the proximal and distal fragments together. Ensure the electrocautery marks align perfectly to prevent any rotational malunion, which would severely restrict forearm pronosupination.
Rotate the plate back into its original position over the dorsum of the ulna. Retighten the first distal screw, and replace and tighten the second distal screw. Apply a bone reduction clamp to secure the plate to the proximal fragment, compressing the osteotomy site.
At this stage, utilize intraoperative C-arm fluoroscopy to assess the ulnar length and confirm that the target variance (0 to -1 mm) has been achieved.
Once confirmed, secure the plate to the proximal ulna by inserting the remaining screws using standard dynamic compression techniques (eccentric drilling in the holes adjacent to the osteotomy).
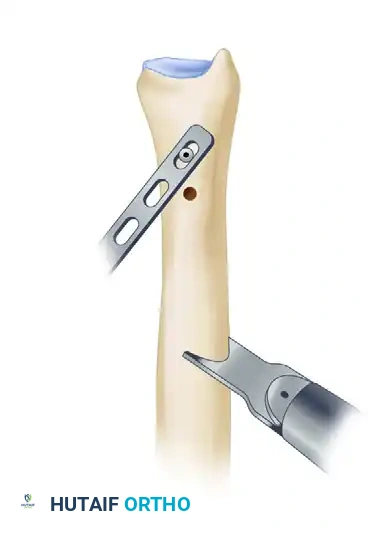
Figure 7: The plate is rotated back into position and secured using dynamic compression technique to close the osteotomy gap.
To maximize construct rigidity and achieve absolute stability, place a separate, independent interfragmentary lag screw across the osteotomy site. This screw should be inserted at exactly 90 degrees to the plane of the osteotomy. Depending on the plate's position and the osteotomy's geometry, this lag screw may be placed through the plate or independently outside the plate.
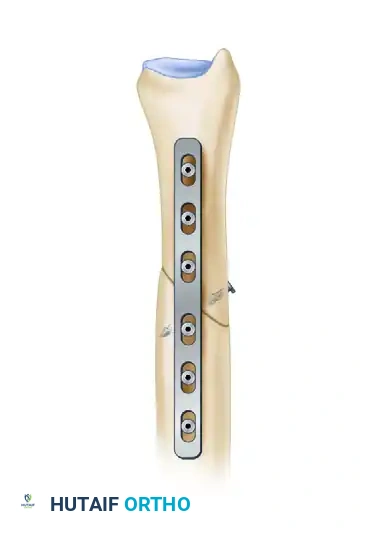
Figure 8: Placement of an independent interfragmentary lag screw perpendicular to the osteotomy plane to provide absolute stability.
Thoroughly irrigate the wound. Deflate the tourniquet and achieve meticulous hemostasis. Close the deep fascia loosely, followed by subcutaneous tissue and skin closure. Apply a sterile dressing and a well-molded short-arm cast or a rigid sugar-tong splint.
Postoperative Protocol and Rehabilitation
Optimal postoperative care is essential to ensure bone healing and restore functional range of motion.
- 0 to 2 Weeks: The patient is immobilized in the initial short-arm cast or splint. Elevation and active digit range of motion are encouraged immediately to prevent stiffness and reduce edema.
- 2 Weeks: The cast is removed for wound inspection and suture removal. A new, well-fitting short-arm cast is applied.
- 4 Weeks: The cast is removed. Radiographs are obtained to assess early callus formation and hardware position. If clinical and radiographic progression is satisfactory, the patient is transitioned to a custom removable thermoplastic splint.
- 4 to 8 Weeks: Gentle, active range-of-motion (ROM) exercises for the wrist and forearm (pronation/supination) are initiated. The splint is worn between exercise sessions and at night.
- 8+ Weeks: Strenuous activities, heavy lifting, and contact sports are strictly prohibited until definitive radiographic union is achieved, which typically occurs between 8 and 12 weeks postoperatively.
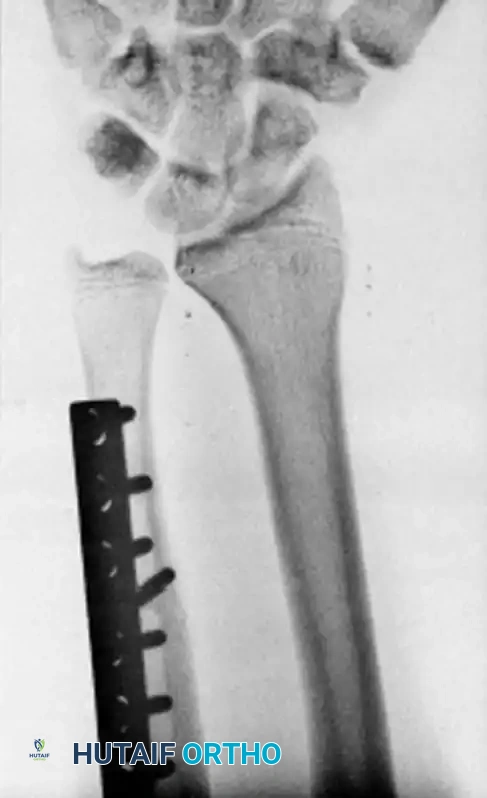
Figure 9: Postoperative PA radiograph at 4 weeks demonstrating a healed osteotomy with restoration of neutral ulnar variance.
Complications and Pitfalls
While highly successful, ulnar shortening osteotomy carries specific risks that the surgeon must mitigate through meticulous technique:
- Nonunion or Delayed Union: The diaphyseal ulna has a relatively precarious blood supply. Rates of nonunion historically approached 10%. This risk is minimized by avoiding excessive periosteal stripping, utilizing an oblique cut (which increases the surface area for healing compared to a transverse cut), and achieving absolute stability with a lag screw and dynamic compression plate.
- Hardware Irritation: Because the ulna is subcutaneous, dorsal or medial plating frequently leads to symptomatic hardware prominence. Up to 40% of patients may request plate removal after complete union. Alternative approach: Some surgeons prefer volar plating under the FCU to provide more soft-tissue coverage, though this requires a more complex exposure.
- DRUJ Incongruity: Over-shortening or performing the procedure in the presence of pre-existing DRUJ arthritis can lead to severe postoperative DRUJ pain and stiffness. Precise preoperative templating is non-negotiable.
- Rotational Malunion: Failure to align the rotational marks can alter the DRUJ mechanics, leading to a mechanical block to pronation or supination.
You Might Also Like