Operative Management of Thumb Carpometacarpal Fractures
Key Takeaway
The integrity of the thumb carpometacarpal (CMC) joint is paramount for hand function. Intraarticular fractures, such as Bennett and Rolando patterns, compromise pinch strength and grip. This guide details the biomechanics, indications, and step-by-step surgical techniques—including closed pinning, open reduction internal fixation (ORIF), and corrective osteotomy—required to restore articular congruity, achieve stable fixation, and prevent posttraumatic arthritis in complex thumb base fractures.
Surgical Anatomy and Biomechanics of the Thumb Carpometacarpal Joint
The integrity of the thumb carpometacarpal (CMC) joint is far more critical to the overall function of the hand than any other individual joint. As a highly specialized biconcave saddle joint, it provides the foundational mobility required for opposition, pinch, and power grip. Offset intraarticular fractures, persistent subluxation, or dislocation at this level inevitably cause severe limitation of motion, debilitating pain, and profound weakness in both pinch and grip strength.
Biomechanically, the forces transmitted across the thumb CMC joint during a simple key pinch are magnified exponentially—up to 12 times the force applied at the fingertips. Consequently, even minor articular incongruities (step-offs) or subtle instabilities can rapidly progress to posttraumatic osteoarthritis.
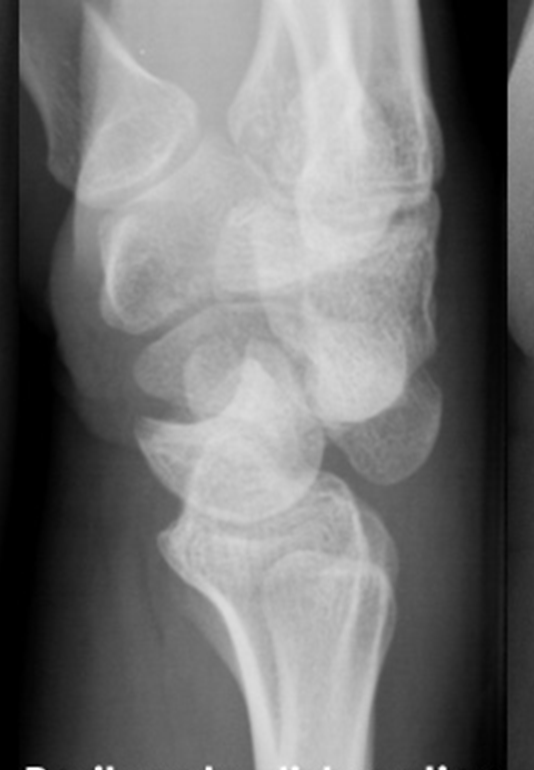
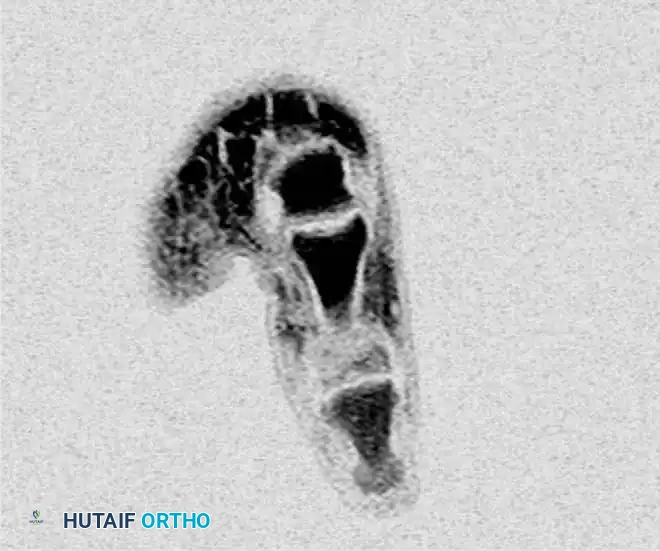
Radiographic evaluation of the thumb CMC joint requires specialized views, including the Robert's view and true lateral, to accurately assess articular step-off and subluxation.
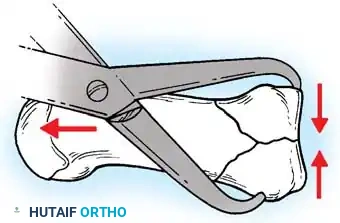
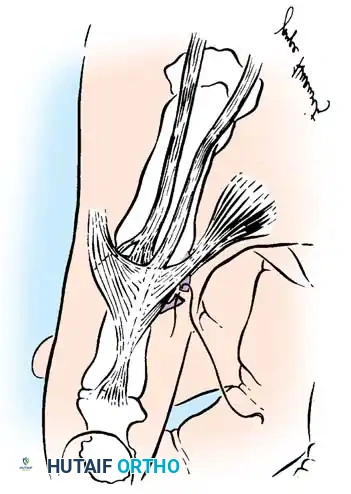
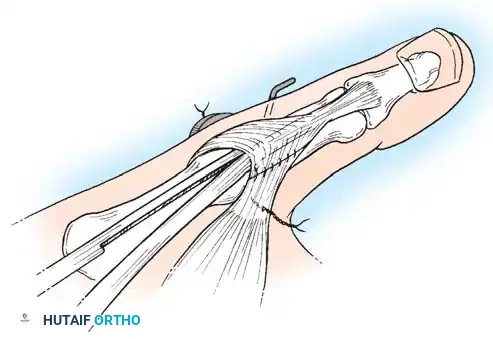
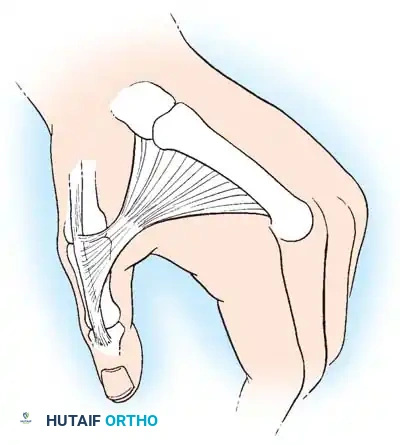
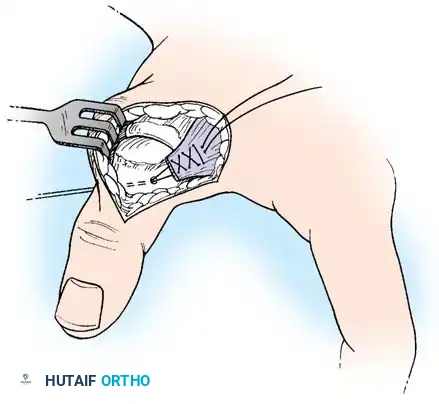
Anatomic diagram illustrating the deforming forces at the thumb base.
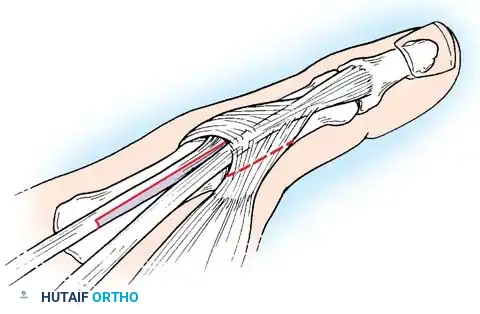
The stability of the CMC joint relies heavily on the volar oblique ligament (anterior oblique ligament), which originates from the trapezium and inserts onto the volar-ulnar tubercle of the first metacarpal base. In intraarticular fractures, this ligament typically remains intact, holding the small volar-ulnar fragment in its anatomic position while the larger metacarpal shaft is displaced by powerful extrinsic and intrinsic muscle forces.
💡 Clinical Pearl: Deforming Forces
The characteristic displacement of a thumb base fracture is driven by three primary forces:
1. Abductor Pollicis Longus (APL): Pulls the metacarpal shaft proximally and radially.
2. Adductor Pollicis: Pulls the metacarpal head into the palm (adduction), exacerbating the apex-dorsal angulation.
3. Extensor Pollicis Longus (EPL): Contributes to proximal migration and dorsal displacement.
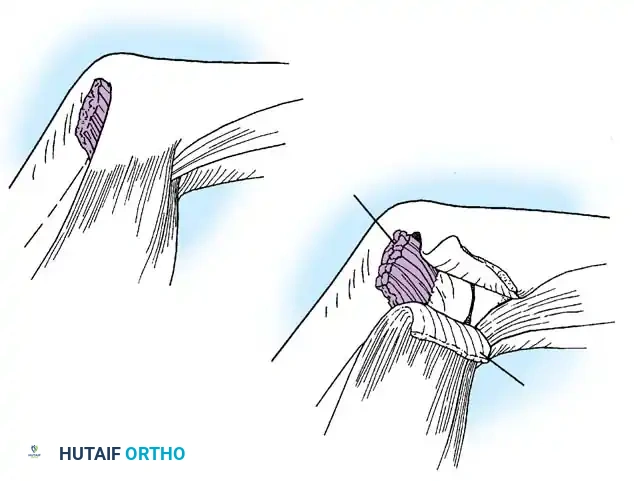
The Bennett Fracture
In 1882, Edward Hallaran Bennett, an Irish surgeon, first described the classic intraarticular fracture through the base of the first metacarpal. In a Bennett fracture, the shaft is laterally and proximally dislocated by the unopposed pull of the abductor pollicis longus. The medial (volar-ulnar) projection of the thumb metacarpal base, to which the volar oblique ligament attaches, remains anatomically reduced within the CMC joint.
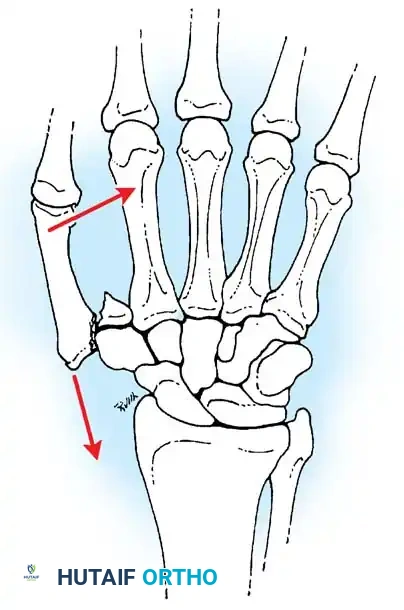
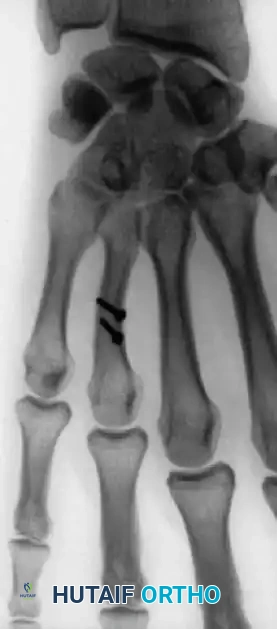
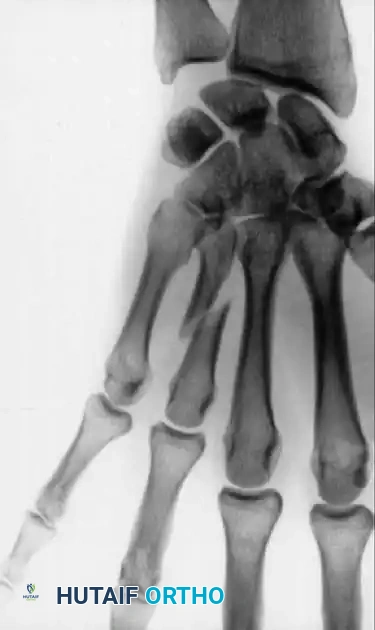
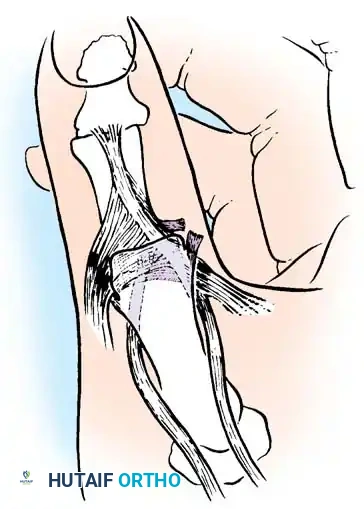
Fig. 64-7: In a Bennett fracture, the first metacarpal shaft is displaced by the divergent pull of the APL and adductor muscles, while the volar-ulnar fragment remains tethered to the trapezium.
Indications for Operative Intervention
Reduction by longitudinal traction is generally easy to achieve but notoriously difficult to maintain with conservative measures alone.
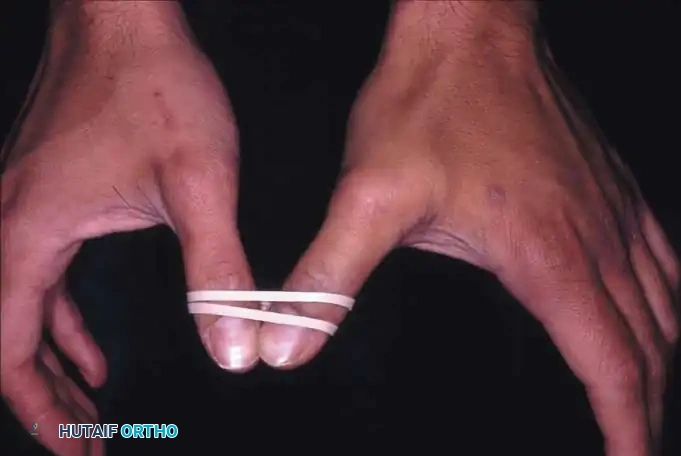
* Rubber band traction through a transverse pin in the proximal phalanx is undependable; immobilization is incomplete, and radiographic verification through an overlying cast is challenging.
* Cast immobilization that attempts to maintain reduction via direct pressure on the metacarpal base is highly unsatisfactory. Excessive pressure risks skin necrosis over the prominent base, while insufficient pressure inevitably allows loss of reduction.
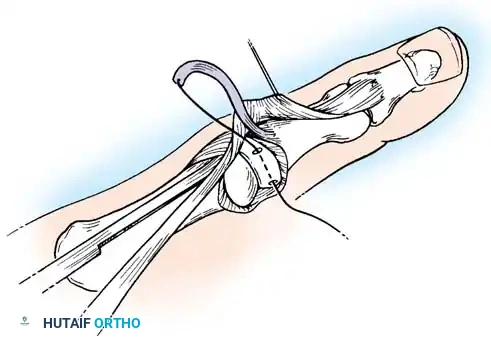
While some controversy surrounds the acceptable limits of displacement—with some authors suggesting that articular incongruity of 1 to 3 mm may be well tolerated provided union and joint stability are achieved—modern academic consensus strongly favors anatomic reduction. The technique of closed pinning described by Wagner is the preferred initial approach. Should closed reduction prove unsatisfactory, open reduction and internal fixation (ORIF) is strictly indicated.
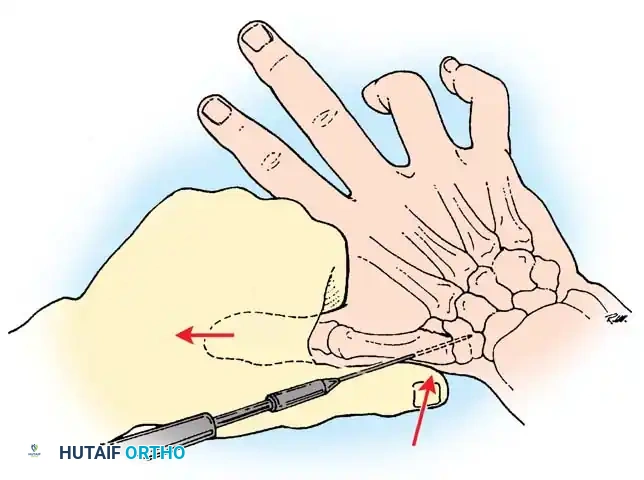
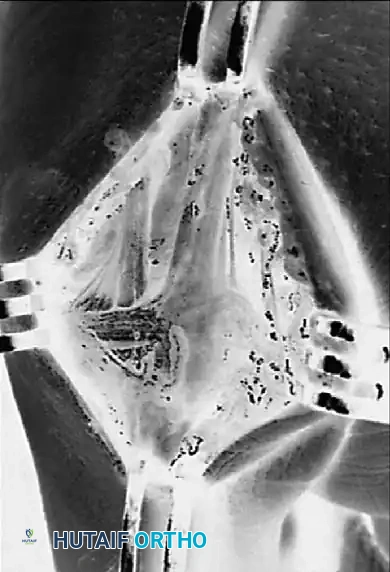
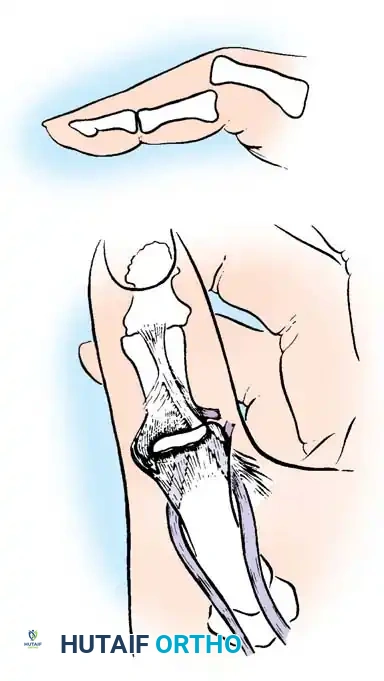
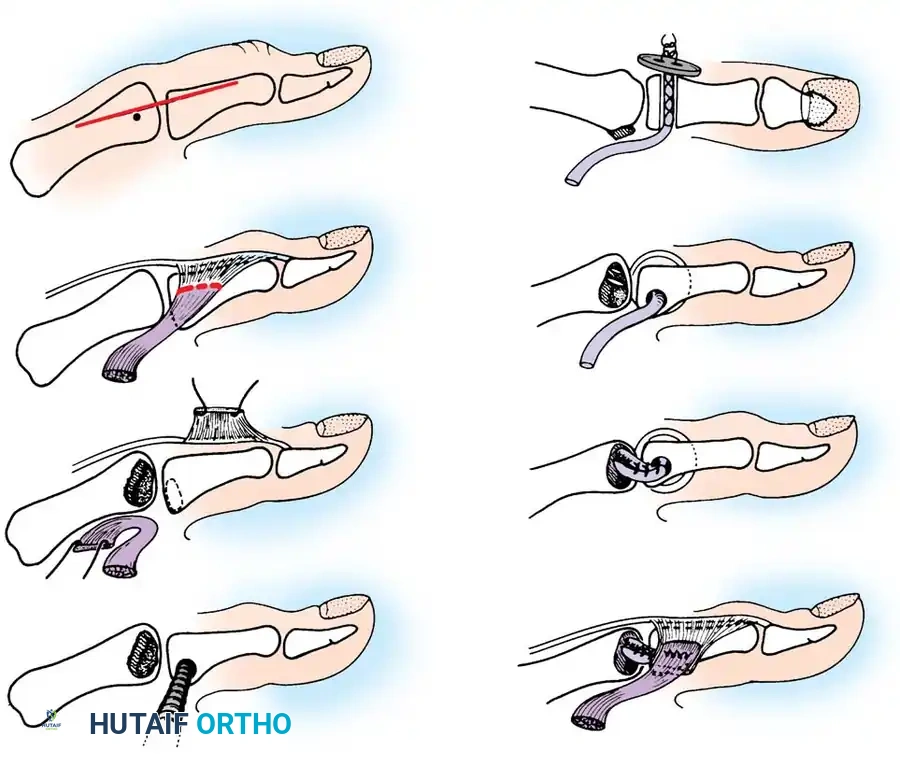
Fig. 64-8: Wagner technique of closed pinning of a Bennett fracture.
Intraoperative fluoroscopy demonstrating provisional reduction prior to definitive wire placement.
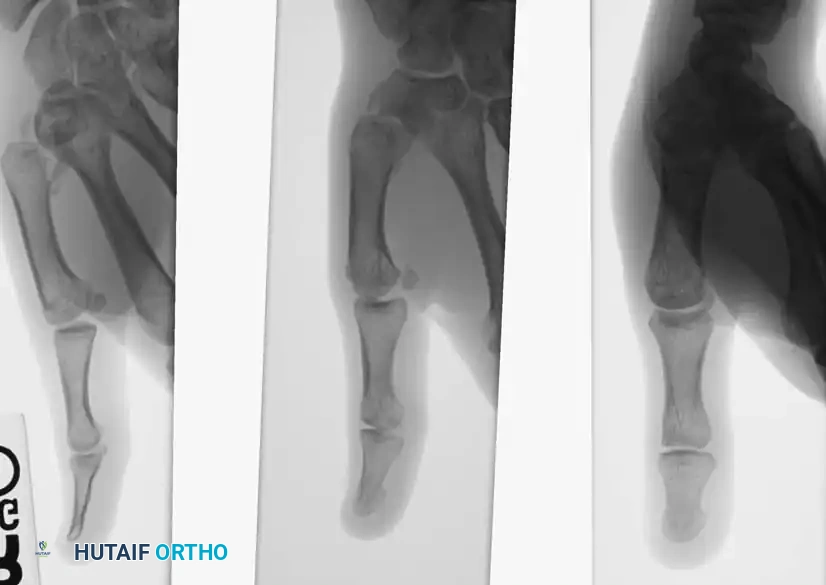
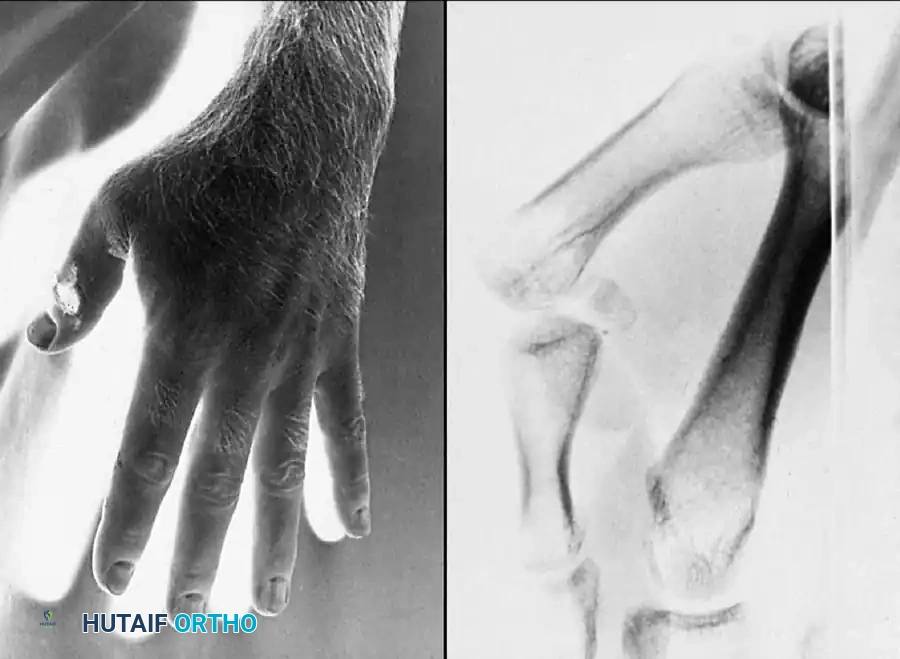
Fig. 64-9: A, Young man with a 6-week-old Bennett fracture and accompanying dorsal trapezial rim fracture. B, Results of fixation after callus excision and fracture fragment reduction.
Closed Pinning (Wagner Technique)
Closed reduction and percutaneous pinning is the workhorse technique for acute Bennett fractures with large, reducible fragments.
🔪 Surgical Technique: Wagner Closed Pinning
- Positioning and Reduction: Place the patient supine with a hand table. Apply longitudinal manual traction to the thumb. Pronate the thumb to correct the supination deformity caused by the adductor pollicis, and apply direct manual pressure over the dorsal-radial aspect of the first metacarpal base to reduce the shaft to the volar-ulnar fragment.
- Wire Insertion: While maintaining reduction, use a battery-driven drill to insert a 0.045-inch or 0.062-inch Kirschner wire (K-wire). Drill from the dorsoradial base of the metacarpal, across the CMC joint, and directly into the trapezium.
- Fluoroscopic Verification: Check the reduction using multiplanar intraoperative fluoroscopy. Ensure the articular step-off is eliminated and the joint is congruous.
- Supplemental Fixation: Sometimes more than one K-wire is required to control rotation. The wire may engage carpal bones other than the trapezium (e.g., the trapezoid or capitate) for adequate fixation. Fixation merely to the small volar oblique fragment is often insufficient to prevent loss of reduction.
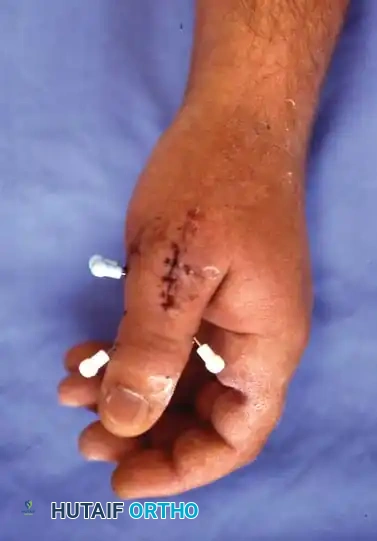
- Completion: If accurate, cut the wires near the skin or bend them outside the skin for easy removal. Apply a well-padded forearm thumb spica cast, holding the wrist in slight extension and the thumb in palmar abduction, leaving the thumb interphalangeal (IP) joint free.
Fluoroscopic confirmation of K-wire trajectory across the CMC joint.
Clinical photograph demonstrating the optimal position of immobilization following closed pinning.
Open Reduction and Internal Fixation (Wagner Technique)
When closed reduction fails to restore articular congruity (step-off > 1 mm) or soft tissue interposition (often the joint capsule or APL tendon) blocks reduction, open reduction is mandatory.
🔪 Surgical Technique: Wagner Open Reduction
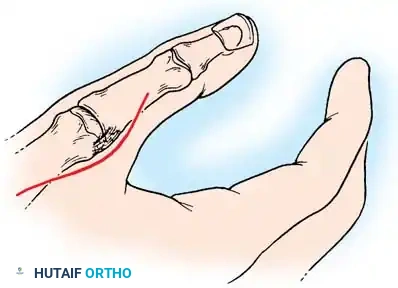
- Incision: Begin a curved incision on the dorsoradial aspect of the first metacarpal, curving it volarward at the wrist crease (Wagner approach).
- Nerve Protection: Carefully identify, mobilize, and protect the sensory branches of the superficial radial nerve (SRN) crossing this area to prevent painful neuroma formation.
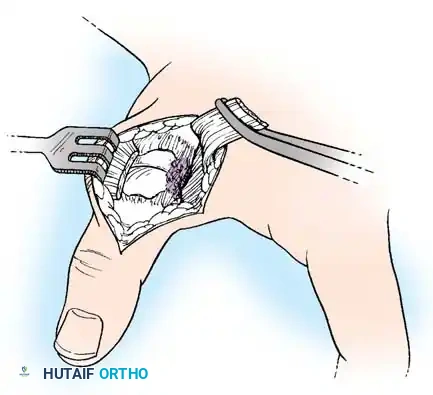
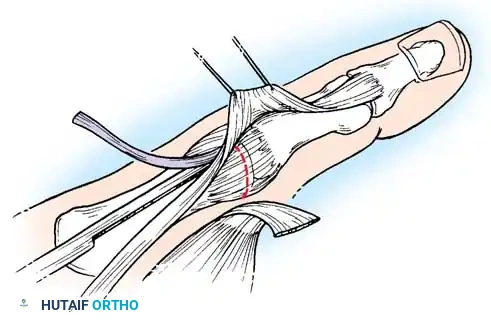
- Exposure: Partially strip the soft tissue and periosteum from the proximal end of the metacarpal shaft. Perform a longitudinal arthrotomy to incise the CMC joint capsule and expose the fracture site.
- Direct Reduction: Irrigate the joint to remove hematoma and small osteochondral debris. Align the articular surface of the larger metacarpal shaft fragment with that of the smaller volar-ulnar fragment.
- Fixation: Under direct vision, drill a provisional K-wire across the fracture site to maintain reduction. Often, fixation by a single wire is insecure, and additional wires are added. Alternatively, definitive fixation can be achieved with a 2.0-mm or 2.7-mm lag screw, as advocated by Foster and Hastings, provided the volar fragment is large enough to accept a screw without shattering.
- Closure: Repair the joint capsule meticulously to restore stability. Close the skin and apply a thumb spica splint.
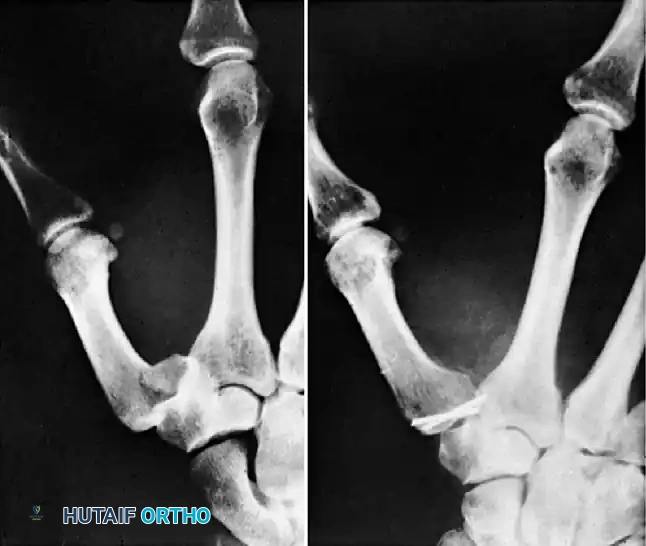
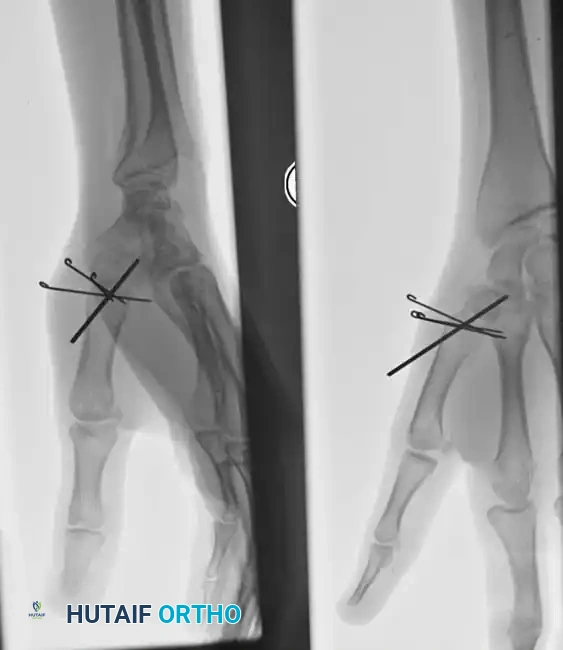
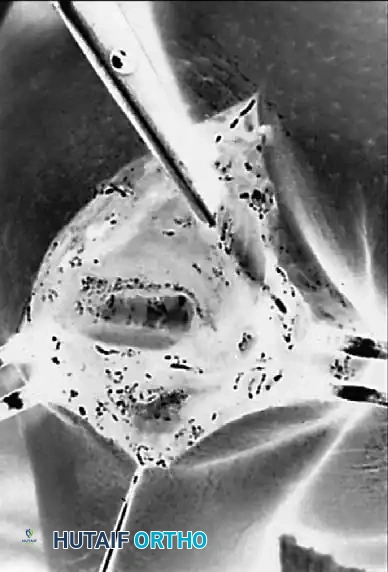
Fig. 64-10: Comminuted Bennett fracture treated by open reduction. Two Kirschner wires were necessary to keep the articular fragments reduced.
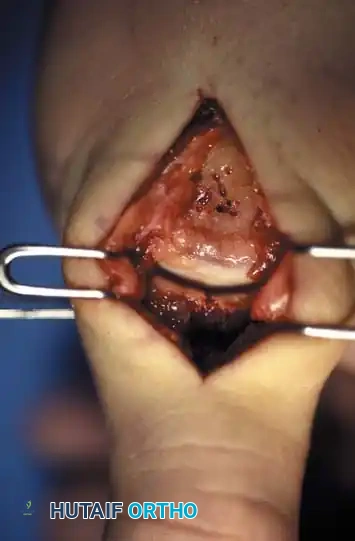
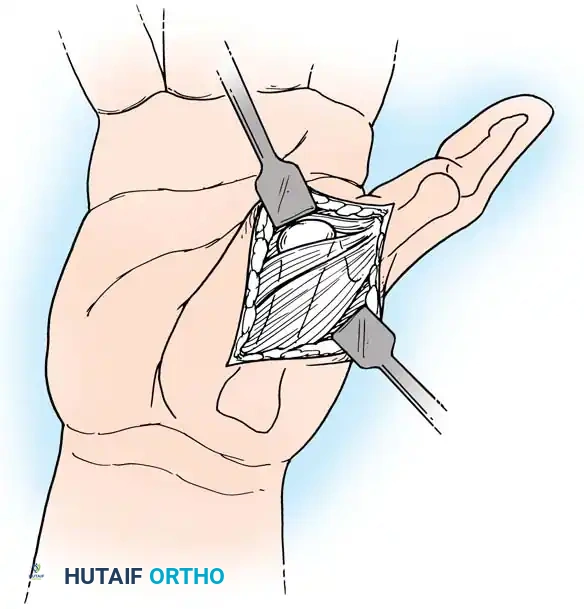
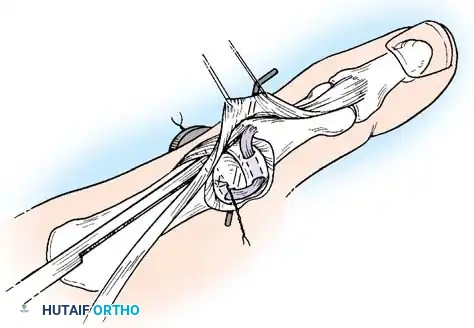
Intraoperative view of the Wagner dorsoradial approach, highlighting the protection of the superficial radial nerve.
Placement of a 2.0-mm lag screw across the Bennett fracture fragment.
Postoperative Care for Bennett Fractures
The cast or splint is removed for wound inspection at 2 to 3 weeks but is replaced and worn until 4 to 6 weeks postoperatively. K-wires are typically removed in the clinic at 4 to 6 weeks once radiographic union is evident. If rigid screw fixation is utilized, active range of motion (AROM) and intermittent splinting can be initiated as early as 10 to 14 days in a compliant patient.
Management of Malunited Bennett Fractures
Malunion with persistent subluxation inevitably progresses to painful osteoarthritis of the CMC joint. Closed reduction should never be attempted after 6 weeks due to dense callus formation and capsular contracture.
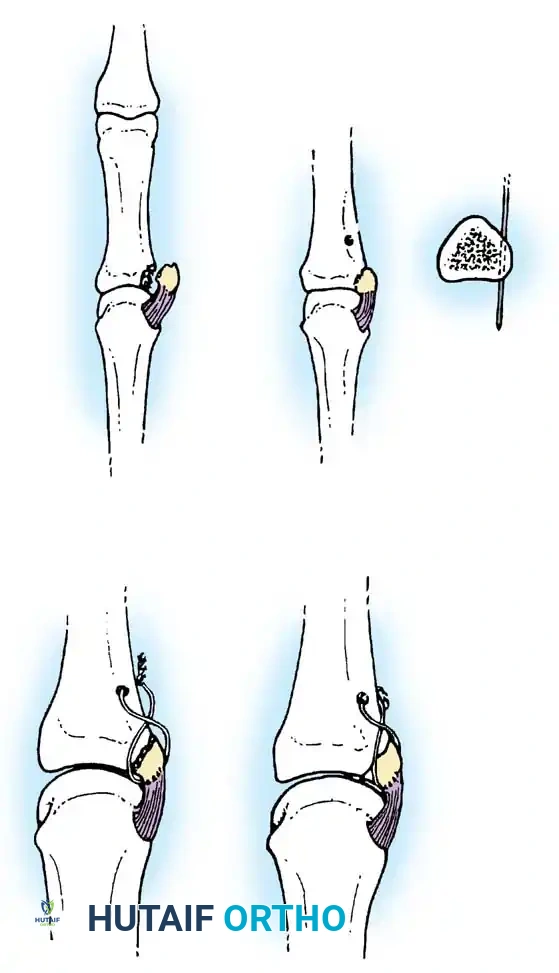
For a malunion that is recognized before advanced degenerative changes are noted on radiographs, Giachino described an elegant technique for corrective intraarticular osteotomy. If degenerative arthritis has already developed, salvage procedures such as CMC arthrodesis or trapeziectomy with ligament reconstruction and tendon interposition (LRTI) are advised.
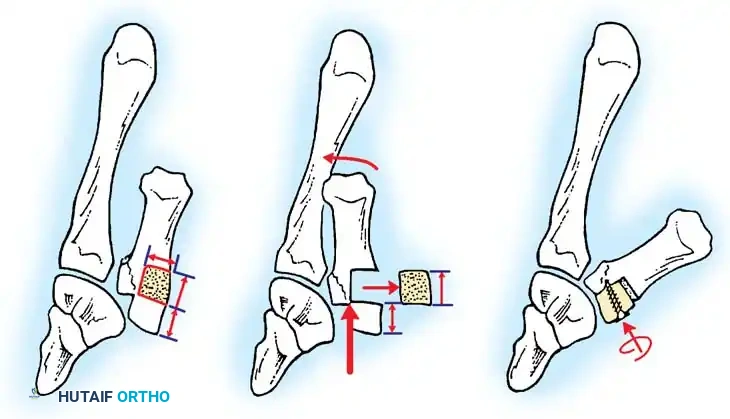
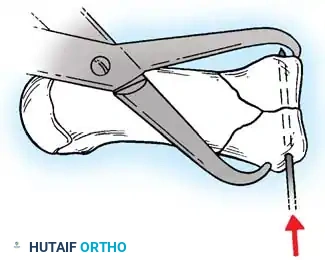
Fig. 64-11: A-C, Reduction of a malunited Bennett fracture using the Giachino corrective osteotomy technique.
🔪 Surgical Technique: Corrective Osteotomy (Giachino)
- Approach: Approach the base of the first metacarpal and the trapezium through a radial incision that exposes the CMC joint.
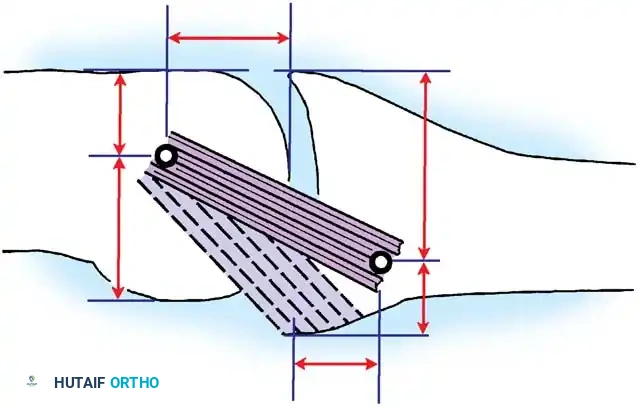
- Osteotomy Planning: Outline a block of bone to be removed from the radial aspect of the shaft of the first metacarpal. The area of bone must be slightly greater than the articular step-off and long enough to tolerate internal fixation without splitting.
- Bone Resection: Use a microsagittal saw to make two transverse cuts into the metacarpal. The distance between the two cuts should be slightly longer than the step-off (an extra 2 mm is recommended to fit the fragments together; distance = b + 2 mm).
- Mobilization: Adduct the thumb to view the malaligned articular surface. Drive a fine osteotome parallel to the shaft, freeing the fragments. Retain the stippled area of bone for bone grafting and the proximal fragment for repositioning.
- Realignment: Abduct the thumb and line the proximal fragment up with the original osteochondral piece that healed in a malunited position. The articular surface of the metacarpal should now be congruous with the articular surface of the trapezium. Slightly rotate the fragment to align the articular surface perfectly.
- Fixation: Temporarily fix the fragments with a K-wire to allow inspection of the articular surface. Once congruity is confirmed, fix definitively with a lag screw or multiple K-wires. Close the capsule and apply a thumb spica cast.
Intraoperative application of the microsagittal saw during corrective osteotomy.
Fluoroscopic confirmation of restored articular congruity post-osteotomy.
The Rolando Fracture and Comminuted Base Fractures
In 1910, Silvio Rolando described a Y-shaped or T-shaped intraarticular fracture involving the base of the thumb metacarpal. Unlike a Bennett fracture, a true Rolando fracture usually does not result in severe diaphyseal displacement because the bilateral ligamentous attachments (volar and dorsal) tether the respective fragments, neutralizing the deforming pull of the APL. However, the severe articular comminution makes this injury notoriously difficult to treat.
Because of the high likelihood of posttraumatic arthritis after these fractures, accurate reduction is paramount. While the quality of radiographic reduction does not always perfectly correlate with the late occurrence of symptoms, it is universally recommended that the joint articulation be restored as close to normal as possible.
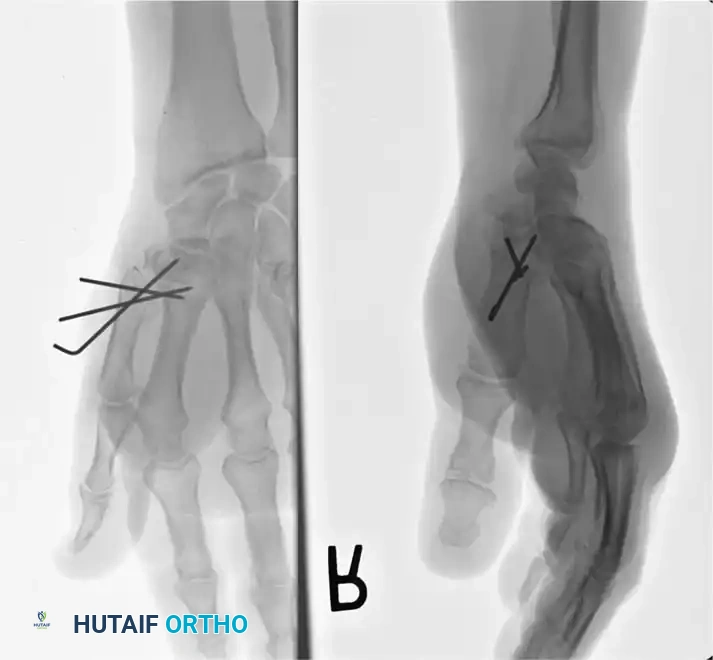
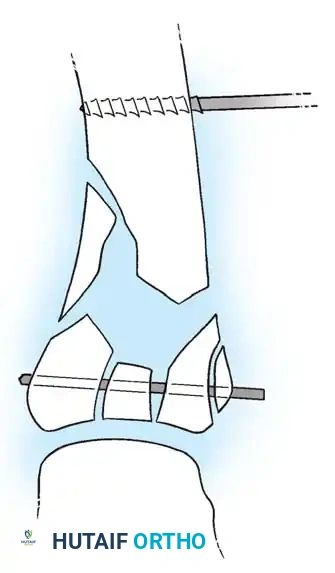
Fig. 64-12: Rolando fracture. A, Male construction worker with a comminuted fracture of the base of the thumb. B, Reduction required an open approach with initial articular segment reduction using 0.035-inch K-wires, followed by metacarpal-trapezial pinning with a 0.062-inch K-wire.
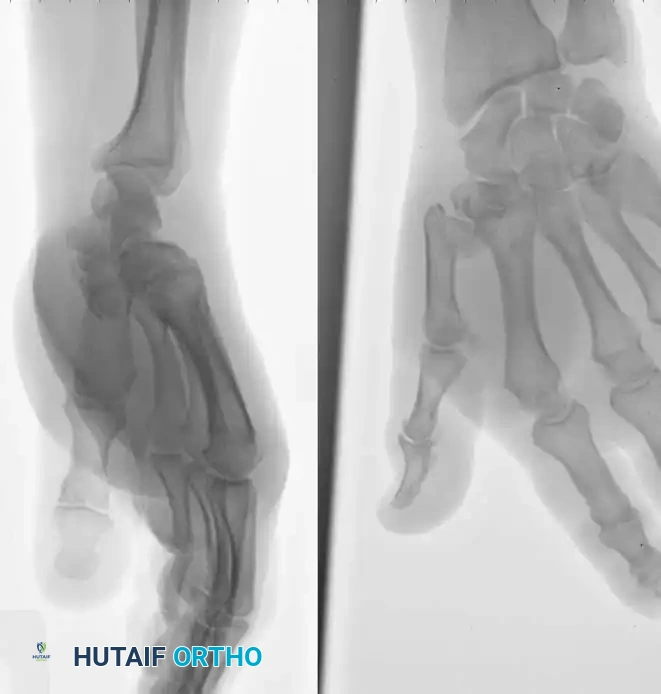
Preoperative AP and lateral radiographs demonstrating the classic Y-shaped Rolando fracture pattern.
Treatment Philosophies for Rolando Fractures
Treatment depends heavily on the size of the articular fragments:
1. Large Articular Fragments: Open reduction and plate fixation with a minifragment T-plate or L-plate is recommended.
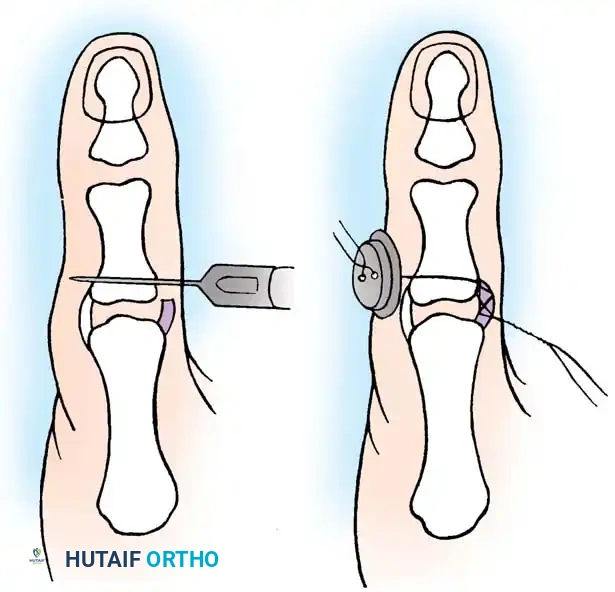
2. Severe Comminution: When fragments are too small for screw fixation, a combination of external fixation (for distraction ligamentotaxis) and limited internal fixation (tension band wiring or fine K-wires) is utilized.
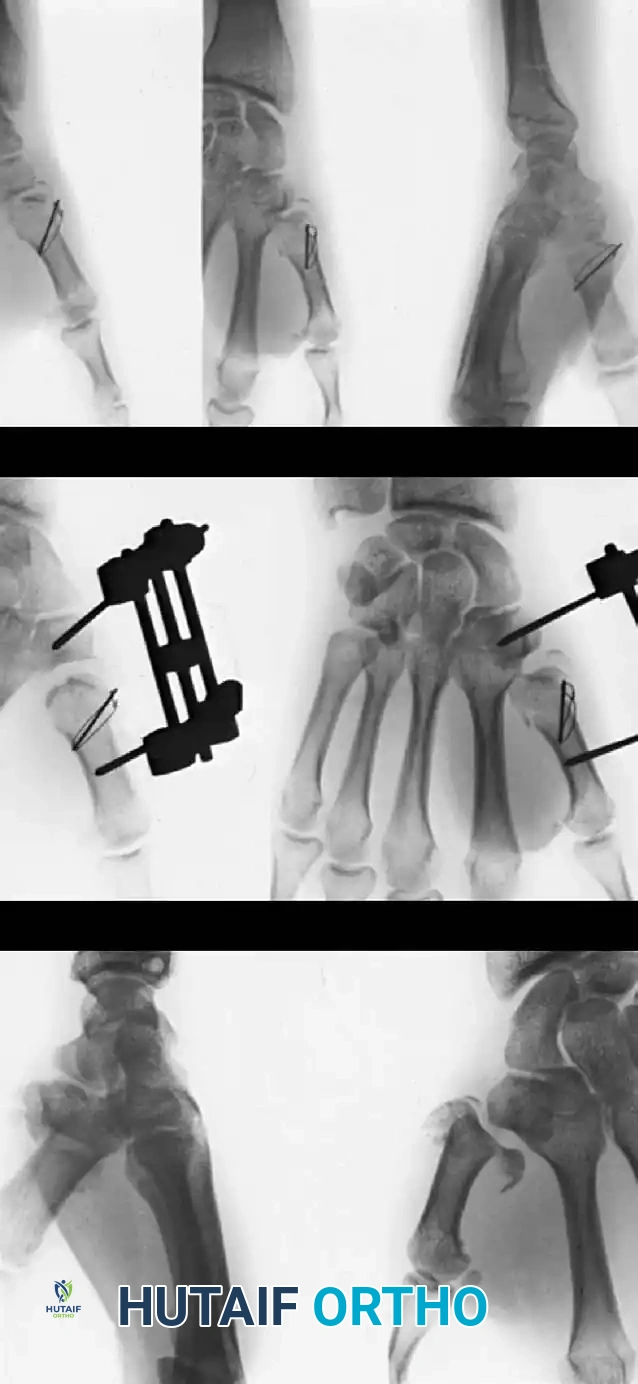
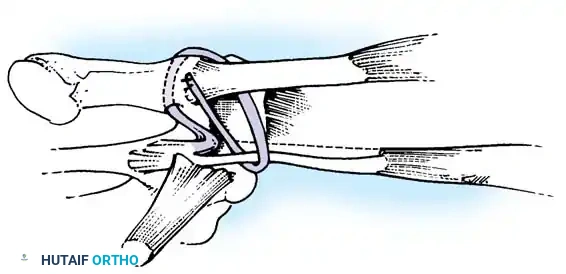
Fig. 64-13: Rolando fracture treated by an external fixation distractor and tension band wiring. The distractor was left in place for 8 weeks due to severe instability.
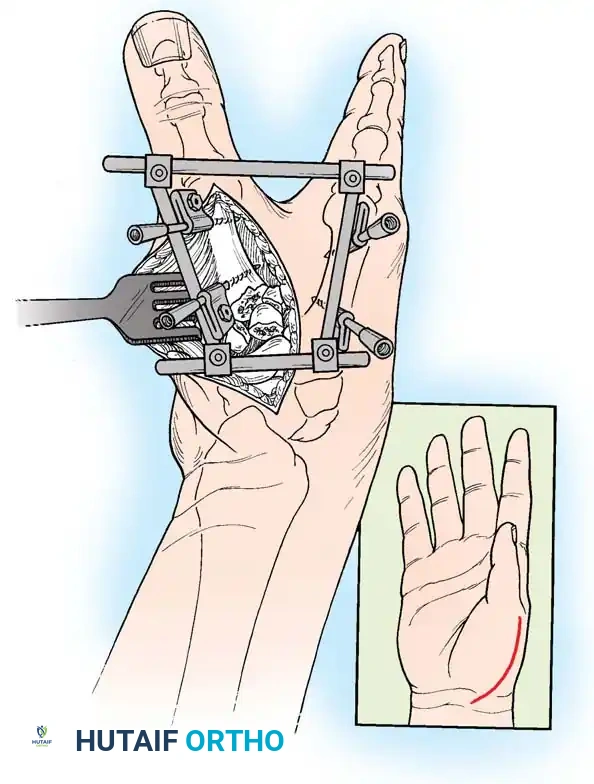
Open Reduction and Internal Fixation (Foster and Hastings)
When the volar and dorsal articular fragments are of sufficient size, rigid internal fixation allows for early mobilization and optimal cartilage healing.
🔪 Surgical Technique: ORIF (Foster and Hastings)
- Incision: Make a palmar-radial incision similar to the approach for a Bennett fracture. Extend the radial end of the incision distally along the diaphyseal portion of the thumb metacarpal. Protect the sensory branches of the radial nerve.
- Provisional Reduction: Reduce the two large basilar fragments (volar and dorsal) to each other, restoring the articular surface. Provisionally fix them together with a 0.035-inch K-wire.
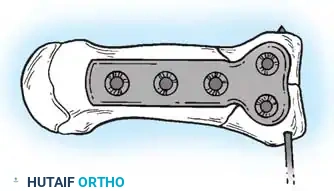
- Plate Selection: Select a small T-plate or L-plate from a 2.0-mm or 2.7-mm minifragment system.
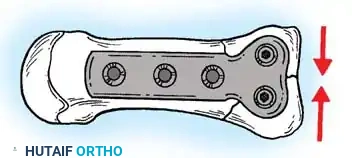
- Articular Compression: Place the transverse portion of the T-plate over the basilar fragments. The previously placed K-wire can slide through one of the holes. Drill, tap, and insert a cortical screw through the plate to compress the palmar articular fragment against the dorsal articular fragment (utilizing a lag screw technique by overdrilling the near cortex).
- Diaphyseal Attachment: Once the articular block is reconstructed and stabilized, reduce the metacarpal shaft to the stabilized intraarticular fragments. Attach the long portion of the T-plate to the diaphysis with appropriate screws.
- Closure: Close the incision and apply a soft compressive dressing and a thumb spica splint.
Application of a minifragment T-plate to stabilize a Rolando fracture.
Postoperative radiograph demonstrating anatomic restoration of the articular surface with T-plate fixation.

Alternative fixation using an L-plate configuration for a complex base fracture.
External Fixation for Severe Comminution
For highly comminuted fractures where plate fixation is impossible, Howard, Buchler, and others advocate for external fixation combined with limited internal fixation. The external fixator restores length and alignment via ligamentotaxis, while fine wires stabilize the articular surface.
🔪 Surgical Technique: External Fixation (Technique 64-5)
- Frame Application: Place an AO mini external fixator between the thumb metacarpal and the index metacarpal (or radius) in a quadrilateral frame configuration. Insert threaded half-pins safely, avoiding the SRN and extensor tendons.
- Distraction: Apply longitudinal distraction to restore metacarpal length and utilize ligamentotaxis to partially reduce the comminuted articular fragments.
- Limited Open Reduction: Perform a limited open reduction through a radial palmar approach, elevating the thenar musculature from its carpal origin for exposure of the CMC joint.
- Articular Reconstruction: With the external fixator maintaining distraction, gently elevate and align the depressed osteochondral joint fragments. Use the intact trapezial joint surface as a template for reduction. Fix the fragments with fine (0.028 or 0.035-inch) K-wires.
- Frame Adjustment: Loosen the external fixation slightly and adjust it to eliminate any flexion deformity of the thumb metacarpal.
- Bone Grafting: If distraction creates a large defect of bone substance at the metaphyseal-diaphyseal junction, autologous cancellous bone grafting (from the distal radius) is required to minimize subsequent settling of the fracture.
Application of the AO mini external fixator in a quadrilateral frame configuration.
Intraoperative view of limited open reduction and fine wire fixation under the protection of an external fixator.
Postoperative radiograph showing maintenance of length and articular reduction via external fixation.
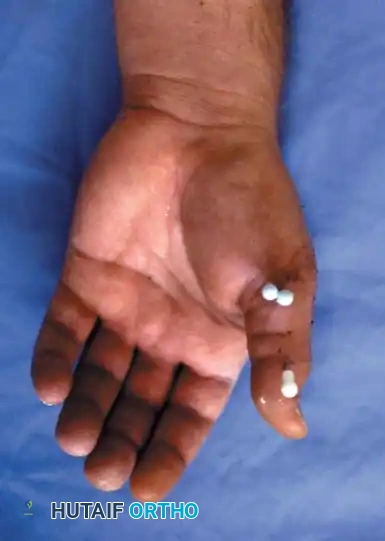
Clinical photograph of the external fixator in place, allowing for IP joint motion while protecting the CMC joint.
Radiographic follow-up at 6 weeks demonstrating early callus formation and maintenance of joint space.
Final clinical outcome showing restored thumb abduction and opposition after external fixator removal.
Final radiographic outcome demonstrating healed Rolando fracture with preserved CMC joint space.
Postoperative Protocol for External Fixation
The external fixator is left in place for an average of 6 to 8 weeks (range 5 to 12 weeks) until fracture stability is adequate and radiographic bridging callus is observed. Pin site care is performed daily using chlorhexidine or saline. Active motion of the IP joint and the unaffected digits is encouraged immediately to prevent tendon adhesions and stiffness. Once the fixator is removed, a custom thermoplastic thumb spica splint is worn between intensive hand therapy sessions focusing on CMC joint mobilization and thenar muscle strengthening.
Advanced Considerations and Complications
Hardware Prominence and Tendon Irritation
When utilizing minifragment plates (T-plates or L-plates) on the dorsoradial aspect of the first metacarpal, the hardware sits directly beneath the EPL and EPB tendons. Tendon irritation, tenosynovitis, or even delayed rupture can occur. Surgeons must ensure plates are perfectly contoured to the bone and screws do not protrude dorsally. Routine hardware removal is not mandatory but should be offered if the patient develops symptomatic tenosynovitis after fracture consolidation.
Careful contouring of the minifragment plate is essential to avoid extensor tendon irritation.
Intraoperative assessment of tendon glide over the implanted hardware.
Posttraumatic Osteoarthritis
Despite anatomic reduction, the severe cartilage damage sustained at the time of impact in Rolando fractures often leads to early posttraumatic osteoarthritis. Patients must be counseled preoperatively regarding
Associated Surgical & Radiographic Imaging
You Might Also Like