Tension-Free Nerve Grafting: Principles and Microsurgical Techniques
Key Takeaway
The tension-free nerve graft, popularized by Millesi, is the gold standard for bridging peripheral nerve gaps where primary end-to-end repair would induce ischemic tension. Utilizing microsurgical interfascicular dissection and step-cut preparation, this technique maximizes axonal regeneration. It is particularly efficacious for polyfascicular nerves like the median and ulnar nerves, yielding superior sensory and motor recovery compared to tension-laden primary repairs.
Introduction to Tension-Free Nerve Grafting
The reconstruction of peripheral nerve defects remains one of the most formidable challenges in reconstructive microsurgery. The experimental and clinical observations meticulously documented by Millesi, and subsequently by Millesi and Meissl, fundamentally shifted the paradigm of peripheral nerve repair. Their seminal work established that a nerve repaired with a tension-free nerve graft possesses a significantly superior prognosis compared to an end-to-end nerve repair performed under excessive tension.
Historically, surgeons attempted to overcome large nerve gaps through extensive mobilization, joint positioning (extreme flexion), and bone shortening. However, these maneuvers inevitably led to secondary tension upon joint mobilization, resulting in intraneural ischemia, profound fibroblastic proliferation, and ultimately, failure of axonal regeneration. The Millesi technique of tension-free interfascicular nerve grafting circumvents these biological pitfalls. By utilizing autologous nerve grafts to bridge defects without tension, surgeons can facilitate optimal axonal sprouting and end-organ reinnervation. This technique, while highly successful—particularly regarding sensory return—demands advanced microsurgical proficiency and a profound understanding of intraneural topography. Remarkably, utilizing this methodology, nerve gaps exceeding 20 cm have been successfully bridged.
Biological Rationale and Biomechanics of Tension
The deleterious effects of tension on peripheral nerve regeneration cannot be overstated. A peripheral nerve is a highly vascularized structure, relying on a delicate extrinsic segmental blood supply and an intrinsic longitudinal microvascular network within the epineurium, perineurium, and endoneurium.
Biomechanically, peripheral nerves exhibit viscoelastic properties. When a nerve is subjected to longitudinal tension exceeding 8% of its resting length, venular flow is significantly compromised. At 15% elongation, all intraneural microcirculation ceases, precipitating an ischemic cascade. Ischemia induces an inflammatory response, leading to the proliferation of epineurial and perineurial fibroblasts. This results in dense scar formation at the coaptation site, creating an impenetrable mechanical barrier to regenerating axonal growth cones. The tension-free graft acts as an immunologically compatible, structurally aligned biological conduit that supports Schwann cell migration and axonal elongation without the ischemic penalty of tension.
Clinical Pearl: The "8-0 Rule" is a reliable intraoperative metric. If an end-to-end coaptation cannot be maintained by a single 8-0 epineurial suture without the nerve ends pulling apart, the repair is under excessive tension, and an interpositional nerve graft is strictly indicated.
Indications and Preoperative Evaluation
Indications for Nerve Grafting
The primary indication for a tension-free nerve graft is a peripheral nerve discontinuity that cannot be repaired primarily without tension. Specific scenarios include:
* High-energy trauma resulting in a segmental loss of nerve tissue.
* Delayed presentations where neuroma-in-continuity resection yields a critical gap.
* Secondary reconstructions following failed primary repairs.
* Tumor extirpation (e.g., neurofibroma, schwannoma) requiring segmental nerve resection.
* Severe traction injuries (e.g., brachial plexus avulsions/ruptures) necessitating bridging from viable proximal roots to distal targets.
Preoperative Assessment
A meticulous clinical examination is paramount to establish the baseline sensory and motor deficits. Two-point discrimination (static and moving), Semmes-Weinstein monofilament testing, and manual muscle testing (Medical Research Council grading) must be documented.
Electrophysiological studies, including Electromyography (EMG) and Nerve Conduction Studies (NCS), are critical adjuncts. They should be obtained at 3 to 4 weeks post-injury to confirm Wallerian degeneration and establish the baseline of denervation, and sequentially thereafter to monitor for subclinical reinnervation.
Donor Nerve Selection
The ideal donor nerve is an expendable cutaneous nerve that provides sufficient length and appropriate fascicular cross-sectional area while minimizing donor site morbidity.
- Sural Nerve: The workhorse of nerve grafting. It provides up to 40 cm of graft material and contains 3 to 6 distinct fascicles. Its harvest leaves a predictable area of numbness on the lateral aspect of the foot, which is generally well-tolerated.
- Medial Antebrachial Cutaneous (MABC) Nerve: Excellent for upper extremity defects, providing up to 20 cm of length. It offers a good size match for digital nerves and the fascicular groups of the median and ulnar nerves.
- Lateral Antebrachial Cutaneous (LABC) Nerve: Often utilized for digital nerve reconstructions or smaller gaps in the hand, providing 8 to 12 cm of graft.
- Terminal Posterior Interosseous Nerve (PIN): Useful for very small defects in the distal forearm or wrist, particularly when a vascularized graft is not required.
Surgical Anatomy and Fascicular Topography
Understanding the internal topography of peripheral nerves is a prerequisite for the Millesi technique. Nerves are classified based on their internal architecture:
- Monofascicular Nerves: Composed of a single large fascicle.
- Oligofascicular Nerves: Composed of a few (2 to 5) distinct fascicles. The common and proper digital nerves typically fall into this category. Because of their pure sensory and oligofascicular nature, extensive interfascicular dissection is generally unnecessary.
- Polyfascicular Nerves: Composed of numerous fascicles arranged in complex, interweaving plexuses. The median and ulnar nerves at the wrist are classic examples. In these nerves, fascicles are grouped into functional bundles (e.g., motor vs. sensory).
In polyfascicular nerves, the topography changes longitudinally. Therefore, mapping the corresponding fascicular groups between the proximal and distal stumps is critical to prevent cross-innervation (e.g., motor axons growing into sensory end-tubes), which would result in functional failure.
Surgical Technique: The Modified Millesi Approach
Patient Positioning and Preparation
The patient is positioned supine on the operating table with the affected extremity extended on a radiolucent hand table.
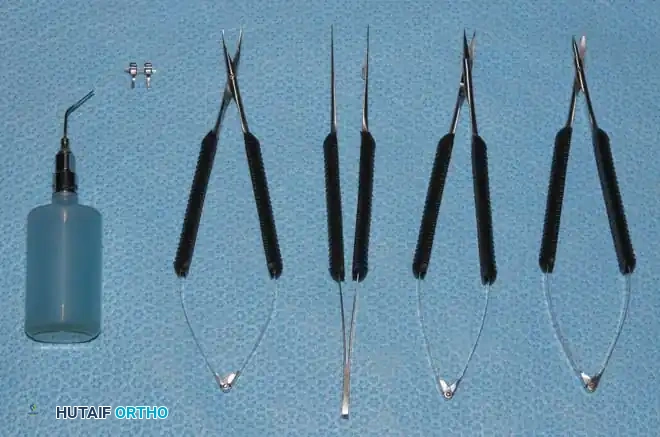
- Tourniquet Application: In the digits, hand, and distal forearm, the use of a pneumatic tourniquet is mandatory. It allows for the meticulous dissection of the injured nerve in an absolutely bloodless field, which is critical for identifying microvascular and fascicular details. The tourniquet is typically inflated to 250 mmHg (or 100 mmHg above systolic pressure) for a maximum of 120 minutes.
- Magnification: Operating loupes (minimum 3.5x to 4.5x) are used for the initial exposure. An operating microscope is strictly required for the interfascicular dissection and coaptation.
Exposure and Neuroma Resection
- Incision: Make appropriate extensile skin incisions (e.g., Brunner zigzag incisions in the digits, or lazy-S incisions across flexion creases) to locate and expose the distal glioma and the proximal neuroma on the injured nerve.
- Proximal Dissection: Open the epineurium proximal to the neuroma in near-normal, unscarred tissue on the proximal stump. Dissect distally toward the zone of injury.
- Distal Dissection: Similarly, in the distal segment, identify healthy nerve tissue and dissect proximally toward the scarred distal stump.
- Resection: The neuroma and glioma must be resected back to healthy fascicles.
Surgical Warning: Never compromise the resection of scarred nerve tissue in an attempt to minimize the gap length. Leaving fibrotic, scarred fascicles at the coaptation site is the most common cause of graft failure. Resect until healthy, pouting axoplasm ("mushrooming") is visualized under the microscope.
Interfascicular Dissection and Step-Cut Preparation
At the wrist and in the distal forearm, the major fascicle groups within the nerve must be identified.
- Epineurectomy: Perform a limited regional epineurectomy to expose the underlying perineurium of the fascicular groups.
- Fascicular Dissection: Using sharp dissection with microscissors or a diamond knife (ideal for thicker scar tissue), separate the major fascicular groups.
- The Step-Cut: Transect the fascicle groups at different levels so that a "step-cut" results. In a polyfascicular nerve, such as the median and ulnar nerves at the wrist, individual fascicle groups are cut to different lengths.
- Rationale: The step-cut technique dramatically increases the surface area for coaptation, prevents the grafts from bunching together, and minimizes the risk of axonal escape and cross-innervation between adjacent fascicular groups.
- Digital Nerves: As noted, such complex fascicular dissection is unnecessary in the common and proper digital nerves due to their pure sensory and oligofascicular nature. A straight transverse cut back to healthy tissue is sufficient.
Donor Nerve Harvest (Sural Nerve)
If the sural nerve is selected, it is harvested using a minimally invasive step-incision technique or a tendon stripper, though open harvest allows for better visualization of branches.
1. Identify the nerve posterior to the lateral malleolus, adjacent to the lesser saphenous vein.
2. Harvest the required length, ensuring the graft is handled strictly by the epineurium to prevent crush injury to the delicate internal architecture.
3. Keep the graft moist in a saline-soaked sponge until ready for interposition.
Graft Interposition and Microsurgical Coaptation
- Measurement: Measure the defect with the limb in a neutral, functional position. The graft should be cut 10% to 15% longer than the measured gap to account for graft shrinkage and to guarantee absolute tension-free coaptation.
- Reversal of the Graft:
> Clinical Pearl: Always reverse the donor nerve graft (place the distal end of the graft to the proximal nerve stump). Because cutaneous nerves give off branches along their course, reversing the graft ensures that regenerating axons are not lost down these dead-end branches, but are instead funneled toward the distal coaptation. - Placement: Lay the cable grafts into the defect. For a large polyfascicular nerve, 3 to 5 cables may be required to match the cross-sectional area of the fascicular groups.
- Coaptation: Using 9-0 or 10-0 monofilament nylon on a spatulated micro-needle, place 1 to 3 perineurial sutures per cable graft. The goal is precise approximation, not strangulation.
- Fibrin Glue Adjunct: Many modern microsurgeons supplement or replace some sutures with fibrin tissue adhesive to secure the coaptation, further reducing foreign body reaction and trauma to the fascicles.
- Tourniquet Deflation: Deflate the tourniquet and achieve meticulous hemostasis using bipolar electrocautery. Hematoma formation at the graft site will lead to fibrosis and must be avoided.
Postoperative Rehabilitation Protocol
The success of a tension-free nerve graft relies heavily on a disciplined, phased postoperative rehabilitation protocol.
Phase I: Immobilization (Weeks 0 to 3)
- The extremity is immobilized in a bulky, non-compressive plaster splint.
- The joints adjacent to the nerve repair are placed in a neutral, relaxed position. Because the graft is tension-free, extreme flexion postures (which were historically used for primary repairs) are strictly avoided, as they lead to joint contractures and secondary nerve stretch upon mobilization.
- Strict elevation is maintained to minimize edema.
Phase II: Early Mobilization (Weeks 3 to 6)
- The splint is removed, and a removable orthosis is fabricated.
- Active and active-assisted range of motion (ROM) exercises are initiated to prevent joint stiffness and promote tendon gliding.
- Nerve gliding exercises are introduced cautiously to prevent the graft from adhering to the surrounding soft tissue bed.
Phase III: Strengthening and Sensory Re-education (Weeks 6 and Beyond)
- Progressive strengthening begins as motor reinnervation is clinically detected.
- Sensory Re-education: As the advancing Tinel's sign reaches the distal targets, a formal sensory re-education program is instituted. This involves cortical remapping exercises, starting with the perception of constant touch, progressing to moving touch, and finally to directional and spatial discrimination.
- Patients must be educated on protective sensation to prevent thermal or mechanical injuries to the insensate distal extremity during the prolonged recovery phase.
Complications and Pitfalls
Despite meticulous technique, complications can arise:
1. Graft Failure: Usually secondary to inadequate resection of the proximal neuroma or distal glioma, resulting in coaptation to fibrotic tissue. It can also occur due to hematoma formation or infection.
2. Donor Site Morbidity: Painful neuromas can form at the proximal stump of the harvested donor nerve. To mitigate this, the proximal stump of the sural or MABC nerve should be buried deep into adjacent muscle bellies or bone away from superficial pressure points.
3. Incomplete Recovery: Patients must be counseled preoperatively that nerve regeneration proceeds at approximately 1 mm per day (or 1 inch per month). Complete restoration of normal sensation or motor strength is rare in adults; the goal is the return of protective sensation and functional motor recovery. Age, smoking status, and the delay between injury and surgery are the most significant independent predictors of outcome.
By adhering to the rigorous principles of the Millesi tension-free nerve graft technique—emphasizing radical debridement to healthy fascicles, precise interfascicular mapping, and tensionless microsurgical coaptation—the orthopedic surgeon can optimize the biological environment for axonal regeneration and maximize functional recovery for the patient.
📚 Medical References
- nerve grafts, J Neurosurg 4:146, 1947.
- Woodhall B: The surgical repair of acute peripheral nerve injury, Surg Clin North Am 31:1369, 1951.
- Woodhall B, Lyons WR: Peripheral nerve injuries: I. The results of “early” nerve suture: a preliminary report, Surgery 19:757, 1946.
- Yiannikas C, Shahani BT: Special review: painful sequelae of injuries to peripheral nerves, Am J Phys Med 63:53, 1984.
- [Zachary RB: Results of nerve suture. In Seddon HJ, ed: Peripheral nerve injuries, London, 1954, Her Majesty’s Stationery Offi ce.
Anatomy and Physiology Bain JR, Mackinnon SE, Hudson AR, et al: Restoration of the blood-nerve barrier following nerve grafting techniques, Plast Reconstr Surg 82:1052, 1988.](https://pubmed.ncbi.nlm.nih.gov/?term=Zachary%20RB%3A%20Results%20of%20nerve%20suture.%20In%20Seddon%20HJ%2C%20ed%3A%20Peripheral%20nerve%20injuries%2C%20London%2C%201954%2C%20Her%20Majesty%E2%80%99s%20Stationery%20Of%EF%AC%81%20ce.%0A%0AAnatomy%20and%20Physiology%20Bain%20JR%2C%20Mackinnon%20SE%2C%20Hudson%20AR%2C%20et%20al%3A%20Restoration%20of%20the%20blood-nerve%20barrier%20following%20nerve%20grafting%20techniques%2C%20Plast%20Reconstr%20Surg%2082%3A1052%2C%201988.)
- Breidenbach WB, Terzis JK: The blood supply of vascularized nerve grafts, J Reconstr Microsurg 3:43, 1986.
- Brushart TM: The central course of primate digital nerve axons. Paper presented at the Annual Meeting of the American Society for Surgery of the Hand, Las Vegas, Jan 21-23, 1985.
- Brushart TM: Selective reinnervation of distal motor stumps by peripheral motor axons, Exp Neurol 97:289, 1987.
- Campbell JN, Raja SN, Meyer RA, et al: Myelinated fi bres in peripheral nerves signal hyperalgesia that follows nerve injury, Pain 32:89, 1988.
- Danielson N, Williams LR, Dahlin LB, et al:
You Might Also Like